Creating Timesheets
This topic discusses how to create timesheets.
|
Page Name |
Definition Name |
Usage |
|---|---|---|
|
SPA_SP_R_MAIN_PG |
Access timesheets. |
|
|
SPA_TIME_ENTRY |
Enter time worked by week using a non-24-hour clock template. Enter time worked by calendar and 24-hour clock. Enter time against multi-resource work orders. |
Use the Manage Timesheets page (SPA_SP_R_MAIN_PG) to access timesheets.
Navigation:
This example illustrates the fields and controls on the Manage Timesheets page. You can find definitions for the fields and controls later on this page.
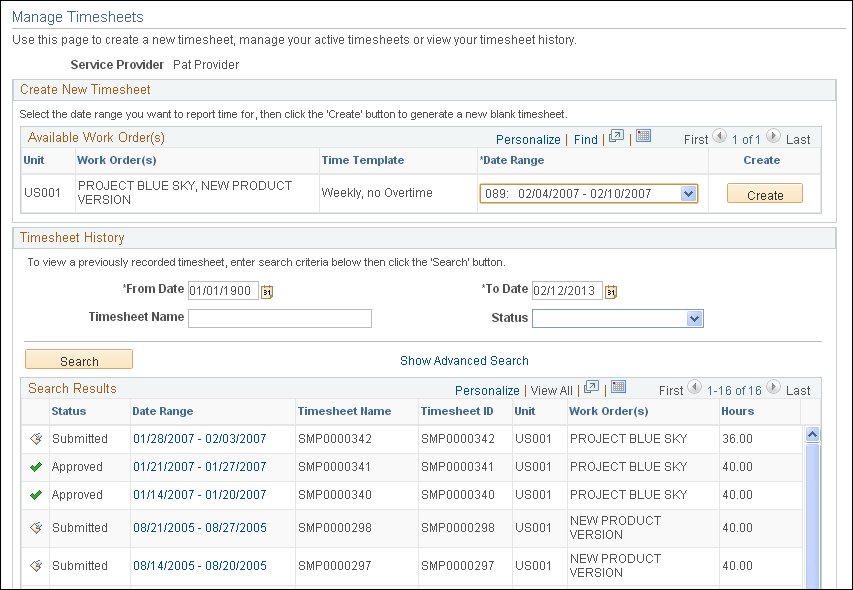
Use this page to create timesheets, view active timesheets, and timesheet history.
Create New Timesheet
The Create New Timesheet grid groups a unique combination of work orders for a given work order time template.
If multi-resource work orders are available, the individual child work orders appear in the Create New Timesheet section, and the Active Timesheets and Timesheet History grids.
Available Work Order(s)
This grid displays work orders that are available to enter time against.
Field or Control |
Description |
|---|---|
Work Order |
Displays work orders for which you can create timesheets. This field also displays multi-resource work orders. |
Time Template |
Indicates the time template that is used by the work order. The template determines how you enter time for the timesheet. Time templates from the lower-level services of a multi-resource service work order also appear in this column. |
Date Range |
Displays the dates that are available for timesheet entry. To see additional dates, click the down arrow at the right of the field. When the work order is a multi-resource order, the date range that appears is the range for the individual child work orders. The system considers the date ranges for the lower-level services to populate the values for the Date Range field. Note: This value always appears by default on the next available time template date range. |
Create |
Click to create a new timesheet for the selected time template. The system displays the Enter Time for page for data entry. All work orders for the service provider and the selected template and time period will be available on the timesheet, including any individual child work orders for a multi-resources service |
Active Timesheets
This section displays timesheets that are in an active status. These timesheets can include timesheets that were created but never submitted or timesheets that were denied and require re-submission.
To modify a timesheet, click the link that corresponds with the active timesheet.
Timesheet History
Use this section to search for and view past timesheets. You can search for a specific timesheet or timesheets in a certain status. Click the Advanced Search Criteria link to also search for a specific work order or work orders in a certain status.
Manual Entry of TRCs for Timesheets
PeopleSoft Services Procurement enables service providers to manually enter TRCs (time reporting codes) for timesheets. This feature adds flexibility in meeting unique time-recording requirements for scenarios in which you are unable to define a generic rule that covers unusual or complex time keeping requirements. Using manual TRC entry, you can specify the appropriate TRCs to meet time reporting requirements.
The system enables service providers or time approvers to manually identify the correct TRC for special situations in which the system cannot automatically derive the correct TRC. When you create a service time/progress template, you can indicate that you want the capability to manually enter TRCs. Then, when a service provider logs time against a work order for that template, the approver can manually specify TRCs for the time reported. This feature is available for templates using both percentage and actual allocation, as well as both the 24- and non-24-hour clock. To use the feature:
Access the Service Time/Progress Template page.
A services administrator can either create a new template or update an existing template. If an existing template already has associated timesheets, you cannot modify the setting for manually entered TRCs.
Complete the template and ensure that you select the Manually enter Timesheet TRCs check box.
A services coordinator or requester can then create a resource-based work order that references the template you created or updated in the first step.
The service provider can then enter a timesheet against the work order.
Using the manual time entry feature, the time for each day can be allocated into the appropriate TRC categories based on your specific requirements.
Submit the timesheet for approval.
Approvers can view whether the provider has specified the TRCs or if they were automatically assigned by the system.
The time approver can then approve the timesheet.
Approvers can view and, if necessary, manually adjust the TRCs before approving the timesheet.
Note: Approvers with appropriate permissions can override a TRC that the system automatically assigned from the Review/Override Time Categories page when manual TRC entry is not allowed. The manual TRC assignment capability does not change the override process, but you can make adjustments to manually assigned TRCs on the timesheet directly when manual TRC entry is allowed.
Use the Enter Time page (SPA_TIME_ENTRY) to enter time worked by week using a non-24-hour clock template.
Enter time worked by calendar and 24-hour clock. Enter time against multi-resource work orders.
Navigation:
Click a linked time report on the Manage Timesheets page to view an existing timesheet.
Click the Create button on the Manage Timesheets page to enter time on the timesheet.
This example illustrates the fields and controls on the Enter Time page. You can find definitions for the fields and controls later on this page.
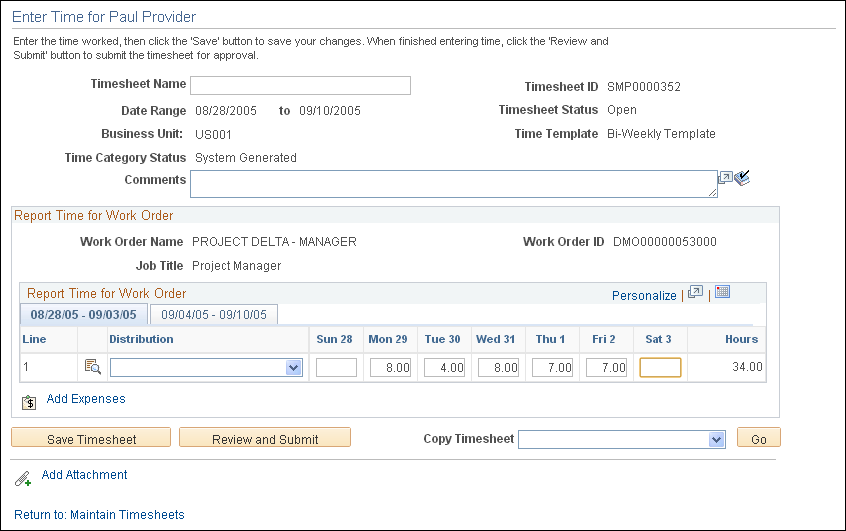
The format of the time entry page is determined by the time template specified on the work order. In the previous example, the time template makes it possible to enter time on a weekly basis. The Enter Time page header provides basic information about the timesheet. To copy an existing timesheet, select a timesheet in the Copy Timesheet field and click the Go button.
The page displays the lower-level individual service and sequence number when you are entering time related to a lower-level service for a multi-resource, service-method work order. The hours that you enter are assigned by work order and by lower-level services and sequence numbers. If time has been reported against multiple lower-level services in the same timesheet, you can distinguish the time reported for lower-level services.
When using multi-resource work orders, the work order ID and name, time template, job title, distribution, activities, shifts, and assignments and assignment incidents available on the timesheet are from the lower-level services of the work order.
Field or Control |
Description |
|---|---|
Timesheet Name |
Displays the name of the timesheet that you selected on the Manage Timesheets page. The name can be assigned by the user or the system when the timesheet is created. |
Timesheet ID |
Displays the system identifier for the timesheet. |
Date Range |
Displays the from and to dates to which the timesheet applies. |
Timesheet Status |
Displays the status of the timesheet. Values include: Approved, Denied, Open, Submitted, Line Denied,and Line Pending |
Time Template |
Displays the time template used to create the timesheet. If the service method is multi-resource, the time template is the one assigned to the associated lower-level service. |
Time Category Status |
Indicates how the system assigned the time categories for this timesheet. Values include: Manually Assigned: Indicates that the service provider manually entered the time reporting codes during time entry. System Generated: Indicates that the system automatically assigned the time reporting codes based on predefined rules. |
Adjusted After Approval |
Indicates if the timesheet was updated after it was initially approved. This field appears after an adjustment has been made to the timesheet. |
Comments |
Enter comments related to the timesheet. The comments are available for use during approvals and reviews. |
Save Timesheet |
Click to save the timesheet. When you save the timesheet, the timesheet appears in the Active Timesheet group box on the Manage Timesheets page. |
Review and Submit |
Click to review and submit the timesheet to the timesheet approver. |
Report Time for Work Order
This section displays basic information about a work order.
Field or Control |
Description |
|---|---|
Work Order Name |
Displays the work order name. |
Work Order ID |
Displays the work order ID. |
Job Title |
Displays the job title for this work order. If this is a multi-resource work order, the job title is for the associated lower-level service. |
Parent Work Order Name |
When entering time for lower-level service related to a multi-resource work order, the parent work order name is displayed in addition to the work order name of the lower-level service itself. |
Parent Work Order ID |
When entering time for lower-level service related to a multi-resource work order, the parent work order ID is displayed in addition to the work order ID of the lower-level service itself. |
Distribution
Field or Control |
Description |
|---|---|
|
Click the Work Order Distribution icon to access the View/Select Work Order Distribution For: page to select the appropriate accounting line for the work order. This column is available only for actual allocation time reporting. |
Distribution |
This field is populated with the work order distribution line number selected on the View/Select Work Order Distribution For: page or can be manually selected for actual allocation time reporting. For multi-resource work orders, values for this page are retrieved from the lower-level service. |
TRC (time reporting code) |
Select a time reporting code to use with this timesheet line. The column appears for timesheets associated to a service time/progress template that is set for manual TRC selection. |
Activity |
This field is available if Project Costing is not installed. It is populated with resource-based service activities associated with the work order and generic service activities. |
Shift |
Select the valid shift for the project, if applicable. This column is available if the Enable Shifts check box is selected on the Services Procurement Bus Unit definition page and if shifts are associated with the service for the reporting time period. |
Assignment |
Select the valid assignment for the project, if applicable. This column is available if the Enable Assignments option was selected on the Services Procurement Bus Unit definition page and if assignments are associated with the service for the reporting time period. |
Time Period |
Enter the number of hours worked for the time period. |
Hours |
Displays the total hours by line for the time period reported. |

See Services Procurement Bus Def (business unit definition) Page.
Report Incidents for Work Order
This section appears if the Enable Assignments option is selected on the Services Procurement Bus Unit definition page, if valid assignments are associated with the service during the time period reported, and if the Based on Incidents option is selected on the Assignment by Service page.
Assignment pay rates come from the Assignment by Service definition if the Define for This Service option is selected; otherwise, the assignment pay rates come from the Assignment definition.
Assignments can be based on time or number of incidents. Any applicable managed service provider (MSP) or enable supplier managed services (VMS) fees are in addition to the assignment pay rate.
Assignment incidents have the following attributes:
They do not require associated time.
Multiple assignments can occur in the same day.
They can have both time and number of incidents associated to them on the same timesheet.
Field or Control |
Description |
|---|---|
Date(s) |
Select the dates for the incident. You can report time against multiple assignments in the same day. |
Assignment |
Select the appropriate assignment for the time period. |
Incident(s) |
Enter the number of incidents for the assignment during the time period. The number of incidents is entered on a per line basis. |
Use the Enter Time page (SPA_TIME_ENTRY) to enter time worked by week using a non-24-hour clock template.
Enter time worked by calendar and 24-hour clock. Enter time against multi-resource work orders.
Navigation:
Click a linked time report on the Manage Timesheets page to view an existing timesheet.
Click the Create button on the Manage Timesheets page to enter time on the timesheet.
This example illustrates the fields and controls on the Enter Time page. You can find definitions for the fields and controls later on this page.
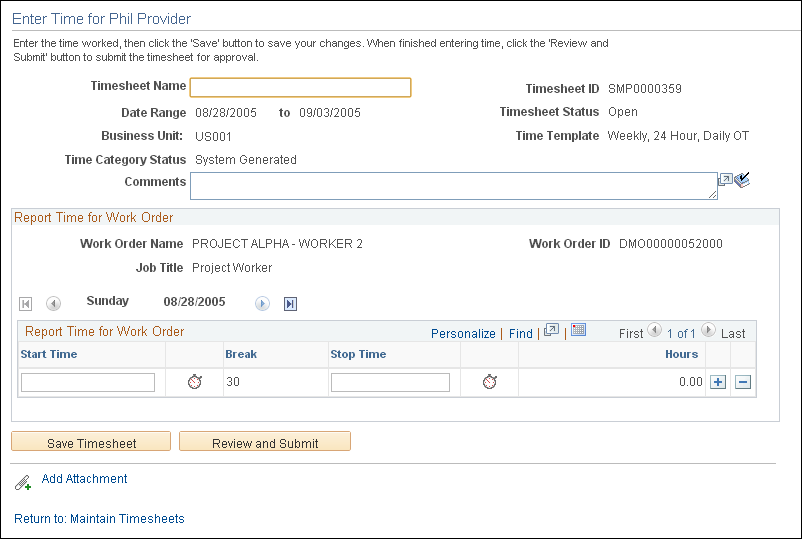
The format of the time entry page is determined by the time template specified on the work order. In this example, the time template enables you to enter time using a 24-hour clock. This method of reporting time enables users to record time on a day-by-day basis, with both start and end times. For example, a user can enter time for a day with a start time of 8:00 a.m., a lunch break from 12:00 noon until 1:00 p.m., and an end time of 5:00 p.m. Time can be reported across two days. For such a timesheet, any hours reported as a.m. following hours reported for p.m. will be considered as a.m. of the next day.
Report Time for Work Order
Field or Control |
Description |
|---|---|
Shift |
Select the valid shift for the project, if applicable. This column is available if the Enable Shifts option was selected on the Services Procurement Bus Unit definition page and if shifts are associated with the service for the reporting time period. In addition, the Derive Shift From Time of Day option on the Service/Time Template page cannot be selected or this column will not appear during time entry. Shifts can be selected manually or automatically based on the time template. Pay rates come from the service itself if the Define for this Service option is selected on the Shift by Service definition page. Otherwise, the pay rates come from the Shift definition page. Values are:
|
Shift Pay Rate Calculations
Shift rate calculation is based on the shift pay type. Any applicable MSP or VMS fees are added in addition to the shift rate.
See Shift Page.
Field or Control |
Description |
|---|---|
Assignment |
Select the valid assignment for the project, if applicable. This column is available if the Enable Assignments option was selected on the Services Procurement Bus Unit definition page and if assignments are associated with the service for the reporting time period. |
Hours |
Displays the total number of hours worked for a week. |
Review/Adjust Time Category |
Click to access the Review Time Categories page where you can review the time reporting categories for timesheet. |
Details |
Click to access the Timesheet details page where you can view the work order and timesheet details, along with the comments and history for the timesheet. |
Add Expenses |
Click to access the Create Services Expense Report page where you can define expenses associated with this timesheet. |
Save Timesheet |
Click to save the timesheet. The system verifies field values that you entered and saves the timesheet. |
Review and Submit |
Click to access the Review Timesheet page. Using the page, you can submit the timesheet for approval, preview approvers, and view charted values for time reporting codes contained in the timesheet. |
Add Attachment |
Click to access the Timesheet Attachments page. You use the page to upload attachments. |
Report Incidents for Work Order
This section appears if the Enable Assignments option is selected on the Services Procurement Bus Unit definition page, if valid assignments are associated with the service during the time period reported, and if the Based on Incidents option is selected on the Assignment by Service definition page.
Field or Control |
Description |
|---|---|
Date(s) |
Select the dates for the incident. You can report time against multiple assignments in the same day. |
Assignment |
Select the appropriate assignment for the time period. |
Incident(s) |
Enter the number of incidents for the assignment during the time period. The number of incidents is entered on a per line basis. |
Use the Enter Time page (SPA_TIME_ENTRY) to enter time worked by week using a non-24-hour clock template.
Enter time worked by calendar and 24-hour clock. Enter time against multi-resource work orders.
Navigation:
Click a linked time report on the Manage Timesheets page to view an existing timesheet.
Click the Create button on the Manage Timesheets page to enter time on the timesheet.
This example illustrates the fields and controls on the Enter Time for page (1 of 2). You can find definitions for the fields and controls later on this page.
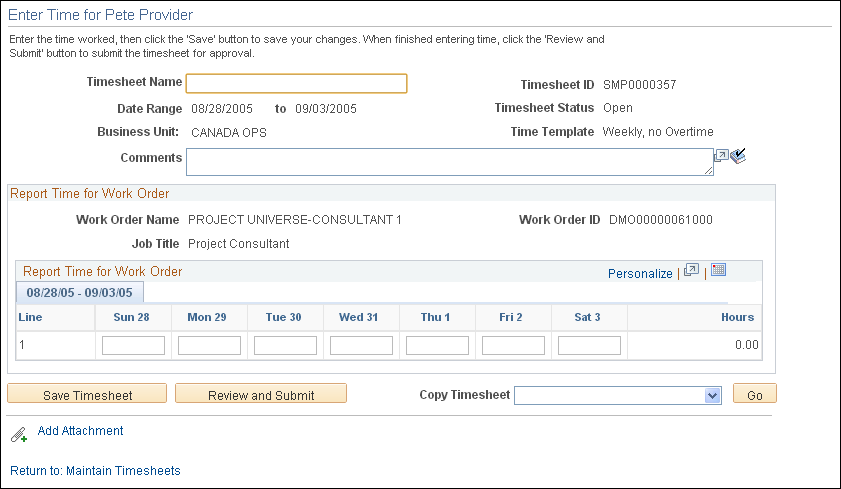
When you are working with multi-resource work orders, each individual service provider reports time and expenses individually for work associated to the same time template. Time approval for service providers can have the same or individual approval workflow.
Consumption is recorded against the overall total for the parent work order as well as the individual service work order.
Approvals and notifications for timesheets are also individual within the work order.