Importing Environment
Cloud Manager supports importing PeopleSoft environments that are running on Oracle Cloud into Cloud Manager as a managed instance. The import functionality supports only PeopleSoft environments that were installed using DPKs. Import utilizes the components and configurations set up during the DPK installation, including Relocatable Puppet and environment variables.
You can import all of the nodes in an environment at one time, or create an imported environment and later import other compute nodes separately. If you plan to import nodes to an imported environment as a separate process, the original imported environment must include at least the Database System tier.
You can import these types of nodes:
ADB-Dedicated database running in OCI.
ADB-Shared database running in OCI.
Database running on DB System (Oracle Base Database Service).
DB Systems on Exadata and VM are supported.
Full Tier environment running on a compute instance (Infrastructure as a Service).
Middle Tier on a Linux compute instance (Infrastructure as a Service).
PeopleSoft Client on a compute instance (Infrastructure as a Service).
Search Stack on a compute instance (Infrastructure as a Service).
Windows middle tier on a compute instance (Infrastructure as a Service).
Windows middle tier is supported only for Process Scheduler used to run nVision.
If you import one of the database tiers you also need at least a Linux middle tier node with App Server in order to create a running environment, as well as to import other nodes without App Server (for example, PeopleSoft Client node, Windows middle tier, and so on). If you import a Full Tier node, you do not need any other nodes, but you may import a PeopleSoft Client node along with a Full Tier node.
Note: Databases created manually on Compute (VM or Bare Metal) are not supported for database tiers. Databases on Compute are supported only as part of Full Tier environments.
You must fulfill the following prerequisites:
Get the following OCI Credentials for the components you want to import from the OCI Console:
Database Credentials for DB System
Database System OCID
Database OCID
Database Private IP
The node for the database contains the private IP.
Autonomous Database OCID
Full Tier OCID
Middle Tier OCID
PeopleSoft Client OCID
Search server OCID (OpenSearch or Elasticsearch)
Windows middle tier OCID
Verify requirements for users and groups.
DPK installations that were performed by non-root users are not supported for import.
DPK installations that were performed by a single user (other than root) are not supported for import.
The Add Node form is populated with default values for the Windows administrative user, Linux user profiles and groups. After you supply the OCID for the node and click Discover, Cloud Manager crawls the instance and compares the information on users and groups with the default values. If a value is missing or incorrect, you see an error message. You must correct the mistake in the form before you can continue.
Here are the default values:
Default OPC user
Default DPK user profiles for Linux -— psadm1, psadm2, psadm3, oracle2.
Default DPK Linux groups — oinstall, psft, appinst, dba
Default user profiles for Search Stack — esuser
It is possible to import an environment having custom users and groups that replace the default DPK Linux users and groups. The number of custom users and groups must be the same as the default. The users and groups must be distinct; you cannot reuse a single user or single group for all the default values. For example, if the custom Application Runtime User is psadm222, then psadm222 cannot be used as the PeopleSoft Install User or Application Install User. Similarly, any custom groups must be distinct from other groups in the environment.
Copy Cloud Manager SSH public key to all the nodes that will be imported.
Log in to the Cloud Manager instance, for example with Putty, as psadm2.
sudo su – psadm2Open and copy the pub key from /home/psadm2/psft/data/cloud/ocihome/keys/cm_adm_pvt_key.pub.
Log on to the Database system as opc, access .ssh/authorized_keys and paste the key from step a into it. This is required to authenticate Cloud Manager to access the Database environment to import the database system.
Log on to each additional node to be imported (Middle Tier, PeopleSoft Client, Search server, Windows middle tier), access .ssh/authorized_keys and paste the key from step a into it.
Make sure that the TNS entry is present in tnsnames.ora on the database system you are importing.
Drive D: is mandatory for a Windows client.
Oratab entry for db home is required in this format <DB_UNIQUE_NAME>:<DB_HOME_PATH>.
Add an entry in the /etc/fstab file for the secondary volume (block volume) for each node.
This is required in order for the secondary volume to be automatically mounted for custom created Linux virtual machines.
You must ensure the following prerequisites are met for importing Exadata into Cloud Manager:
If the number of nodes is more than 1, use a private IP of the last node. This applies for the RAC DB system as well.
Update the TNS entry for the imported database in $ORACLE_HOME/network/admin/tnsnames.ora.
Cloud Manager uses "opc" and "oracle" users for all operations in Exadata.
To import all of the nodes in an environment at the same time:
From the Cloud Manager homepage, click the Environments tile.
Click the Import Environment button at the top of the Environments page.
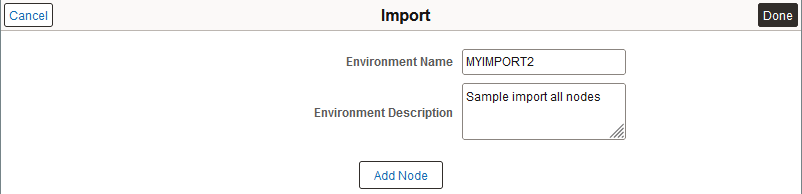
This example illustrates the fields and controls on the Import environment page. You can find definitions for the fields and controls later on this page.
Field or Control
Description
Environment Name
Enter a name for the new environment.
Environment Description
Enter a description for the new environment.
Ensure that the description does not include any double quotation marks (").
Add Node
Select to add a node to the environment.
Click the Add Node button.
Select the instance type from the drop down list. These types of tiers can be imported:
ADB-Dedicated
ADB-Shared
Database System
Full Tier
If you import a Full Tier node, no other nodes are needed for a running environment.
Middle Tier
PeopleSoft Client
Search Stack
Windows MT (Middle Tier)
The Add Node page for the instance type is displayed.
See the following sections for information on the instance types.
Enter the values for the instance type and click OK.
To add another instance type, click the + icon and select the instance type.
Note: Add each instance type separately.
Once you have included all the nodes for the environment, click Done.
This example illustrates the fields and controls on the Import page with multiple nodes.
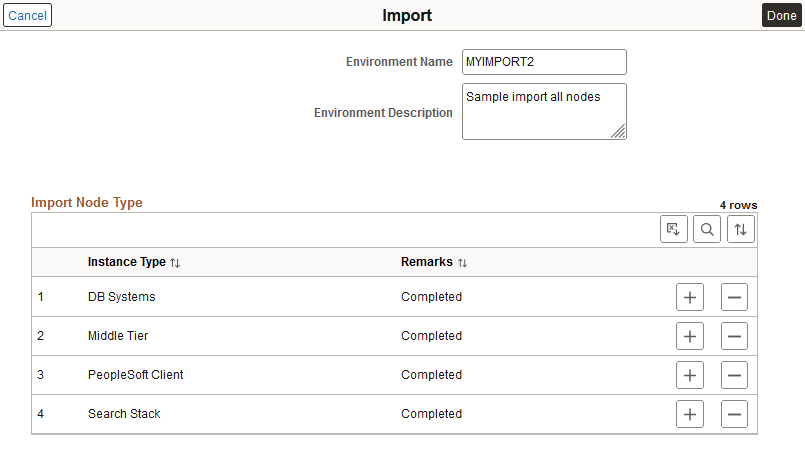
The respective card is added to the Environments page with the status of ImportingMultipleTier.
To view the status of the import process, select Details from the actions menu for the environment, then select Import from the left-side menu.
See Environment Details - Import Status in this section.
To continue importing nodes after creating an imported environment:
Complete the process to import an environment with at least the Database System node.
Select the actions menu for the running imported environment and select Import Node.
On the Import page, click Add Node.
Note: The Environment Name and Environment Description fields are not editable.
The nodes (instance types) that you add must be for components that were originally associated with the same database in the selected environment.
Select the instance type from the drop-down list.
Middle Tier
PeopleSoft Client
Search Stack
Windows MT (Middle Tier)
The Add Node page for the instance type is displayed.
See the following sections for information on the instance types. The fields on the pages change as appropriate for the instance type. Illustrations are given only for a couple of instance types.
Enter the values for the instance type and click OK.
Click Done to begin the import process.
On the Environments page, the status on the environment card indicates that it is importing the instance, such as ImportingMiddleTier, or ImportingWinClient.
To view the status of the import process, select Details from the actions menu for the environment, then select Import from the left-side menu.
See Environment Details - Import Status in this section.
On the Import page, the steps associated with the original import, such as for the database node, will display as complete. The steps associated with importing the subsequent nodes will display as in progress.
To add another instance type, repeat steps 2 through 10.
Note: Complete the import process for each instance type separately.
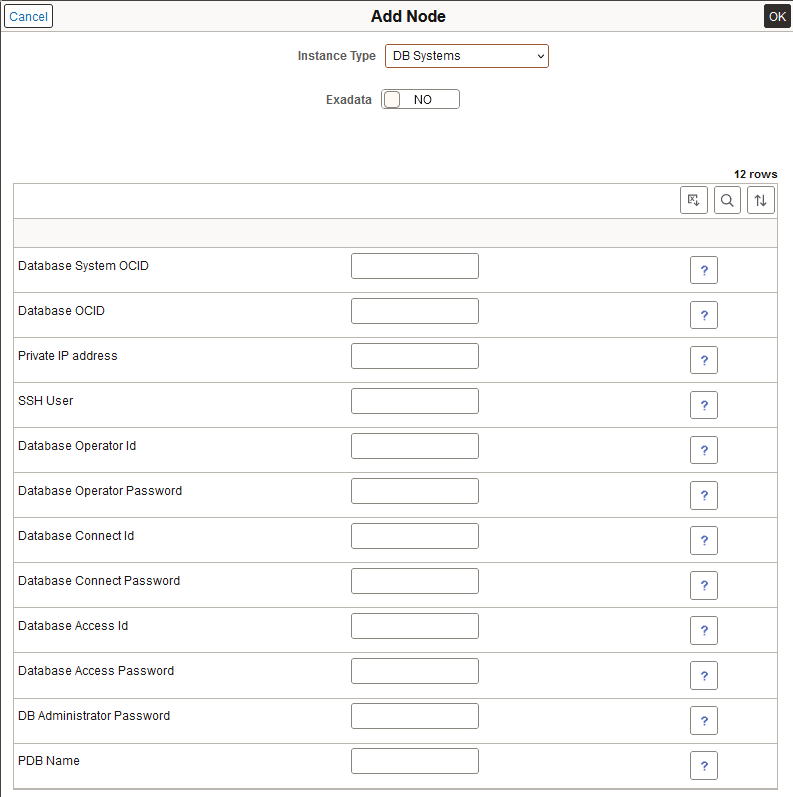
For the database system node, all the values are mandatory.
This example illustrates the fields and controls on the Add Node page for DB Systems. You can find definitions for the fields and controls later on this page.
|
Field or Control |
Description |
|---|---|
|
Exadata |
Select Yes if the DB System is Exadata. An additional field for Container Database Name will be added. |
|
Database System OCID |
Database System OCID for the target database. For Exadata, if the new resource model consisting of separate infrastructure and VM cluster resources is used, enter the VM Cluster ID. |
|
Database OCID |
Database OCID for the target database. |
|
Private IP Address |
Private IP address for the target the Database environment. |
|
SSH User |
SSH user on the database system being imported |
|
Database Operator ID |
Database Operator ID |
|
Database Operator Password |
Database Operator Password |
|
Database Connect ID |
Database Connect ID |
|
Database Connect Password |
Database Connect Password |
|
Database Access ID |
Database Access ID |
|
Database Access Password |
Database Access Password |
|
DB Administrator Password |
Database Administrator Password |
|
PDB Name |
Pluggable Database Name This is the database name in the tnsnames.ora file. |
|
Container Database Name |
For Exadata DB systems enter the container database name. |
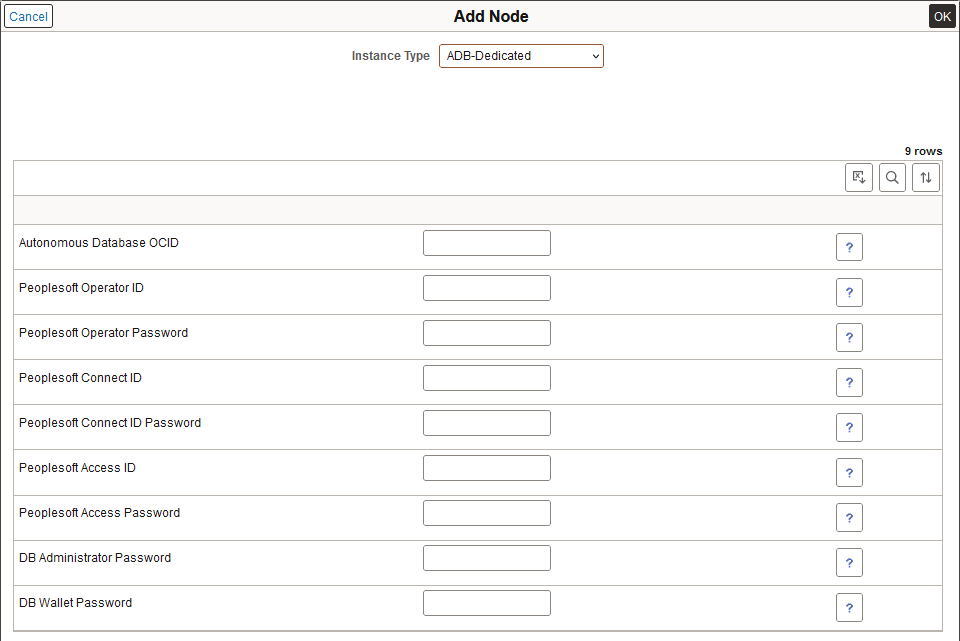
The same fields are necessary for ADB-Dedicated or ADB-Shared node, and all the values are mandatory.
This example illustrates the fields and controls on the Add Node page for ADB-Dedicated node. You can find definitions for the fields and controls later on this page.
|
Field or Control |
Description |
|---|---|
|
Autonomous Database OCID |
Autonomous Database OCID for the target database. |
|
PeopleSoft Operator ID |
Database Operator ID |
|
PeopleSoft Operator Password |
Database Operator Password |
|
PeopleSoft Connect ID |
Database Connect ID |
|
PeopleSoft Connect Password |
Database Connect Password |
|
PeopleSoft Access ID |
Database Access ID |
|
PeopleSoft Access Password |
Database Access Password |
|
DB Administrator Password |
Database Administrator Password |
|
DB Wallet Password |
DB Wallet Password The DB Wallet Password can be any password that adheres to the password policy for wallets for an ADB. |
For imported ADB-Dedicated and ADB-Shared nodes, the ADB Wallet Refresh Policy is added to the environment.
This example illustrates the Policies page for an environment with imported ADB-Dedicated or ADB-Shared database node.
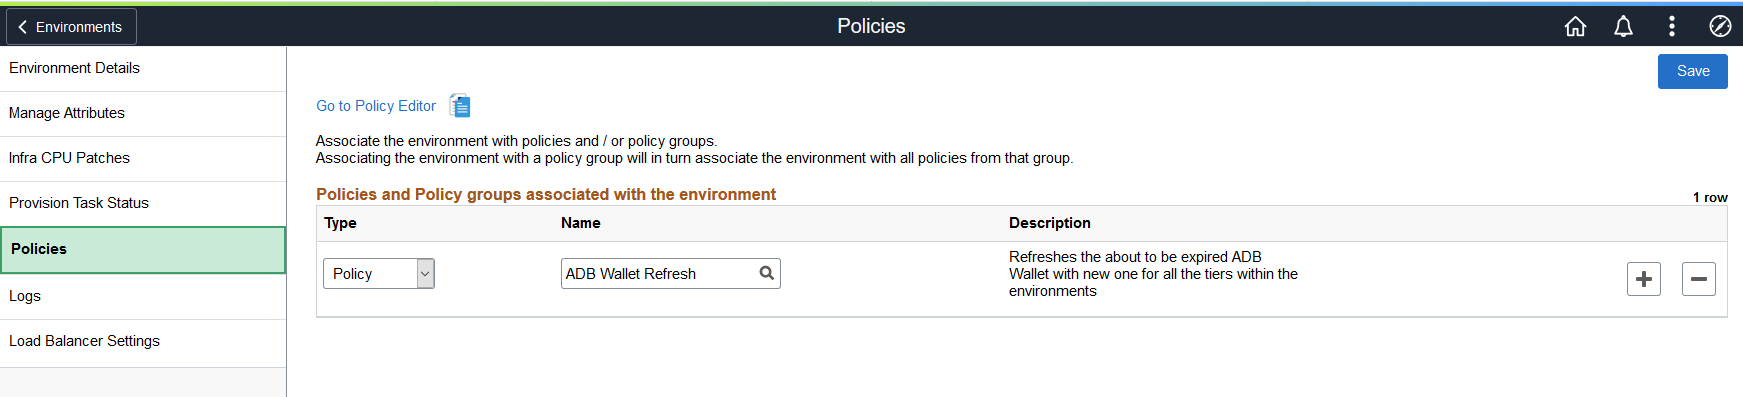
By default the Expiry Day Count is set to 540 (meaning the wallet expires after 540 days). Use the Go to Policy Editor link to change the Expiry Day Count. Select Parameters under Policy Actions.
To import a full-tier node.
Note: For information on users and groups, see the product documentation PeopleSoft PeopleTools <Release> Deployment Packages Installation on Oracle Help Center at https://docs.oracle.com/en/applications/peoplesoft/peopletools/index.html. Select the PeopleTools release for your environment at the top.
Click the + (Add) icon on the Import page.
Select Full Tier Instance Type.
The fields are populated with default values for the instance users and groups.
Enter the Full Tier OCID.
Click Discover.
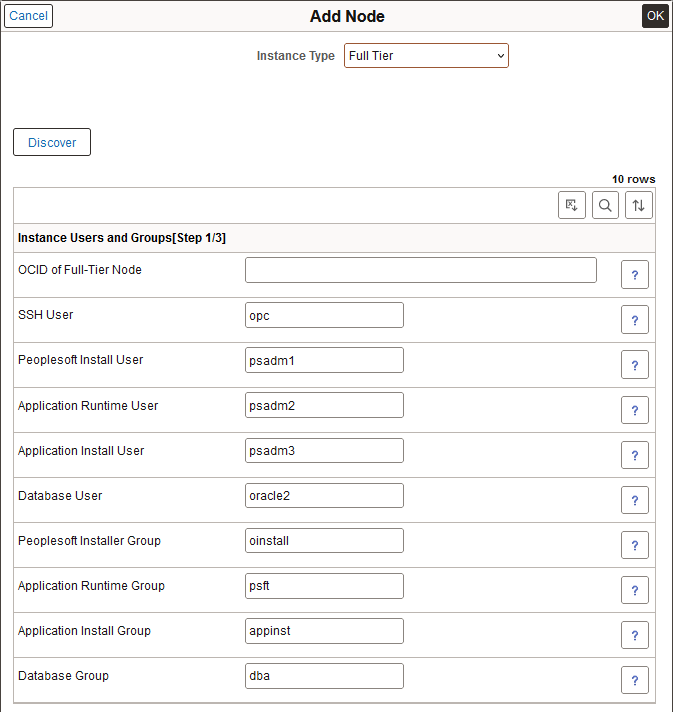
This example illustrates the fields and controls on the Add Node page for Full Tier instance type, Instance Users and Groups [Step 1 of 3].
Field or Control
Description
OCID of Full-Tier Node
The OCID for the instance in Oracle Cloud Infrastructure console.
SSH User
User that accesses the instance with SSH. The default is opc.
If the SSH entry is incorrect, you see an error message and the Discover process will be unable to proceed.
Peoplesoft Install User
Linux user with install permission. The default is psadm1.
Custom users must be distinct from other PeopleSoft users.
Application Runtime User
Linux user with permissions for application directories. The default is psadm2.
Custom users must be distinct from other PeopleSoft users.
Application Install User
Linux user with permissions to install application. The default is psadm3.
Custom users must be distinct from other PeopleSoft users.
Database User
The default is oracle2.
Custom users must be distinct from other PeopleSoft users.
Peoplesoft Installer Group
The default is oinstall.
Custom groups must be distinct from other PeopleSoft groups.
Application Runtime Group
The default is psft.
Custom groups must be distinct from other PeopleSoft groups.
Application Install Group
The default is appinst.
Custom groups must be distinct from other PeopleSoft groups.
Database Group
The default is dba.
Custom groups must be distinct from other PeopleSoft groups.
Review the entries and make any necessary corrections.
The Discover process will connect with SSH to the full tier instance and compare the information on users and groups with the default values. If a value is missing or incorrect, you see an error message. Correct the mistake and click Discover again to verify the change.
Based on the servers that are present, a pop-up message will appear listing the servers that were discovered. Click OK.
Cloud Manager lists the discovered environment paths.
Change the values to match the paths on your environment, if necessary. All of the paths are mandatory except Peoplesoft Cust Path. A blank field indicates that nothing was found. You can enter a valid location for a blank field.
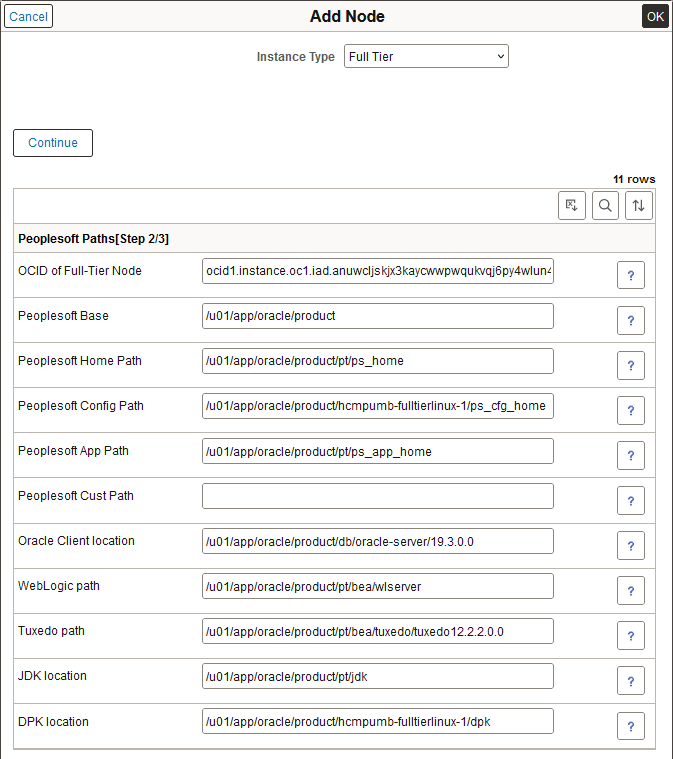
This example illustrates the fields and controls on the Add Node page for Full Tier instance type, Peoplesoft Paths [Step 2 of 3].
Field or Control
Description
Peoplesoft Base
The top-level installation directory; for example, /u01/app/oracle/product.
Peoplesoft Home Path
PS_HOME location; for example, /u01/app/oracle/product/pt/ps_home.
Peoplesoft Config Path
PS_CFG_HOME location; for example, /u01/app/oracle/product/<instance_name>/ps_cfg_home.
Peoplesoft App Path
PS_APP_HOME location; for example, /u01/app/oracle/product/pt/ps_app_home.
Peoplesoft Cust Path
PS_CUST_HOME location.
Oracle Client location
Oracle Database Client location; for example, /u01/app/oracle/product/db/oracle-server/19.3.0.0.
WebLogic path
Oracle WebLogic location; for example, /u01/app/oracle/product/bea/wlserver.
Tuxedo path
Oracle Tuxedo location; for example, /u01/app/oracle/product/bea/tuxedo/tuxedo12.2.2.0.0.
JDK location
Java JDK location; for example, /u01/app/oracle/product/pt/jdk.
DPK location
DPK location; for example, /u01/app/oracle/product/<instance_name>/dpk.
Click Continue.
Enter the credentials for the Full Tier.
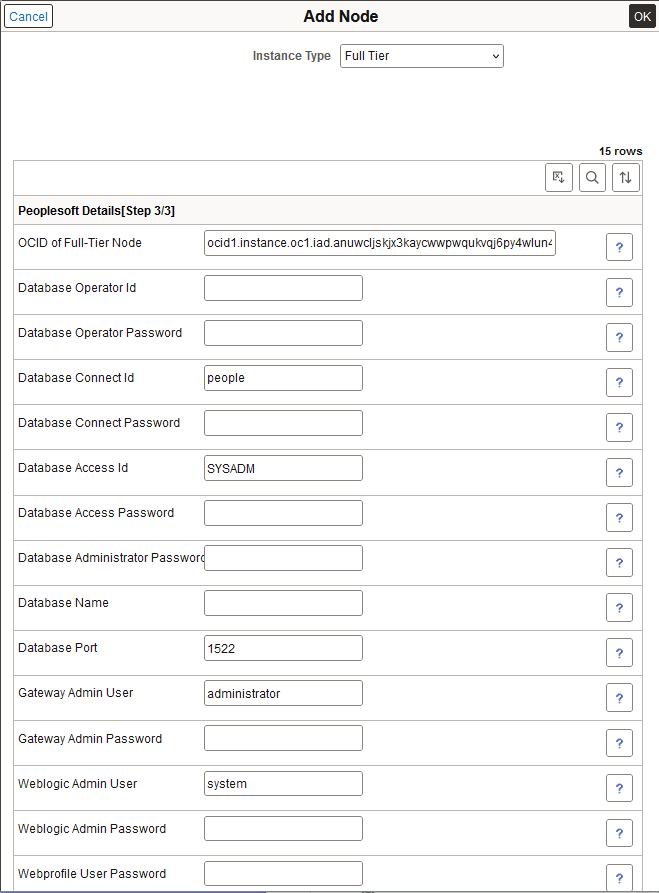
This example illustrates the fields and controls on the Add Node page for Full Tier instance type, Peoplesoft Details [Step 3 of 3].
Field or Control
Description
Database Operator Id
The user ID that accesses the environment.
Database Operator Password
Enter the password associated with the environment.
Database Connect Id
The default is people.
Database Connect Password
Enter the password associated with the environment.
Database Access Id
The default is SYSADM.
Database Access Password
Enter the password associated with the environment.
Database Administrator Password
Enter the password associated with the environment.
Database Name
Enter the name for the database.
Database Port
The default is 1522.
Gateway Admin User
The default is administrator.
Gateway Admin Password
Enter the password associated with the environment.
Weblogic Admin User
The default is system.
Weblogic Admin Password
Enter the password associated with the environment.
Webprofile User Password
Enter the password associated with the environment.
To import a Middle Tier node.
Note: For information on middle tier requirements, see the product documentation PeopleSoft PeopleTools <Release> Deployment Packages Installation on Oracle Help Center at https://docs.oracle.com/en/applications/peoplesoft/peopletools/index.html. Select the PeopleTools release for your environment at the top.
Click the + (Add) icon on the Import page.
Select Middle Tier Instance Type.
The fields are populated with default values for the instance users and groups.
Enter the Middle Tier OCID.
Click Discover.
Field or Control
Description
OCID of Mid-Tier Node
The OCID for the instance in Oracle Cloud Infrastructure console.
SSH User
User that accesses the instance with SSH. The default is opc.
If the SSH entry is incorrect, you see an error message and the Discover process will be unable to proceed.
Peoplesoft Install User
Linux user with install permission. The default is psadm1.
Custom users must be distinct from other PeopleSoft users.
Application Runtime User
Linux user with permissions for application directories. The default is psadm2.
Custom users must be distinct from other PeopleSoft users.
Application Install User
Linux user with permissions to install application. The default is psadm3.
Custom users must be distinct from other PeopleSoft users.
Database User
The default is oracle2.
Custom users must be distinct from other PeopleSoft users.
Peoplesoft Installer Group
The default is oinstall.
Custom groups must be distinct from other PeopleSoft groups.
Application Runtime Group
The default is psft.
Custom groups must be distinct from other PeopleSoft groups.
Application Install Group
The default is appinst.
Custom groups must be distinct from other PeopleSoft groups.
Database Group
The default is dba.
Custom groups must be distinct from other PeopleSoft groups.
Review the entries and make any necessary corrections.
The Discover process will connect with SSH to the middle tier instance and compare the information on users and groups with the default values. If a value is missing or incorrect, you see an error message. Correct the mistake and click Discover again to verify the change.
The Discover process will connect with SSH to the middle tier instance and find the servers (application server, web server, or Process Scheduler) that are present, the PeopleSoft deployment path, and whether COBOL is enabled or not.
Based on the servers that are present, a pop-up message will appear listing the servers that were discovered. Click OK.
Cloud Manager lists the discovered environment paths.
Change the values to match the paths on your environment, if necessary. All of the paths are mandatory except Peoplesoft Cust Path. A blank field indicates that nothing was found. You can enter a valid location for a blank field.
Field or Control
Description
Peoplesoft Base
The top-level installation directory; for example, /u01/app/oracle/product
Peoplesoft Home Path
PS_HOME location; for example, /u01/app/oracle/product/pt/ps_home
Peoplesoft Config Path
PS_CFG_HOME location; for example, /u01/app/oracle/product/<instance_name>/ps_cfg_home
Peoplesoft App Path
PS_APP_HOME location; for example, /u01/app/oracle/product/pt/ps_app_home
Peoplesoft Cust Path
None
Oracle Client location
Oracle Database Client location; for example, /u01/app/oracle/product/db/oracle-server/19.3.0.0
WebLogic path
Oracle WebLogic location; for example, /u01/app/oracle/product/bea/wlserver
Tuxedo path
Oracle Tuxedo location; for example, /u01/app/oracle/product/bea/tuxedo/tuxedo12.2.2.0.0
JDK location
Java JDK location; for example,/u01/app/oracle/product/pt/jdk
DPK location
Location for the DPKs; for example, /u01/app/oracle/product/<instance_name>/dpk
Click Continue.
Enter the credentials for the Middle Tier, then click OK.
Field or Control
Description
Database Operator Id
The user ID that accesses the environment.
Gateway Admin User
The default is administrator.
Gateway Admin Password
Enter the password associated with the environment.
Weblogic Admin User
The default is system.
Weblogic Admin Password
Enter the password associated with the environment.
Webprofile User Password
Enter the password associated with the environment.
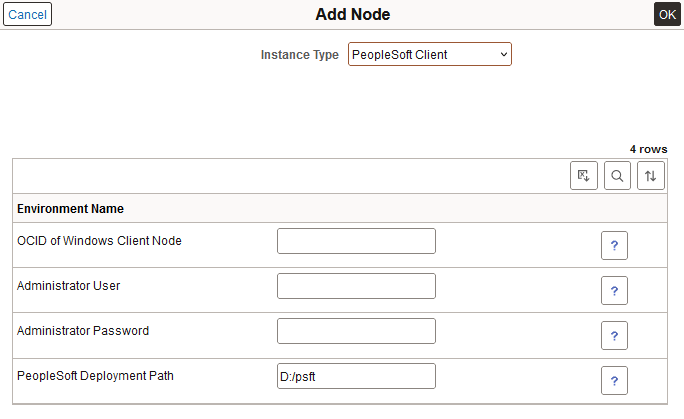
To import a PeopleSoft Client node:
Note: The fields for the PeopleSoft Client and Windows MT instance type are the same.
Click the + (Add) icon on the Import page.
Select PeopleSoft Client Instance Type.
Enter the required information.
The import process does not crawl the PeopleSoft Client instance to discover or verify this information.
This example illustrates the fields and controls on the Add Node page for PeopleSoft Client.
Field or Control
Description
OCID of Windows Client Node
The OCID for the instance in Oracle Cloud Infrastructure console.
Administrator User
The default user is opc. If you created an instance with a different user, enter that here.
Cloud Manager does not validate the Administrator User, but if the value is incorrect, the import process will fail.
Administrator Password
The password for the Windows administrator.
PeopleSoft Deployment Path
The default is D:\psft. Drive D: is mandatory for a Windows client.
Click OK.
To import a Search Stack node:
Note: For information on search stack requirements, see the product documentation PeopleSoft Deployment Packages Installation for Search Components on Oracle Help Center at https://docs.oracle.com/en/applications/peoplesoft/peopletools/index.html. Select the PeopleTools release for your environment at the top.
Click the + (Add) icon on the Import page.
Select Search Stack Instance Type.
The fields are populated with default values for the instance users and groups.
Enter the Search Stack node OCID.
Click Discover.
Field or Control
Description
OCID of Search Stack Node
The OCID for the instance in Oracle Cloud Infrastructure console.
SSH User
User that accesses the instance with SSH. The default is opc.
If the SSH entry is incorrect, you see an error message and the Discover process will be unable to proceed.
Open Search User
The default is esuser.
Open Search Group
The default is esuser.
Wheel Group
This is a native Linux group that is required for the search stack. If there is no wheel group on your environment, you need to add it before importing. The default is wheel.
Review the entries and make any necessary corrections.
The Discover process will connect with SSH to the search stack instance and compare the information on users and groups with the default values. If a value is missing or incorrect, you see an error message. Correct the mistake and click Discover again to verify the change.
Click Continue.
Based on the servers that are present, a pop-up message will appear listing the servers that were discovered. Click OK.
Cloud Manager lists the discovered environment paths.
Change the values to match the paths on your environment, if necessary. All of the paths are mandatory. A blank field indicates that nothing was found. You can enter a valid location for a blank field.
Field or Control
Description
Installation Directory
The top-level installation directory; for example, /u01/app/oracle/product/.
Search Location
The installation location for Elasticsearch or OpenSearch; for example, /u01/app/oracle/product/es/pt/elasticsearch7.10.0
Search Dashboard Location
The installation location for Kibana or OpenSearch Dashboards; for example, /u01/app/oracle/product/es/pt/Kibana7.10.0.
Click Continue.
Enter the credentials for the search stack.
Field or Control
Description
Administrator User
The default is esadmin.
Administrator Password
Enter the password for the Elasticsearch or OpenSearch Administrator.
Proxy User
The default is people.
Proxy Password
Enter the password for the proxy user.
Cluster Name
The default is ESCL.
Discovery Host Name
The default is 127.0.0.1.
Port
The default is 9200.
To view the status of the import process:
The respective card is added to the Environments page with the status of ImportingMultipleTier.
To view the status of the import, select Details from the actions menu for the environment.
Select Import from the left-side menu.
The status page shows the import steps and status of Import activity.
This example illustrates the import status.
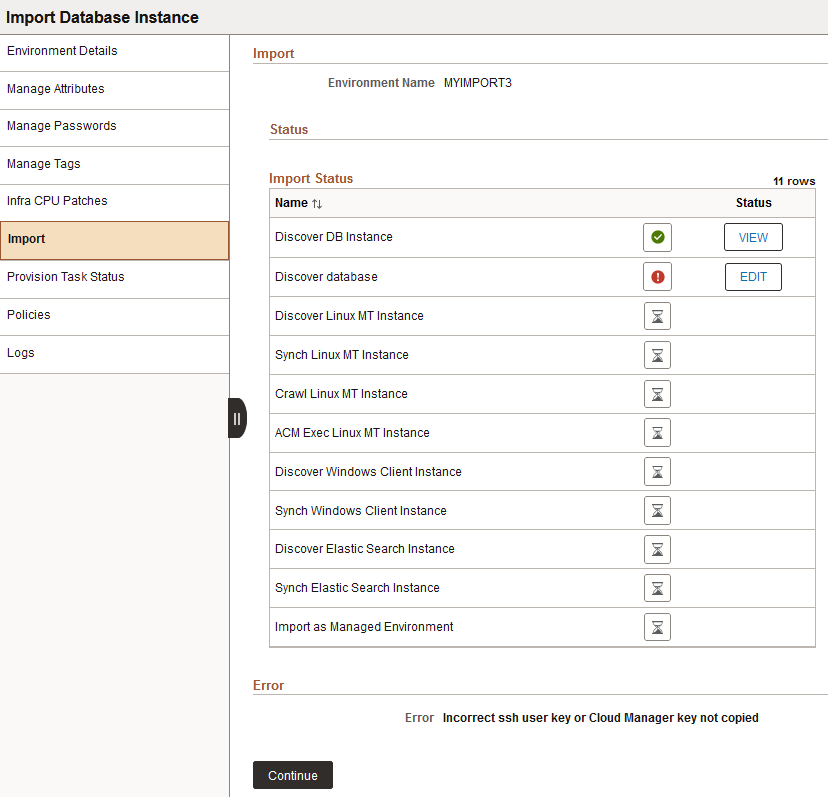
The Status column will display one of the following buttons:
View
Displays the output of that particular step.
Edit
Displays the inputs for a step that fails. You can edit the inputs and retry the step.
None
Some steps do not contain any output.
After the completion of each step, the View button will be displayed to allow you to review the respective input parameters.
This table describes the status icons:
|
Field or Control |
Description |
|---|---|
|
|
Pending |
|
|
Success |
|
|
In Progress |
|
|
Failed |
|
|
Continue |
|
|
Abort |
|
|
Step details |
|
|
Pause |


If there are any errors in a step, then Errors will be shown and an Edit button will be displayed to allow you to view and edit the respective input parameters.
Location of Database Import log files:
Import Database instance — Terraform logs are located in /home/psadm2/psft/data/cloud/cmlogs/envs/<Import envName>. Log on as psadm2 user to view the logs.
Import Database — psp.log is located in /home/psadm2/psft/pt/<pt release number>/appserv/prcs/PRCSDOM/LOGS. Log on as psadm2 user to view the log.
Discover UI logs — psp.log is located in /home/psadm2/psft/pt/<pt release number>/appserv/APPDOM/LOGS. Log on as psadm2 user to view the log.
Once edited, select the Continue button to re-try the failed and subsequent steps.
If the steps succeed, the target Database becomes a managed instance under Cloud Manager.
This example illustrates the fields and controls on the Import Database Instance page showing the status.
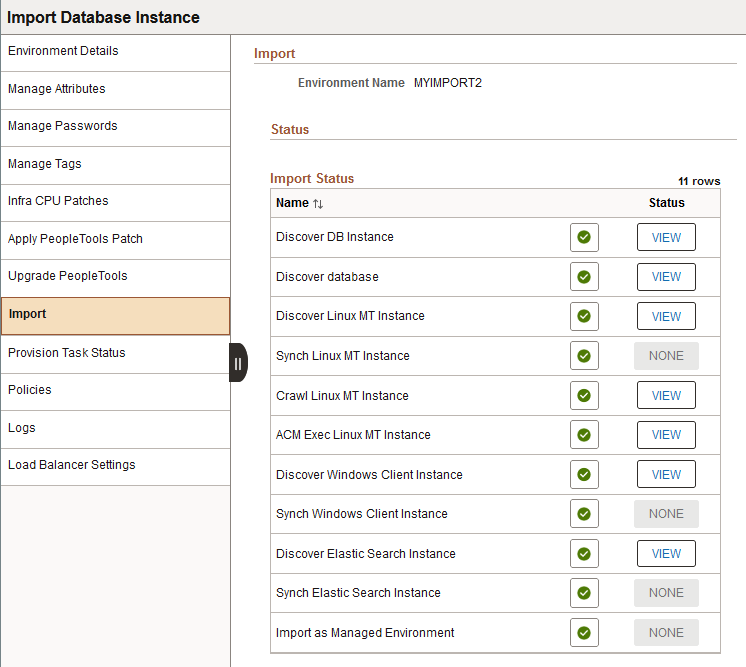
If a step has no specific output, a disabled None button is displayed instead of the View button.
An imported environment supports the following functions:
Review environment details and manage attributes.
On Demand Scale Up and Scale down.
See Managing Nodes.
Start
Stop
Delete
The database node regardless of whether it is running on Database Systems or compute is not deleted.
Upgrade
Update
Delegate Access
See Delegating Access.
Lifecycle activities like “Apply PeopleTools Patch” and “Upgrade PeopleTools” can be done on the imported environment just like any other Cloud Manager provisioned environment.
If you import an environment and then scale-up the node in Cloud Manager, the following occurs when you delete the scaled-up node:
Deletes the scaled up node.
Cleans up the metadata corresponding to the deleted node, which is stored in Cloud Manager.
When you delete a Middle Tier node, Search Stack node, or PeopleSoft Client node, which is not scaled up, from an imported environment, Cloud Manager cleans up the metadata and the instance infrastructure is not deleted from OCI.
Note: Database Systems node is not deleted.
See Managing Nodes