Provisioning and Sharing Search Clusters
A search cluster in Cloud Manager refers to several search nodes that are configured to be used by a provisioned environment.
When you create an environment with a search node, Cloud Manager deploys the node in a single OCI instance (that is, a single Linux VM). Multiple search nodes can be grouped in a cluster. A cluster is identified by a unique name. All of the search nodes must reference the same unique cluster name.
The OpenSearch documentation recommends at least three search nodes for fail-over and high availability. If one search node fails, the search framework will remain available.
This section includes the following topics for using search clusters:
Provisioning Environments with Search Clusters
Sharing a Search Cluster Across Multiple Environments
Managing Search Clusters
For more information, see the product documentation PeopleTools: Search Technology, Understanding Clusters in OpenSearch, on Oracle Help Center at https://docs.oracle.com/en/applications/peoplesoft/peopletools/index.html.
Search clusters are supported only for provisioned environments that use OpenSearch. OpenSearch and OpenSearch Dashboards are supported for PeopleTools releases 8.59.21 and later, 8.60.07 and later, and 8.61.
Here are the high-level steps, which are discussed in this section, for provisioning an environment with a search cluster:
Add a security rule to open the search cluster transport port on the subnet where search instances are deployed.
Create topology with multiple search nodes.
Create an environment template that specifies the same search cluster name and port for all search nodes
Provision the environment.
In the provisioned environment, adjust the replica number in the search instance settings.
Opening the Cluster Transport Port
The node in a cluster communicates through a cluster transport port, which must be opened for the provisioned environment.
The default cluster transport port is 9300. When you provision an environment with a search cluster or add a node to a cluster, the port must be accessible. You enter the port number when creating an environment template.
To enable communication through the cluster transport port, access the details for the VCN used for the environment in the OCI console. Review the security rules for the VCN subnet where search instances are deployed. Verify that the search cluster transport port is accessible.
See the Cloud Manager tutorial Plan the Virtual Cloud Network for PeopleSoft Cloud Manager, on Oracle Help Center at https://docs.oracle.com/en/applications/peoplesoft/cloud-manager/index.html#InstallationTutorials.
Creating Topology for Search Clusters
Create topology with a database node (Database on Compute or DB Systems), one or more mid-tier nodes, and as many search nodes as you want for the cluster. A minimum of three search nodes is recommended for fail-over and high availability. An odd number of search nodes is also recommended.
This example shows a sample topology with database on compute, mid-tier node, and three search nodes.
Topology Information page with three search nodes
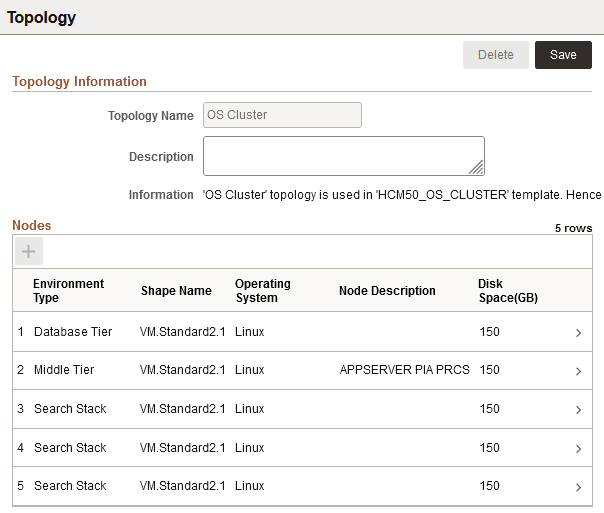
Full-tier environments are not supported for search clusters.
Creating an Environment Template for Search Clusters
Create an environment template based on the topology with multiple search nodes.
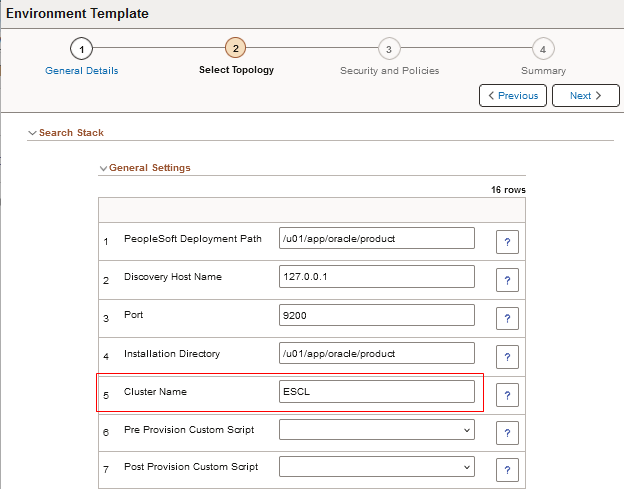
On the Select Topology page, in the Search Stack, General Settings sections, ensure that all of the nodes have the same values for Cluster Name (the default is ESCL) and Cluster Transport Port (the default is 9300).
This example illustrates the Environment Template - Select Topology page showing the Cluster Name field.
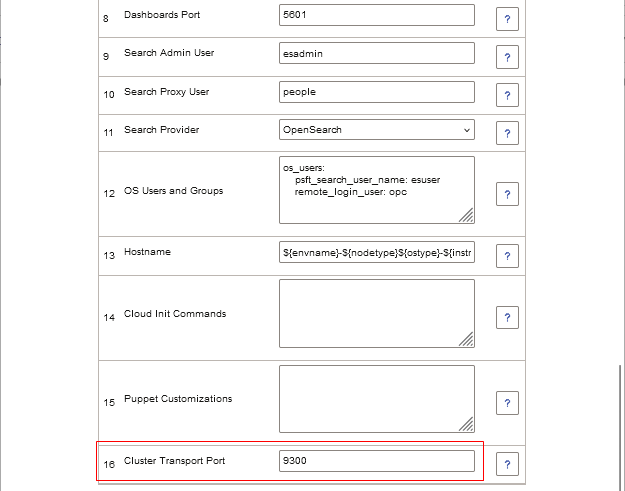
This example illustrates the Environment Template - Select Topology page showing the Cluster Transport Port field.
Complete the environment template creation.
See Creating a Template.
Provisioning an Environment with a Search Cluster
Create an environment and complete the configuration.
When you create an environment, the fields are populated with the entries from the selected environment template. Ensure that all of the search nodes include the same cluster name and cluster template port.
After the environment is provisioned:
Click the Related Action button for the environment and select Details.
Expand the Search section on the Environment Details page to see the search nodes in the cluster.
This example illustrates the Environment Details page for an environment with a cluster comprised of three search nodes.
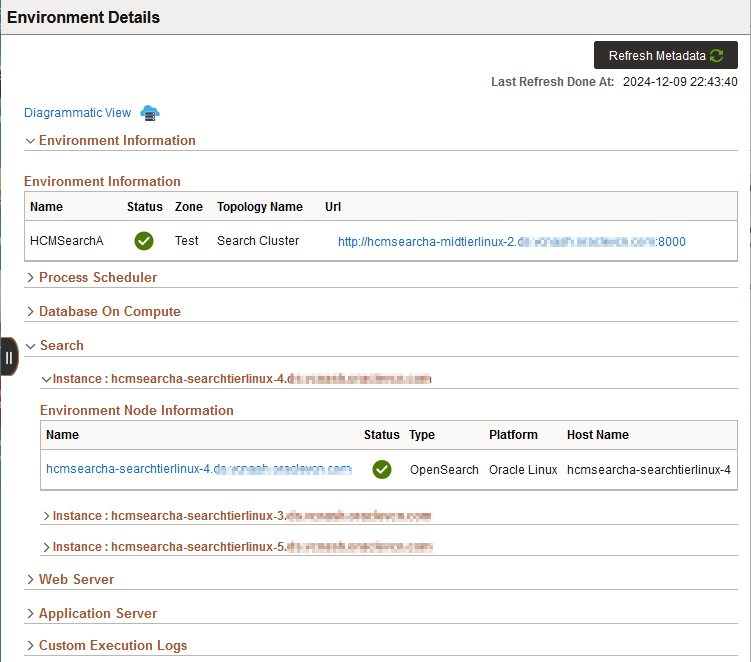
Click each instance name for details.
Click the URL under Environment Information to sign in to PIA for the environment.
Select .
The PeopleSoft search instance configuration will be updated with metadata for all the nodes in the cluster. This ensures that the search instance configuration works even if a node is down. The Search Instance Properties grid lists the nodes in the cluster.
Note: The PeopleSoft search instance in this context refers to a single instance of the search engine in the PeopleSoft Search Framework.
This example illustrates the Search Instance Properties page with three search instances (1 of 2).
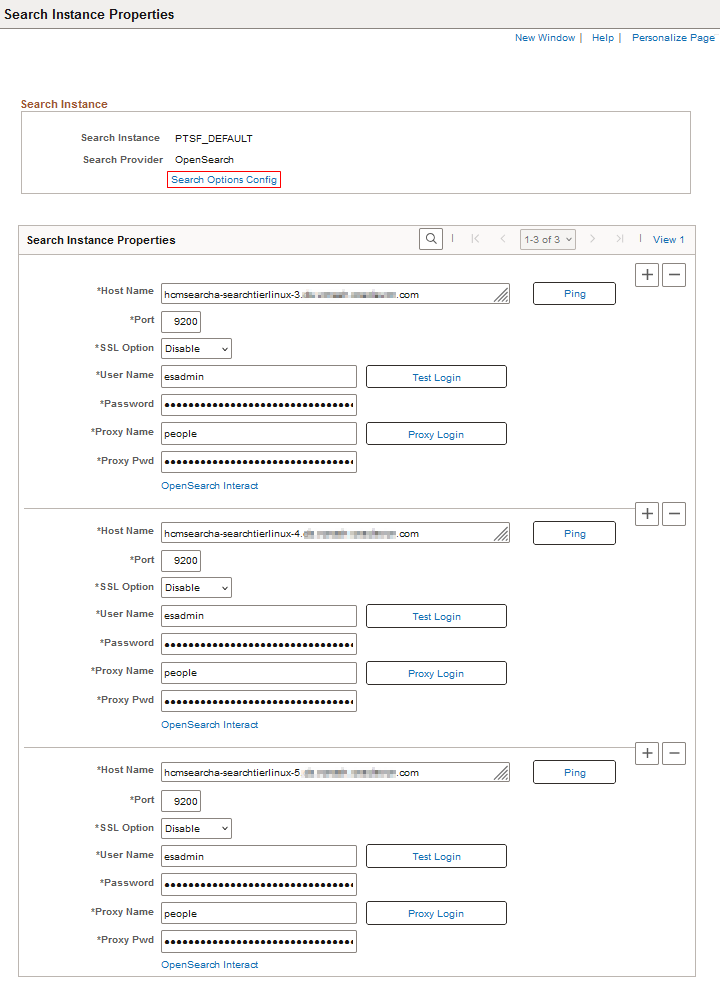
This example illustrates the Search Instance Properties page with three search instances (2 of 2)
Select the link Search Options Config.
On the Search Options page, ensure that Number of Replicas is set to 1 (one) or greater.
This example illustrates the Search Options page with Number of Replicas set to 2.
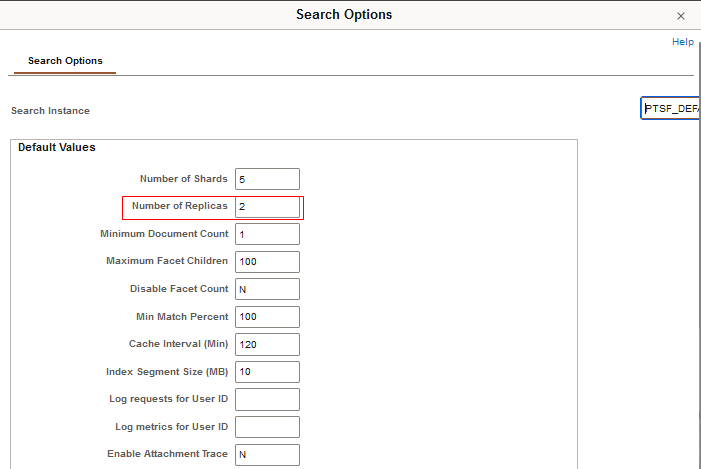
This ensures that search indexes are replicated within the cluster, which protects against loss of data in case a search node fails.
See the product documentation PeopleTools: Search Technology, Managing General Search Options and Setting the Number of Replicas, on Oracle Help Center at https://docs.oracle.com/en/applications/peoplesoft/peopletools/index.html
Select .
Select the deployed search definitions, and click Update.
See the product documentation PeopleTools: Search Technology, Administering Search Definitions and Search Categories, on Oracle Help Center at https://docs.oracle.com/en/applications/peoplesoft/peopletools/index.html.
Set up a search cluster so that it can be used by multiple provisioned environments, referred to here as shared search.
In a shared search setup, search operations for several PeopleSoft environments are performed by a single search cluster. For example, a logging-test cluster could be shared by all test environments and a logging-staging cluster by all staging environments. Shared search clusters can be shared by different PeopleSoft applications, such as FSCM and HCM. Because fewer resources are required for the search component, shared search has the advantage of reducing costs.
The requirements for using shared search are:
The PeopleTools release must support OpenSearch.
OpenSearch and OpenSearch Dashboards are supported for PeopleTools releases 8.59.21 and later, 8.60.07 and later, and 8.61.
The database name for the environment that owns the search cluster and the database names for any environments that share the search cluster must be different.
Each search index uses the database name as a suffix. This means that multiple data sources from different PeopleSoft applications can be deployed on the same cluster.
The environment topology includes database tier and middle tier. Full-tier topology is not supported for search clusters.
The environment must be running for the search cluster sharing to be successful.
An odd number of search nodes is recommended for a search cluster.
Note: To reset a password on a search node that is part of a shared search cluster, you must manually update it in all environments that share the cluster. See Managing Passwords.
Setting Up Search Cluster Sharing
To share a search cluster, set up the search cluster for the first environment, and then share it from the second.
Here are the high-level steps for sharing a search cluster between two environments:
Create an environment with a search cluster.
See the section Provisioning an Environment with a Search Cluster.
Create a second environment whose topology does not include a search cluster or search instances.
Use the Manage Node action from the second environment to configure it to share the search cluster on the first environment.
Configuring an Environment to Share a Search Cluster
Create topology for an environment with database tier and middle tier. Do not include a search node.
Create an environment template and provision the environment.
Click the Related Actions button for the environment and select Manage Node.
Select Add from the Action drop-down list.
Select Search Stack from the Type drop-down list.
Select Linux from the Operating System drop-down list.
Select Shared Search from the Search Topology drop-down list.
Note: This option is available only when there is at least one environment in Cloud Manager that has a search cluster.
From the Use Search Cluster in Env drop-down list, select the environment that owns the search cluster.
This example illustrates the Add Node page for an environment with a search cluster.
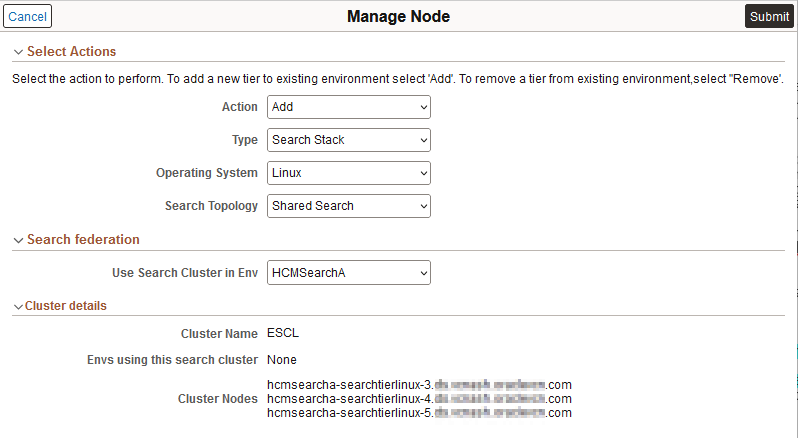
The Cluster details area displays:
Cluster name
Environments using the search cluster — Lists the environments that share the search cluster.
If no other environments share the search cluster, this displays None.
Cluster Nodes — Lists the FQDN for all search nodes in the cluster.
Click Submit.
Follow the progress on the Provision Task Status page.
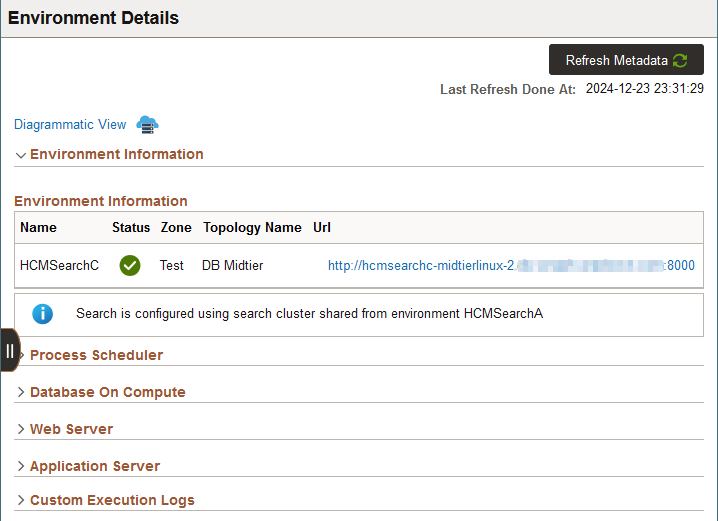
After the sharing process is complete, the sharing status is displayed on the Environment Details page.
This example illustrates the Environment Details page after sharing a search cluster.
Sign in to PIA for the environment and set the number of replicas.
To set the number of replicas, see the section Provisioning an Environment with a Search Cluster.
Resolving VP1 User Error
For certain PeopleSoft environments such as FSCM, which use VP1 as the default user, the sharing search cluster operation may fail. In case of failure:
Click the Related Actions button for the failed environment and select Details.
Click the URL under Environment Information and sign in to PIA for the environment.
Select .
If there is a Failed status for the search operation, click the Details icon.
If you see the following text in the message, continue with the next step.
"User Role check VP1. User does not have the role: Report Distribution Administrator"
Select .
Select the VP1 user and add the role ReportDistAdmin, then save the page.
In Cloud Manager, go to the details for the PeopleSoft environment, and retry the failed task from the Provision Task Status page.
Removing an Environment from a Shared Search Cluster
Use these steps to unshare—that is, remove an environment from a shared search cluster.
All nodes in a cluster must be up and running in order to remove an environment from a shared search cluster.
Click the Related Actions button for the environment and select Manage Node.
Select Remove from the Action drop-down list.
Select Search Stack from the Type drop-down list.
Select Linux from the Operating System drop-down list.
Select Shared Search from the Search Topology drop-down list.
The Use Search Cluster in Env field displays the name of the environment that owns the search cluster, the cluster name, and the search nodes, in read-only text.
Click Submit, which removes the association of the environment with the shared search cluster.
If the process to remove the environment fails, go to Process Monitor. Check for any search-related processes, such as PTSF_GENFEED and related processes, that are queued or in progress. If this is the case, it means that the environment is in the process of deploying search indexes. The system does not allow the unsharing to proceed in this case, to avoid data loss or corruption.
After the search index processes are complete, retry the unsharing from the Provision Task Status page.
This section describes the following actions for environments with search clusters.
Add a node to the search cluster.
Remove a node from the search cluster.
Clone an environment with a search cluster.
Import an environment with a search cluster.
Adding a Node to an Existing Search Cluster
Use the Manage Node page to add a search node to an environment. You can add one or more search nodes to an environment that does not have any search nodes to form a cluster. You can also add a search node to an environment with an existing search cluster. All search nodes must be up and running for the operation to work.
Adding a new search node to a managed environment that already has a search node will not form a search cluster, if the managed environment was provisioned in a Cloud Manager image prior to Image19 (Cloud Manager upgrade case). To form a search cluster in such a scenario, a customer needs to remove the existing search node from the managed environment and add new nodes.
Note: On environments that own a search cluster, adding a node only affects the search instance configuration on the environment that owns the cluster. In the environments that share the cluster, you must modify the search instance configuration manually to indicate that the nodes were added. See the product documentation PeopleTools: Search Technology.
Click the Related Actions button for the environment and select Manage Node.
Select Add from the Action drop-down list.
Select Search Stack from the Type drop-down list.
Select Linux from the Operating System drop-down list.
Select Add Search Node from the Search Topology drop-down list.
Use the Copy From drop-down list to select an existing search node from which to copy the configuration.
Supply the necessary attributes and settings.
Click Submit, which carries out these actions:
The node is added to the existing search cluster.
All existing nodes in the cluster are updated with the metadata for the added node.
The PeopleSoft search instance configuration is updated with the information about the added node.
Sign in to PIA for the environment and set the number of replicas.
If you are adding search nodes to an environment with an existing search cluster, it is recommended to set the number of replicas after all of the search nodes have been added.
To set the number of replicas, see the section Provisioning an Environment with a Search Cluster.
Removing a Node From an Existing Search Cluster
Use the Manage Node page to remove a search node from an existing search cluster. All search nodes must be up and running for the operation to work.
Note: On environments that own a search cluster, removing a node only affects the search instance configuration on the environment that owns the cluster. In the environments that share the cluster, you must modify the search instance configuration manually to indicate that the nodes were removed.
Click the Related Actions button for the environment and select Manage Node.
Select Remove from the Action drop-down list.
Select Search Stack from the Type drop-down list.
Select Linux from the Operating System drop-down list.
Select Remove Search Node from the Search Topology drop-down list.
Select an existing search node to remove.
Click Submit, which carries out these actions:
The node is removed from the existing search cluster.
All existing nodes in the cluster are updated to remove the node metadata.
The PeopleSoft search instance configuration is updated with the information about the removed node.
Sign in to PIA for the environment and update the number of replicas.
To set the number of replicas, see the section Provisioning an Environment with a Search Cluster.
Cloning an Environment with a Search Cluster
When you clone an environment with a search cluster, a new search cluster is formed.
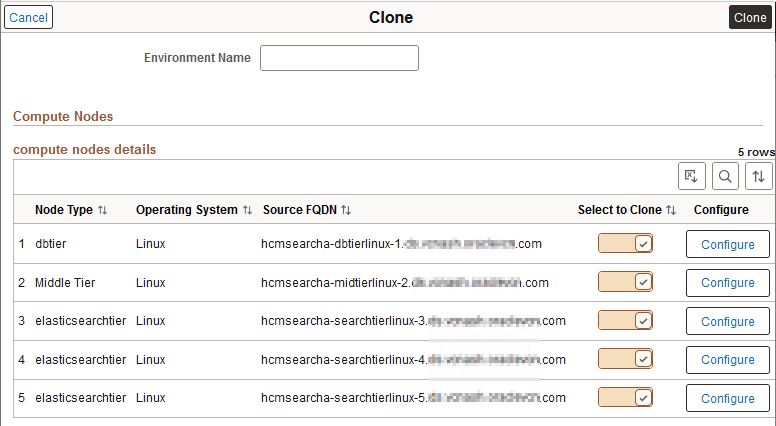
When you clone an environment with an associated search cluster, you must clone all of the search nodes in the cluster or none of them. You cannot select a subset of search nodes. On the Clone page, ensure that Select to Clone is selected for all the search nodes.
The data in the cloned search cluster will be an exact replica of that in the original search cluster. The name of the search cluster on the cloned environment will be the same as that of the source environment.
When you clone an environment that shares a search cluster (owned by another environment), the cloned environment does not inherit the sharing.
This example illustrates the Clone page with a search cluster.
See Cloning Environment.
Importing an Environment with a Search Cluster
When you import an environment with a search cluster, you must import all of the search nodes in the cluster or none of them. You cannot select a subset of search nodes.