Configuring Hierarchy Components
This topic provides information about configuring hierarchy components, which are also called relationship hierarchy components. This topic is part of Configuring Data Visualization Components.
This topic contains the following information:
-
About Configuring Hierarchy Components
-
Mapping Business Components to the Business Object
-
Configuring and Mapping Business Component Fields
-
Configuring the Hierarchy Applet
-
Configuring the Tree Control
-
Mapping the Applet Web Template and Web Template Items
-
Configuring the Applet Tree and Tree Nodes
-
Configuring Drilldown Objects
-
Configuring Applet User Properties Related to Drilldown and Images
-
Configuring Multiple Hierarchy Applets
-
Mapping the Presentation Model and Physical Renderer
-
Mapping the Hierarchy Applet to a View Web Template
About Configuring Hierarchy Components
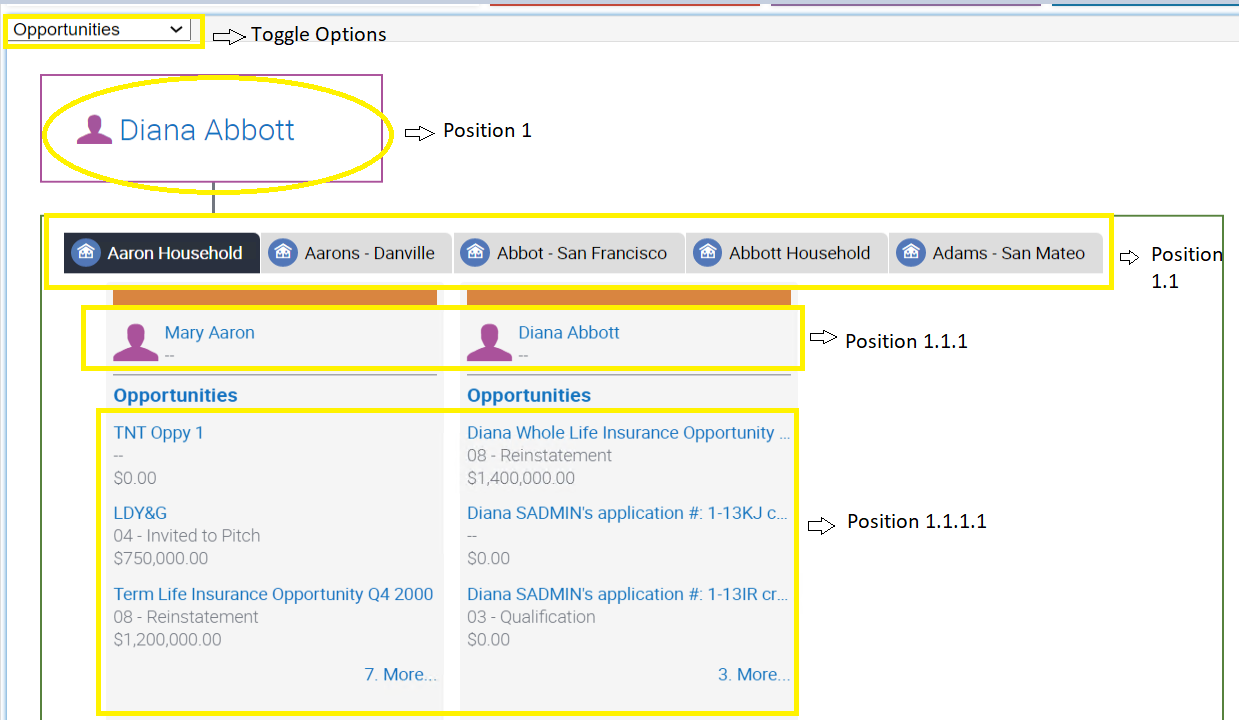
As noted in Hierarchy Components, a hierarchy applet displays linked data in an ordered four-level hierarchy. Hierarchy data is organized within a tree model framework and rendered using a custom tile model. Conceptually, each level represents a position, such as the following. The example data used throughout is from the hierarchy applet FINS Contact Hierarchy Applet, which is part of the Siebel Financial Services dashboard.
-
Position 1 (level 1). In this example, this level represents a single contact, such as Diana Abbott. The remaining levels represent aggregated data associated with this contact.
-
Position 1.1 (level 2). This level represents a single household of the parent contact. Multiple households (up to five) are displayed using tabs, with a single tab currently selected.
-
Position 1.1.1 (level 3). This level represents multiple contacts of the parent household. Each contact is shown in a tile below the parent household.
-
Position 1.1.1.1 (level 4). This level represents the opportunities of each parent household contact. The opportunities are shown in a tile below the parent household contact. The user can also access different level-4 data using an applet toggle drop-down menu.
The hierarchy shown in the following image is based on the level-4 entity, opportunities. An applet toggle is available at the top of the hierarchy applet, from which, in this example, the user might be able to select other entities, such as activities, financial accounts, or service requests. You can configure each selectable option in the applet toggle and what it displays.
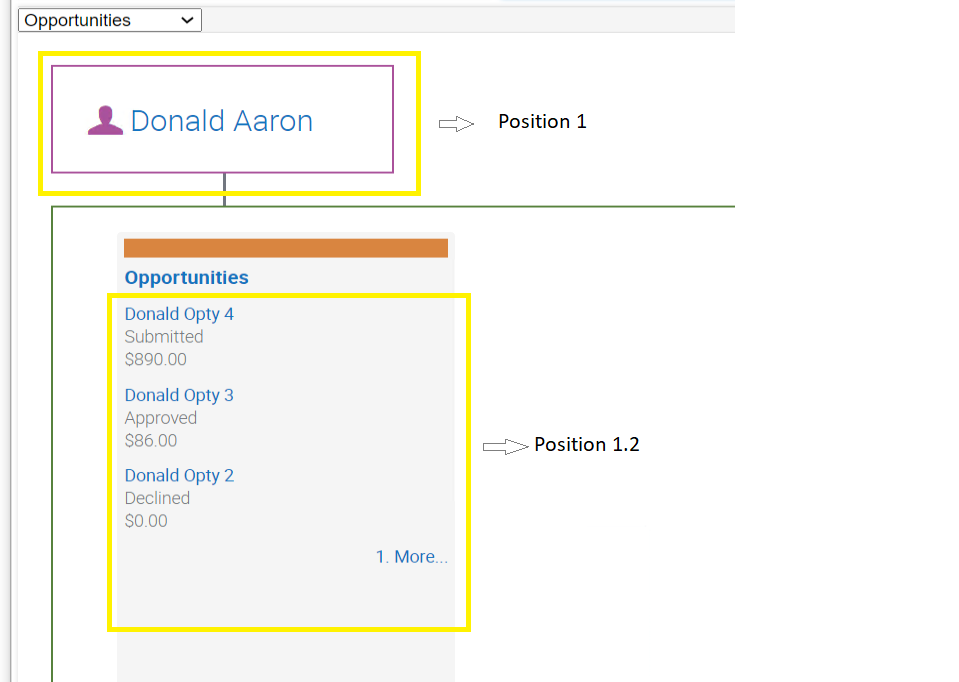
If no data is found representing position 1.1 (that is, households of parent contact in this example), then the hierarchy applet will display alternate data, referred to as position 1.2. For example, position 1.2 can be configured as opportunities of the parent contact. In this example, if data from position 1.2 is displayed (as shown in the following image), then no tabs are shown. The position 1.2 data (opportunities) displays in tiles, the same as in the four-level case previously described, because Opportunities is selected in the applet toggle drop-down menu.
Mapping Business Components to the Business Object
The relationship hierarchy framework can be reused by any business scenario matching up to four levels of hierarchy. To adapt this framework for a new business scenario, first identify the business object and the four levels of business components for which to show hierarchical data. The business components representing the four levels must belong to a single business object and must have a hierarchical relationship within the business object.
If you need to create the hierarchical relationship of the four levels of business components, then you can use the following table as a general guide for this purpose. Also examine the repository data used in this example, which is configured in the business object Contact.
| Business Component | Links (Source BC / Destination BC) | Description |
|---|---|---|
|
<Position 1 BC> Example: FINS DB Hierarchy Root Contact |
<Primary BC> / <Position 1 BC> Example: Contact/FINS DB Hierarchy Root Contact |
Root contact "Diana Abbott" |
|
< Position 1.1 BC> Example: FINS DB Hierarchy Household |
<Position 1 BC> / <Position 1.1 BC> Example: FINS DB Hierarchy Root Contact/FINS DB Hierarchy Household |
Relation between root contact and all its households. |
|
< Position 1.1.1 BC> Example: FINS DB Hierarchy Contact |
<Position 1.1 BC> / <Position 1.1.1 BC> Example: FINS DB Hierarchy Household/FINS DB Hierarchy Contact |
Relation between a household and all its contacts. |
|
<Entity 1 Position 1.1.1.1 BC> Example: FINS DB Hierarchy Opportunity 2 |
<Position 1.1.1 BC> / <Position 1.1.1.1 BC> Example: FINS DB Hierarchy Contact/FINS DB Hierarchy Opportunity 2 |
Relation between a household contact and its opportunities entity. |
|
<Entity 1 Position 1.2 BC> Example: FINS DB Hierarchy Opportunity 1 |
<Position 1 BC> / <Position 1.2 BC> Example: FINS DB Hierarchy Root Contact/FINS DB Hierarchy Opportunity 1 |
Relation between root contact and its opportunities entity. |
To support hierarchy applets in dashboards, the business component relationships described in the table have been implemented for the Contact business object. These repository updates included creating new business components and links.
According to your requirements for using hierarchy applets, you might choose to modify or extend these configuration changes or configure new hierarchies. You might, for example, want to reuse the existing hierarchical relationships defined for positions 1, 1.1, and 1.1.1 but, for positions 1.1.1.1 and 1.2, make configuration changes that substitute opportunities with activities, financial accounts, or service requests. For these entities, the following business components are configured and mapped in the Contact business object to show entity details at positions 1.1.1.1 and 1.2.
In these tables, Entity 1 is Opportunity, Entity 2 is Activity, Entity 3 is Financial Account, and Entity 4 is Service Request.
| Business Component | Links (Source BC / Destination BC) | Position |
|---|---|---|
|
<Entity 2 Position 1.1.1.1 BC> Example: FINS DB Hierarchy Activity 1 |
FINS DB Hierarchy Contact/FINS DB Hierarchy Activity 1 |
1.1.1.1 |
|
<Entity 2 Position 1.2 BC> Example: FINS DB Hierarchy Activity 2 |
FINS DB Hierarchy Root Contact/FINS DB Hierarchy Activity 2 |
1.2 |
|
<Entity 3 Position 1.1.1.1 BC> Example: FINS DB Hierarchy FA 1 |
FINS DB Hierarchy Contact/FINS DB Hierarchy FA 1 |
1.1.1.1 |
|
<Entity 3 Position 1.2 BC> Example: FINS DB Hierarchy FA 2 |
FINS DB Hierarchy Root Contact/FINS DB Hierarchy FA 2 |
1.2 |
|
<Entity 4 Position 1.1.1.1 BC> Example: FINS DB Hierarchy SR 1 |
FINS DB Hierarchy Contact/FINS DB Hierarchy SR 1 |
1.1.1.1 |
|
<Entity 4 Position 1.2 BC> Example: FINS DB Hierarchy SR 2 |
FINS DB Hierarchy Root Contact/FINS DB Hierarchy SR 2 |
1.2 |
Configuring and Mapping Business Component Fields
As part of configuring hierarchy applets, you must also configure and map business component fields. These business component fields are mapped in the tree node configuration, which is part of the applet configuration. For some of the fields in the current example, calculated fields were created (as detailed in the following paragraph) allowing values from multiple fields to be combined. Where more than one field value is required, you must create a calculated field (concatenation of multiple fields separated by | symbols).
In the example in the following table, each position can be configured to display field data in a way consistent with its location in the hierarchy:
-
Positions 1 and 1.1 each support the display of a single field value (single attribute).
-
Position 1.1.1 uses a calculated field value to obtain and display two field values (two attributes).
-
Positions 1.1.1.1 and 1.2 each use a calculated field to obtain and display four field values (four attributes).
| Position | Business Component | Field | Number of Attributes Shown | Description |
|---|---|---|---|---|
|
Position 1 |
FINS DB Hierarchy Root Contact |
Full Name |
1 |
The field Full Name is mapped in the applet tree control Node Position 1 to render the Contact FullName value. |
|
Position 1.1 |
FINS DB Hierarchy Household |
Household Name |
1 |
The field Household Name is mapped in the applet tree control Node Position 1.1 to render the Household value. |
|
Position 1.1.1 |
FINS DB Hierarchy Contact |
'Rel Hierarchy Calc Field' |
2 |
This calculated field has the following value: [Full Name]+"| "+[Relation to Household] |
|
Position 1.1.1.1 |
FINS DB Hierarchy Opportunity 2 |
'Rel Hierarchy Calc Field' |
4 |
This calculated field has the following value: [Name]+"| "+[Sales Stage]+"| "+"currency"+"| "+[Currency Code]+"| "+[Primary Revenue Amount] |
|
Position 2 |
FINS DB Hierarchy Opportunity 1 |
'Rel Hierarchy Calc Field' |
4 |
This calculated field has the following value: [Name]+"| "+[Sales Stage]+"| "+"currency"+"| "+[Currency Code]+"| "+[Primary Revenue Amount] |
You can reuse existing fields or create new calculated fields, depending on your use case.
Configuring the Hierarchy Applet
This step shows you how to create and configure a new hierarchy applet. You must create a new workspace and create a new applet with the following properties. The example data in this topic is for the FINS Contact Hierarchy Applet.
| Property Name | Value | Comment |
|---|---|---|
|
Name |
<AppletName> |
The name of the applet. In this example, the applet name is FINS Contact Hierarchy Applet. |
|
Class |
CSSSWETreeRelHier |
The name of a C++ class used to manage the applet. This is the hierarchy applet framework class. The framework constructs the CSS class based on the business component mapped to the applet. |
|
Type |
Standard |
By default, the type is Standard. |
|
Business Component |
<BusComp> |
The name of the primary business component for this hierarchy applet. The business component must be defined in the business object specified for any view that uses this applet. |
|
Applet Title |
<AppletTitle> |
The applet title is autopopulated based on the value of the property Title - String reference. |
Configuring the Tree Control
For the hierarchy applet (FINS Contact Hierarchy Applet in this example), create a Tree control, as follows.
| Property | Value | Comment |
|---|---|---|
|
Name |
Tree |
The name of the control. |
|
HTML Type |
Text |
The HTML type for the control you create. This must be Text. |
|
Caption - String Reference |
Tree |
The caption property is populated based on this mapping. In this example, the caption is Tree. |
Mapping the Applet Web Template and Web Template Items
For this applet (FINS Contact Hierarchy Applet in this example), create a new applet web template with the properties shown in the following table.
| Property | Value | Comment |
|---|---|---|
|
Name |
Base |
The name of the applet web template. |
|
Type |
Base |
The type of applet web template. In this case, the Type must be Base. |
|
Web Template |
Relationship Hierarchy Applet |
The type of web template for this applet web template. It must be Relationship Hierarchy Applet. |
Create an applet web template item for this applet web template with the properties shown in the following table.
| Name | Control | Item Identifier |
|---|---|---|
|
Tree |
Tree |
99,994 |
Configuring the Applet Tree and Tree Nodes
For this applet (FINS Contact Hierarchy Applet in this example), navigate to the Tree object and create a new record with the properties shown in the following table.
| Name | HTML Hierarchy Bitmap |
|---|---|
|
Tree |
Global Account Bitmaps |
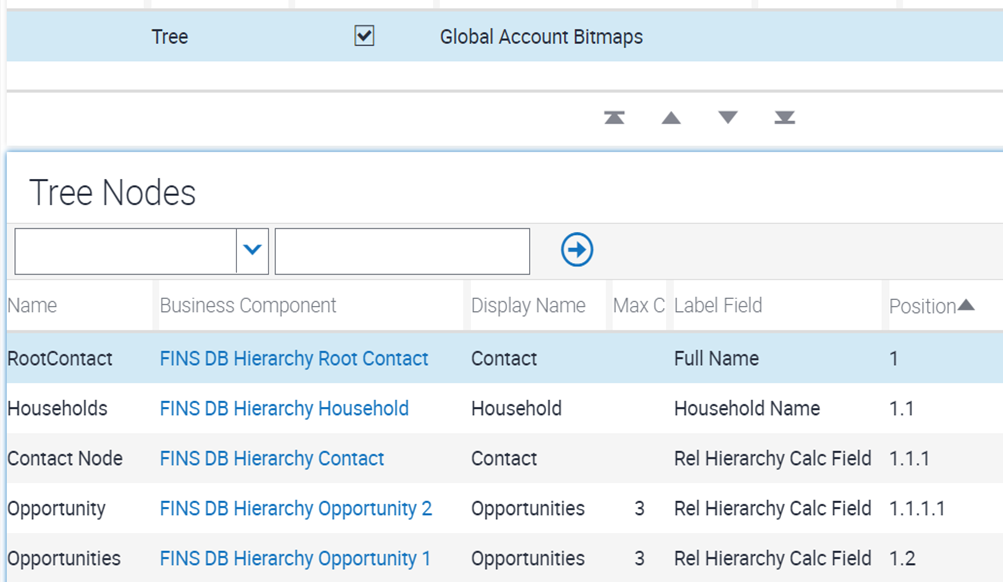
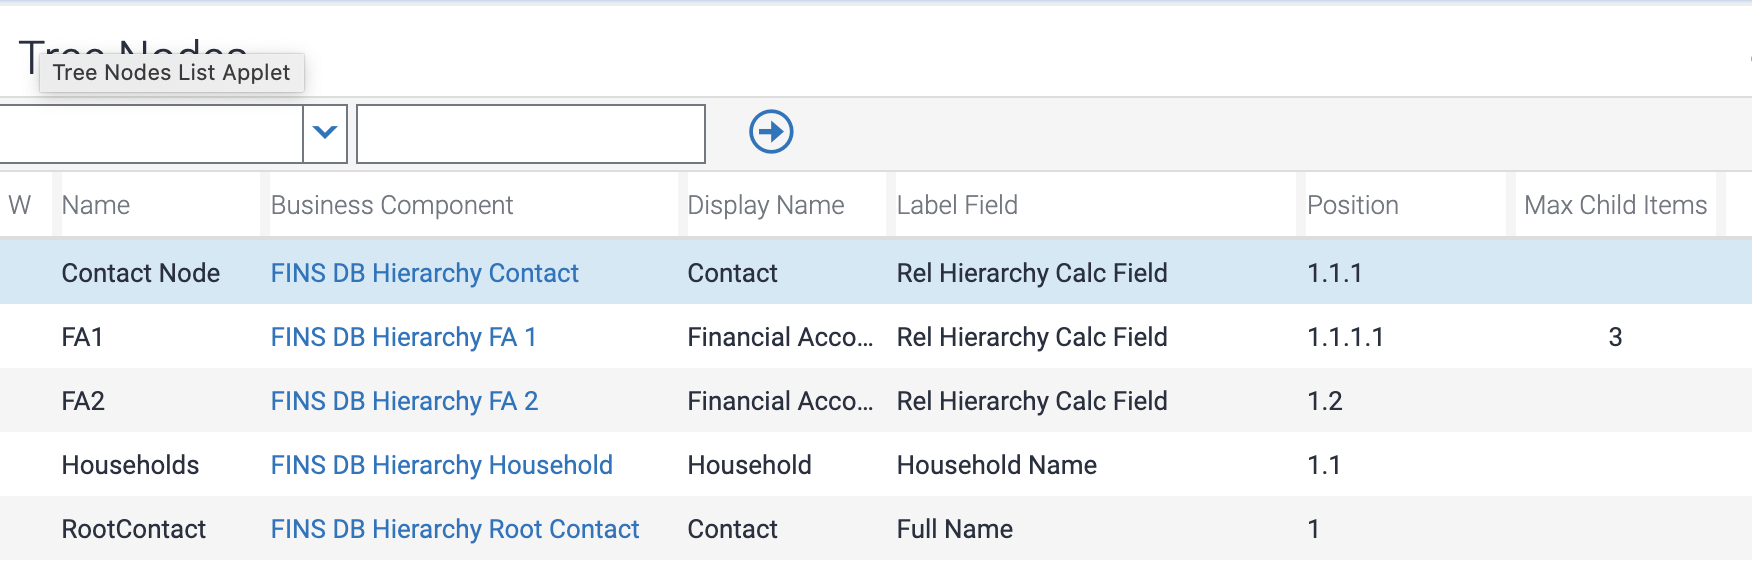
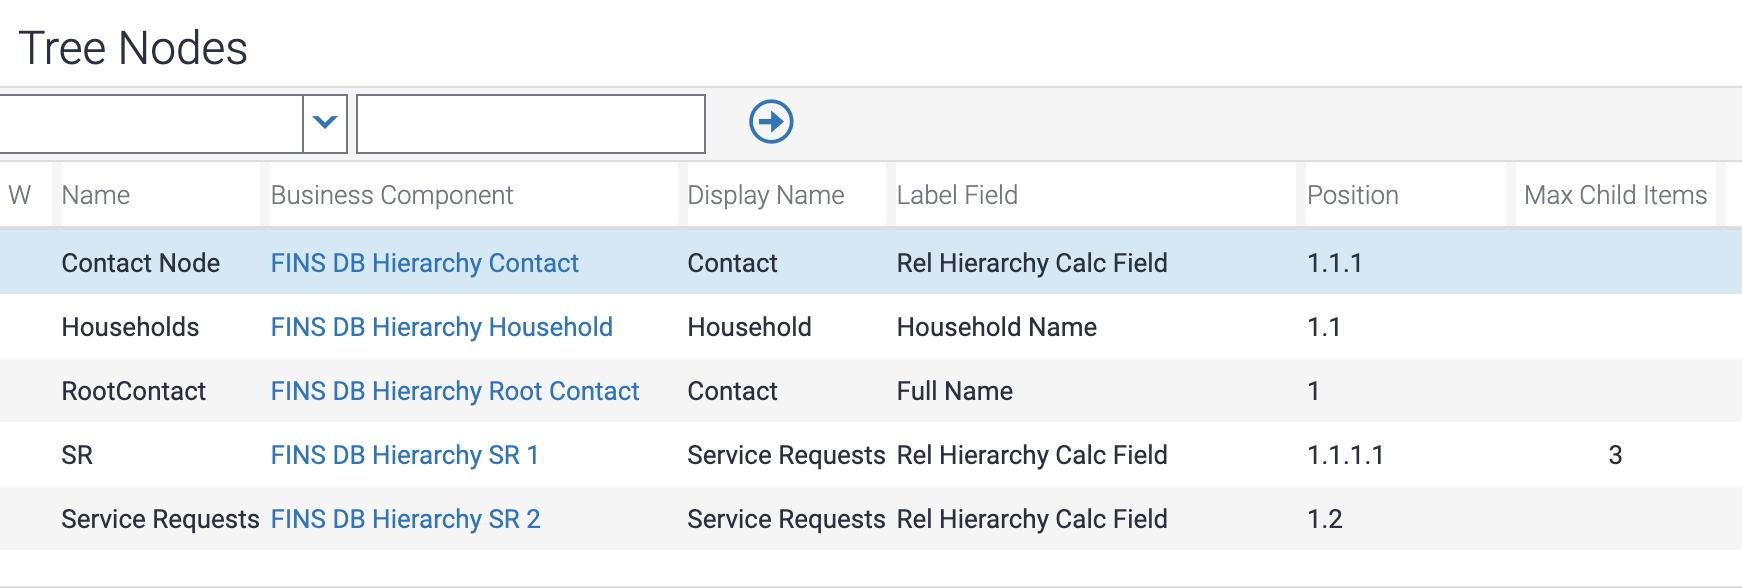
Then navigate to the Tree Node object and create a new record with the properties shown in the following table. This configuration differs in each entity at only positions 1.1.1.1 and 1.2.
| Name | Business Component | Display Name | Label Field | Max Child Items | Position |
|---|---|---|---|---|---|
|
<Position 1> |
<Position 1 BC> |
<Title of Position 1> |
<Position 1 BC Field> |
1 |
|
|
<Position 1.1> |
<Position 1.1 BC> |
<Title of Position 1.1> |
<Position 1.1 BC Field> |
1.1 |
|
|
<Position 1.1.1> |
<Position 1.1.1 BC> |
<Title of Position 1.1.1> |
<Position 1.1.1 BC Field> |
1.1.1 |
|
|
<Position 1.1.1.1> |
<Position 1 1.1.1.1 BC> |
<Title of Position 1.1.1.1> |
<Position 1.1.1.1 BC Field> |
3 |
1.1.1.1 |
|
<Position 1.2> |
<Position 1.2 BC> |
<Title of Position 1.2> |
<Position 1.2 BC Field> |
3 |
1.2 |
The following image shows an example of tree node configuration for a hierarchy applet.
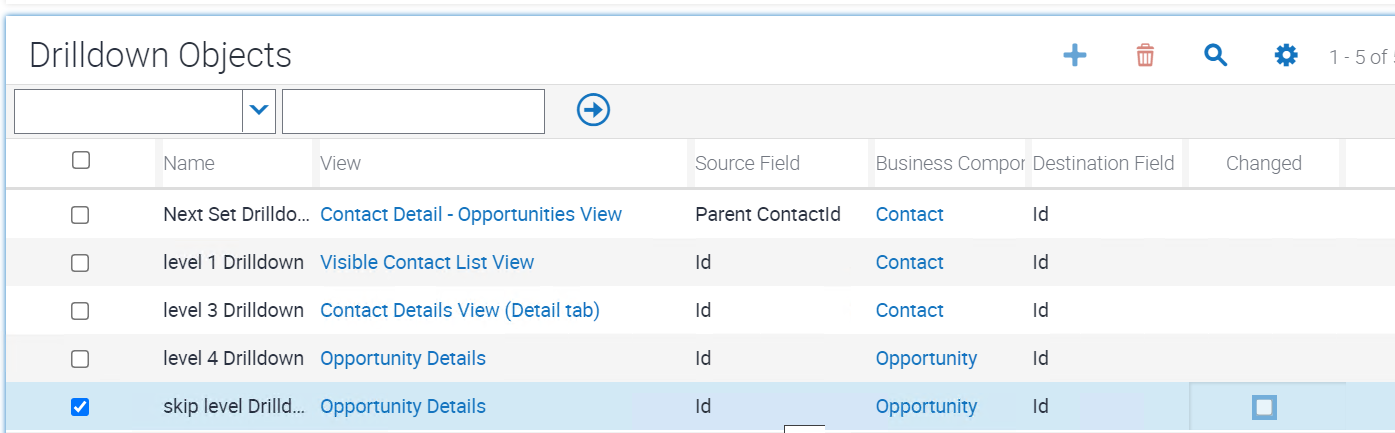
Configuring Drilldown Objects
To support drilldown functions for different levels in the hierarchy, you must configure drilldown objects. For this applet (FINS Contact Hierarchy Applet in this example), navigate to Drilldown Objects. Then create and configure five drilldown objects for different positions with the properties shown in the following table. Drilldown is supported at positions 1, 1.1.1, 1.1.1.1, and 1.2 and on More link. This configuration differs in each entity at only positions 1.1.1.1 and 1.2.
| Name | View | Source Field | Business Component | Destination Field |
|---|---|---|---|---|
|
<Drilldown Name> For example:
|
<Destination View> For example:
|
<Field from node level BC> For example:
|
<Destination BC> For example:
|
<Field from Destination BC> For example:
|
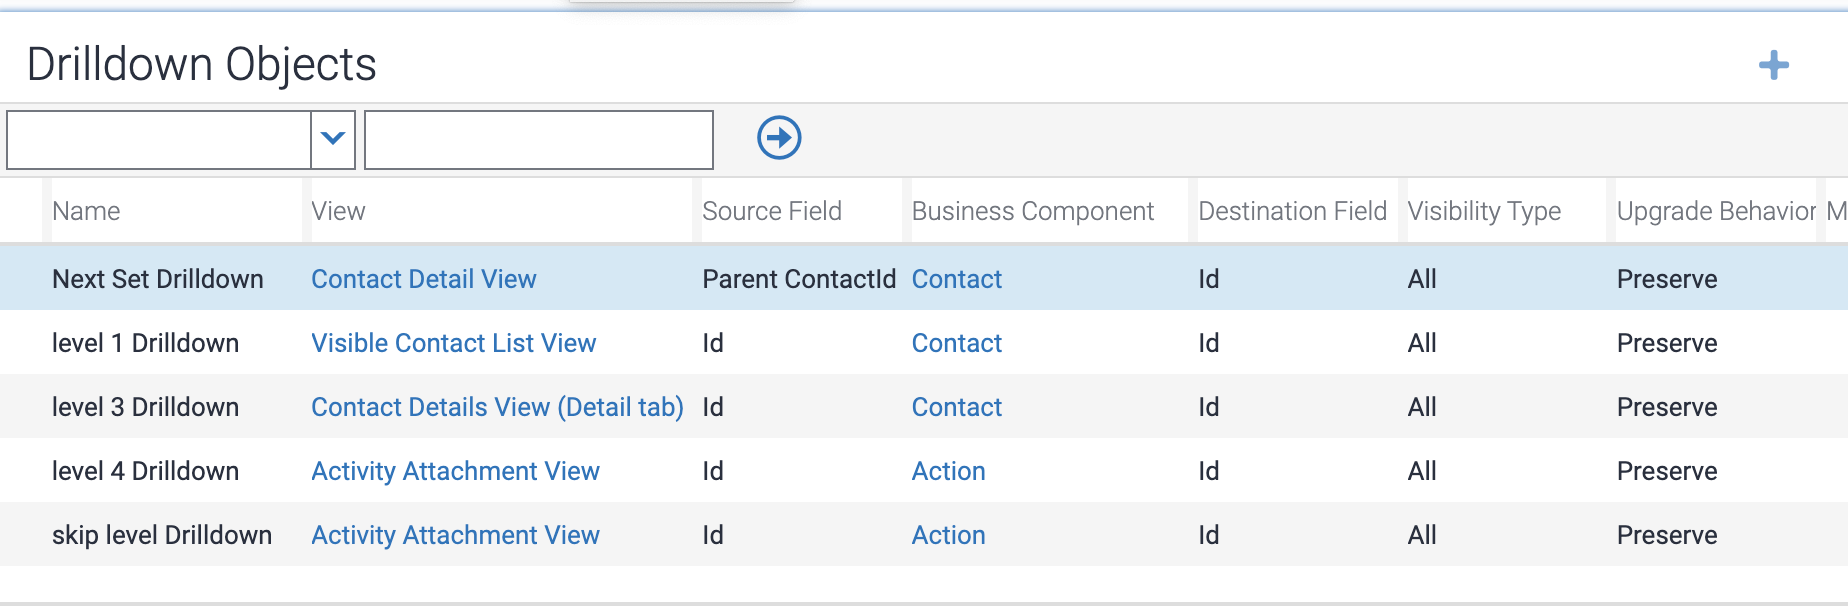
The following shows an example of the drilldown objects (as detailed in the previous table) for a hierarchy applet.
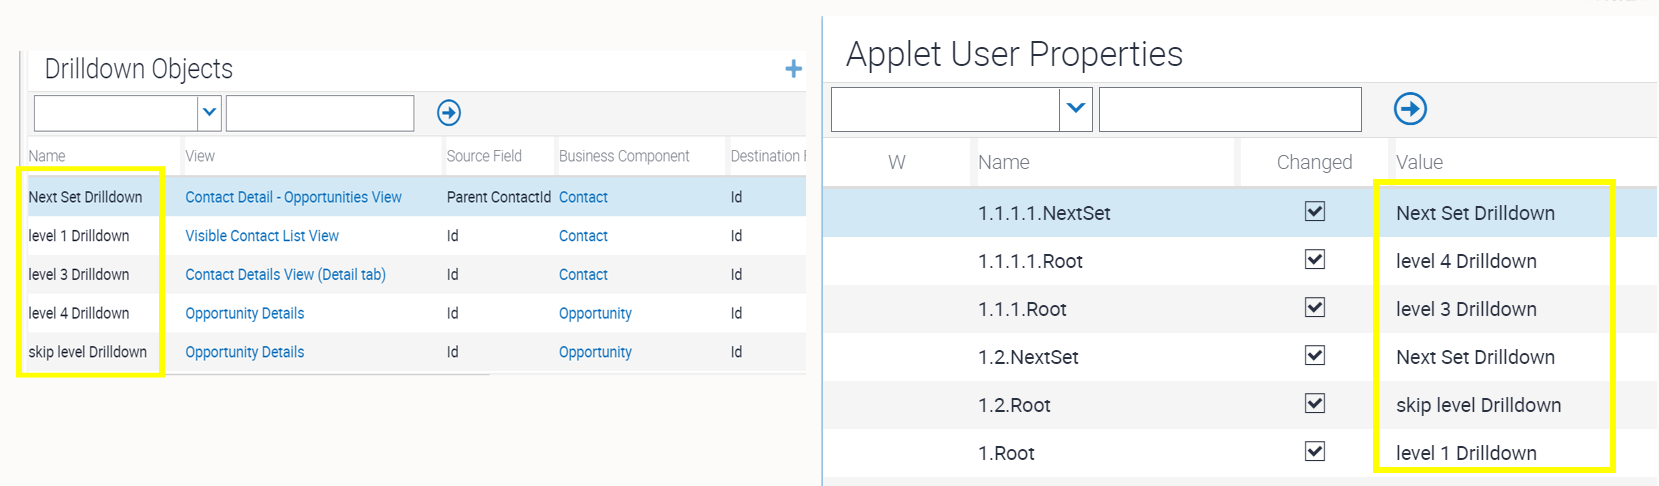
Configuring Applet User Properties Related to Drilldown and Images
In addition to creating the drilldown objects for the hierarchy applet, you must enable the drilldown for each applicable tree node position. To do this, first create an applet user property called Enable Tree DrillDown. Then create applet user properties for the tree node position and "Root" or "NextSet", as shown in the following table. Set the value to the name of the corresponding drilldown object, which you previously configured.
Then, for the new applet, navigate to Applet User Properties. Create new records with the following properties. For each property, set the value to the name of the corresponding drilldown object.
| Name | Value |
|---|---|
|
1.Root |
<Position 1 drilldown name> |
|
1.1.1.Root |
<Position 1.1.1 drilldown name> |
|
1.1.1.1.Root |
<Position 1.1.1.1 drilldown name> |
|
1.1.1.1.NextSet |
<Position 1.1.1.1 More link drilldown name> |
|
1.2.Root |
<Position 1.2 drilldown name> |
|
1.2.NextSet |
<Position 1.2 More link drilldown name> |
The following image shows an example of the drilldown objects (Next Set Drilldown, Level 1 Drilldown, Level 3 Drilldown, Level 4 Drilldown, Skip Level Drilldown) and applet user properties (as detailed in the previous table) to support drilldown for a hierarchy applet.
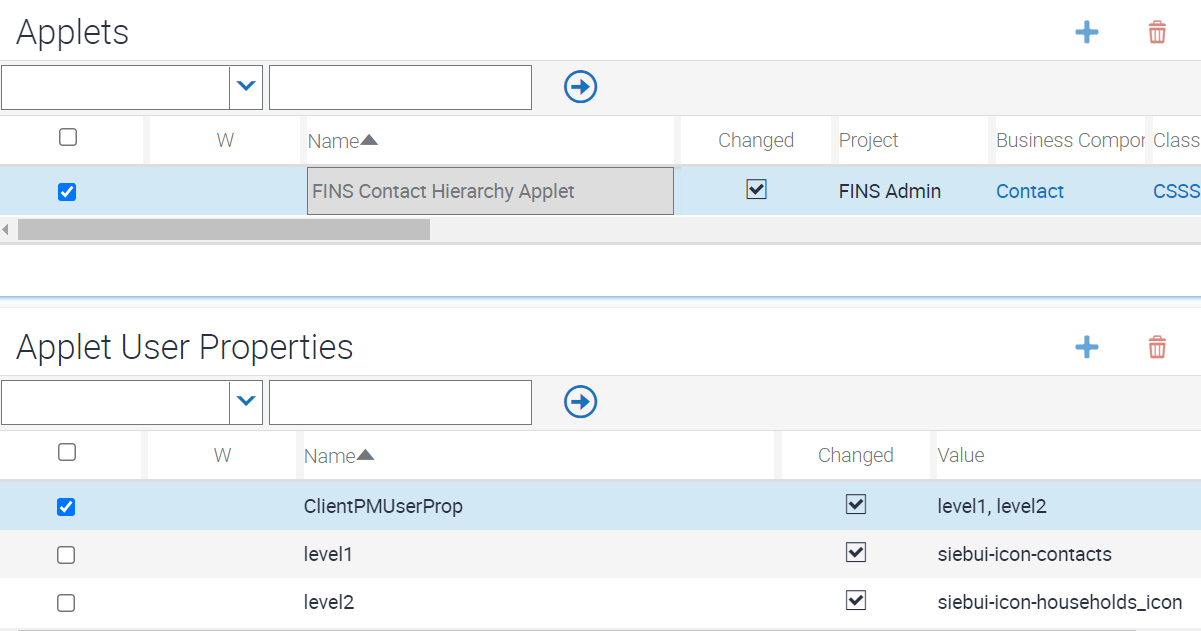
Next, configure applet user properties (as shown in the following table) to map images at positions 1, 1.1, and 1.1.1.
| Name | Value | Comments |
|---|---|---|
|
ClientPMUserProp |
level1, level2 |
This is a generic framework user property to send data to the client. This property is processed at the client side to get the level1 icon value to map in the user interface at positions 1 and 1.1.1 and to get the level2 icon value to map at position 1.1. The property name and value cannot be changed for hierarchy applets. |
|
level1 |
<Icon Class> |
This property is used by the hierarchy applet client code to fetch the icon value for positions 1 and 1.1.1. The property name cannot be changed. In this example, the property specifies the value siebui-icon-contacts. |
|
level2 |
<Icon Class> |
This property is used by the hierarchy applet client code to fetch the icon value for position 1.1. The property name cannot be changed. In this example, the property specifies the value siebui-icon-households_icon. |
The following image shows an example of the applet user properties (ClientPMUserProp, level1, level2) to support images for a hierarchy applet (FINS Contact Hierarchy Applet).
Configuring Multiple Hierarchy Applets
If you need to create a new hierarchy applet for a new entity to serve as a toggle applet for displaying level-4 data, then perform the following four steps:
-
Copy an existing hierarchy applet. Make a copy of an existing configured hierarchy applet and then modify the copy for the new entity. By doing this, you save configuration steps compared to creating a new hierarchy applet from the beginning.
-
Modify the tree node configuration for the copied hierarchy applet. For the newly copied hierarchy applet, change the tree node property values for position 1.1.1.1 and position 1.2, as detailed in the following table, to support the new entity.
Name Business Component Display Name Label Field Position <Entity Name for Position 1.1.1.1>
<New Entity BC for Position 1.1.1.1> <Entity Display Name for Position 1.1.1.1>
<Field from New Entity BC>
1.1.1.1
<Entity Name for Position 1.2>
<New Entity BC for Position 1.2> <Entity Display Name for Position 1.2>
<Field from New Entity BC>
1.2
The following image shows an example of the tree nodes to modify when creating an Activities hierarchy applet.

The following image shows an example of the tree nodes to modify when creating a Financial Accounts hierarchy applet.
The following image shows an example of the tree nodes to modify when creating a Service Request hierarchy applet.
-
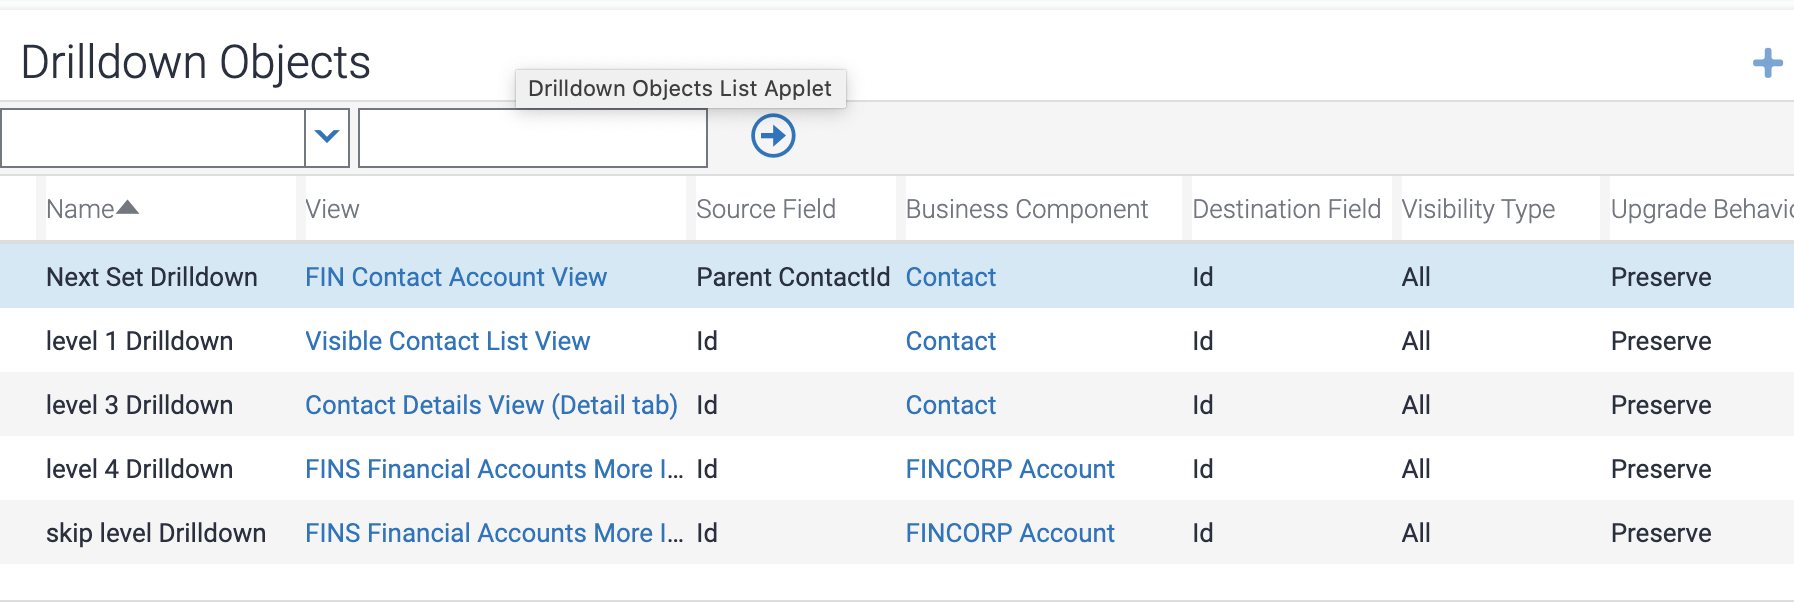
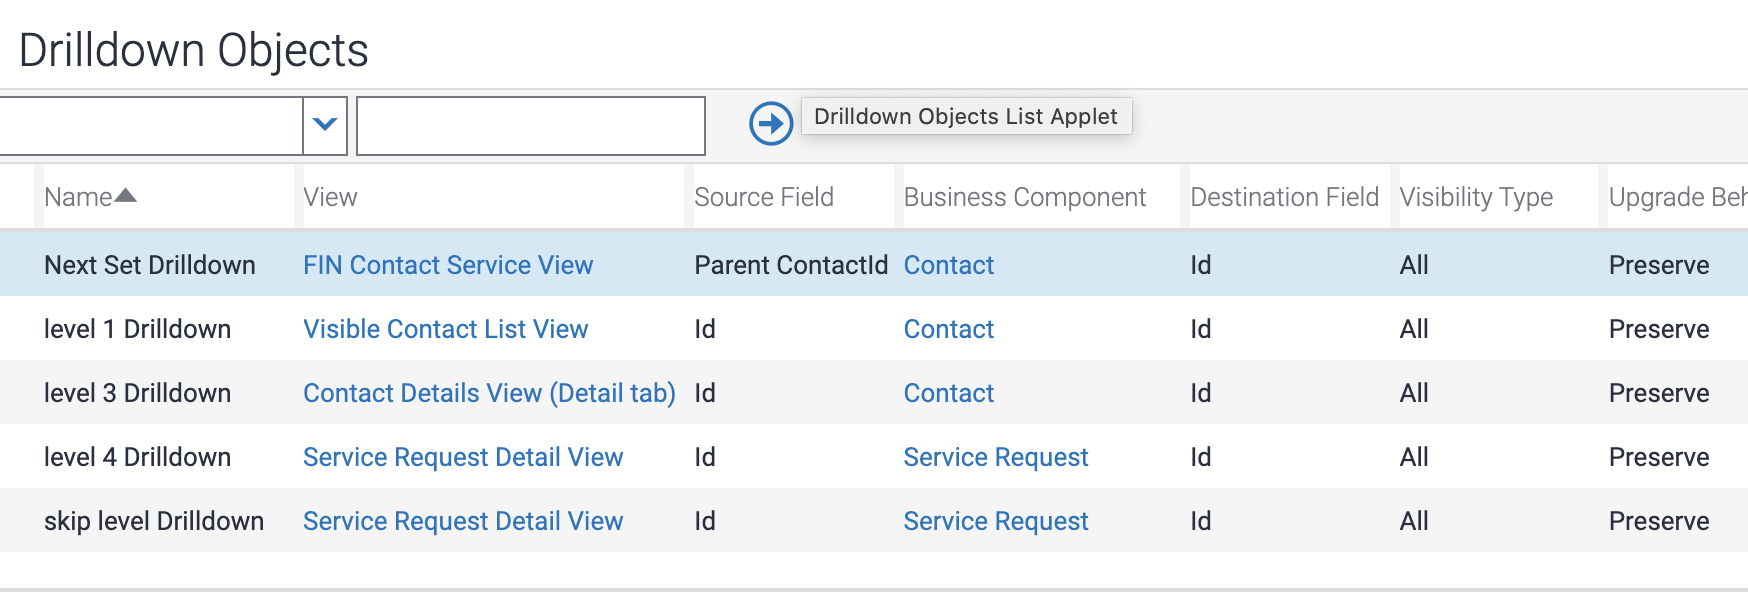
Modify the drilldown object configuration for the copied hierarchy applet. For the newly copied hierarchy applet, change the property values for the drilldown objects shown in the following table. Modify the following properties as required to support the new entity: View, Source Field, Business Component, and Destination Field.
Name View Source Field Business Component Destination Field Next Set Drilldown
<View Name>
<Source Field>
<Destination BC>
<Destination Field>
level 4 Drilldown
<View Name>
<Source Field>
<Destination BC>
<Destination Field>
skip Level Drilldown
<View Name>
<Source Field>
<Destination BC>
<Destination Field>
The following image shows an example of the drilldown objects to modify when creating an Activities hierarchy applet.
The following image shows an example of the drilldown objects to modify when creating a Financial Accounts hierarchy applet.
The following image shows an example of the drilldown objects to modify when creating a Service Requests Accounts hierarchy applet.
-
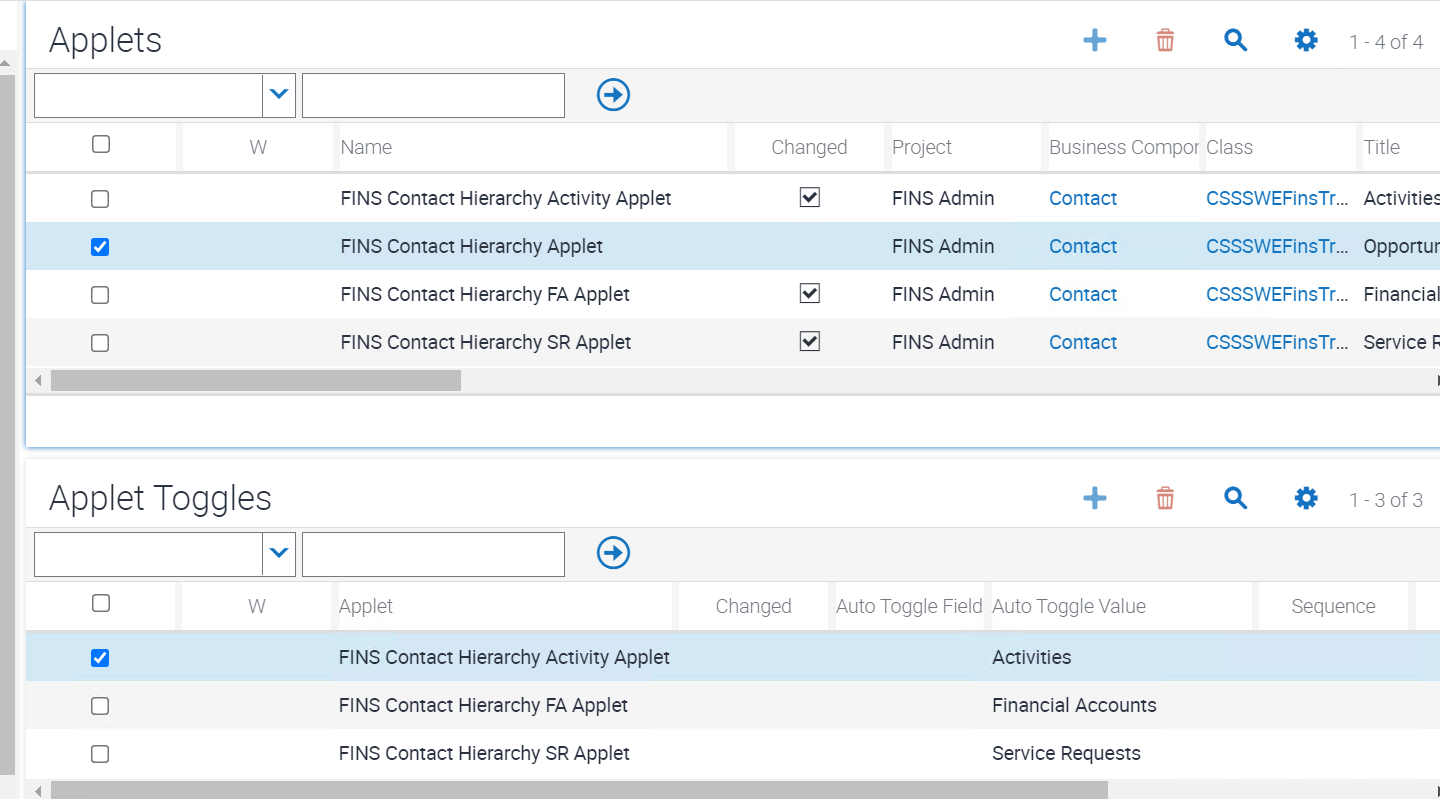
Map applet toggles. For the main hierarchy applet (FINS Contact Hierarchy Applet in this example), you must configure the applet toggles that provide additional choices for level-4 data to display in the hierarchy applet. As described earlier, the default configured level-4 entity for this example is Opportunities, but alternative data such as Activities, Financial Accounts, or Service Requests can also be displayed at position 1.1.1.1 or position 1.2 in the hierarchy applet. Business components and links already configured for this purpose are listed in the information about mapping business components. Displaying these entities requires creating applet toggle records for the main hierarchy applet.
For the main hierarchy applet (FINS Contact Hierarchy Applet in this example), navigate to Applet Toggles. Then create new records that specify each required applet toggle for each required entity. Also specify the Auto Toggle Value to indicate the entity name that is selectable in the applet toggle drop-down menu at the top of the hierarchy applet. The following table identifies some of this information to help you add applet toggles for FINS Contact Hierarchy Applet. Substitute entries for your use case as needed.
Entity Applet Auto Toggle Value Activities
FINS Contact Hierarchy Activity Applet
Activities
Financial Accounts
FINS Contact Hierarchy FA Applet
Financial Accounts
Service Requests
FINS Contact Hierarchy SR Applet
Service Requests
The following image shows an example of the applet toggle records required to support Activities, Financial Accounts or Service Requests (for FINS Contact Hierarchy Applet).
Mapping the Presentation Model and Physical Renderer
You must register the new hierarchy applet (such as FINS Contact Hierarchy Applet in this example) and all related toggle hierarchy applets with presentation model and physical renderer settings. In these tasks, the Files records you create specify the files siebel/relationshiphierpm.js (for presentation model) and siebel/relationshiphierpr.js (for physical renderer). These tasks are needed for automation support and for supporting a custom CSS style class. Note the following:
-
The client presentation model file relationshiphierpm.js retrieves data in a property set named "root" and is mapped to the client-side controls.
-
The client physical renderer file relationshiphierpr.js renders data in tile format.
Also map the presentation model relationshiphierviewpm.js to the view displaying the hierarchy applet. Doing this is necessary to maintain the context of the selected position 1.1 tab when the user toggles between different toggle applets.
To map the presentation model to the hierarchy applet
-
Navigate to Administration - Application screen and then to the Manifest Administration view.
You must register the new applet (such as FINS Contact Hierarchy Applet) with new presentation model settings.
-
In the UI Objects list, create a new record with properties shown in the following table.
Type Usage Type Name Applet
Presentation Model
<AppletName>
-
In the Object Expression list, create a new record with property shown in the following table.
Level 1
-
In the Files list, create a new record with properties shown in the following table.
Level Name 1
siebel/relationshiphierpm.js
To map the physical renderer to the hierarchy applet
-
Navigate to Administration - Application screen and then to the Manifest Administration view.
You must register the new applet (such as FINS Contact Hierarchy Applet) with new physical renderer settings.
-
In the UI Objects list, create a new record with properties shown in the following table.
Type Usage Type Name Applet
Physical Renderer
<AppletName>
-
In the Object Expression list, create a new record with property shown in the following table.
Level 1
-
In the Files list, create a new record with properties shown in the following table.
Level Name 1
siebel/relationshiphierpr.js
To map the presentation model to the view
-
Navigate to Administration - Application screen and then to the Manifest Administration view.
You must register the view displaying the hierarchy applet with new presentation model settings.
-
In the UI Objects list, create a new record with properties shown in the following table.
Type Usage Type Name View
Presentation Model
<ViewName>
-
In the Object Expression list, create a new record with property shown in the following table.
Level 1
-
In the Files list, create a new record with properties shown in the following table.
Level Name 1
siebel/relationshiphierviewpm.js
Mapping the Hierarchy Applet to a View Web Template
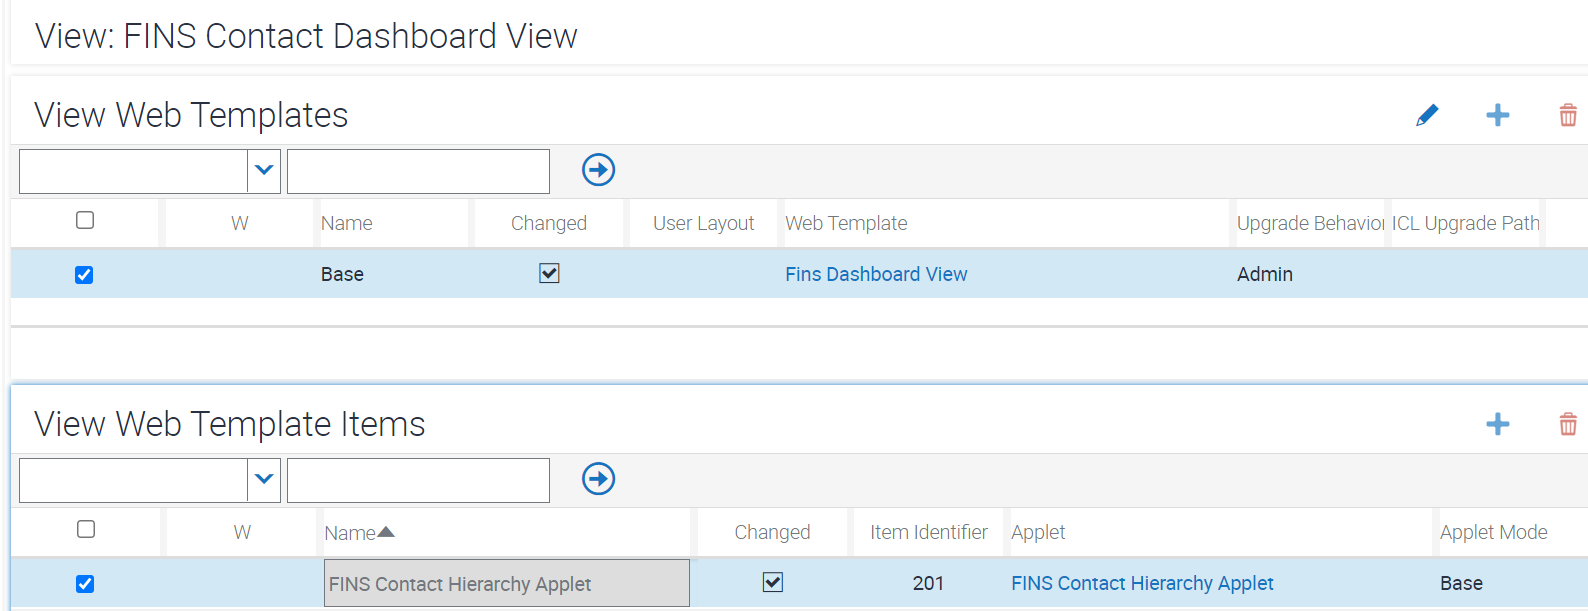
You must also map the main hierarchy applet (FINS Contact Hierarchy Applet in this example) to the view that is to display the hierarchy applet. Typically, this is the view representing a particular dashboard into which you are mapping multiple applets for different data visualization components.
The view web template for the view FINS Contact Dashboard View (for the Siebel Financial Services dashboard), for example, has a placeholder for the hierarchy applet. For example, review the following content (which is highlighted in the following image) for the view web template Fins Dashboard View:
<div class="siebui-timeline-container siebui-span-x1-8 siebui-span-1g-8 siebui-span-md-8 siebui-span-sm-12">
   <div od-type="applet" od-id="201" od-property="FormattedHtml" hintMapType="Applet" hintText="Applet" od-context="Parent"/>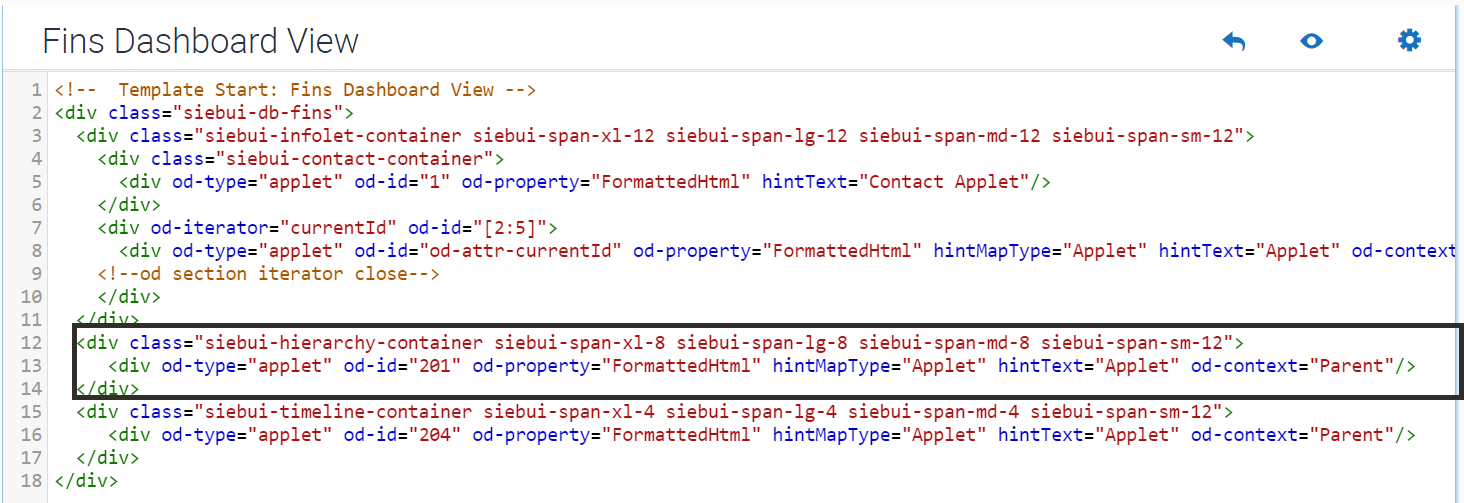
Only the main hierarchy applet (FINS Contact Hierarchy Applet in this example) must be mapped in the view. In any new view to display a hierarchy applet, this hierarchy applet must be mapped to the view. You must also add the necessary classes to the view web template to achieve the required height and width. You can customize or override the styling on the existing CSS classes of the hierarchy applet. The view web template item must specify the applet mode Base for a hierarchy applet that you map. For example, create a view web template item with the properties shown in the following table.
| Name | Applet | Applet Mode | Item Identifier |
|---|---|---|---|
|
<Applet Name> |
<Hierarchy Applet Name> |
Base |
<Item Identifier for Hierarchy> |
The following image shows a sample configuration of the view web template and view web template items, for this example (FINS Contact Dashboard View).