Configuring Timeline Components
This topic provides information about configuring timeline components. This topic is part of Configuring Data Visualization Components. This topic contains the following information:
-
About Configuring Timeline Components
-
About the Timeline VBC Virtual Business Component
-
Mapping Business Components
-
Configuring the Data Map
-
Configuring the Timeline Applet
-
Configuring the Applet User Property for Specifying the Data Map
-
Creating Controls
-
Configuring Drilldown Objects
-
Creating the List and List Columns
-
Mapping Applet Web Template and Web Template Items
-
Mapping the Physical Renderer to the Timeline Applet
-
Mapping the Timeline Applet to a View Web Template
About Configuring Timeline Components
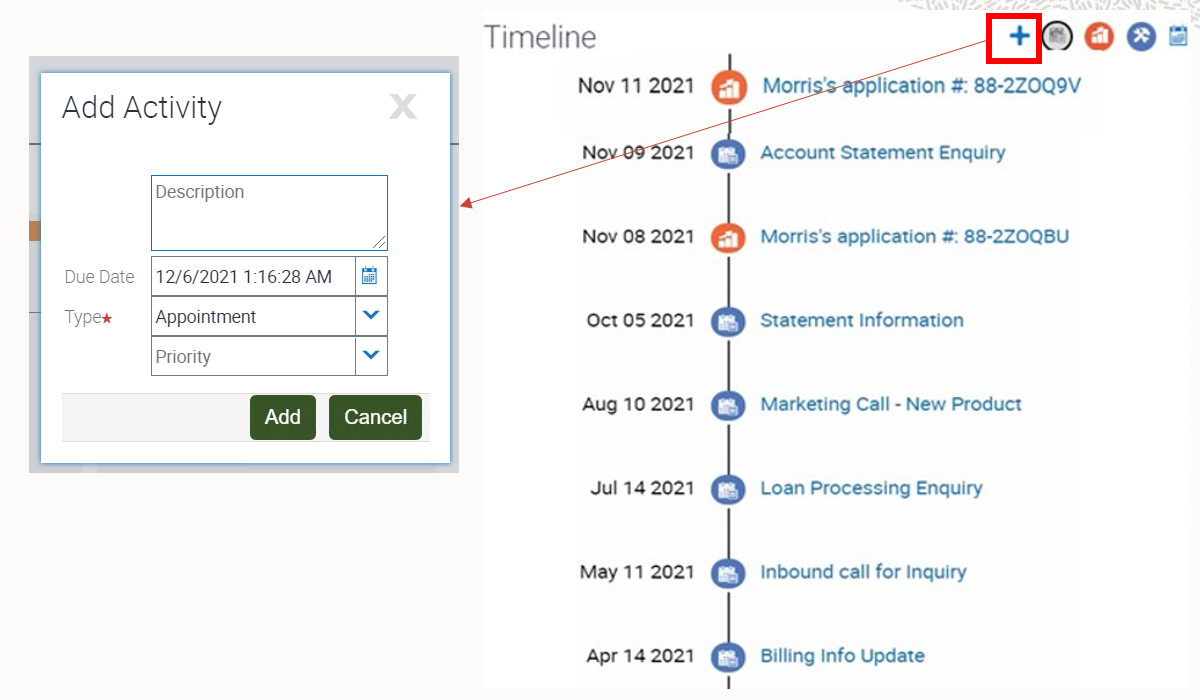
As noted in Timeline Components, a timeline applet can display various entities (like activities, opportunities, sales orders, and service requests) for a business object (such as Account or Contact). The entities are displayed in reverse chronological order, with the most recent record at the top. The example data used throughout is from the timeline applet FINS Contact Dashboard Timeline List Applet, which is part of the Siebel Financial Services dashboard. Each type of entity is displayed using a different icon. Icons are configurable. The following image shows an example of a timeline component.
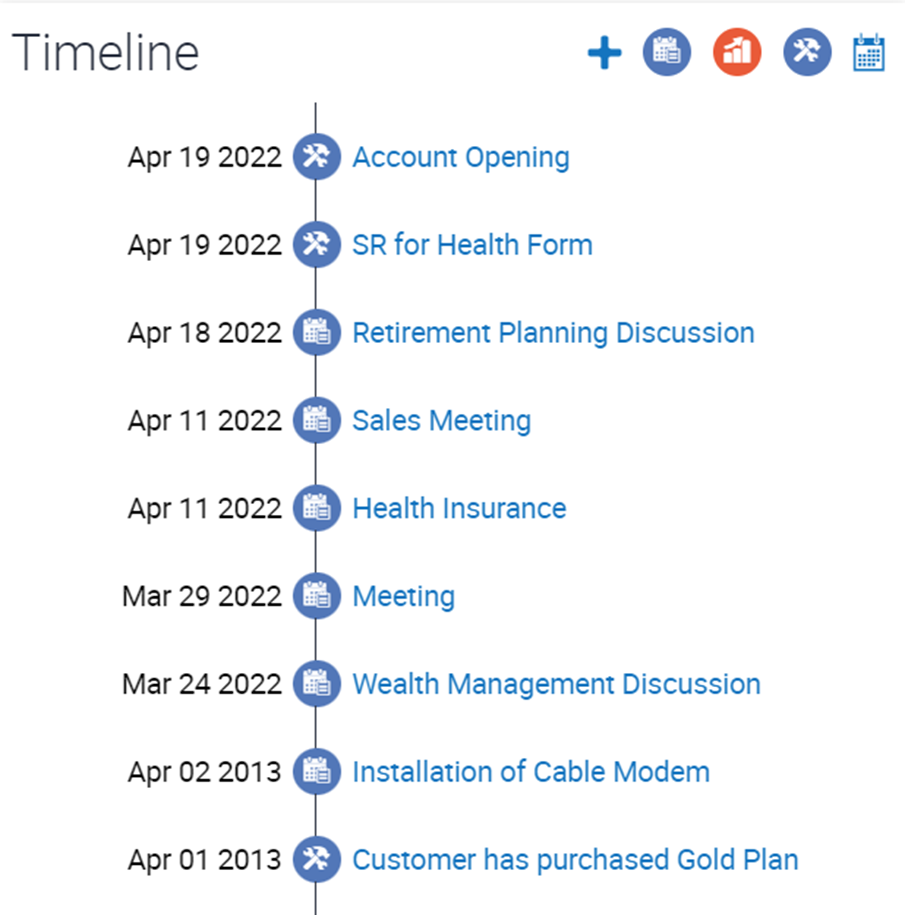
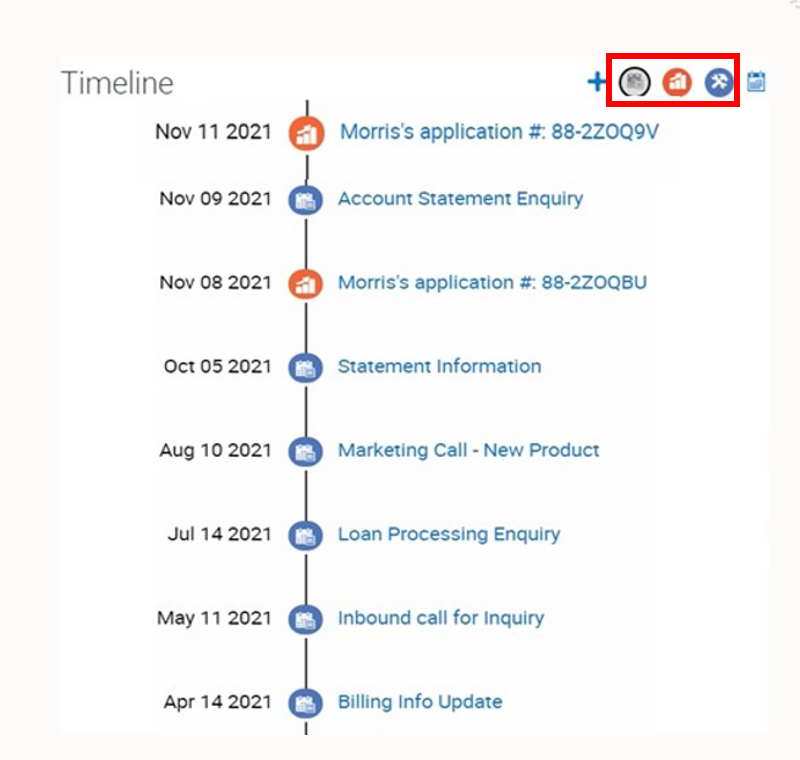
The following are some of the features of the timeline component:
-
Entity filtering. You can filter the data based on the type of entity. The entity filter buttons, highlighted in the following image, are toggle buttons. Clicking a button hides data for that entity from the timeline and the button dims. Clicking the dimmed button displays that entity data on the timeline again. In the following image, the available entity filters (activities, opportunities, service requests) are highlighted in the example timeline. (The timeline on the Siebel Telecommunications dashboard includes sales orders, as seen in Siebel Telecommunications Dashboard.)
-
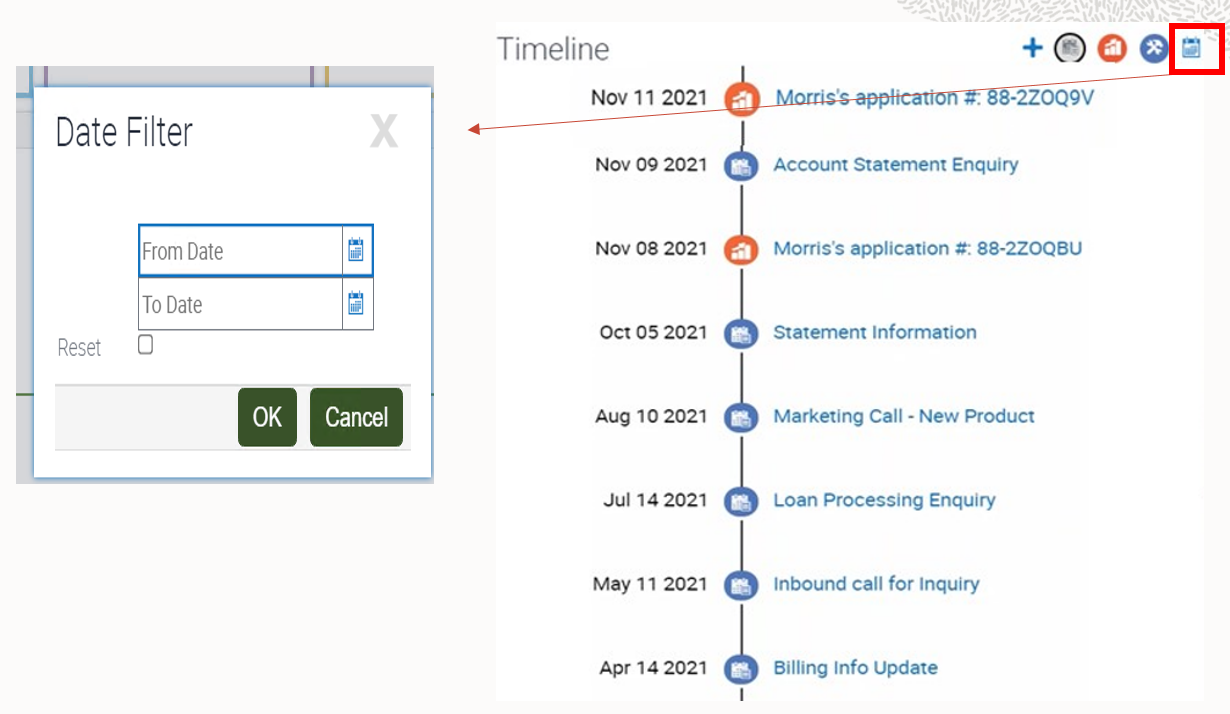
Date filtering. Click the Calendar button, highlighted in the following image, to filter the data based on a date range. Clicking the Calendar button opens the Date Filter pop-up dialog (also shown in the following image) where you can use the Reset option to reset the most recently used date filter.
-
Adding a new activity. Click Add Activity (the plus (+) icon), highlighted in the following image, to enter a new activity. Clicking the plus (+) icon in the timeline opens the Add Activity pop-up. Once an activity is added, it appears in the timeline.
-
Navigating to detail view. Click the description of a timeline item to drill down and navigate to the detail view. For example, clicking an opportunity item navigates to the Opportunity Details view, while clicking a sales order navigates to the Sales Order Details view.
About the Timeline VBC Virtual Business Component
Timeline VBC is a new C++ framework virtual business component created to support the timeline functionality. This VBC executes the data map to fetch information from multiple entity business components mapped to the VBC in the data map. Timeline VBC must be added to the business object with a link to the primary business component.
For sample data for the Siebel Financial Services dashboard, the VBC executes the data map FINS Contact Dashboard TimeLine DataMap and retrieves data from these entities: Activities, Opportunities, Sales Orders, and Service Requests. Data fields for these entities are mapped to the following fields in Timeline VBC:
| Timeline VBC Fields (Destination Fields in the Data Map) | Description |
|---|---|
|
Artifact Id |
Required for drilldown functionality. Maps to the row ID field of the source business component. |
|
Date |
The pivot field used for sorting functionality in timeline. The data type must be DATETIME. |
|
Description |
The description shown for a timeline item. By default, the drilldown is configured on this field. |
|
Type |
The data map retrieves data from multiple business components. The Type field is used to distinguish between these business components. You must associate each unique type with the appropriate business component in the data map. |
|
Type Image |
The CSS class name associated to each type to render the icon image while showing a list of records in the timeline applet. |
Mapping Business Components
Before you configure the timeline applet, you must map the business components and configure the data map. First, do the following:
-
Identify all source business components that need to be part of the timeline data. Make sure that business components for multiple entities are part of a single business object, such as Contact.
-
Make sure the business component search specification is constrained to get the appropriate data. For example, for the Siebel Financial Services dashboard, the Opportunities business component is constrained by the Contact Id field to get opportunities for a particular contact.
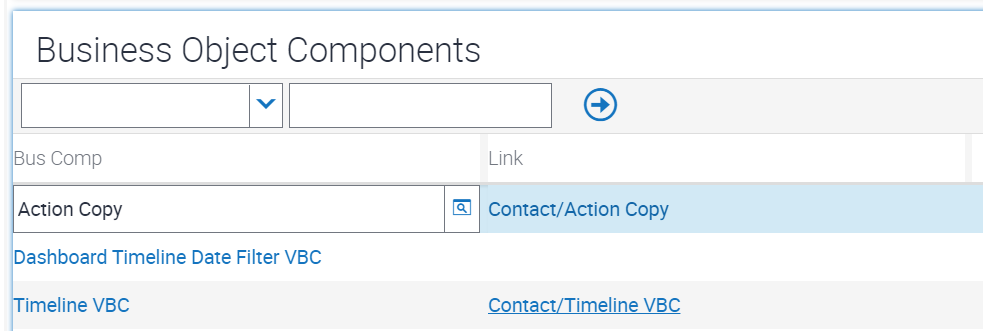
In Siebel Web Tools, select Business Object. For the business object you are using (such as Contact), map the following required framework business object components (business components). Also map all of the business components for which data is to display on the timeline.
| Business Component | Link | Comment |
|---|---|---|
|
Dashboard Timeline Date Filter VBC |
Supports date filtering in the timeline. |
|
|
Timeline VBC |
<Primary BC> / Timeline VBC |
Consolidates data from multiple entities using the data map. In this example, the primary business component is Contact. |
|
Action Copy |
<Primary Business Component>/Action Copy |
This BC is mapped to "Dashboard Timeline Activity PopUp Applet". |
The following image shows the Contact business object.

The following image shows the business object components (Dashboard Timeline Date Filter VBC and Timeline VBC) for the Contact business object.
Next, configure the data map for the timeline.
Configuring the Data Map
Configuring the data map specifies source and destination business component mapping and merges source records from multiple entities to a single destination VBC (Timeline VBC). When creating the data map, you also define field mapping of source and destination fields. For examples, refer to the sample data map, FINS Contact Dashboard TimeLine DataMap.
Data map. To create the data map, navigate to Administration - Application, then Data Map Administration. Create a new record that specifies the names of the source business object (containing the source business components) and the destination business object (containing Timeline VBC). The following table shows fields for creating a data map record.
| Name | Source Business Object | Destination Business Object |
|---|---|---|
|
<Data Map Name> |
<Source Business Object Name> |
<Destination Business Object Name> |
Data map components. Next, specify the data map components. Each data map component specifies a business component in the source business object and in the destination business object. The example timeline applet, FINS Contact SDashboard Timeline List Applet, displays timeline data from Activities, Opportunities, Sales Orders, and Service Requests.
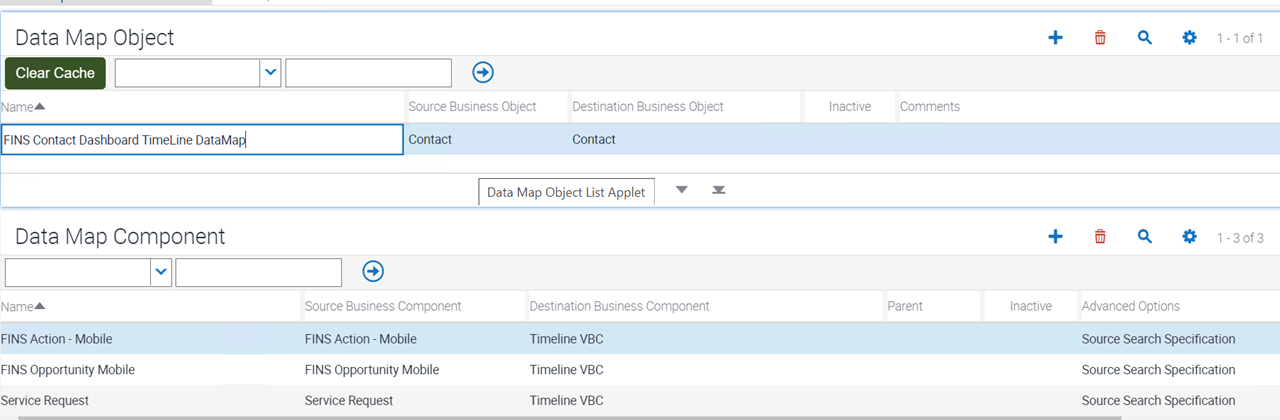
To support activities, opportunities, and service requests, FINS Contact Dashboard TimeLine DataMap includes the following source business components:
-
FINS Action - Mobile
-
FINS Opportunity Mobile
-
Service Request
The following image shows that these data map components are associated with the following data map object: Fins Contact Dashboard Timeline DataMap.
Data map components in FINS Contact Dashboard TimeLine DataMap also support advanced options, which are used for search specifications, as follows:
| Name | Source Business Component | Destination Business Component | Advanced Options |
|---|---|---|---|
|
FINS Action - Mobile |
FINS Action - Mobile |
Timeline VBC |
Source Search Specification Value: [Contact Id]=[&Id] |
|
FINS Opportunity Mobile |
FINS Opportunity Mobile |
Timeline VBC |
Source Search Specification Value: [Key Contact Id]=[&Id] |
|
Service Request |
Service Request |
Timeline VBC |
Source Search Specification Value: [Contact Id]=[&Id] |
Data map fields. Finally, in the Data Map Field list of the Data Map Administration view, you specify the field mapping from each source business component to the destination business component (Timeline VBC). Create one record for each destination field in Timeline VBC, as follows. Examples follow for data map components for Activities, Opportunities, and Service Requests. If you later determine you do not need a particular field to display in the timeline, then you can set it to be inactive.
| Source Type | Source | Destination Type | Destination |
|---|---|---|---|
|
Field |
Id |
Field |
Artifact Id |
|
Field |
<Date Type Field from Source Business Component> |
Field |
Date |
|
Expression |
<Expression to Expose Value of Source Field Name in UI> |
Field |
Description |
|
Expression |
"<Source Business Component Name>" |
Field |
Type |
|
Expression |
"<Entity Icon Class>" |
Field |
Type Image |
The following table lists examples of field mapping for the data map component FINS Action - Mobile (for Activities):
| Source Type | Source | Destination Type | Destination |
|---|---|---|---|
|
Field |
Id |
Field |
Artifact Id |
|
Field |
Planned Completion |
Field |
Date |
|
Expression |
IIF([Description] IS NOT NULL,[Description],[Id]) |
Field |
Description |
|
Expression |
"FINS Action - Mobile" |
Field |
Type |
|
Expression |
"siebui-icon-activities_icon" |
Field |
Type Image |
The following table lists examples of field mapping for the data map component FINS Opportunity Mobile (for Opportunities):
| Source Type | Source | Destination Type | Destination |
|---|---|---|---|
|
Field |
Id |
Field |
Artifact Id |
|
Field |
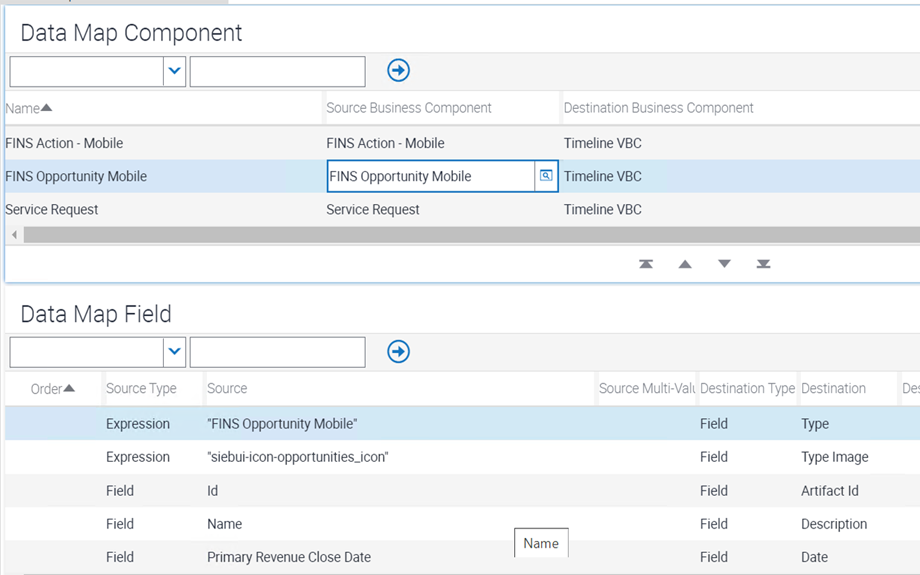
Primary Revenue Close Date |
Field |
Date |
|
Expression |
Name |
Field |
Description |
|
Expression |
"FINS Opportunity Mobile" |
Field |
Type |
|
Expression |
"siebui-icon-opportunities_icon" |
Field |
Type Image |
The following table lists examples of field mapping for the data map component Service Request (for Service Requests):
| Source Type | Source | Destination Type | Destination |
|---|---|---|---|
|
Field |
Id |
'Field' |
Artifact Id |
|
Field |
Updated |
'Field' |
Date |
|
Expression |
IIF([Abstract] IS NOT NULL,[Abstract],[SR Number]) |
'Field' |
Description |
|
Expression |
"Service Request" |
'Field' |
Type |
|
Expression |
"siebui-icon-service_requests_icon" |
'Field' |
Type Image |
The following image shows a sample configuration for specifying data map fields (it shows the data map fields associated with the following data map component: FINS Opportunity Mobile.
Configuring the Timeline Applet
This step shows you how to create and configure a new timeline applet. You must create a new workspace and create a new applet with the following properties. The example data in this topic is for the FINS Contact Dashboard Timeline List Applet.
| Property Name | Value | Comment |
|---|---|---|
|
Name |
<AppletName> |
The name of the applet. In this example, the applet name is FINS Contact Dashboard Timeline List Applet. |
|
Class |
CSSSWEFrameList |
The name of a C++ class used to manage the applet. This is the timeline applet framework class. The framework constructs the CSS class based on the business component mapped to the applet. |
|
Type |
Standard |
By default, the type is Standard. |
|
Business Component |
Timeline VBC |
The name of the virtual business component for timeline applets. The Timeline VBC business component must be defined in the business object specified for any view that uses this applet. |
|
Applet Title |
<AppletTitle> |
The applet title is autopopulated based on the value of the property Title - String Reference. |
Configuring the Applet User Property for Specifying the Data Map
For the timeline applet (FINS Contact Dashboard Timeline List Applet in this example), create a Data Map user property, as follows. By setting this user property, you associate the data map you created with the timeline applet. This data map is used by the timeline framework to fetch the corresponding timeline items.
| Property | Value | Comment |
|---|---|---|
|
Data Map |
<DataMapName> |
The name of the data map, such as FINS Contact Dashboard TimeLine DataMap, that you are associating to this timeline applet. |
Creating Controls
Filter type controls. For the timeline applet (FINS Contact Dashboard Timeline List Applet in this example), create a filter type control for each entity filter supported for the timeline, as follows:
| Property | Value | Comment |
|---|---|---|
|
Name |
<EntityFilterName> |
The name of the control, such as the following: Activities: ActionFilter Opportunities: OpptyFilter Service Requests: SRFilter |
|
HTML Type |
MiniButton |
The HTML type for the control you create. This must be MiniButton. |
|
Method Invoked |
Filter|<BC Name of the Entity> |
The method invoked when the entity filter is clicked. |
|
Caption - String Reference |
<Caption> |
The caption property is populated based on this mapping. |
Next, configure control user properties for each filter type control, as follows:
| Property | Value | Comment |
|---|---|---|
|
ClientPMUserProp |
Filter Image |
This value cannot be changed. |
|
Filter Image |
<Icon Name> |
The icon for the entity filter. The following icon names are used: Activities: siebui-icon-activities_icon. Opportunities: siebui-icon-opportunities_icon. Service Requests: siebui-icon-service_requests_icon. |
NewButton control. For the timeline applet (FINS Contact Dashboard Timeline List Applet in this example), create the NewButton control for the timeline, as follows. This button invokes the Activity Popup Applet.
| Property | Value | Comment |
|---|---|---|
|
Name |
NewButton |
The name of the control, such as NewButton. |
|
HTML Type |
MiniButtonNew |
The HTML type for the control you create. This must be MiniButtonNew. |
|
Method Invoked |
ShowPopup |
The method invoked when the new button is clicked. |
|
Caption - String Reference |
<Caption> |
The caption property is populated based on this mapping. The value might be SBL_NEW-1004235437-602. |
Next, configure control user properties for the NewButton control, as follows:
| Property | Value | Comment |
|---|---|---|
|
Mode |
New |
This value cannot be changed. |
|
Popup |
Dashboard Timeline Activity PopUp Applet |
The name of the pop-up applet to display. |
DateFilter control. For the timeline applet (FINS Contact Dashboard Timeline List Applet in this example), create the DateFilter control for the timeline, as follows. This button invokes the Dashboard Timeline Date Filter PopUp Applet.
| Property | Value | Comment |
|---|---|---|
|
Name |
DateFilterButton |
The name of the control, such as DateFilterButton. |
|
HTML Type |
MiniButtonNew |
The HTML type for the control you create. This must be MiniButtonNew. |
|
Method Invoked |
ShowPopup |
The method invoked when the new button is clicked. |
|
Caption - String Reference |
<Caption> |
The caption property is populated based on this mapping. The value might be SBL_NEW-1004235437-602. |
Next, configure control user properties for the DateFilter control, as follows:
| Property | Value | Comment |
|---|---|---|
|
Mode |
New |
This value cannot be changed. |
|
Popup |
Dashboard Timeline Date Filter PopUp Applet |
The name of the pop-up applet to display. |
Configuring Drilldown Objects
To support drilldown functions for the timeline, you must configure drilldown objects. For this applet (FINS Contact Dashboard Timeline List Applet in this example), navigate to Drilldown Objects. Then create and configure drilldown objects, as follows. Example values are shown for activities, opportunities, and service requests.
| Name | View | Source Field | Business Component | Destination Field |
|---|---|---|---|---|
|
<Drilldown Name> Example records follow. |
<Destination View> |
<Field from node level BC> |
<Destination BC> |
<Field from Destination BC> |
|
GotoActivities |
Activity Attachment View |
Artifact Id |
Action |
Activity Id |
|
GoToOppty |
Opportunity Details |
Artifact Id |
Opportunity |
Row Id |
|
GotoServiceRequests |
Service Request Detail View |
Artifact Id |
Service Request |
Id |
When multiple drilldown objects are configured for the applet, then, for each drilldown object after the first one, you must create a record under Dynamic Drilldown Destinations, as follows:
| Name | Field | Value | Destination Drilldown Object | Sequence | Upgrade Behavior |
|---|---|---|---|---|---|
|
<Dynamic Drilldown Destination Name> |
<Type> Specifies the Type field in the business component that the applet references. |
<View matched with the Type field> |
<Name of Drilldown Object in BC> |
<Search order for children of a drilldown object> Search from lowest to highest according to the integer value that this property contains. |
<Upgrade Behavior> Specifies the upgrade behavior. |
|
GoToOppty |
Type |
FINS Opportunity Mobile |
GoToOppty |
1 |
Preserve |
|
GotoServiceRequests |
Type |
Service Request |
GotoServiceRequests |
2 |
Preserve |
Creating the List and List Columns
For this applet (FINS Contact Dashboard Timeline List Applet), navigate to List. Create a new list record named List, with the following properties:
| Property | Value | Comment |
|---|---|---|
|
Name |
List |
Do not change this value. |
For this list, create and configure the following list columns:
| Name | Field | HTML Type | Display Name |
|---|---|---|---|
|
Artifact Id |
Artifact Id |
Text |
Id |
|
Date |
Date |
PlainText |
Date |
|
Description |
Description |
Text |
Description |
|
Type |
Type |
Text |
Type |
|
Type Image |
Type Image |
Text |
Type Image |
Mapping Applet Web Template and Web Template Items
For this applet (FINS Contact Dashboard Timeline List Applet in this example), create a new applet web template, as follows:
| Property | Value | Comment |
|---|---|---|
|
Name |
<Edit List> |
The name of the applet web template. |
|
Type |
Edit List |
The type of applet web template. In this case, the Type must be Edit List. |
|
Web Template |
Applet Vertical TimeLine |
The type of web template for this applet web template. It must be Applet Vertical TimeLine. |
Create an applet web template item for this applet web template, as follows:
| Name | Control | Item Identifier | Type |
|---|---|---|---|
|
<Entity Filter> |
<Control Name> |
<Item Identifier> Must be in range of 10 to 154, inclusive. |
<Control Type> |
|
<NewButton> |
NewButton |
155 |
Control |
|
<DateFilterButton> |
DateFilterButton |
156 |
Control |
|
Date |
Date |
501 |
List Item |
|
Type |
Type Image |
502 |
List Item |
|
Description |
Description |
503 |
List Item |
Mapping the Physical Renderer to the Timeline Applet
You must register the new timeline applet (such as FINS Contact Dashboard Timeline List Applet in this example) with physical renderer settings. In this task, the Files record you create specifies the file siebel/timelinerenderer.js (for physical renderer). This task is needed for automation support and for supporting a custom CSS style class.
-
Navigate to Administration - Application screen and then to the Manifest Administration view.
You must register the new applet (such as FINS Contact Dashboard Timeline List Applet) with new physical renderer settings.
-
In the UI Objects list, create a new record with the properties shown in the following table.
Type Usage Type Name Applet
Physical Renderer
<AppletName>
-
In the Object Expression list, create a new record with the property shown in the following table.
Level 1
-
In the Files list, create a new record with the properties shown in the following table.
Level Name 1
siebel/timelinerenderer.js
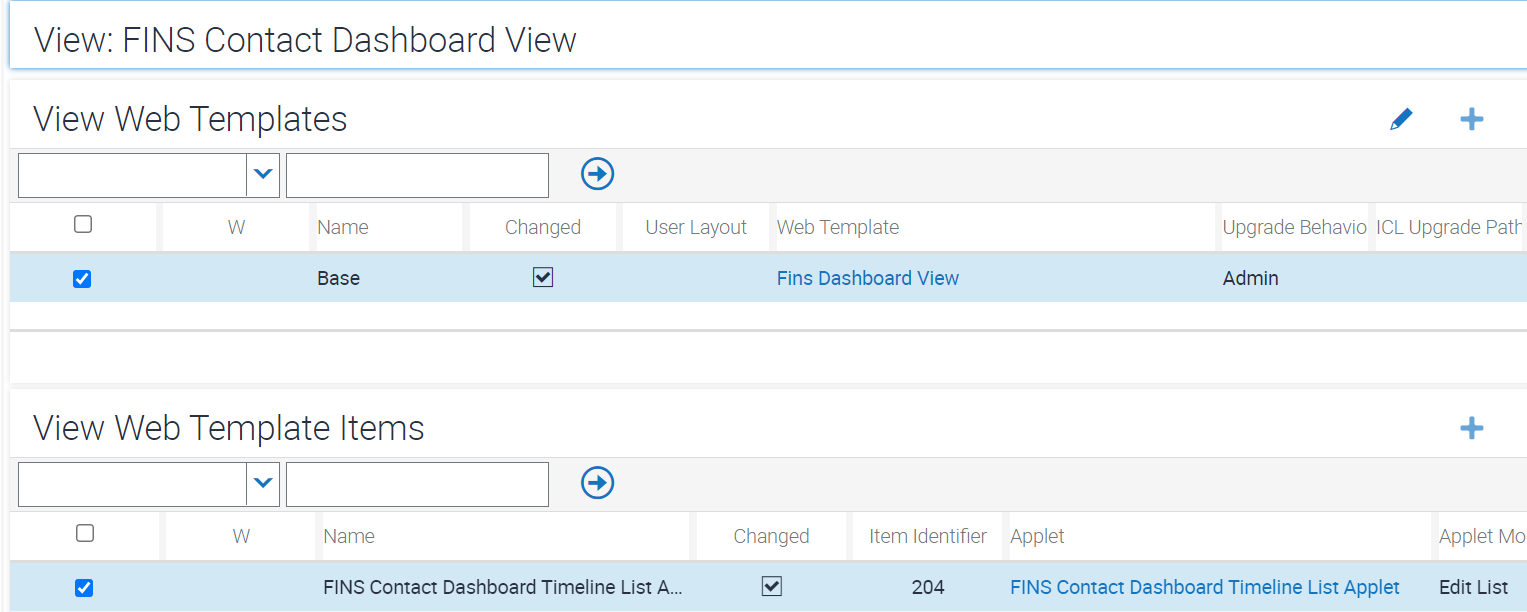
Mapping the Timeline Applet to a View Web Template
You must also map the timeline applet (FINS Contact Dashboard Timeline List Applet in this example) to the view that is to display the timeline applet. Typically, this is the view representing a particular dashboard into which you are mapping multiple applets for different data visualization components.
The view web template for the view FINS Contact Dashboard View (for the Siebel Financial Services dashboard), for example, has a placeholder for the timeline applet. For example, review the following content (which is highlighted in the following image) for the view web template Fins Dashboard View:
<div class="siebui-timeline-container siebui-span-x1-4 siebui-span-1g-4 siebui-span-md-4 siebui-span-sm-12">
   <div od-type="applet" od-id="204" od-property="FormattedHtml" hintMapType="Applet" hintText="Applet" od-context="Parent"/>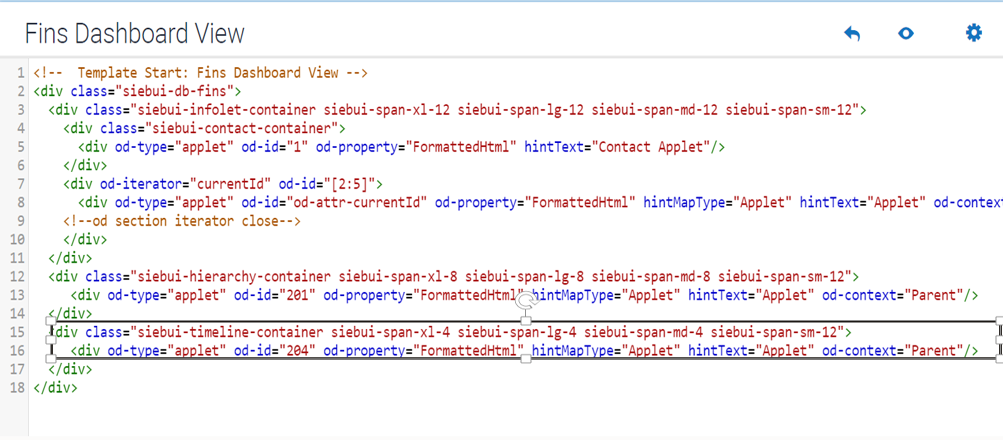
In any new view to display a timeline applet, this timeline applet must be mapped to the view. You must also add the necessary classes to the view web template to achieve the required height and width. You can customize or override the styling on the existing CSS classes of the timeline applet. The view web template item must specify the applet mode Edit List for a timeline applet that you map. For example, create a view web template item as follows:
| Name | Applet | Applet Mode | Item Identifier |
|---|---|---|---|
|
<Applet Name> |
<Timeline Applet Name> |
Edit List |
<Item Identifier for Timeline> |
The following image shows a sample configuration of the view web template and view web template items, for this example (FINS Contact Dashboard View).