Oracle JDeveloperでのSpringサービス・コンポーネントの作成方法
Oracle JDeveloperでSpringサービス・コンポーネントを作成するには:
-
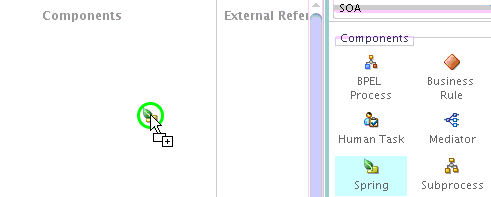
図56-1に示すように、「コンポーネント」ウィンドウで、「Spring」サービス・コンポーネントをSOAコンポジット・エディタにドラッグします。
「Springの作成」ダイアログが表示されます。
-
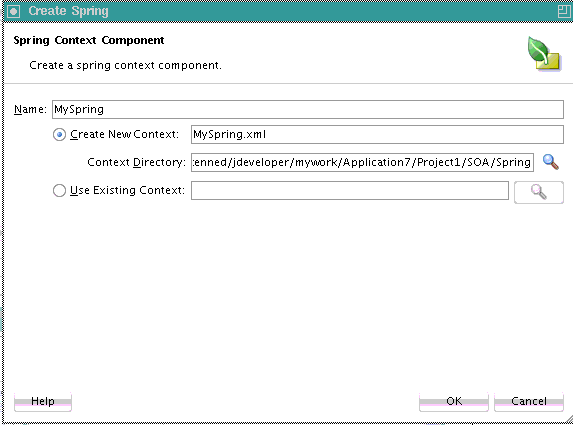
「名前」フィールドに、Springサービス・コンポーネントの名前を入力します。この名前は、コンポーネント名とSpringコンテキスト・ファイル名の両方になります。図56-2に詳細を示します。
既存のコンテキストの使用を選択し、「参照」をクリックして、既存のSpringファイルを選択することもできます。たとえば、Oracle JDeveloperで作成されたがOracle SOA Suiteの外部にあるSpringコンテキストをインポートできます。別のプロジェクトから参照して選択したSpringコンテキストは、SOAプロジェクトにコピーされます。
ノート:
WebLogic SCAのスタンドアロンのSpringバージョンも使用可能です。通常、このバージョンはOracle SOA Suiteの外部で使用されます。このバージョンにアクセスするには、Springエディタ内での作業中に、「コンポーネント」ウィンドウからSpring 2.5 JEEを選択します。
-
「OK」をクリックします。
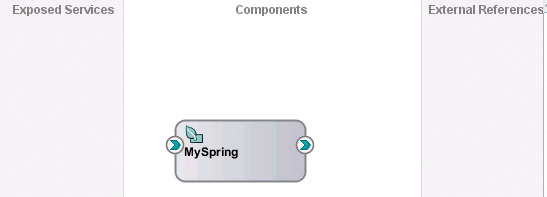
SOAコンポジット・エディタにSpringアイコンが表示されます。
-
コンテンツが自動的に表示されない場合は、このアイコンをダブルクリックすると、SpringエディタにSpringコンテキストの内容が表示されます。
-
「コンポーネント」ウィンドウで、ドロップダウン・リストから「WebLogic SCA」を選択します。
リストがリフレッシュされ、図56-3に示すように、選択内容が表示されます。
-
「サービス」アイコンをSpringエディタにドラッグします。
「サービスの挿入」ダイアログが表示されます。
-
表56-1に示すフィールドに入力して、ターゲットBeanおよびJavaインタフェースを定義します。
表56-1 サービスの挿入ダイアログ
フィールド 説明 名前
名前を入力します。
ターゲット
ターゲットBeanを入力します。このアクションにより、Beanをサービスとして公開できます。
ノート: このターゲットが存在していることを確認してください。このターゲットの存在をチェックする検証機能はサポートされていません。
タイプ
Javaインタフェースを入力します。
完了すると、サービスの挿入ダイアログは図56-4のようになります。
-
「OK」をクリックします。
ターゲットBeanは、Springコンテキストでサービス・インタフェースになります。
<?xml version="1.0" encoding="UTF-8" ?> <beans xmlns="http://www.springframework.org/schema/beans" xmlns:util="http://www.springframework.org/schema/util" xmlns:jee="http://www.springframework.org/schema/jee" xmlns:lang="http://www.springframework.org/schema/lang" xmlns:aop="http://www.springframework.org/schema/aop" xmlns:tx="http://www.springframework.org/schema/tx" xmlns:sca="http://xmlns.oracle.com/weblogic/weblogic-sca" xmlns:xsi="http://www.w3.org/2001/XMLSchema-instance" xsi:schemaLocation="http://www.springframework.org/schema/beans http://www.springframework.org/schema/beans/spring-beans.xsd http://www.springframework.org/schema/tool http://www.springframework.org/schema/tool/spring-tool.xsd http://www.springframework.org/schema/util http://www.springframework.org/schema/util/spring-util.xsd http://www.springframework.org/schema/aop http://www.springframework.org/schema/aop/spring-aop.xsd http://www.springframework.org/schema/cache http://www.springframework.org/schema/cache/spring-cache.xsd http://www.springframework.org/schema/context http://www.springframework.org/schema/context/spring-context.xsd http://www.springframework.org/schema/task http://www.springframework.org/schema/task/spring-task.xsd http://www.springframework.org/schema/jee http://www.springframework.org/schema/jee/spring-jee.xsd http://www.springframework.org/schema/lang http://www.springframework.org/schema/lang/spring-lang.xsd http://www.springframework.org/schema/tx http://www.springframework.org/schema/tx/spring-tx.xsd http://www.springframework.org/schema/jdbc http://www.springframework.org/schema/jdbc/spring-jdbc.xsd http://www.springframework.org/schema/jms http://www.springframework.org/schema/jms/spring-jms.xsd http://www.springframework.org/schema/oxm http://www.springframework.org/schema/oxm/spring-oxm.xsd http://www.springframework.org/schema/mvc http://www.springframework.org/schema/mvc/spring-mvc.xsd http://xmlns.oracle.com/weblogic/weblogic-sca META-INF/weblogic-sca.xsd"> <!--Spring Bean definitions go here--> <sca:service name="scaserv1" target="cp" type="oracle.mypackage.myinterface"/> </beans>Springエディタを閉じてSOAコンポジット・エディタに戻ると、図56-5に示すように、Springサービス・コンポーネントの左側にハンドルが追加されています。
-
Springエディタに戻ります。
-
図56-3に示すリストから、「参照」アイコンをSpringエディタにドラッグします。
「参照の挿入」ダイアログが表示されます。
-
表56-2に示すようにダイアログに入力して、「OK」をクリックします。
表56-2 「参照の挿入」ダイアログ
フィールド 説明 名前
名前を入力します。
タイプ
Javaインタフェースを入力します。
完了すると、Springエディタに、Springコンテキストのサービスおよび参照が表示されます。
<?xml version="1.0" encoding="UTF-8" ?> <beans xmlns="http://www.springframework.org/schema/beans" xmlns:util="http://www.springframework.org/schema/util" xmlns:jee="http://www.springframework.org/schema/jee" xmlns:lang="http://www.springframework.org/schema/lang" xmlns:aop="http://www.springframework.org/schema/aop" xmlns:tx="http://www.springframework.org/schema/tx" xmlns:sca="http://xmlns.oracle.com/weblogic/weblogic-sca" xmlns:xsi="http://www.w3.org/2001/XMLSchema-instance" xsi:schemaLocation="http://www.springframework.org/schema/beans http://www.springframework.org/schema/beans/spring-beans.xsd http://www.springframework.org/schema/tool http://www.springframework.org/schema/tool/spring-tool.xsd http://www.springframework.org/schema/util http://www.springframework.org/schema/util/spring-util.xsd http://www.springframework.org/schema/aop http://www.springframework.org/schema/aop/spring-aop.xsd http://www.springframework.org/schema/cache http://www.springframework.org/schema/cache/spring-cache.xsd http://www.springframework.org/schema/context http://www.springframework.org/schema/context/spring-context.xsd http://www.springframework.org/schema/task http://www.springframework.org/schema/task/spring-task.xsd http://www.springframework.org/schema/jee http://www.springframework.org/schema/jee/spring-jee.xsd http://www.springframework.org/schema/lang http://www.springframework.org/schema/lang/spring-lang.xsd http://www.springframework.org/schema/tx http://www.springframework.org/schema/tx/spring-tx.xsd http://www.springframework.org/schema/jdbc http://www.springframework.org/schema/jdbc/spring-jdbc.xsd http://www.springframework.org/schema/jms http://www.springframework.org/schema/jms/spring-jms.xsd http://www.springframework.org/schema/oxm http://www.springframework.org/schema/oxm/spring-oxm.xsd http://www.springframework.org/schema/mvc http://www.springframework.org/schema/mvc/spring-mvc.xsd http://xmlns.oracle.com/weblogic/weblogic-sca META-INF/weblogic-sca.xsd"> <!--Spring Bean definitions go here--> <sca:service name="scaserv1" target="cp" type="oracle.mypackage.myinterface"/> <sca:reference name="scaref1" type="external.bean.myInterface"/> </beans> -
図56-6に示すように、Springコンテキスト・ファイルを閉じます。
図56-7に示すように、Springサービス・コンポーネントの右側にハンドルが追加されています。
-
図56-8に示すように、左側のハンドルを「公開されたサービス」スイムレーンにドラッグして、サービス・バインディング・コンポーネントを作成します。
図56-9に示すように、サービスをWebサービスとして公開するか、またはEJBサービスとして公開するかを選択するように求めるプロンプトが表示されます。
-
EJB: EJBサービスをJavaインタフェースから公開します。このオプションを選択した場合、WSDLファイルを使用する必要はありません。
-
Webサービス: WebサービスをSOAP WSDLインタフェースから公開します。このオプションを選択すると、Springサービス・コンポーネントとの互換性を維持するために、JavaインタフェースからWSDLが生成されます。
-
-
このサービスをEJBサービスとして公開するか、またはWebサービスとして公開するかを選択します。「公開されたサービス」スイムレーンにサービスが自動的に作成され、Springサービス・コンポーネントに接続されます(この例では「EJB」が選択されています)。図56-10に詳細を示します。
図56-10 Springサービス・コンポーネントに接続されたEJBサービス・バインディング・コンポーネント

「図56-10 Springサービス・コンポーネントに接続されたEJBサービス・バインディング・コンポーネント」の説明 -
EJBサービスをダブルクリックすると、図56-11に示すように、自動的に設定された構成が表示されます。この構成詳細は、ステップ7で「サービスの挿入」ダイアログに入力した値から作成されています。
-
自動的に生成されたデフォルトのJNDI名を、環境に適用可能な名前に置き換えます。
-
ダイアログを閉じます。
-
Springサービス・コンポーネントの右側のハンドルを「外部参照」スイムレーンにドラッグして、参照バインディング・コンポーネントを作成します。
ステップ13で説明した内容と同じSpringタイプ・オプションのメッセージが表示されます。
-
この参照を公開するオプションを選択します。「外部参照」スイムレーンに参照が自動的に作成され、Springサービス・コンポーネントに接続されます(この例では「EJB」が選択されています)。図56-12に詳細を示します。
図56-12 Springサービス・コンポーネントに接続されたEJB参照バインディング・コンポーネント
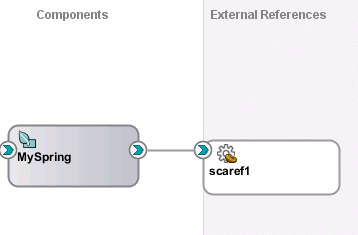
「図56-12 Springサービス・コンポーネントに接続されたEJB参照バインディング・コンポーネント」の説明 -
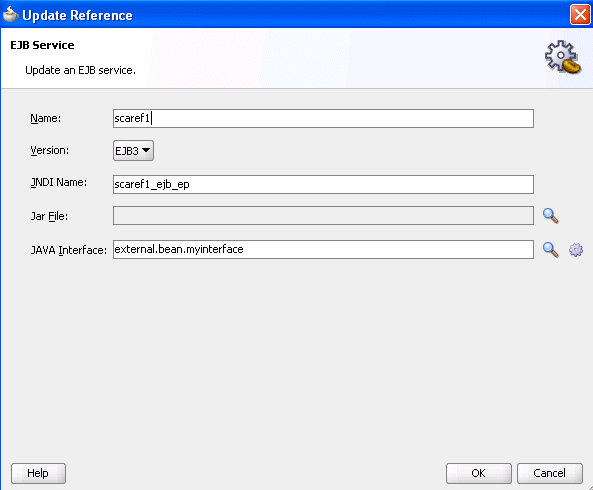
EJB参照をダブルクリックすると、図56-13に示すように、自動的に設定された構成が表示されます。この構成詳細は、ステップ11で「参照の挿入」ダイアログに入力した値から作成されています。
-
ダイアログを閉じて、図56-14に示すようにSOAコンポジット・エディタに戻ります。
図56-14 Javaインタフェース・ベースのEJBサービスおよびEJB参照バインディング・コンポーネント

「図56-14 Javaインタフェース・ベースのEJBサービスおよびEJB参照バインディング・コンポーネント」の説明 -
サービスの右ハンドル(図56-15を参照)とSpringサービス・コンポーネントの左ハンドルの両方にカーソルを合せます(図56-16を参照)。Javaインタフェースが表示されます。
-
Springサービス・コンポーネントの右ハンドル、および参照バインディング・コンポーネントの左ハンドルでも同様にカーソルを置いて、Javaインタフェースを表示します。
-
composite.xmlファイルの「ソース」ビューを選択して、同様の詳細を表示します。<?xml version="1.0" encoding="UTF-8" ?> <!-- Generated by Oracle SOA Modeler version 12.1.3.0.0 at [5/16/14 3:05 AM]. --> <composite name="Project1" . . . . . . <service name="scaserv1"> <interface.java interface="oracle.mypackage.myinterface"/> <binding.ejb uri="scaserv1_ejb_ep" ejb-version="EJB3"/> </service> <property name="productVersion" type="xs:string" many="false">12.1.3.0.0</property> <property name="compositeID" type="xs:string" many="false">4c07dbf0-5c01-450e-bde6-8c3866f45edc</property> <component name="MySpring"> <implementation.spring src="Spring/MySpring.xml"/> <componentType> <service name="scaserv1"> <interface.java interface="oracle.mypackage.myinterface"/> </service> <reference name="scaref1"> <interface.java interface="external.bean.myInterface"/> </reference> </componentType> </component> <reference name="scaref1"> <interface.java interface="external.bean.myInterface"/> <binding.ejb uri="scaref1_ejb_ep" ejb-version="EJB3"/> </reference> <wire> <source.uri>scaserv1</source.uri> <target.uri>MySpring/scaserv1</target.uri> </wire> <wire> <source.uri>MySpring/scaref1</source.uri> <target.uri>scaref1</target.uri> </wire> </composite> -
Springサービス・コンポーネントの右ハンドルを、Javaインタフェース・ベースのEJB参照ではなく、XMLベースのコンポーネント(Oracle Mediatorなど)に接続すると、Oracle Mediatorの既存のWSDLインタフェースからJavaインタフェースが生成されます。次のステップで詳細を説明します。
-
図56-17に示すように、Springサービス・コンポーネントの右ハンドルをOracle Mediatorにドラッグします。
-
Oracle MediatorのWSDLファイルから互換性のあるインタフェースが作成されたことを確認するプロンプトが表示された場合は、「OK」をクリックします。
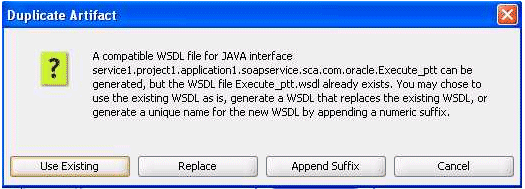
JavaインタフェースとWSDLベース・コンポーネント間の接続をドラッグすると、(Javaインタフェース名に基づく)デフォルト名のWSDLファイルがすでに存在する場合、4つのオプションがプロンプトされます。接続の作成を取り消すには、「取消」をクリックします。図56-19に詳細を示します。
-
Springサービス・コンポーネントの右ハンドル(図56-20を参照)とOracle Mediatorの左ハンドルの両方にカーソルを合せ(図56-21を参照)、互換性のあるインタフェースを表示します。
-
Springサービス・コンポーネントをダブルクリックすると、SpringエディタにSpringコンテキスト・ファイルの内容が表示されます。
<?xml version="1.0" encoding="windows-1252" ?>
<beans xmlns="http://www.springframework.org/schema/beans"
       xmlns:util="http://www.springframework.org/schema/util"
       xmlns:jee="http://www.springframework.org/schema/jee"
       xmlns:lang="http://www.springframework.org/schema/lang"
       xmlns:aop="http://www.springframework.org/schema/aop"
       xmlns:tx="http://www.springframework.org/schema/tx"
       xmlns:sca="http://xmlns.oracle.com/weblogic/weblogic-sca"
       xmlns:xsi="http://www.w3.org/2001/XMLSchema-instance"
       xsi:schemaLocation="http://www.springframework.org/schema/beans
        http://www.springframework.org/schema/beans/spring-beans-2.5.xsd
        http://www.springframework.org/schema/util
        http://www.springframework.org/schema/util/spring-util-2.5.xsd
        http://www.springframework.org/schema/aop
        http://www.springframework.org/schema/aop/spring-aop-2.5.xsd
        http://www.springframework.org/schema/jee
        http://www.springframework.org/schema/jee/spring-jee-2.5.xsd
        http://www.springframework.org/schema/lang
        http://www.springframework.org/schema/lang/spring-lang-2.5.xsd
        http://www.springframework.org/schema/tx
        http://www.springframework.org/schema/tx/spring-tx-2.5.xsd
        http://www.springframework.org/schema/tool
        http://www.springframework.org/schema/tool/spring-tool-2.5.xsd
        http://xmlns.oracle.com/weblogic/weblogic-sca META-INF/weblogic-sca.xsd">
  <!--Spring Bean defintions go here-->
  <sca:service name="scaserv1" target="ep" type="oracle.mypackage.myinterface"/>
  <sca:reference type="mediator1.project1.application4.com.oracle.xmlns.Execute_
ptt" name="Mediator1.Mediator1"/>
</beans>
-
ノート:
-
Javaインタフェースを使用するコンポーネントとWSDLファイルを使用するコンポーネントとをSOAコンポジット・エディタで統合する際に、特定のインタフェース・クラスがクラスパスになく(
SCA-INF/libディレクトリにあるJARファイルを含む)、ソース・ファイルがSOAプロジェクトに存在する場合は、ソースを自動的にコンパイルするように要求されます。 -
Javaインタフェースを使用するサービスとのBPELプロセスのパートナ・リンクを作成することもできます。パートナ・リンクの作成時に、「サービス・エクスプローラ」ダイアログでこのサービスのタイプを選択します。詳細は、「パートナ・リンクの概要」を参照してください。
