Working with the Repository
Use the Repository to:
View downloaded artifacts
Subscribe to channels
Download history
Download logs
Filter and delete downloads
Manage custom scripts
Use the My Downloads page (ECL_REPO_AMYDLS_FL) to view the artifacts downloaded. New entries are added as soon as new artifacts are downloaded.
Navigation:
Click the Repository tile on the delivered Cloud Manager Fluid home page. My Downloads page is displayed by default.
This example illustrates the fields and controls on the My Downloads page. You can find definitions for the fields and controls later on this page.
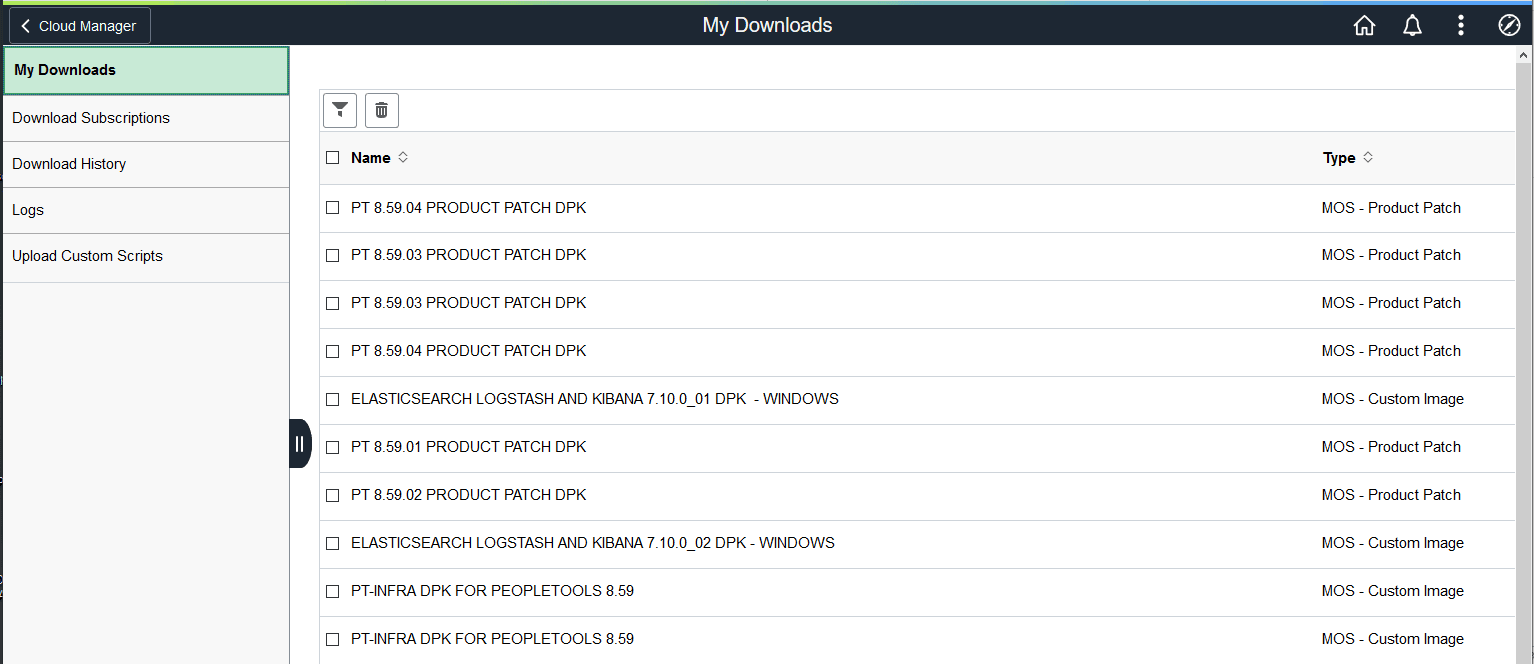
Note: Clicking an item in the My Downloads page displays additional details of the downloaded artifact.
|
Field or Control |
Description |
|---|---|
|
|
Use the Filter icon to refine the search results based on search criteria. |
|
|
Use the Delete icon to delete downloaded PIs and PRPs. Select the check box corresponding to the row you want to delete, and then click Delete button. |
|
Name |
Name of the downloaded artifact. |
|
Type |
Indicates the artifact type such as PeopleSoft Update Image, PRP, Custom Image, and so on. |
|
Product |
Indicates the PeopleSoft application product pillar. |
|
Release |
Indicates the PeopleSoft application release. |
|
Version |
Indicates the application PeopleSoft Update Image version. |
|
Platform |
Indicates the Operating System platform, such as Linux, or Windows. |
|
Size |
Total size of the PeopleSoft Update Image or PRP. |


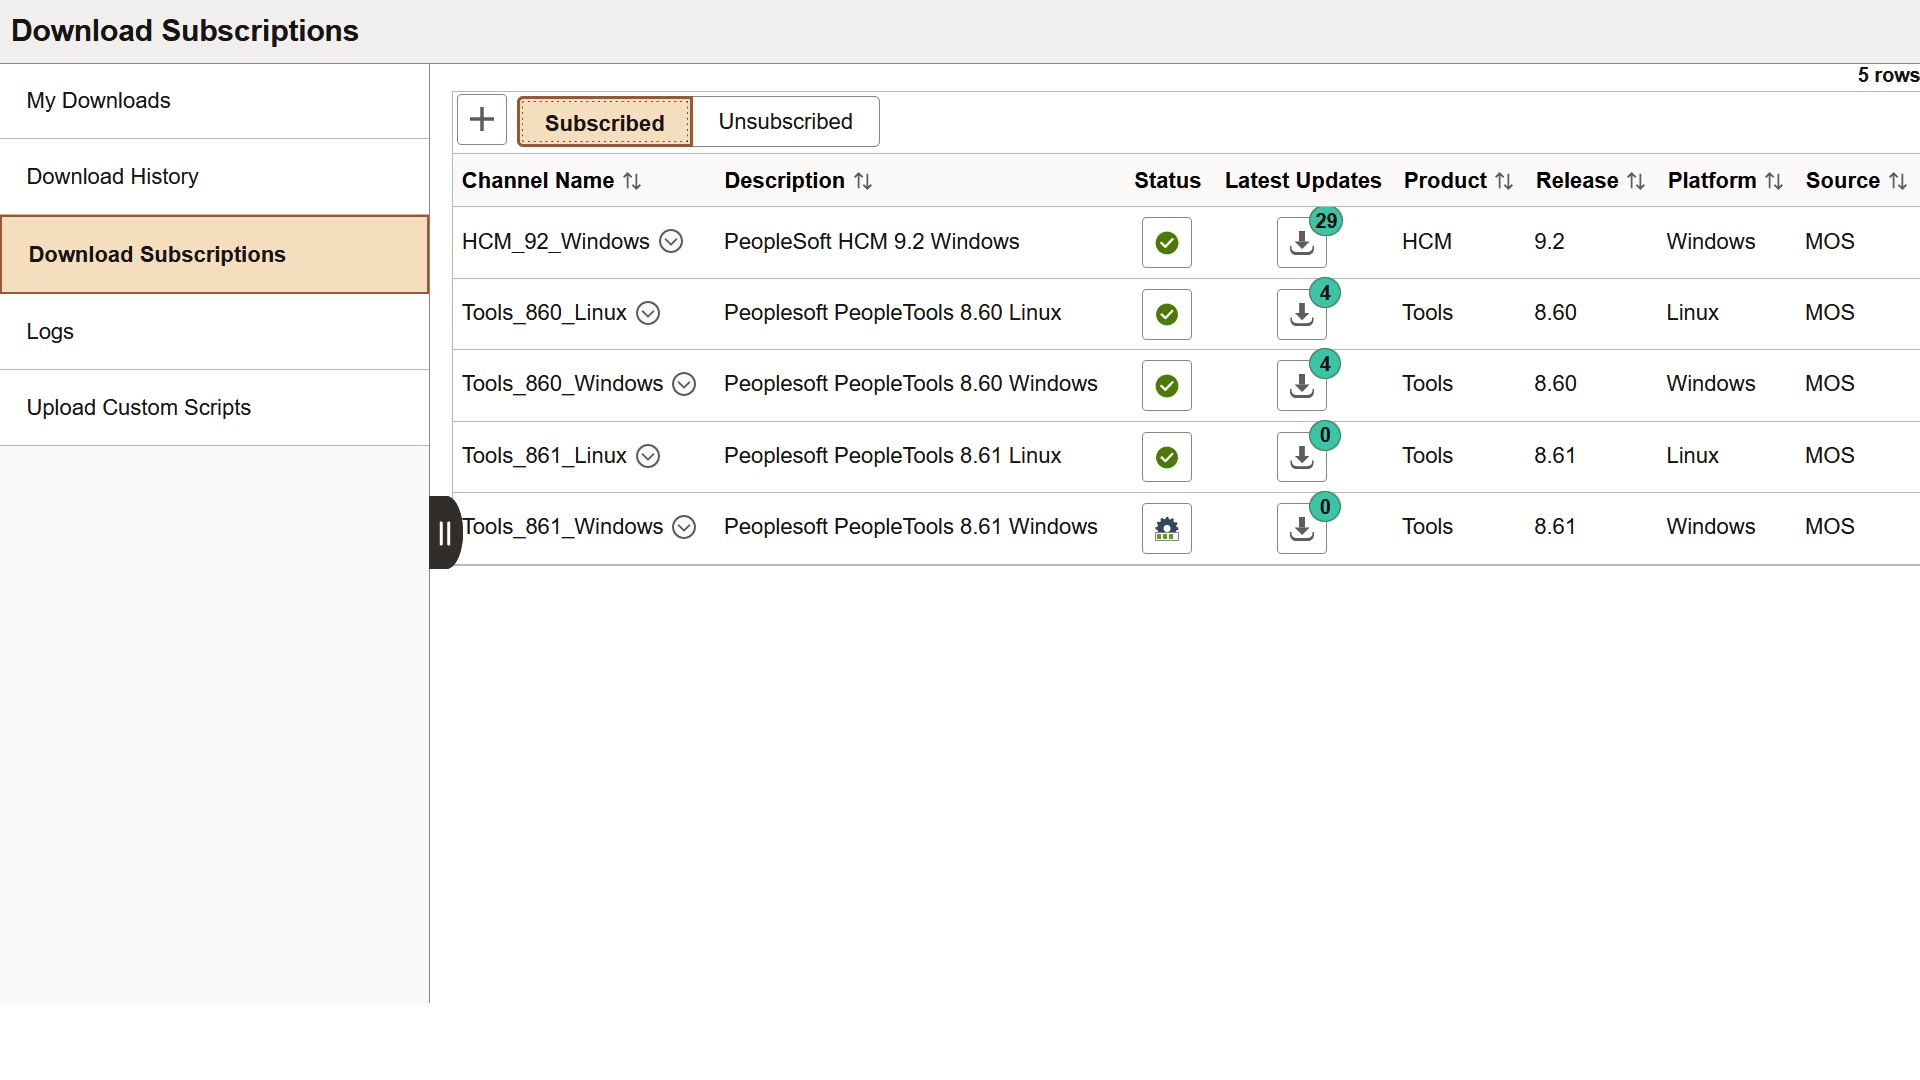
Use the Download Subscriptions page (ECL_REPO_BCHNL_FL) to subscribe to download channels and initiate downloads.
Note: Cloud Manager delivers default channels and those channels are available in the unsubscribed list of the Download Subscriptions page.
Navigation:
Click the Repository tile on the delivered Cloud Manager Fluid home page. Select the Download Subscriptions tab in the left panel of the Cloud Manager home page.
This example illustrates the fields and controls on the Download Subscriptions page. You can find definitions for the fields and controls later on this page.
|
Field or Control |
Description |
|---|---|
|
|
To subscribe or unsubscribe channel, click the Related Actions button corresponding to the channel name. If you select the Subscribe option, Cloud Manager starts monitoring for any new PIs or PRPs and downloads them from My Oracle Support. If you select the Unsubscribe option, Cloud Manager will no longer monitor or download latest PeopleSoft Update Images or PRPs. When a release channel is subscribed, Cloud Manager invokes the download manager application, which connects to MOS and downloads latest updates for the release channel. Note that artifacts, such as Update Images, are large in size and can take a few hours to download. User can view the status of active downloads from the Download History page. |
|
Subscribed tab |
Click this tab to view a list of subscribed channels. When you select the Related Action to subscribe to a channel, that channel will be added to the Subscribed tab. Note: This operation will renew the channel subscriptions for all channels present in the Subscribed tab. This means that Cloud Manager will check for updates and download them for all channels present in the Subscribed tab. |
|
Unsubscribed tab |
Click this tab to view a list of unsubscribed channels. By default, newly created download channels are listed under the Unsubscribed tab. |
|
Status
|
Status will indicate current state.
|


This example illustrates the fields and controls on the Download Subscriptions – Unsubscribed page. You can find definitions for the fields and controls later on this page.
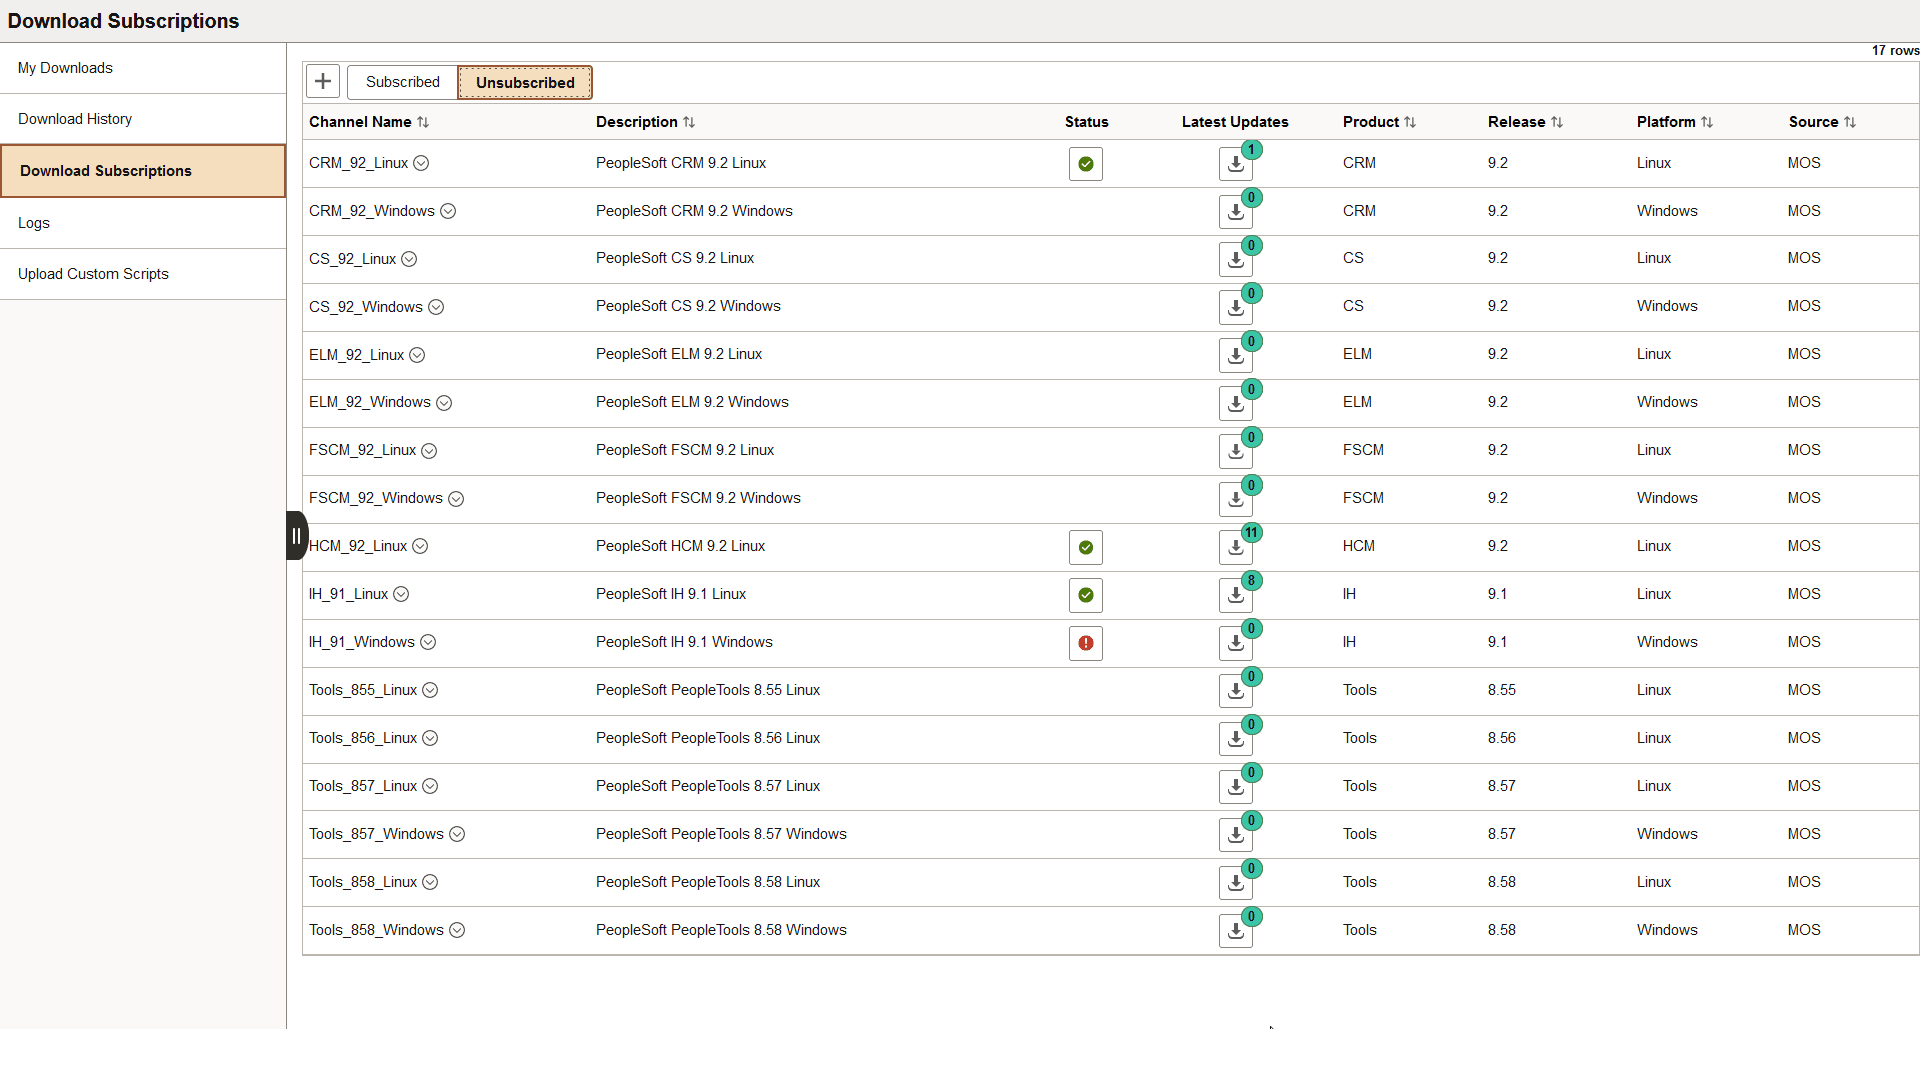
Use the related actions button to subscribe to a channel.
Download Error Page
Click the failed icon on the Download page to view the Download Error pop-up page. There are two types of error pop-up pages, one for standard errors and another for invalid password. The invalid password pop-up page only applies to password protected downloads.
This example illustrates the fields and controls on the Download Error page. You can find definitions for the fields and controls later on this page.
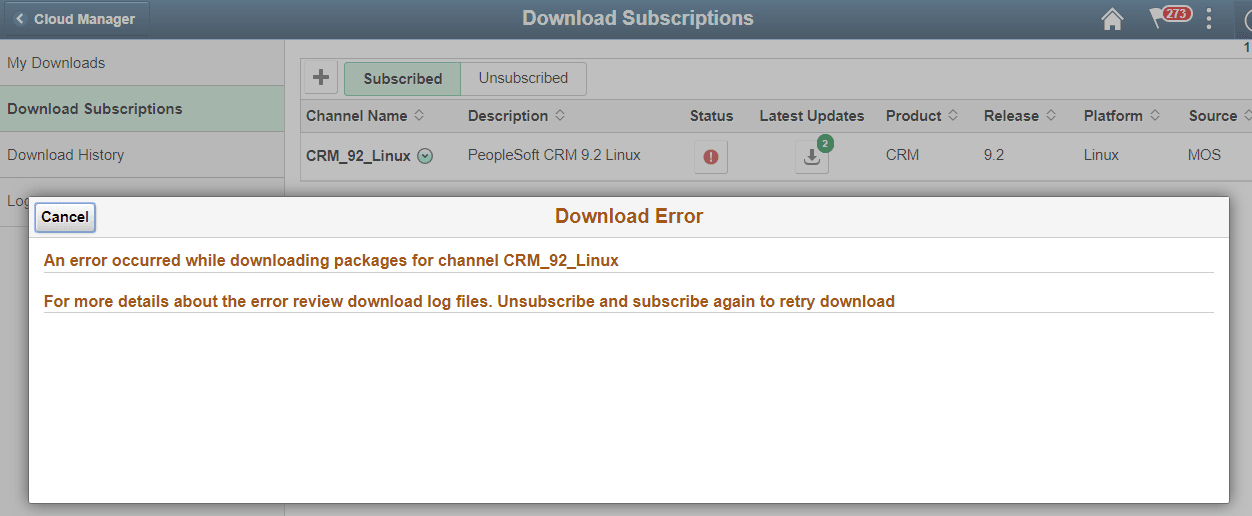
The download error message will indicate the error and direct the user to review the download log files. Error could be due to issues occurring during the download, such as network connection disruption (unable to reach MOS) or if there is no space available on the file server to save downloads.
Password Protected Subscription Password Error
When you subscribe to the a password protected download channel, the DownloadAssist file is downloaded from MOS to Cloud Manager. The DownloadAssist file contains the password required to download the packages.
This example illustrates a Download Error page displaying a password error.
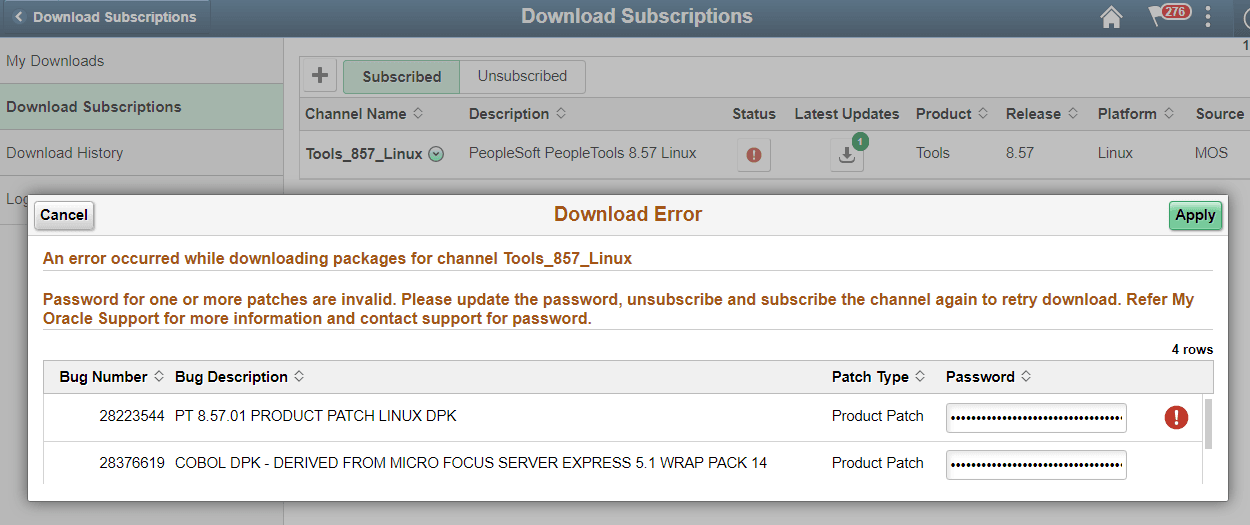
This message will only appear if Cloud Manager is unable to retrieve the password due to an error in MOS. If this does occur, the user will need to request the password from Support and update it manually on this page.
If the issue is due to an expired password, user can do a unsubscribe to the channel and then re-subscribe to the channel. Any password changes will be updated in the DownloadAssist file that is posted in MOS. On re-subscribing to a channel, the new password should get automatically updated in Cloud Manager.
If a re-subscribing doesn't solve the problem, then there could be issues in Cloud Manager that is failing to retrieve and update the password automatically or an unforeseen issue in MOS which is not allowing the download of the DownloadAssist file. In such a scenario, the user is expected to get the password from support and update the same on the Download Error page.
Note: The next scheduled download will renew the subscription and include any password changes in the DownloadAssist file. See Changing Download Interval
Cloud Manager can download previous PeopleTools patch releases for the PeopleTools channel. But for Application channels, only latest patches get downloaded.
In case of Tools channel subscription, you are presented with a modal window for selecting the patch version you want to download.
Navigation:
Click the Unsubscribed tab. Select any Tools channel. Click the Related Options menu and select Subscribe.
This example illustrates the fields and controls in Download Filter modal window.
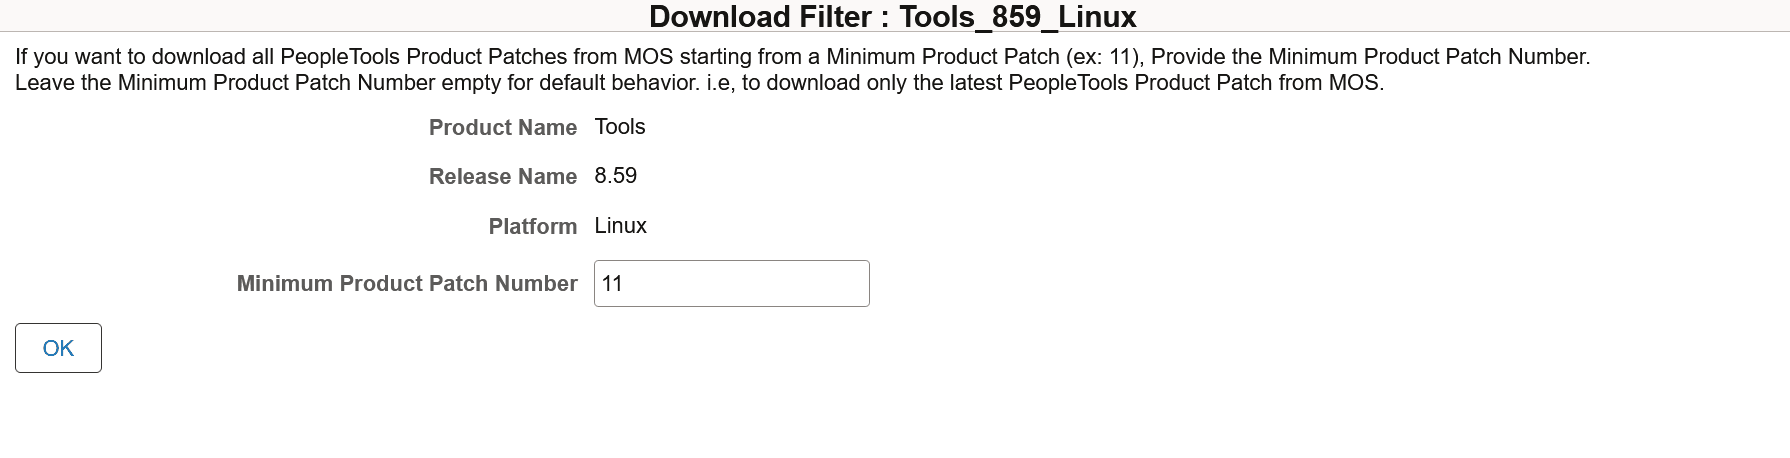
Enter the required product patch version in the Minimum Product Patch Number field. For example, if user enters 11 in this field, then CM will download tools patches 8.59.11, 8.59.12, 8.59.13 up to the latest.
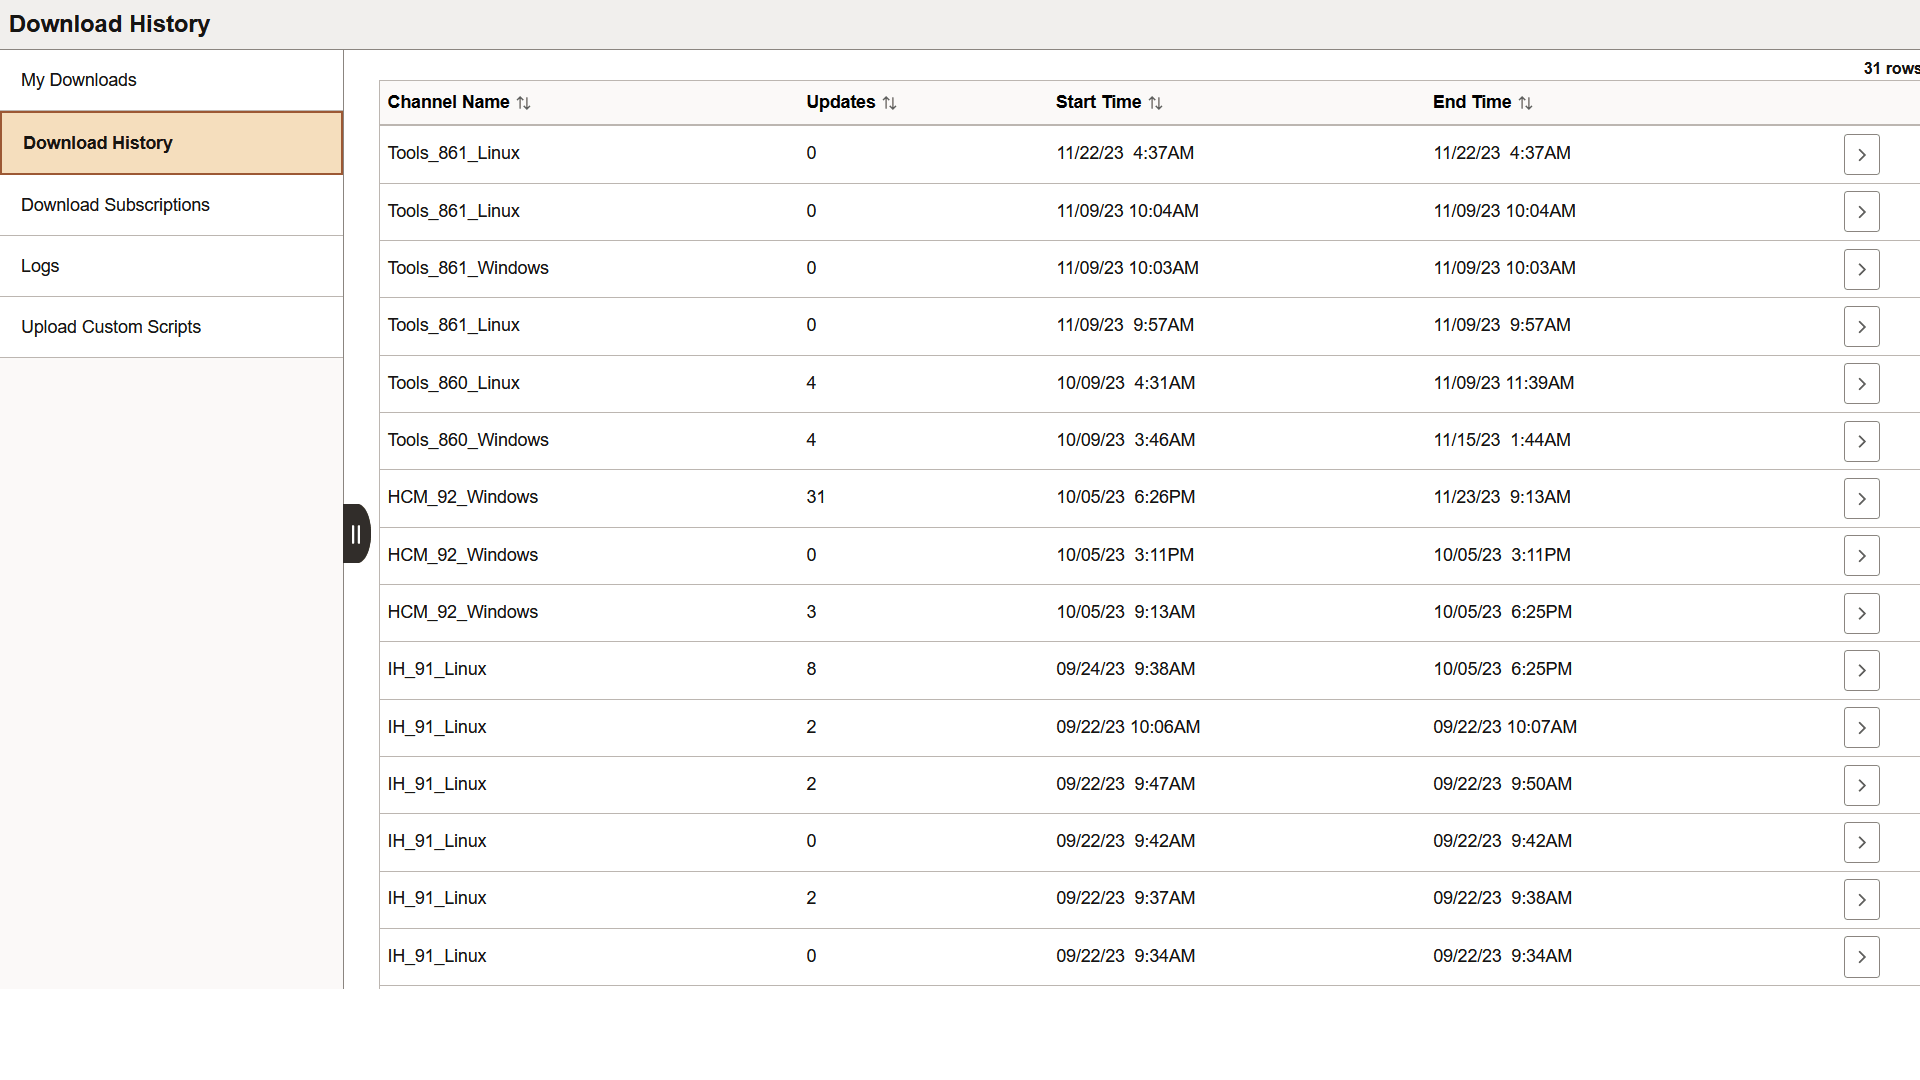
Use the Download History page (ECL_REPO_BDLHIS_FL) to view the history of downloads.
Note: The entries in Download History page are updated based on the download interval. Clicking an entry in the Download History page displays the current state of the download channel (that is, a list of files already downloaded, another list of files in the download queue and those that are currently downloading).
Navigation:
Click the Repository tile on the delivered Cloud Manager Fluid home page. Select the Download History tab in the left panel of the Cloud Manager home page.
This example illustrates the fields and controls on the Download History page. You can find definitions for the fields and controls later on this page.
|
Field or Control |
Description |
|---|---|
|
Channel Name |
Name of the download channel. |
|
Updates |
Number of updates downloaded. |
|
Start Time and End Time |
Indicates the time when downloads are started/finished for the release channel. |
Use the Logs page (ECL_REPO_MLOG_FL) to view the download logs corresponding to the subscribed channels. It displays download logs for all the files that get downloaded.
Navigation:
Click the Repository tile on the delivered Cloud Manager Fluid home page. Select the Logs tab in the left panel of the Cloud Manager home page.
This example illustrates the fields and controls on the Logs page. You can find definitions for the fields and controls later on this page.

|
Field or Control |
Description |
|---|---|
|
Channel Name |
Name of the subscribed channel. |
|
Log File |
Log files are generated when a channel is subscribed. Select an appropriate log file in this field. |
|
Number of Lines to Display |
Indicates how many lines of the selected log file to be displayed. |
|
Search String |
Used to search for specific keywords in the log file. When user inputs a keyword, such as "ERROR" as an example, then only those lines are displayed which has an Error string in it. Here, only the specified number of lines are displayed. |
|
Regex Search |
Enables advanced searching, where a user can provide Unix style regular expressions. |
|
Fetch Logs button |
Click this button to fetch log data based on the input provided by the user in the Logs page. |
|
Log Data |
Data from the logs. |
Re-synchronizing Repository Data with Downloaded List
Sometimes even after subscribing to a channel, you may not able to see some of the downloaded patches in Repository > My Downloads page. The logs may show that the downloads are being skipped. This indicates a situation where the patches are already downloaded but their metadata is not synced with Cloud Manager. In such situations re-sync the downloaded patches metadata with Cloud Manager using the following steps.
Go to Repository > Download Subscriptions page and unsubscribe all channels that are currently subscribed.
Navigate to .
Enter a Run Control.
Run the process "ECL_REPODM".
After the process finishes, you should be able to see the missing patches in the Repository > My Downloads page.
This section details the process flow for subscribing to channels using the Cloud Manager Repository.
Note: Cloud Manager has a process scheduler recurring job defined, which invokes the download manager for all the subscribed release channels once a week. This will make sure that latest updates for all the subscribed release channels are downloaded every week without any user interaction.
Prerequisites
The administrator needs to define My Oracle Support credentials prior to subscribing channels using the Cloud Manager Repository. For this, perform the following:
Select the Cloud Manager Settings tile.
Edit the value in the User ID field and My Oracle Support password field in the My Oracle Support (MOS) Credentials section.
Click Save Settings to save the details. For details on the Cloud Manager settings, see Cloud Manager Settings Page.
Note: This is a one-time setup.
Perform the following steps to subscribe to channels using the Cloud Manager Repository tile:
Click the Repository home page available on the Cloud Manager home page.
Select Download Subscriptions on the left panel. The Download Subscriptions page is displayed.
Click Unsubscribed.
To subscribe to the release channel, perform the following:
Click the Related Actions button corresponding to the channel name.
Select Subscribe action. If there are any new updates, then the system starts downloading the new updates.
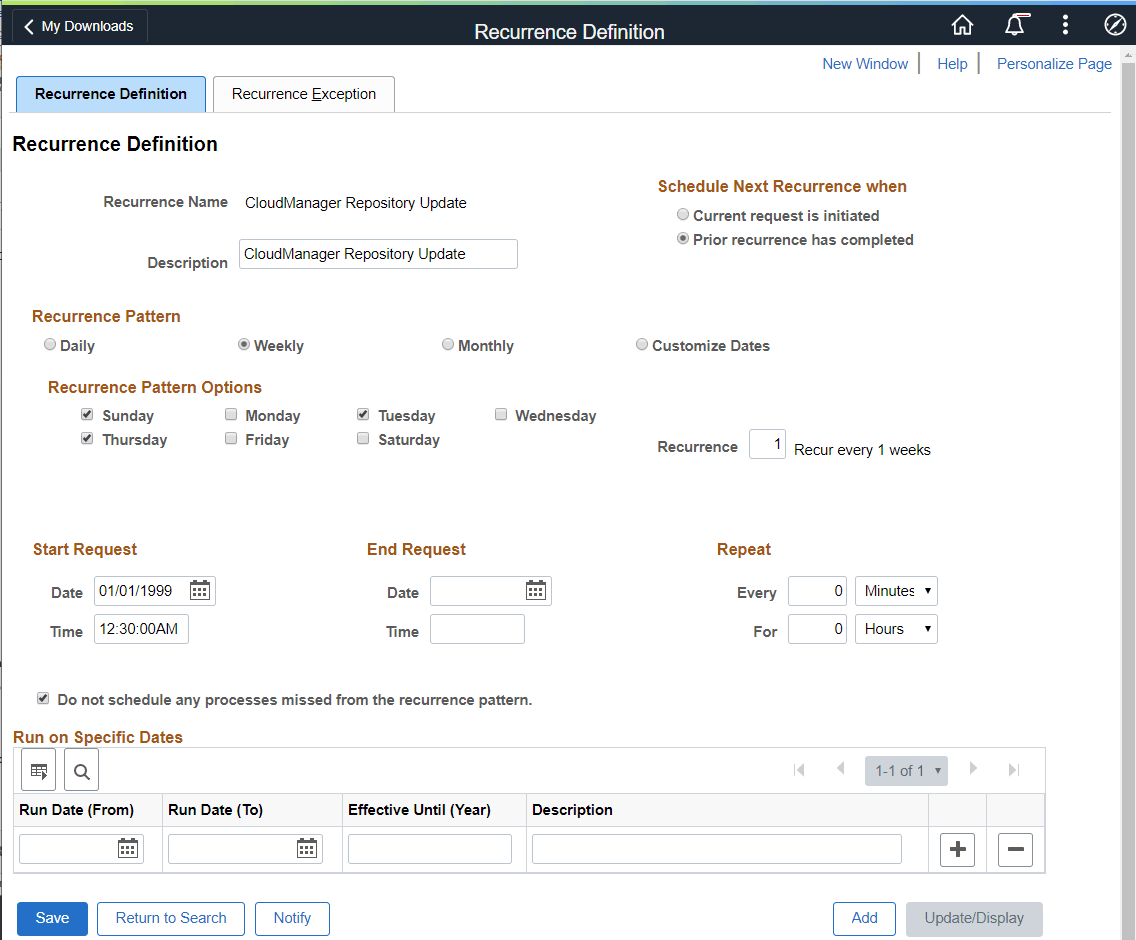
By default, Cloud Manager polls My Oracle Support for new updates every week. The recurrence definition for download channel subscriptions is CloudManager Repository Update. To modify the download schedule to meet your organizational needs, modify the recurrence pattern to a pattern that meets your needs.
For example, if you want to poll for updates on alternate days, you would perform the following:
In Cloud Manager, navigate to PeopleTools, Process Scheduler, Process Scheduler Recurrences.
Select the recurrence CloudManager Repository Update.
Select Recurrence Pattern to Weekly.
Select the alternating days as in Monday, Wednesday, and Friday or Sunday, Tuesday, Thursday.
Note: It is recommended to select alternate days.
Save the page.
This example illustrates the fields and controls on the Recurrence Definition – Cloud Manager Repository Update where the occurrence is set to alternate days.
For more information on setting up recurring schedules, see Product documentation for PeopleTools: Process Scheduler, “Defining PeopleSoft Process Scheduler Support Information”, Defining Recurrence Definitions.
Starting with Cloud Manager Update Image 8 custom scripts can be run before or after provisioning a PeopleSoft environment.
Note: After a PeopleTools upgrade, you must
edit the webserver property (configuration.properties) file to add or modify the
HttpRepositoryPath as shown here: HttpRepositoryPath=/opt/oracle/psft/customscripts
This table lists the script types and which tiers they can run on.
|
Script Type |
Where you can run the script |
|---|---|
|
Python |
Full Tier Middle Tier Database Tier PeopleSoft Client Search Stack Database as a service (DBaaS) |
|
Shell |
Full Tier Middle Tier Database Tier Search Stack Database as a service (DBaaS) |
|
Batch |
PeopleSoft Client and Windows Middle Tier |
|
PowerShell |
Windows Client and Windows Middle Tier |
Scripts can contain instructions to call and run one or more other scripts. For example, a shell script can invoke multiple shells, Python, or other scripts. You can also upload any kind of supporting files that are used by the scripts.
To upload a custom file:
From Cloud Manager homepage, select the Repository tile.
Select Upload Custom Scripts.
Click the Add icon.
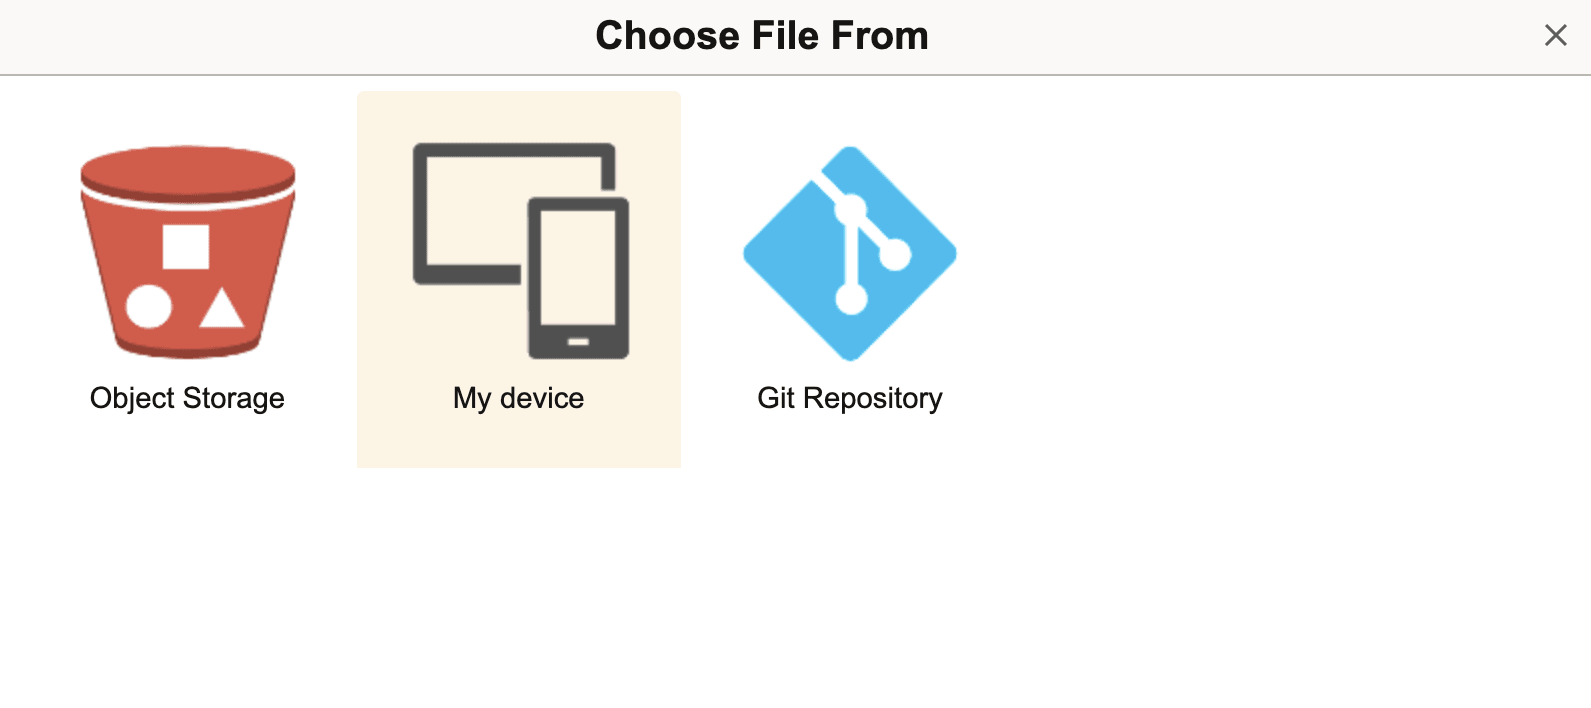
The File Attachment pop up appears where you can choose files from object storage, your local device, or a public Git repository by clicking on the corresponding option.
Note: You must enable firewall connectivity between Cloud Manager and your Git repository. You must also ensure that the customisation artifacts uploaded through Git, object storage or local drive are robust and secure.
Cloud Manager does not capture the data regarding modification of settings using custom scripts and custom DPK, and the responsibility of ensuring that such modifications do not adversely affect other lifecycle activities of Cloud Manager rests with you.
This example illustrates the options for uploading custom files on the Upload Custom Scripts page.
This example illustrates the fields and controls on the File Attachment pop up when you select Object Storage as the option for uploading custom files. You can find definitions for the fields and controls later on this page.
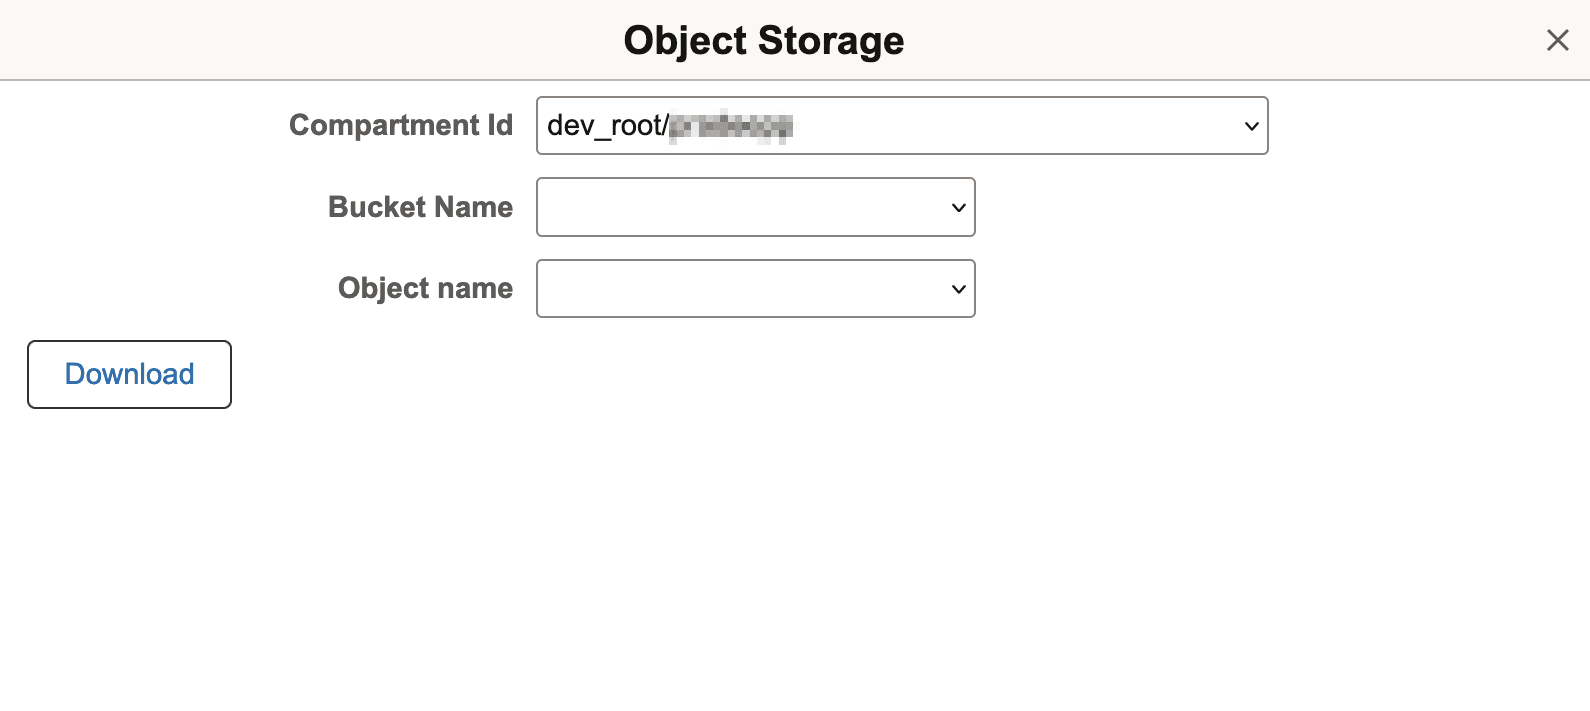
Field or Control
Description
Compartment Id
Compartment where custom file is stored.
Bucket Name
Name of the bucket that contains the custom file.
Object name
Name of the object that contains the custom file.
This example illustrates the fields and controls on the File Attachment pop up for uploading custom files directly from your device.
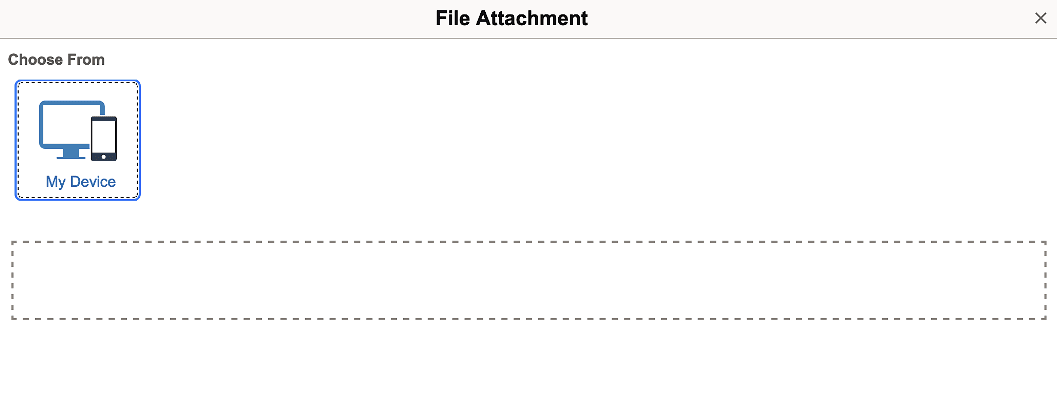
Note: The maximum supported file size for uploading custom files is 2 GB.
This example illustrates the fields and controls on the File Attachment pop up for sourcing input from Git. You can find definitions for the fields and controls later on this page.
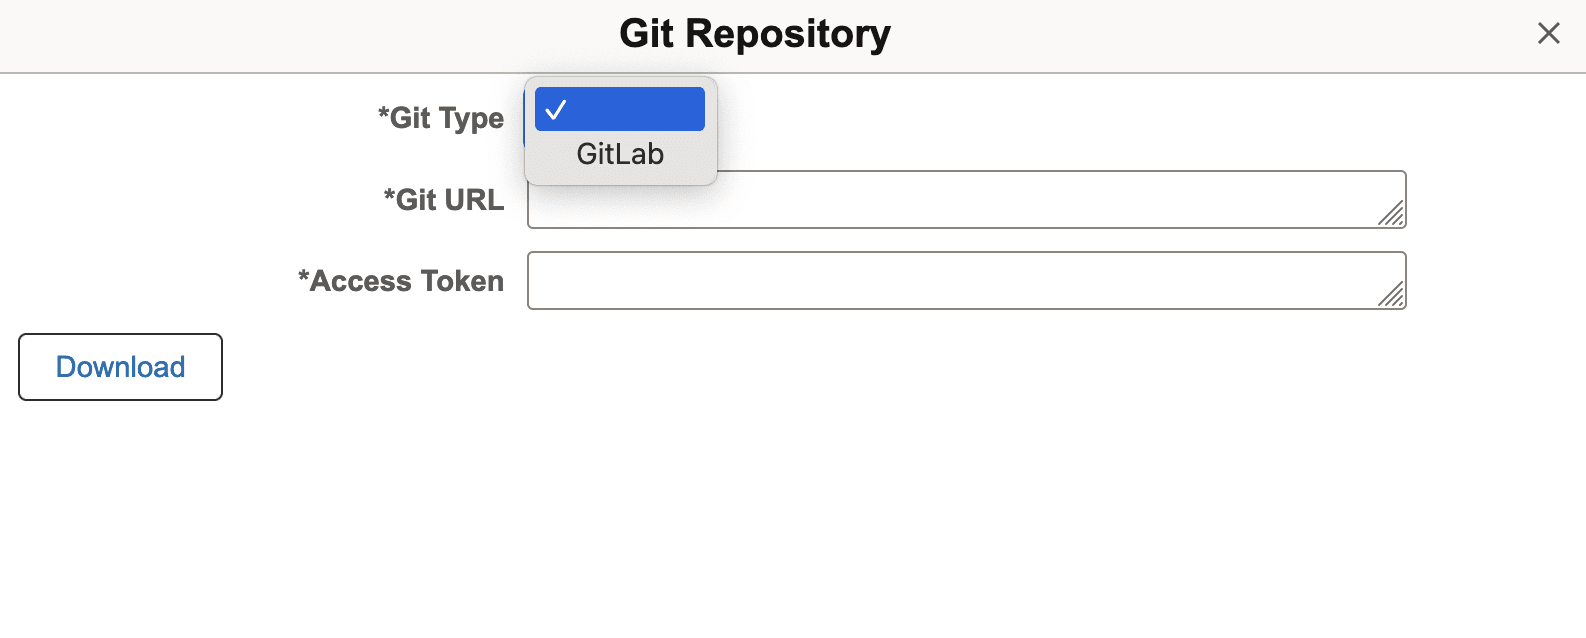
Field or Control
Description
Git Type
Git Type used for sourcing input. Supported types are GitLab and GitHub.
Git URL
Raw file download REST APIs URL of your Git repository.
Access Token
Access token required by Cloud Manager for using GIT to download artifacts. Cloud Manager needs access to only the repository's raw file download API.
Note: Access token is optional for public repository.
Once you have selected the file, the Upload option appears.
Click the Upload button to upload the file to Cloud Manager.
When upload is complete, click Done to complete the process.
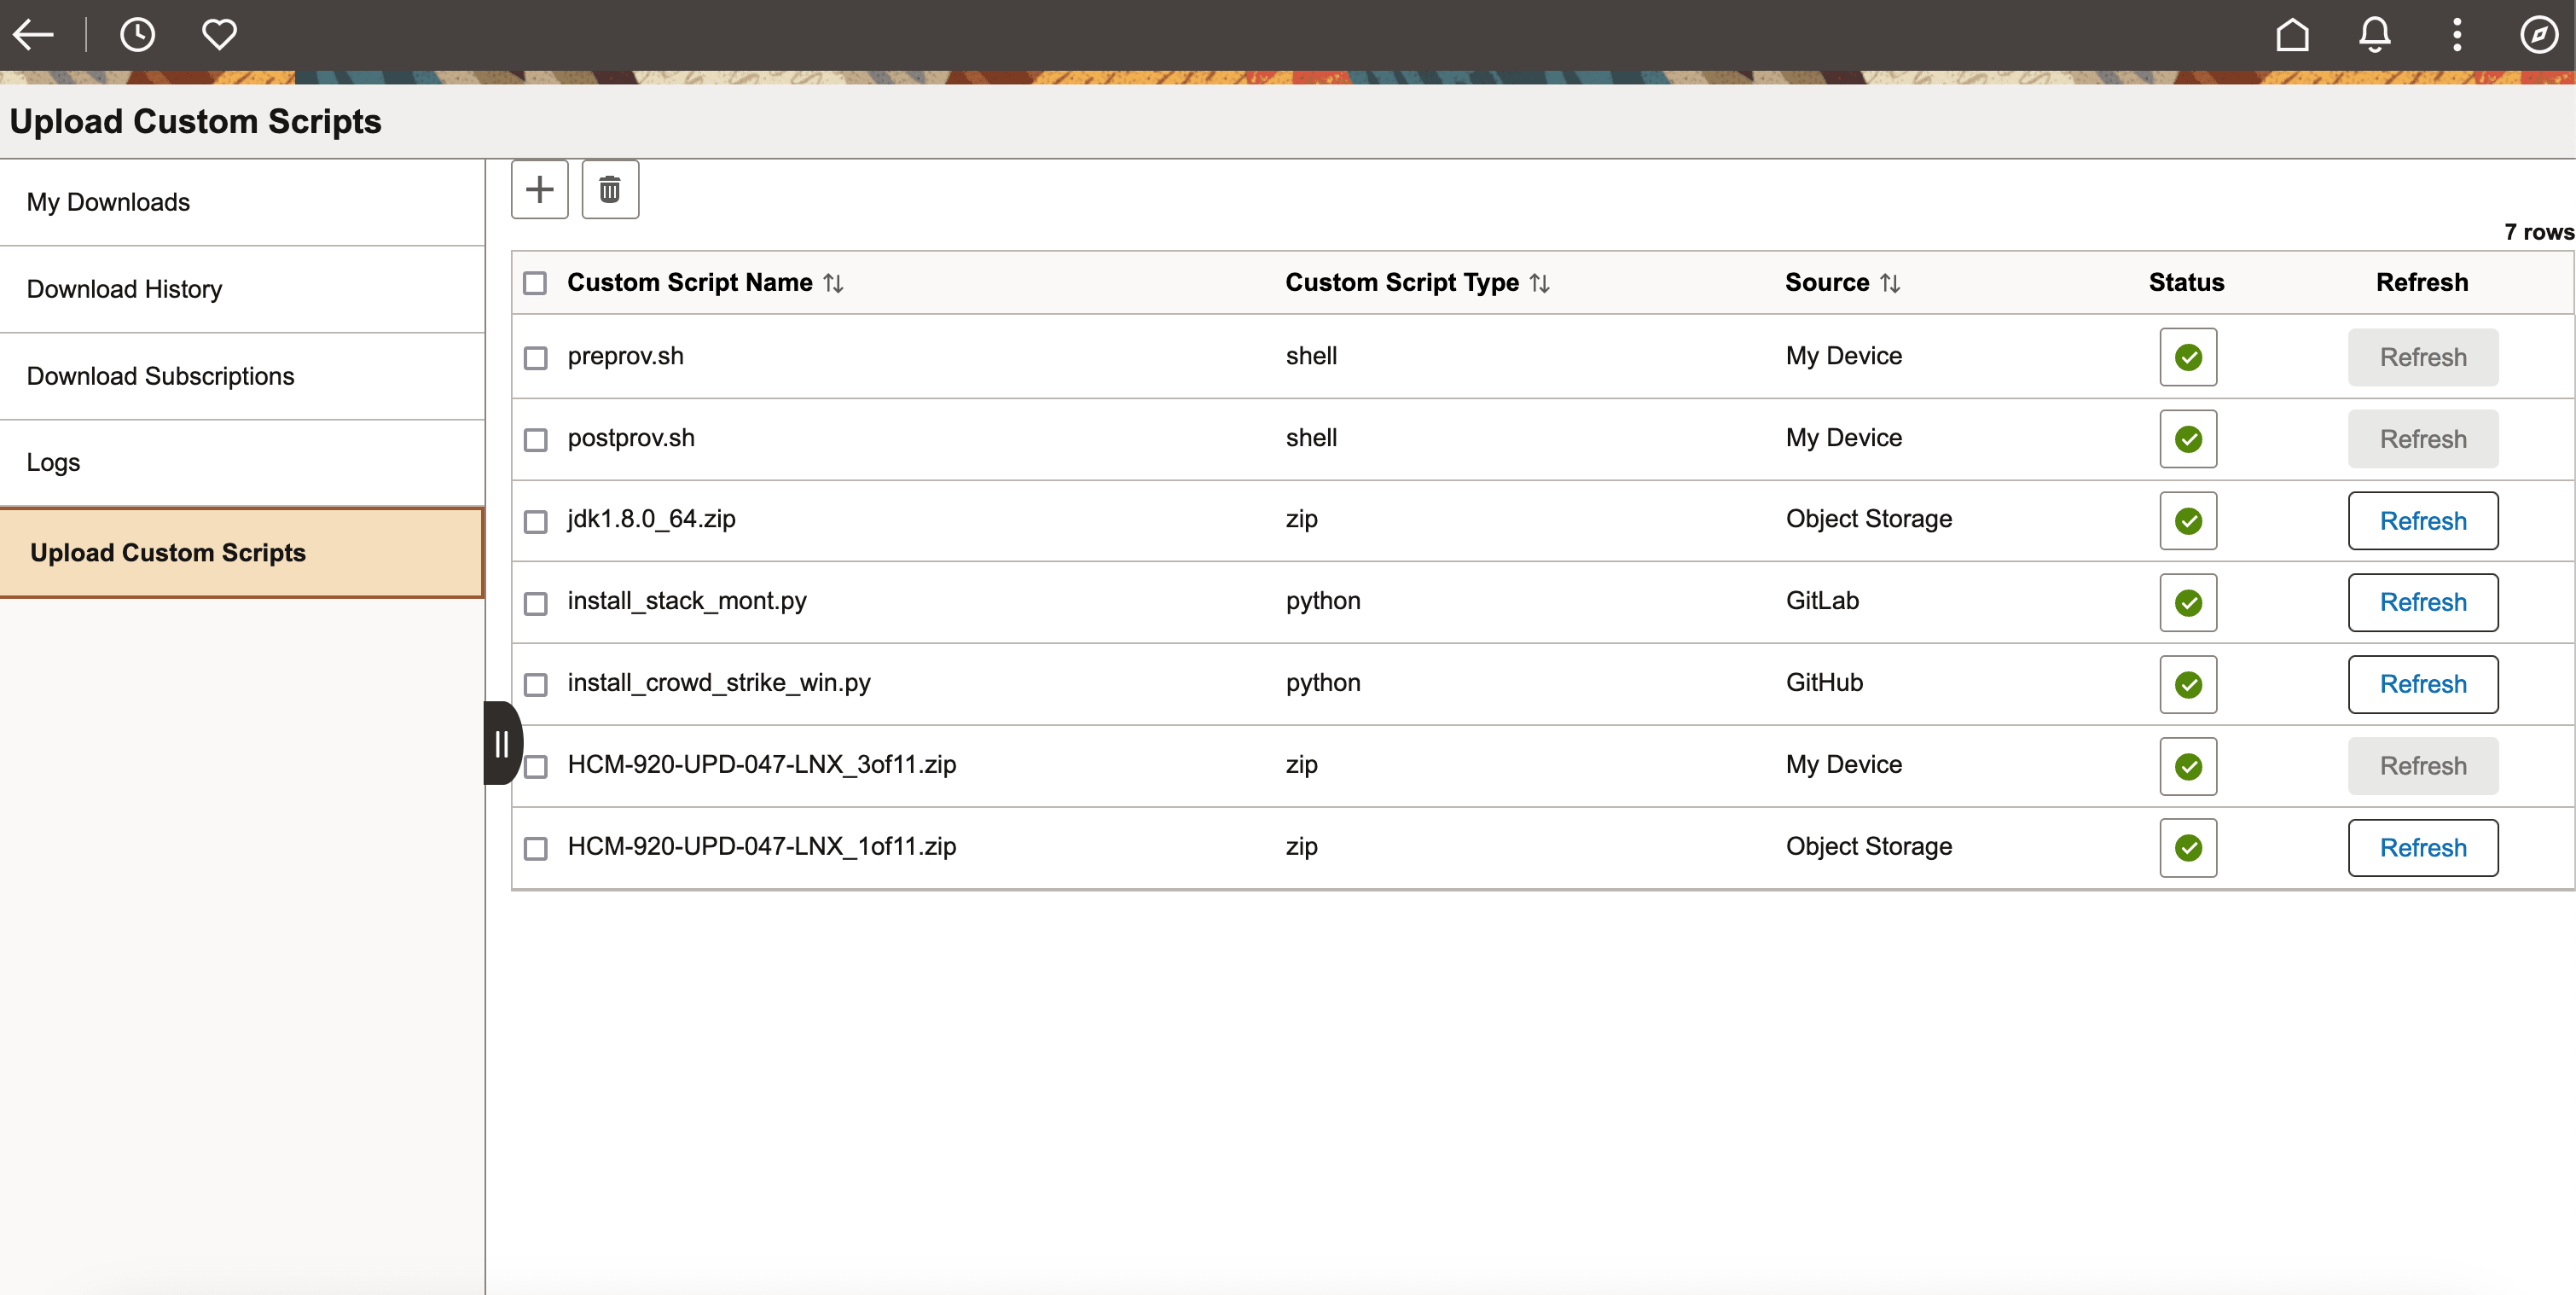
This example illustrates the fields and controls on the Upload Custom Scripts page. You can find definitions for the fields and controls later on this page.
|
Field or Control |
Description |
|---|---|
|
Custom Script Name |
Name of the custom script. |
|
Custom Script Type |
Type of the custom script. Possible values are Shell, Python and Zip. |
|
Source |
Source of the uploaded custom file. Possible values are Object Storage, your local device, GitLab, and GitHub. |
|
Status |
Status of the custom script upload. File metadata of the successfully uploaded files can be viewed by clicking the Status button corresponding to the file. |
|
Refresh |
On clicking the Refresh button, Cloud Manager is updated to the latest version for Git and Object Storage sources. If the script is relocated after you upload it or if the access token is renewed, Refresh can fail by throwing an error message related to HTTP status 401 or 404. When this happens, you must enter the new details again as you would do for a new script or file upload. |
Environment Variables Allowed in Custom Scripts
Custom scripts provide an ability to extend Cloud Manager's provisioning flow. During provisioning orchestration, Cloud Manager provides access to following environment variables inside the custom scripts. The environment variables allowed in custom scripts and their sample values are as follows:
PSFT_APP_APPDOM01_JOLT_LISTENER_PORT=9033
PSFT_INST_PS_CUST_HOME=/u01/app/oracle/product/pt/ps_cust_home
PSFT_ES_PORT=9200
PSFT_INFRA_AVAILDOMAINPRIMARY=evQs:US-ASHBURN-AD-1
PSFT_INFRA_COMPARTMENT_ID=ocid1.compartment.oc1..aaaaaaaaoxxxxxxxxxxxxxxxxxxxxxx7era
PSFT_CONNECT_ID=people
PSFT_APP_APPDOM01_PSPUBHND_DFLT_MAX_INSTANCES=1
PSFT_ULIMIT_CUSTOMIZATION=true
PSFT_PRCS_PRCSDOM01_MSTRSRV=Yes
PSFT_ADMIN_PWD=xxx
PSFT_INST_DB_LOCATION=/u01/app/oracle/product/db
PSFT_APP_APPDOM01_PSPUBHND_DFLT_MIN_INSTANCES=1
PSFT_INST_PS_APP_HOME=/u01/app/oracle/product/pt/ps_app_home
PSFT_INST_PS_CFG_HOME=/u01/app/oracle/product/sample09-fulltierlinux-1/ps_cfg_home
PSFT_ADB_CM_WALLET_LOCATION=xxx
PSFT_CUST_SCRIPT=TestPost.sh
PSFT_PRCS_PRCSDOM01_PSAESRV_MIN_INSTANCES=2
PSFT_WEB_WEBSERVER01_WEBSERVER_HTTP_PORT=8000
PSFT_APP_APPDOM01_JOLT_LISTENER_MAX_INSTANCES=3
PSFT_WEB_WEBSERVER01_AUTH_TOKEN_DOMAIN=.ft.vcnnet.oraclevcn.com
PSFT_APP_APPDOM01_JOLT_LISTENER_MIN_INSTANCES=3
PSFT_INFRA_TENANCY_ID=ocid1.tenancy.oc1..aaaaaaaayy35xxxxxxxxxxxxxxxxxxxxxxxma5a
PSFT_PI_IMAGE=17
PSFT_COBOL_TYPE=VisualCobol
PSFT_PRCS_DOMAINS=['PRCSDOM01']
PSFT_WEBLOGIC_ADMIN_USER=system
PSFT_INFRA_FAULT_DOMAIN=OCI Default
PSFT_PRCS_PRCSDOM01_APPLICATION_ENGINE=1
PSFT_ADB_WALLET_PASSWORD=xxx
PSFT_INFRA_PRIVATE_IP=10.1.10.124
PSFT_PRCS_PRCSDOM01_MAXAPIAWARE=1
PSFT_PSFT_BASE=/u01/app/oracle/product
PSFT_PRCS_PRCSDOM01_COBOL_SQL=1
PSFT_ACCESS_ID=SYSADM
PSFT_WEB_WEBSERVER01_PEOPLESOFT01_APPSERVER_CONNECTIONS=sample09-fulltierlinux-1.ft.vcnnet.oraclevcn.com:9033
PSFT_ES_INSTALL_DIRECTORY=/u01/app/oracle/product
PSFT_GW_ADMIN_USER=administrator
PSFT_SEARCH_PROXY_USER=people
PSFT_OS_USERS={'psft_search_user_name': 'esuser', 'psft_app_install_user_name': 'psadm3', 'remote_login_user': 'opc', 'psft_install_user_name': 'psadm1', 'psft_runtime_user_name': 'psadm2', 'oracle_user_name': 'oracle2'}
PSFT_INST_EYAML_PRIVATE_KEY=/u01/app/oracle/product/sample09-fulltierlinux-1/dpk/puppet/secure/keys/private_key.pkcs7.pem
PSFT_PRCS_PRCSDOM01_PSAESRV_MAX_INSTANCES=2
PSFT_WEBLOGIC_ADMIN_PWD=xxx
PSFT_KERNEL_CUSTOMIZATION=true
PSFT_PRE_PROVISION_CUST_SCRIPT=xxx
USER=root
PSFT_ACCESS_PWD=xxx
PSFT_OPR_ID=VP1
PSFT_INFRA_NSG_IDS=[]
PSFT_CLOUD_INIT_COMMANDS=echo "# testing01 " >> /etc/test.sh;
echo "# testing02 " >> /etc/test.sh;
PSFT_KERNEL_DATA=xxx
PSFT_IS_ADB_BASED_ENV=False
PSFT_SEARCH_ADMIN_USER=esadmin
PSFT_EM_AGENT=xxx
PSFT_INST_TOOLS_CLIENT_HOME=/u01/app/oracle/product/pt/tools_client
PSFT_ULIMIT_DATA=xxx
PSFT_PRCS_PRCSDOM01_PSDSTSRV_MAX_INSTANCES=2
PSFT_INFRA_VCN_ID=ocid1.vcn.oc1.iad.amaaaaaaxxxxxxxxxxxxxxxxxxxxxxxxxxxxxdaq
PSFT_OS_USER_GROUPS={'oracle_runtime_group_name': 'dba', 'oracle_install_group_name': 'oinstall', 'psft_app_install_group_name': 'appinst', 'psft_runtime_group_name': 'psft'}
PSFT_DB_TYPE=DEMO
PSFT_PRCS_PRCSDOM01_APPENG=Yes
PSFT_ES_CLUSTER_NAME=ESCL
SUDO_USER=opc
PSFT_ES_HOSTNAME=xxx
PSFT_INST_PUPPET_BASE_LOCATION=/u01/app/oracle/product/sample09-fulltierlinux-1/dpk/puppet
PSFT_APP_APPDOM01_PSSUBHND_DFLT_MIN_INSTANCES=1
SHLIB_PATH=:/home/opc/cloud/lnx_python/lib
PSFT_INST_DPK_LOCATION=/u01/app/oracle/product/sample09-fulltierlinux-1/dpk
PSFT_APP_APPDOM01_PSQRYSRV_MAX_INSTANCES=1
PSFT_CUSTOMER_DPK_FILE=xxx
PSFT_APP_APPDOM01_PSAPPSRV_MIN_INSTANCES=2
PSFT_CUSTOMIZATION=xxx
PSFT_PI_NUMBER=17
PSFT_WEBPROFILE_USER_PWD=xxx
PSFT_ES_PROXY_PASSWD=xxx
PSFT_APP_APPDOM01_PSBRKHND_DFLT_MIN_INSTANCES=1
PSFT_APP_APPDOM01_WORKSTATION_LISTENER_PORT=7000
PSFT_INST_PUPPET_PROD_LOCATION=/u01/app/oracle/product/sample09-fulltierlinux-1/dpk/puppet/production
PSFT_WEB_WEBSERVER01_WEBSERVER_HTTPS_PORT=8443
PSFT_PRCS_PRCSDOM01_SQR_REPORT=1
PSFT_SEARCH_PROVIDER=xxx
PSFT_DB_IS_ML=xxx
PSFT_PRCS_PRCSDOM01_OPTIMIZATION_ENGINE=1
PSFT_INFRA_PUBLIC_IP=129.80.206.203
PSFT_ELASTIC_SETUP=false
PSFT_INST_PT_LOCATION=/u01/app/oracle/product/pt
PSFT_ELASTIC_SEARCH=N
PSFT_APP_APPDOM01_PSSAMSRV_MIN_INSTANCES=1
PSFT_APP_TYPE=IH
PSFT_CUSTOM_INPUT=xxx
PSFT_INST_LOG_DIR=/home/opc/log/1715748988842831561/psft_activity_custom_post_provisioning_lnx_4_20240515_060212
PSFT_INST_EYAML_KEYS_DIR=/u01/app/oracle/product/sample09-fulltierlinux-1/dpk/puppet/secure/keys
PSFT_PRCS_PRCSDOM01_XML_PUBLISHER=1
PSFT_PIA_DOMAINS=['WEBSERVER01']
PSFT_COBOL_SETUP=false
PSFT_APP_APPDOM01_PSBRKHND_DFLT_MAX_INSTANCES=1
PSFT_INFRA_REGION=us-ashburn-1
PSFT_POST_PROVISION_CUST_SCRIPT=TestPost.sh
PSFT_CONNECT_PWD=xxx
PSFT_HOST_NAME=${envname}-${nodetype}${ostype}-${instno}
SHLVL=4
PYTHONPATH=/home/opc/cloud
PSFT_WEB_WEBSERVER01_SITE_NAMES=peoplesoft01
PSFT_DB_SERVICE_NAME=PSPDB
PSFT_APP_APPDOM01_PSAPPSRV_MAX_INSTANCES=2
PSFT_PRCS_PRCSDOM01_SQR_PROCESS=1
PSFT_APP_APPDOM01_PSSAMSRV_MAX_INSTANCES=1
PSFT_ES_DISCOVERY_HOST_NAME=127.0.0.1
PSFT_INFRA_HOST=sample09-fulltierlinux-1.ft.vcnnet.oraclevcn.com
PSFT_INFRA_HOST_OS=linux
LOGNAME=root
CV_ASSUME_DISTID=OL7
PSFT_APP_APPDOM01_PSSUBHND_DFLT_MAX_INSTANCES=1
PSFT_PRCS_PRCSDOM01_PSDSTSRV_MIN_INSTANCES=2
PATH=/home/opc/cloud/lnx_python/bin:/sbin:/bin:/usr/sbin:/usr/bin
PSFT_DB_NAME=PSPDB
PSFT_INFRA_SUBNET_ID=xxx
PSFT_APP_APPDOM01_PSQRYSRV_MIN_INSTANCES=1
PSFT_GW_ADMIN_USER_PWD=xxx
PSFT_INST_EYAML_PUBLIC_KEY=xxx
PSFT_ENV_TYPE=fulltier
PSFT_COBOL_VERSION=xxx
PSFT_DB_INSTANCE_TYPE=Compute
PSFT_APP_DOMAINS=['APPDOM01']
PSFT_DB_PORT=1522
PSFT_LOGSTASH=N
PSFT_OPR_PWD=xxx
PSFT_KIBANA_PORT=5601
How to Access Environment Variables in or from Custom Scripts
This section shows some examples of using the environment variables.
Example for Python:
crowdstrike_installer=os.environ.get('CS_BIN_PATH')+'/'+os.environ.get('CS_BINARY') Example for Shell:
crowdstrike_installer="${CS_BIN_PATH}/{CS_BINARY}" Example for Batch:
set crowdstrike_installer=%CS_BIN_PATH%/%CS_BINARY%Example for puppet script (Ruby script):
crowdstrike_installer=ENV["CS_BIN_PATH"]+"/"+ENV["CS_BINARY"]Example for puppet script (puppet script):
$psft_site = hiera('peoplesoft_site_name')Sample Batch File
This sample batch file will print the PATH and PSFT_DB_NAME and store it in a file.
set file=C:\temp\script_batch.log

@echo off

@echo Starting the provisioning script > %file%

@echo The value for variable PATH is:  >> %file%

@echo %PATH% >> %file%

@echo The value for variable PSFT_DB_NAME is:  >> %file%

@echo %PSFT_DB_NAME% >> %file%

@echo Ending the provisioning script >> %file%
Sample Python Script
This sample python script will print the PATH and PSFT_DB_NAME and store it in a file.
import os, time

millis = int(round(time.time() * 1000))

file_name = '/tmp/post-provision_python_{}.log'.format(millis)

f = open(file_name, 'w+')

f.write('Starting post-provisioning script')

f.write('The variable PATH value is: {}\n'.format(str(os.environ.get('PATH'))))

f.write('The variable PSFT_DB_NAME value is: {}\n'.format(str(os.environ.get('PSFT_DB_NAME'))))

f.write('Ending post-provisioning script')

f.close()
Sample PowerShell Script
This sample PowerShell script reads and writes the environment variables PSFT_ACCESS_ID and PATH to a file.
$file="C:\script.log"

Add-Content $file "Starting the provisioning script"

Add-Content $file "The value for variable PATH is:"

Add-Content $file (Get-ChildItem Env:PATH).Value

Add-Content $file "The value for variable PSFT_ACCESS_ID is:"

Add-Content $file (Get-ChildItem Env:PSFT_ACCESS_ID).Value

Add-Content $file "Ending the provisioning script"
Sample Shell Script
This sample shell script will print the PATH and PSFT_DB_NAME and store it in a file.
now=$(date +%d%m%Y%H%M%S)
file=/tmp/prov_$now.log

echo "Starting the provisioning script" > $file

echo "The value for variable PATH is: " >> $file

echo $PATH >> $file

echo "The value for variable PSFT_DB_NAME is: " >> $file

echo $PSFT_DB_NAME >> $file

echo "Ending the provisioning script" >> $file
Creating Custom DPK
You must create the custom DPK file by following directory structure and file structure similar to PeopleSoft DPK format. It must be in zip file format (for example, customerDPK.zip).
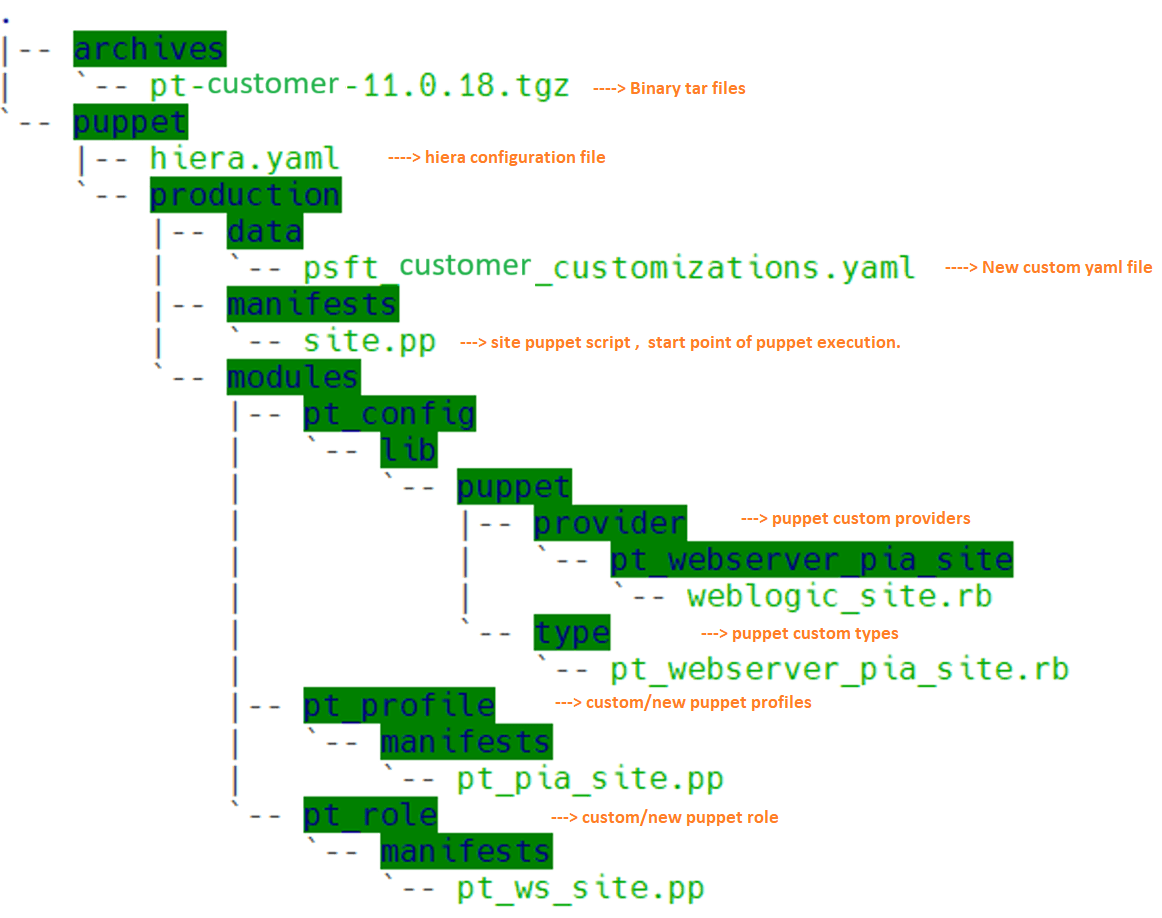
This example illustrates the custom DPK structure.
During the deployment of custom DPK, Cloud Manager overwrites the existing instance archives, YAML files, and puppet scripts. Since use cases such as clone, restore, add node, PeopleTools Patch, and PeopleTools Update use the existing puppet script present in the environment, you must ensure that the modifications using custom scripts do not interfere with the existing logic.
The Puppet process starts from the site.pp file (current customerDPK.zip/puppet/production/manifests/site.pp) in the custom DPK. Therefore, it is important to update the correct puppet role details in the site.pp file. The following sample script invokes the pt_ws_site puppet role, by using the puppet role script (customerDPK.zip/puppet/production/modules/pt_role/manifests/pt_ws_site.pp) file.
node default {
  include  ::pt_role::pt_ws_site
}
The puppet role script can be used for implementing different puppet profiles in sequence. You can write custom implementations using any combination of the following options:
Puppet profiles (customeredDPK.zip/puppet/production/modules/pt_profile/manifests/pt_pia_site.pp)
Puppet custom providers (customerDPK.zip/puppet/production/modules/pt_config/lib/puppet/pt_config/lib/puppet/provider/pt_webserver_pia_site/weblogic_site.rb)
Custom types (customerDPK.zip/puppet/production/modules/pt_config/lib/puppet/pt_config/lib/puppet/type/pt_webserver_pia_site.rb)
You can pack the binary files and installer.exe in a tgz file in the archive directory (for example: customerDPK.zip/archives/pt-customer-11.0.18.tgz). Puppet custom script can be used for deploying the binaries. Use the Puppet Customizations field to provide new custom values in the psft_customizations.yaml. See Configuring DB Systems Settings.
Cloud Manager usually keeps all the dpk-specific files in a hostname based directory (for example: /u01/app/oracle/product/usernameft07-fulltierlinux-1/dpk). To update any values hiera.yaml file in CustomDPK, use factor global variables (%{::hostname}) for resolving the hostname. This example illustrates a sample hiera.yaml file:
:backends:
  - eyaml
  - yaml

:hierarchy:
  - defaults
  - psft_customizations
  - psft_unix_system
  - psft_deployment
  - psft_configuration
  - psft_patches

:yaml:
  :datadir: /u01/app/oracle/product/%{::hostname}/dpk/puppet/production/data

:eyaml:
  :datadir:   /u01/app/oracle/product/%{::hostname}/dpk/puppet/production/data
  :extension: 'yaml'

  :pkcs7_private_key: /u01/app/oracle/product/%{::hostname}/dpk/puppet/secure/keys/private_key.pkcs7.pem
  :pkcs7_public_key:  /u01/app/oracle/product/%{::hostname}/dpk/puppet/secure/keys/public_key.pkcs7.pem
Note: When you use custom DPK for ad hoc changes in the environment, you must ensure that the settings are specified accordingly and that proper cleanup is done. Cloud Manager does not track or consider the changes done using custom DPK. You can use a post provisioning script, which is run after the custom DPK, for correcting the puppet script and for cleanup operation.
Custom DPK is applied to the environment as part of the final tasks in provisioning use case. If the use case fails, you can retry the failed steps from Environment > Details > Provision Task Status. If a custom DPK file (Custom Puppet Script) is sourced from a Git repository or object storage, the latest file is pulled from the repository during provisioning.