Configuring Cloud Manager Settings for OCI
The steps involved in Cloud Manager configuration for OCI are:
Configuring Cloud Manager settings (Required).
Configuring Infrastructure settings (Required).
Configuring File Server (Required).
Managing Updates.
Data Science settings.
Auto Scale Settings.
Advisory settings.
Role Based Security settings.
Use the Cloud Manager Settings page (ECL_CMCFG_OCI_FL) to change the system settings as per requirements.
Navigation:
Click the Cloud Manager Settings tile on the delivered Cloud Manager Fluid home page. Cloud Manager Settings page is displayed. By default, the details that were provided during Cloud Manager bootstrap process are displayed.
This example illustrates the fields and controls on the Cloud Manager Settings page. You can find definitions for the fields and controls later on this page.
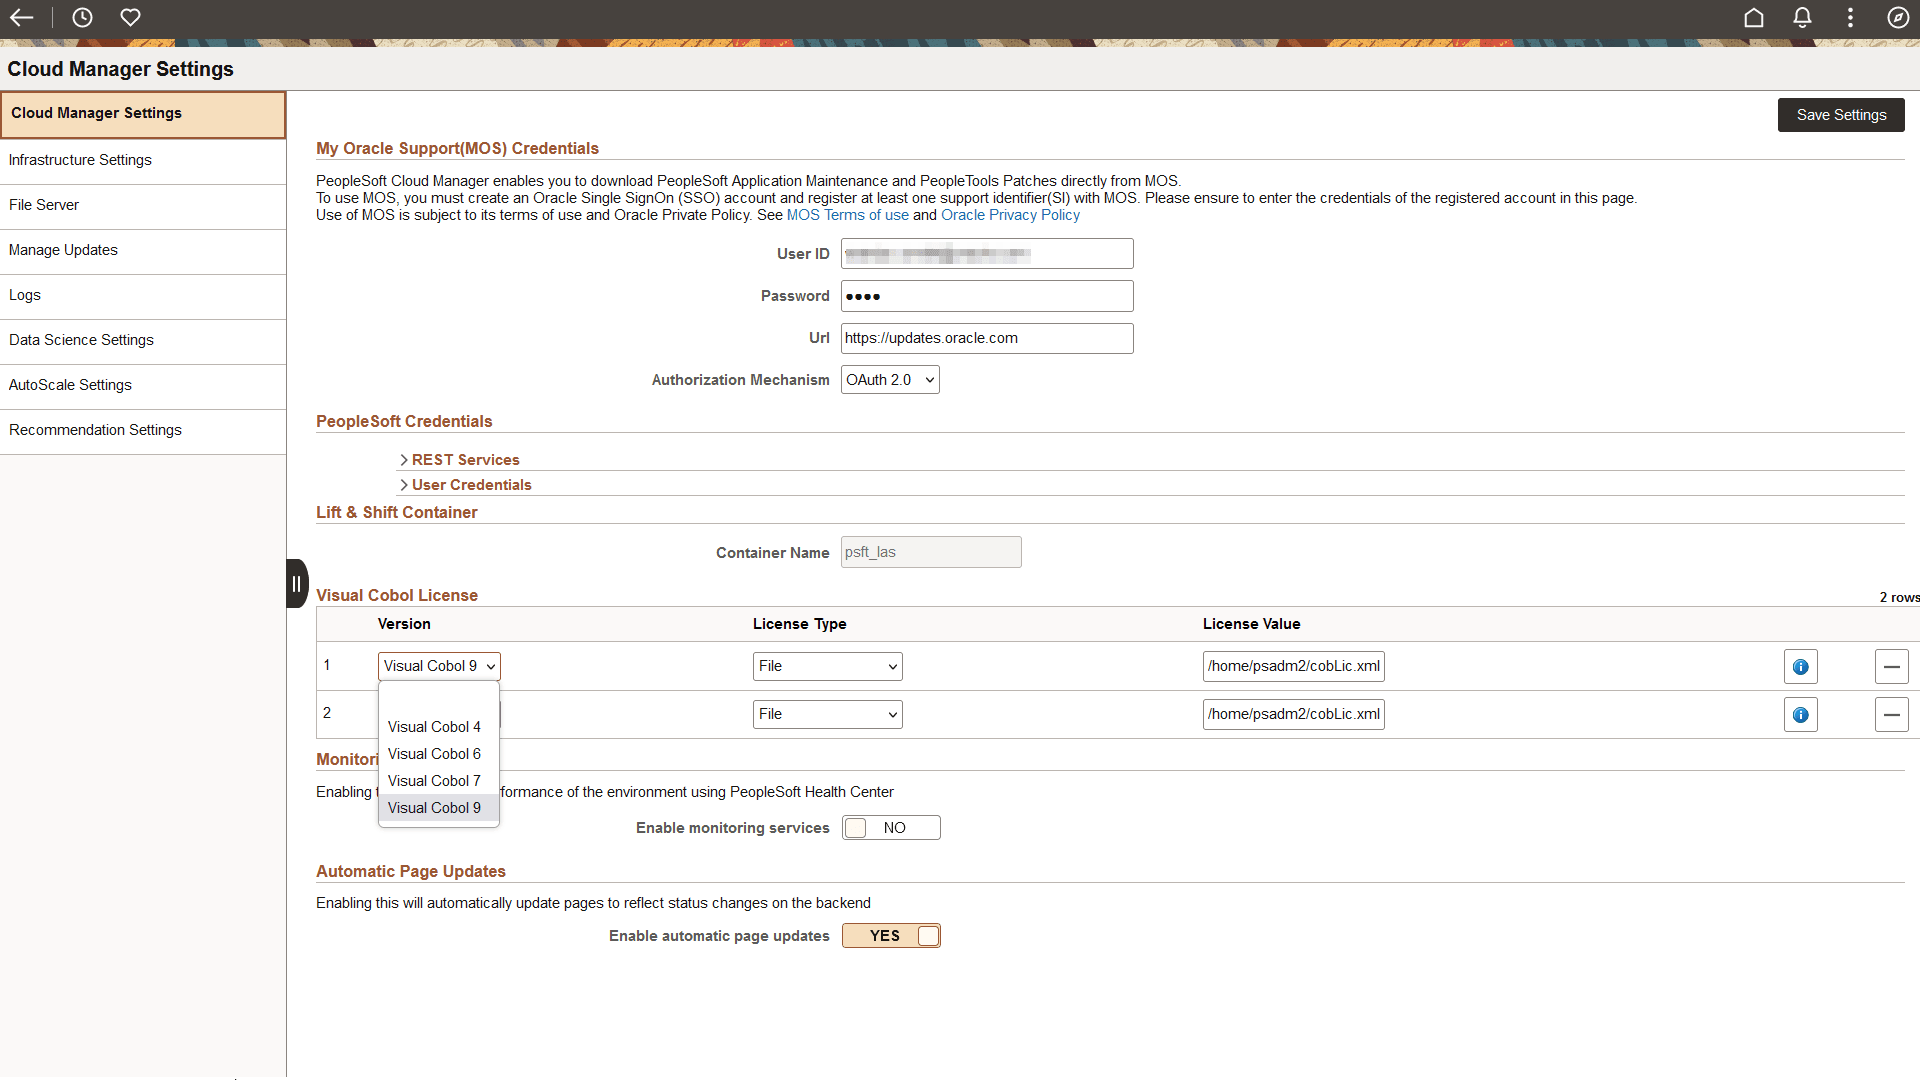
My Oracle Support (MOS) Credentials
This refers to My Oracle Support (MOS) user name and password inputs. Using this credential, Cloud Manager downloads the required updates, PIs and PRPs from MOS. The MOS credentials were provided through the Resource Manager Stack.
Field or Control |
Description |
|---|---|
User ID |
Enter the user ID for your My Oracle Support account. |
URL |
Enter the URL: https://updates.oracle.com. |
Password |
Enter the password for your My Oracle Support account. |
|
Authorization Mechanism |
The available authorization mechanisms are OAuth 2.0 and BasicAuth. OAuth 2.0 is the preferred authorization mechanism. |
Note: Read the MOS License information. Click the links to understand My Oracle Support terms of use and privacy policy.
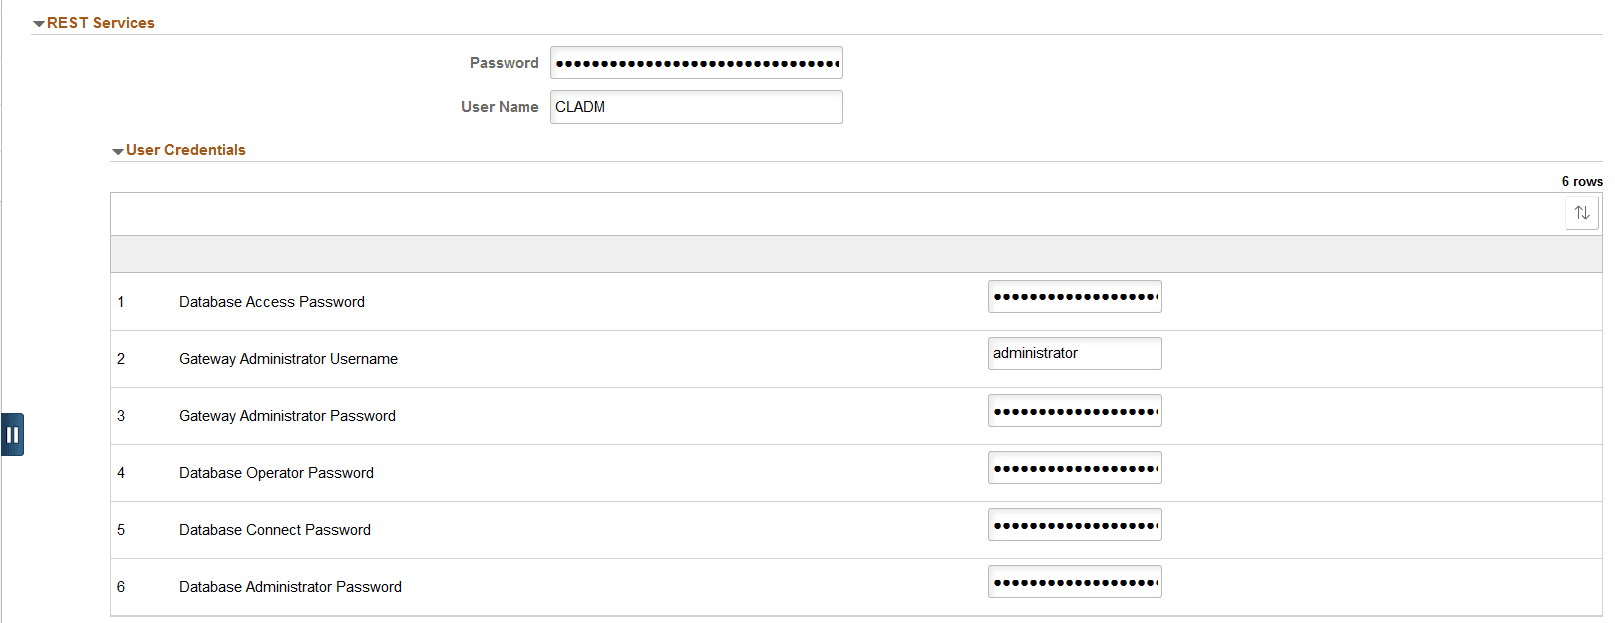
PeopleSoft Credentials for REST Services
REST services are standard IB REST services available in the Cloud Manager instance. These REST services are used internally by Cloud Manager modules to send/receive the results of long-running, asynchronous activities.
Important! User credentials must be manually updated on the Cloud Manager instance before updating here. Updating credentials here does not update the Cloud Manager instance.
Field or Control |
Description |
|---|---|
User Name |
Enter the delivered Cloud Manager Administrator user name. |
Password |
Enter the Cloud Manager Administrator password. |
Expand the User Credentials section and enter all the necessary passwords.
This example illustrates the fields for REST Services - User Credentials.
Lift and Shift Container
This section refers to the Oracle Cloud Storage Container name in which the lifted DPKs (Lifted DPK means migrated environment from your on premise environment through Lift process) are stored. It is from this container that the list of lifted environments are displayed on the Lift and Shift page.
Field or Control |
Description |
|---|---|
Container Name |
Displays the container name. In the current version of Cloud Manager this name cannot be changed. |
Visual COBOL License
Starting with PeopleTools 8.58 Visual COBOL is the only supported COBOL compiler for Cloud Manager environments.
Use this section to provide COBOL license details. Cloud Manager supports up to two COBOL versions. COBOL installation is enabled on the topology by selecting COBOL field value as Yes in the Features section of Edit Node modal window. For details on topology, see Adding Nodes with COBOL Enabled. To enable COBOL in the template, the topology for the template must have COBOL enabled. See Configuring Custom Attributes.
Note: Oracle is the exclusive reseller of the Rocket Software Visual COBOL compiler for use with PeopleSoft applications. Contact your Oracle sales representative for a license.
Visual COBOL
Field or Control |
Description |
|---|---|
Version |
Select the COBOL version. Visual COBOL 4, Visual COBOL 6, Visual COBOL 7, and Visual COBOL 9 are supported. Note: In order to be applied, the selected Visual COBOL version must be supported by the PeopleTools version. Visual COBOL versions 6, 7, and 9 are supported for PeopleTools 8.61. |
|
License Type |
License Type can be:
|
|
License Value |
The license depends on the license type:
|
Monitoring Services
Select Yes to enable performance monitoring of the environment using PeopleSoft Health Center. The health of your PeopleSoft application is determined by providing historical and real-time analysis of performance and load.
Note: Monitoring must be enabled to use auto scaling with Data Science.
Automatic Page Updates
Select Yes to enable automatic page updates to reflect status changes on the back-end.
Use Cloud Manager Settings – Infrastructure Settings page (ECL_OCICFG_OCI_FL) to configure OCI related settings for instance provisioning and management.
Navigation:
Click the Cloud Manager Settings tile on the delivered Cloud Manager Fluid home page. Cloud Manager Settings page is displayed. On the Cloud Manager Settings page, click the Infrastructure Settings link displayed on the left panel.
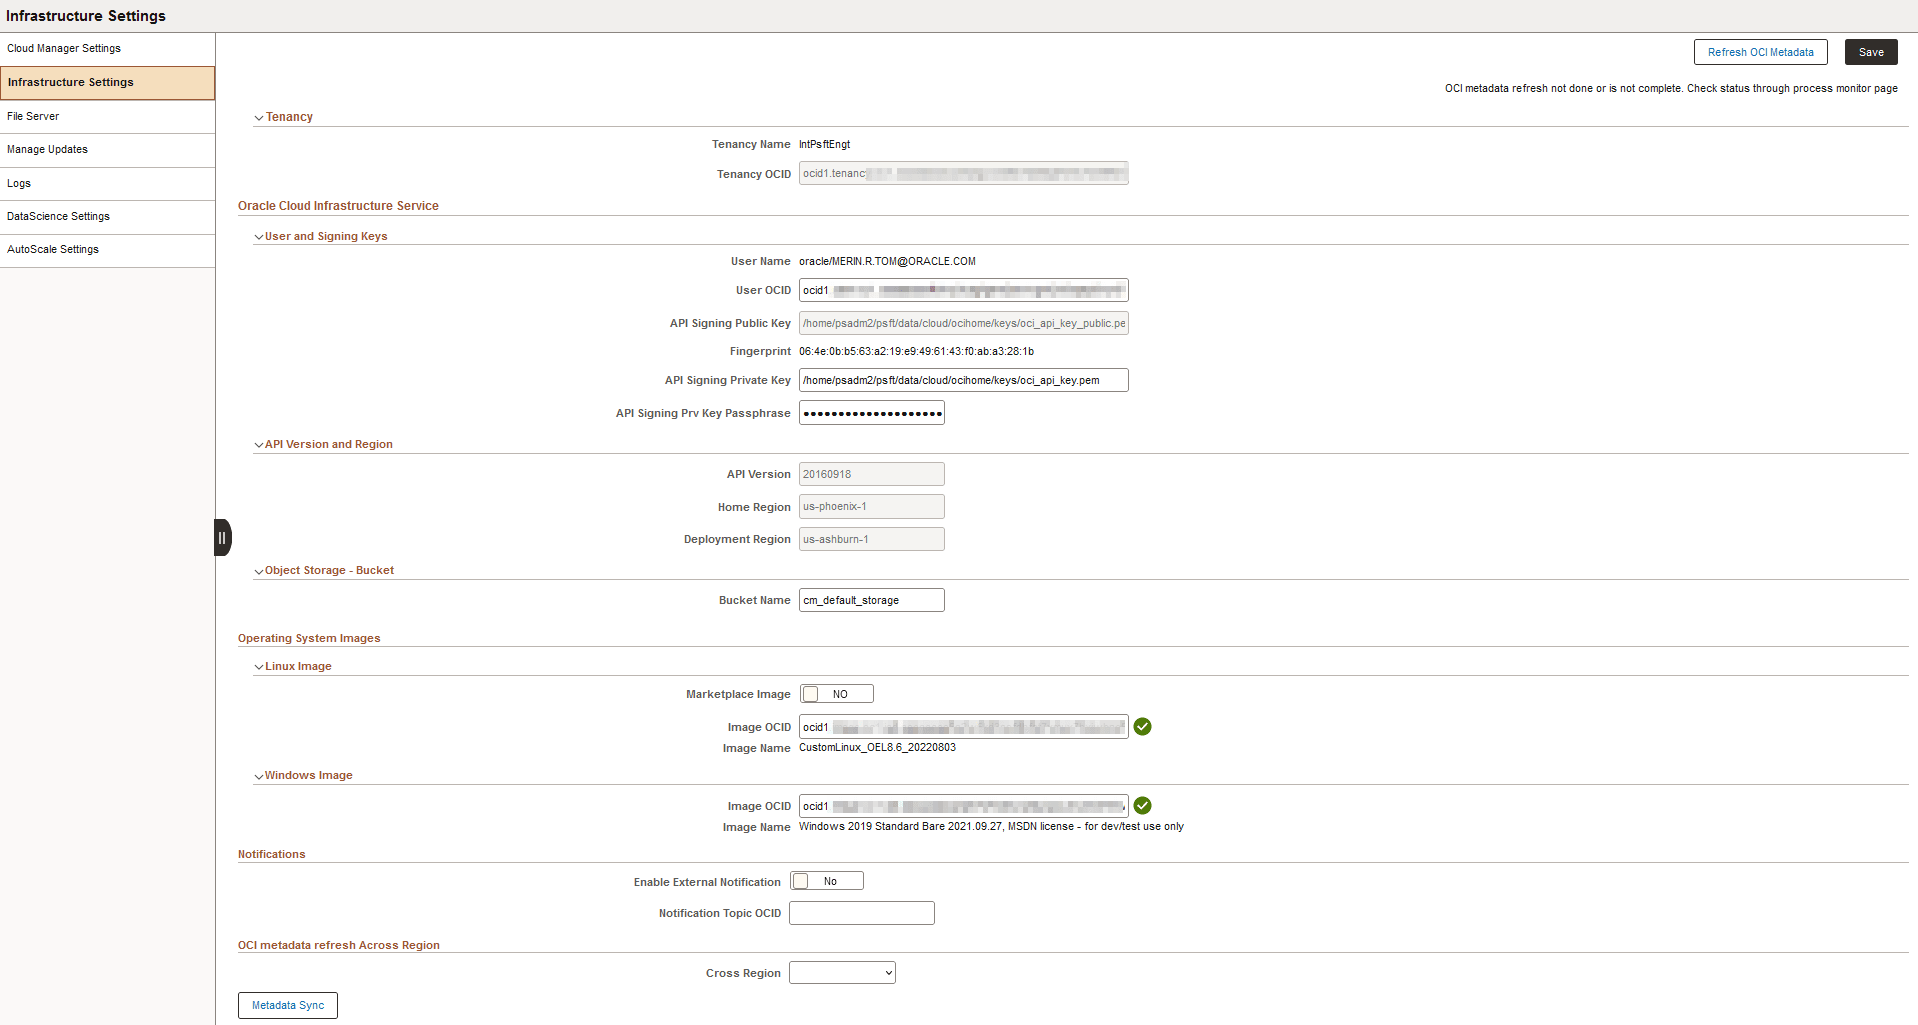
This example illustrates the fields and controls on the Infrastructure Settings page. You can find definitions for the fields and controls later on this page.
Field or Control |
Description |
|---|---|
Tenancy OCID |
Unique Oracle Cloud Identifier (OCID) for the tenancy. Tenancy is the root compartment that contains all your organization’s compartment and other OCI Cloud resources. If you use the Oracle Cloud Infrastructure API, you will need your tenancy's OCID in order to sign the API requests. You will also use the tenancy ID in some of the IAM API operations. You can find your tenancy's OCID displayed at the bottom of the Oracle Cloud Infrastructure Console pages. |
User OCID |
Unique OCID for the user. You can find the user’s OCID in the Oracle Cloud Infrastructure Console page showing the user’s details. |
API Signing Public Key and API Signing Private Key |
RSA key pair in PEM format. Your API requests will be signed with your private key, and Oracle Cloud Infrastructure will use the public key to verify the authenticity of the request. Note: For details on the creation and usage of the API signing keys, refer the PeopleSoft Cloud Manager Installation tutorials. Important! It is not recommended to modify these values without completely understanding the impact. If in case the public keys are required to be changed, then manually update the public keys for the user using the OCI Console. |
API Signing Prv Key Passphrase |
Displays the API signing private key encrypted with a passphrase. |
API Version |
API version is the Rest API version for OCI. The base path of the endpoint includes the desired API version (for example, 20160918). |
Home Region |
When you sign up for Oracle Cloud Infrastructure, Oracle creates a tenancy for you in one region. This is your home region. Your home region is where your IAM resources are defined. When you subscribe to a new region, your IAM resources are replicated in the new region, however, the definitions reside in your home region and can only be changed there. |
Deployment Region |
The region where the PeopleSoft environments will be provisioned by Cloud Manager. Cloud Manager and the file server instance also reside on this same region. |
|
Object Storage Bucket |
Accept the default name or enter a new name. The bucket is required for compare reports generated when upgrading the PeopleTools version of a provisioned environment. |
Save |
Click the Save button to save your settings. |
Refresh OCI Metadata |
Once all the Infrastructure settings are entered and saved, click the Refresh OCI Metadata button. When this button is clicked, the Cloud Manager will run a process scheduler job (Process Name: ECL_OCI_SYNC) which will fetch all the OCI-specific metadata required for the Cloud Manager to function properly. |
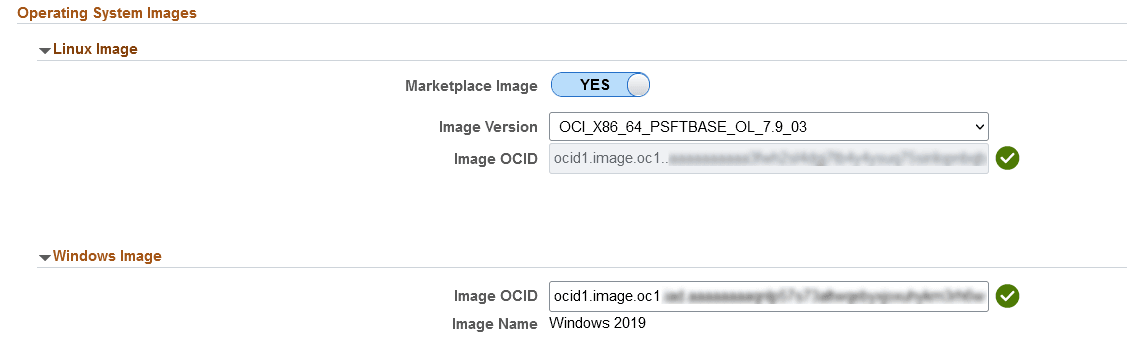
Operating System Image
This refers to OS images in Oracle Cloud that CM uses to provision VMs during environment creation. Refer to the Cloud Manager Installation tutorials at https://docs.oracle.com/en/applications/peoplesoft/cloud-manager/index.html#InstallationTutorials.
.
For Linux Image, you can either:
Obtain the Oracle Linux Image customized for PeopleSoft from Marketplace.
See tutorial Prepare to Install PeopleSoft Cloud Manager.
Create a custom Linux Image for PeopleSoft Cloud Manager.
See tutorial Create a Custom Linux Image for PeopleSoft Cloud Manager.
For Windows Image, you can either:
Use an Oracle platform image for Microsoft Windows for PeopleSoft Cloud Manager.
See tutorial Prepare to Install PeopleSoft Cloud Manager.
Create a custom Windows image for PeopleSoft Cloud Manager in Oracle Cloud Infrastructure.
See tutorial Create a Custom Windows Image for PeopleSoft Cloud Manager in Oracle Cloud Infrastructure.
This example illustrates the fields and controls on the Operating System Image. You can find definitions for the fields and controls later on this page.
Field or Control |
Description |
|---|---|
Linux Image Image OCID |
Select whether or not the Linux Image was obtained from Marketplace. The OCID is automatically populated if the image is obtained from Marketplace. If a custom image is used enter the OCID for the Linux Image. See tutorial Create a Custom Linux Image for PeopleSoft Cloud Manager. |
Windows Image Image OCID |
Enter the OCID for the Windows Image. The image name will be displayed. |
Notifications
When using the Upgrade PeopleTools feature in the current Cloud Manager update image, users can view compare reports such as DDDAUDIT, SYSAUDIT and Alter Audit. Users can choose to receive email notification when compare reports are available.
In order to enable notification, the Cloud Manager administrator must complete the prerequisites. Refer to the Prepare to Upgrade PeopleTools for a Provisioned Environment section in the tutorial Prepare to Install PeopleSoft Cloud Manager at https://docs.oracle.com/en/applications/peoplesoft/cloud-manager/index.html#InstallationTutorials.
This example illustrates the Notifications section on the Infrastructure Settings page. You can find definitions for the fields and controls later on this page.

|
Field or Control |
Description |
|---|---|
|
Enable External Notification |
Select Yes to allow end users performing a PeopleTools upgrade to enable report notifications on the Cloud Manager Upgrade PeopleTools page for an environment. This applies to upgrades to PeopleTools 8.60.x. This enables Cloud Manager to send you weekly recommendation email. This also enables Cloud Manager to send daily and weekly summary email for scaling and monitoring events, based on the Auto Scale Settings. |
|
Notification Topic OCID |
Enter the OCID for the topic created in Oracle Cloud Infrastructure Notification Service. Note: Creating the topic is one of the prerequisites listed in the Prepare to Upgrade PeopleTools for a Provisioned Environment section in the tutorial Prepare to Install PeopleSoft Cloud Manager at https://docs.oracle.com/en/applications/peoplesoft/cloud-manager/index.html#InstallationTutorials |
OCI Metadata Refresh Across Regions
OCI provides a disaster recovery service to ensure higher availability of an application by switching over to an identical copy of the application instance in another region. The region where an application instance runs is called a Primary region and the region to which a switchover potentially happens is called a Standby region.
See Enabling Disaster Recovery.
This example illustrates the OCI Metadata Refresh Across Regions section on the Infrastructure Settings page. You can find definitions for the fields and controls later on this page.

|
Field or Control |
Description |
|---|---|
|
Enable Disaster Recovery |
Select Yes to enable the creation of a standby region for a primary region to ensure business continuity in the event of an outage. |
|
Standby Region |
Select the standby region to which you need to migrate the components of an application such as database, middle-tier and load balancer. |
Use Cloud Manager Settings – File Server page (ECL_CMFILESERV_FL) to configure file server as repository for Cloud Manager.
Use the Cloud Manager File Server page to select or configure a File Storage Service (FSS) file system.
See tutorial Use File Storage Service for PeopleSoft Cloud Manager Repository.
The following use cases apply while creating the file server:
Create a new file server with new Mount Target
Create file system and export with existing Mount Target
Use existing file system (Mount Target and Export Path)
Upgrade existing file server to FSS in upgrade environment
The following ports need to be opened in the FSS mount target’s subnet to allow NFS connections:
Field or Control |
Description |
|---|---|
TCP Ports |
111 2048 2049 2050 |
UDP Ports |
111 2048 |
Navigation:
Click the Cloud Manager Settings tile on the Cloud Manager home page. On the Cloud Manager Settings page, click the File Server link displayed on the left panel.
This example illustrates the fields and controls on the File Server page. You can find definitions for the fields and controls later on this page.
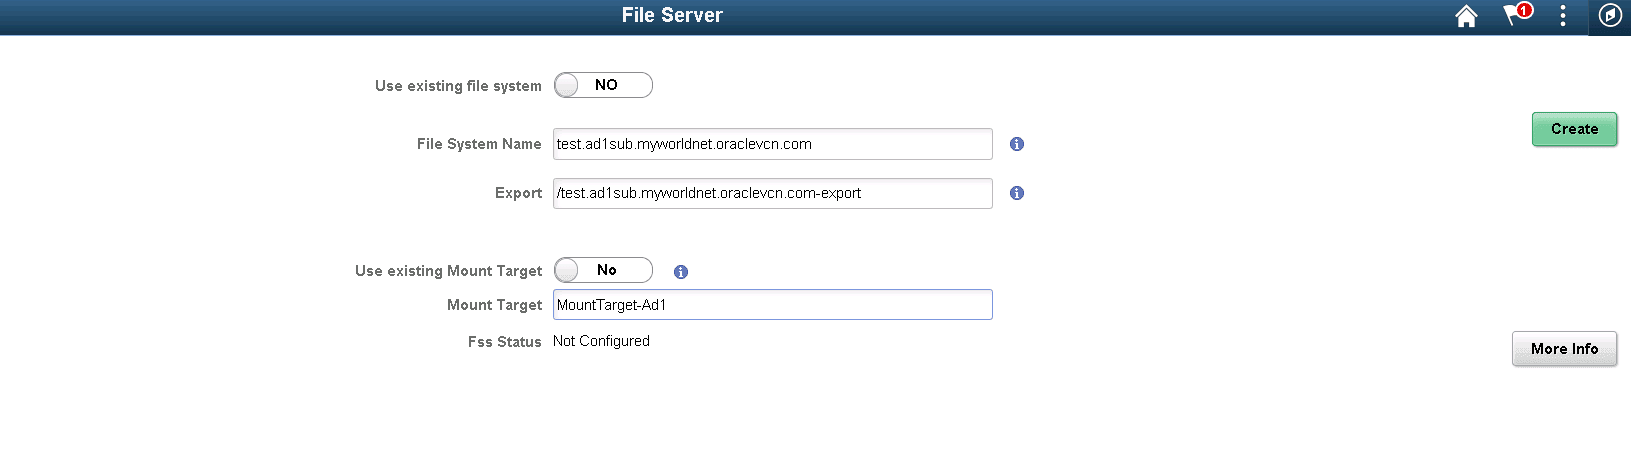
The File Server settings provides the options to set up a new file system.
By default, options Use existing file system and Use existing Mount Target are set to No.
Field or Control |
Description |
|---|---|
Use exiting file system |
Set to No when creating a new file system. |
File System Name |
Name for the file system to be created. |
Export Path |
Path for instances to mount the file system through mount target. |
Use existing Mount Target |
Set to No when creating a new file system. |
Mount Target |
IP address or DNS name that is used in the mount command to connect NFS clients to a file system. A single mount target can export many file systems. By default, you can create two mount targets per account per availability domain. |
Create button |
Once the inputs are provided, click the Create button to create the file system, mount target and export path. |
Creating a New File System, Mount Target and Export
To create a new File system, mount target and export:
Enter the File System Name.
Enter the Export Path.
Enter the Mount Target.
Select No for Use existing file system.
Select No for Use existing Mount Target.
Click Create.
When the file system becomes available, you can subscribe to your desired download channels in the repository.
Creating New File System and Export with Existing Mount Target
As a mount target can export many file systems, a new File System can be created using an existing Mount Target.
To create a new file system and export with existing mount:
Select Infrastructure Settings from the left-side menu and click the Refresh OCI Metadata button.
Select File Server from the left-side menu.
Select Yes to use existing Mount Target.
Select the exiting Mount Target from the drop-down list.
Click Create.
This example illustrates the fields and controls on the File Server page for creating new file system and export with existing Mount Target.
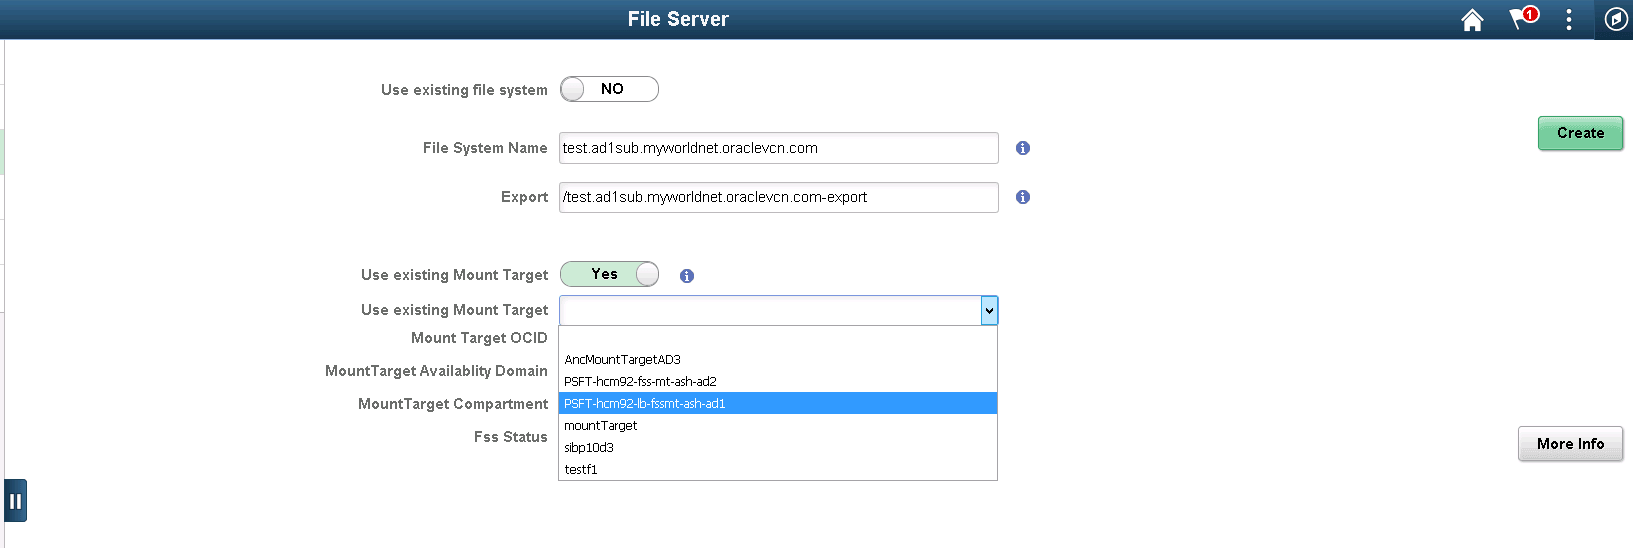
After selecting the existing mount target the availability domain and compartment are displayed.
Using Existing File System
Instead of creating a new file system, an existing file system can be used. Select Use existing file system and enter the export path for the target FSS.
To create a file server from an existing file system:
Select Yes to Use existing file system.
Enter the Existing Mount path.
Click Create.
This example illustrates the fields and controls on the File Server page for using existing file system.

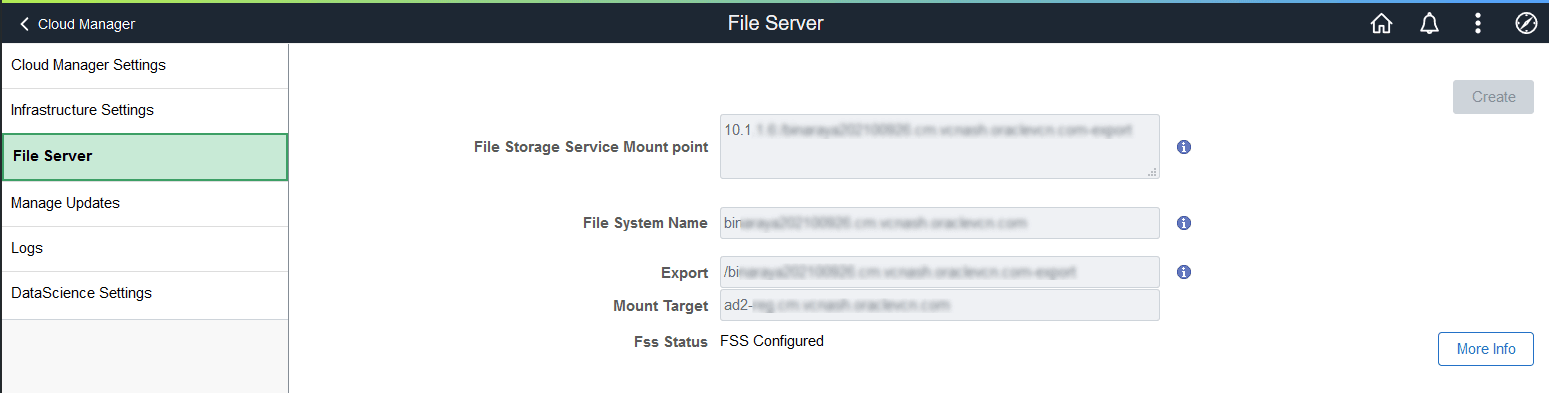
Completed FSS
This example illustrates the fields and controls on the Completed File Server page.
Field or Control |
Description |
|---|---|
File Storage Service Mount Point |
IP address or DNS name that is used in the mount command to connect NFS clients to a file system. |
File System Name |
Name of the File System. |
Export |
Export path. |
Mount Target |
IP address or DNS name that is used in the mount command to connect NFS clients to a file system. A single mount target can export many file systems. By default, you can create two mount targets per account per availability domain. |
FSS Status |
File Server status. Different statuses are: Not Configured, FSS Configured, and Failed.
|
More Info |
Select to view the progress of the migration. More Info contains the list of tasks that can be continued or retried in case of a failure or error. |
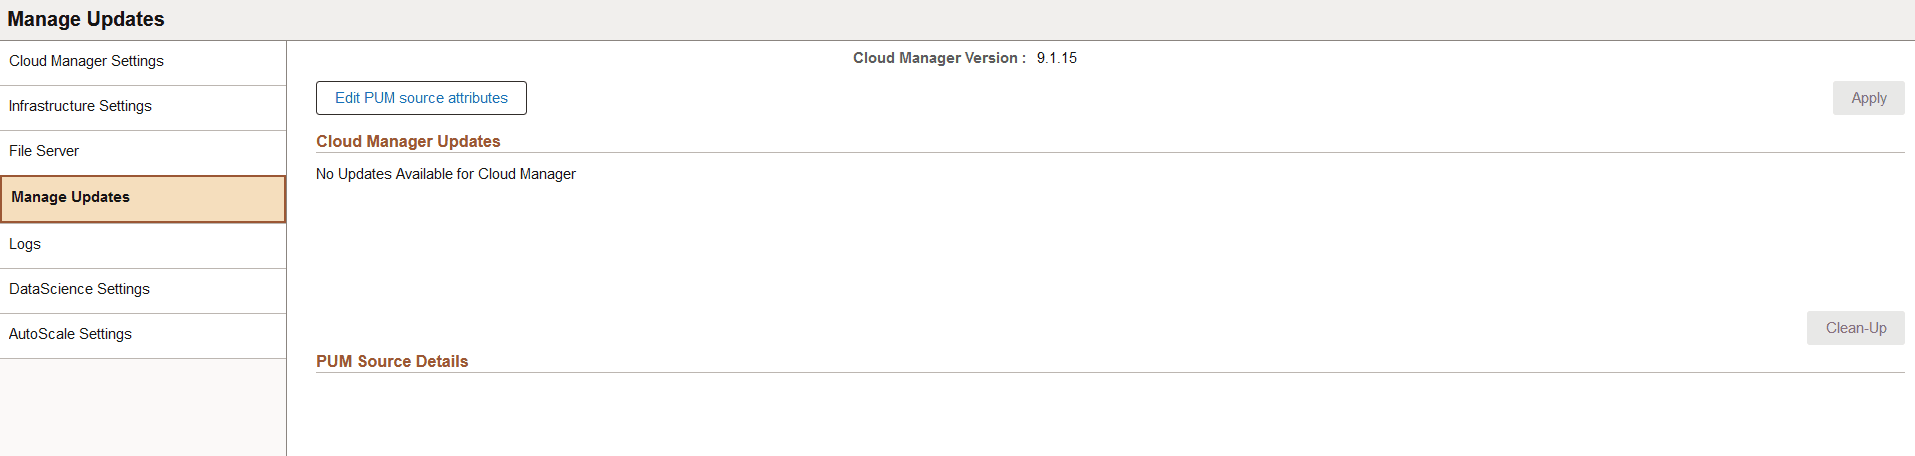
Use the Manage Updates page (ECL_CMSELFUPD_FL) to apply Cloud Manager updates delivered through PeopleSoft IH Updates and PRPs.
Note: This feature is meant for the Cloud Manager application update only.
Navigation:
Click the Cloud Manager Settings tile on the delivered Cloud Manager Fluid home page. The Cloud Manager Settings page is displayed. On the Cloud Manager Settings page, click the Manage Updates link displayed on the left panel.
For information on updating Cloud Manager see Updating Cloud Manager Overview.
This example illustrates the fields and controls on the Manage Updates page when no updates are available.
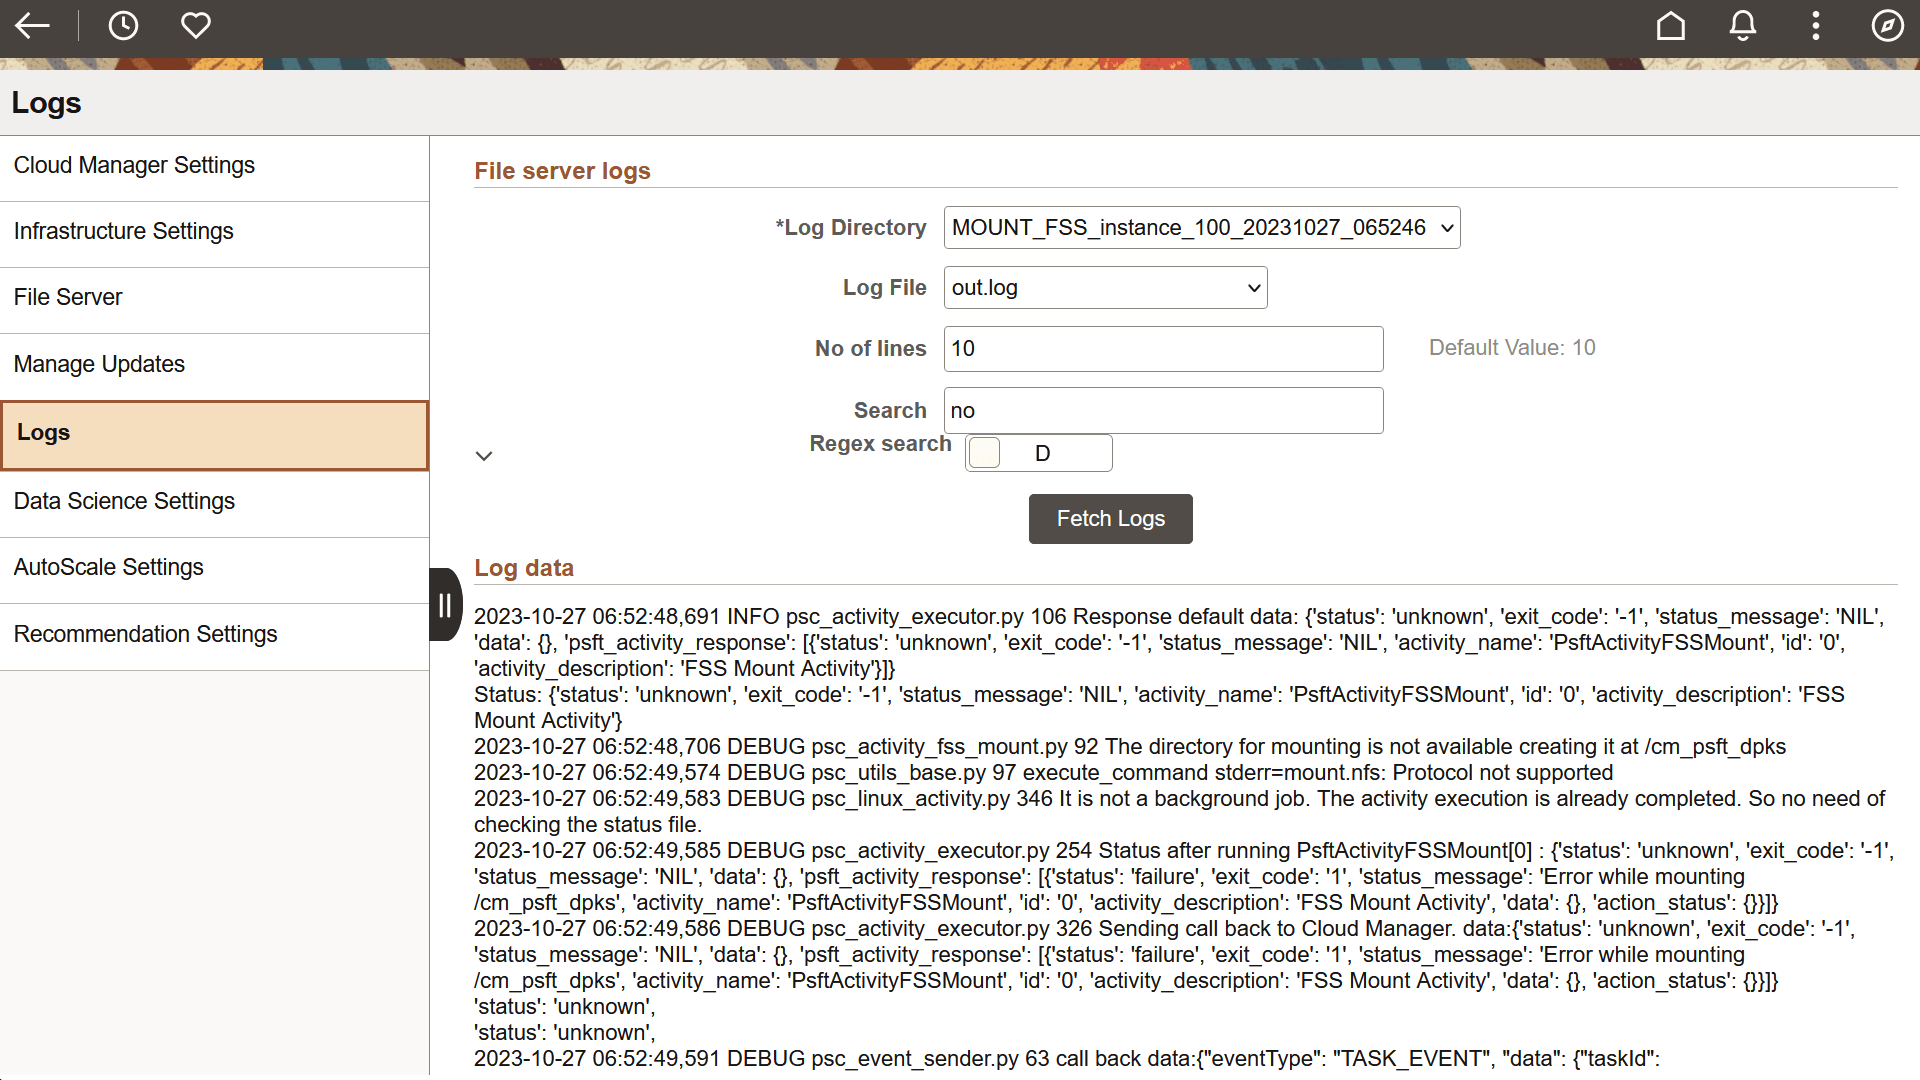
The Logs page (ECL_CM_FSLOGS_FL) enables you to view the logs with respect to FSS creation and its mounting to Cloud Manager.
Navigation:
Click the Cloud Manager Settings tile on the delivered Cloud Manager Fluid home page. Select the Logs tab in the left panel of the Cloud Manager home page.
This example illustrates the fields and controls on the Logs page. You can find definitions for the fields and controls later on this page.
|
Field or Control |
Description |
|---|---|
|
Log Directory |
Name of the file directory. |
|
Log File |
Log files from the selected directory. Select an appropriate log file in this field. |
|
No of lines |
Indicates how many lines of the selected log file to be displayed. |
|
Search |
Used to search for specific keywords in the log file. When user inputs a keyword, such as "ERROR" as an example, then only those lines are displayed which has an Error string in it. Here, only the specified number of lines are displayed. |
|
Regex Search |
Select E to enable advanced searching, where a user can provide UNIX-style regular expressions. |
|
Fetch Logs button |
Click this button to fetch log data based on the input provided by the user on the Logs page. |
|
Log Data |
Data from the logs. |
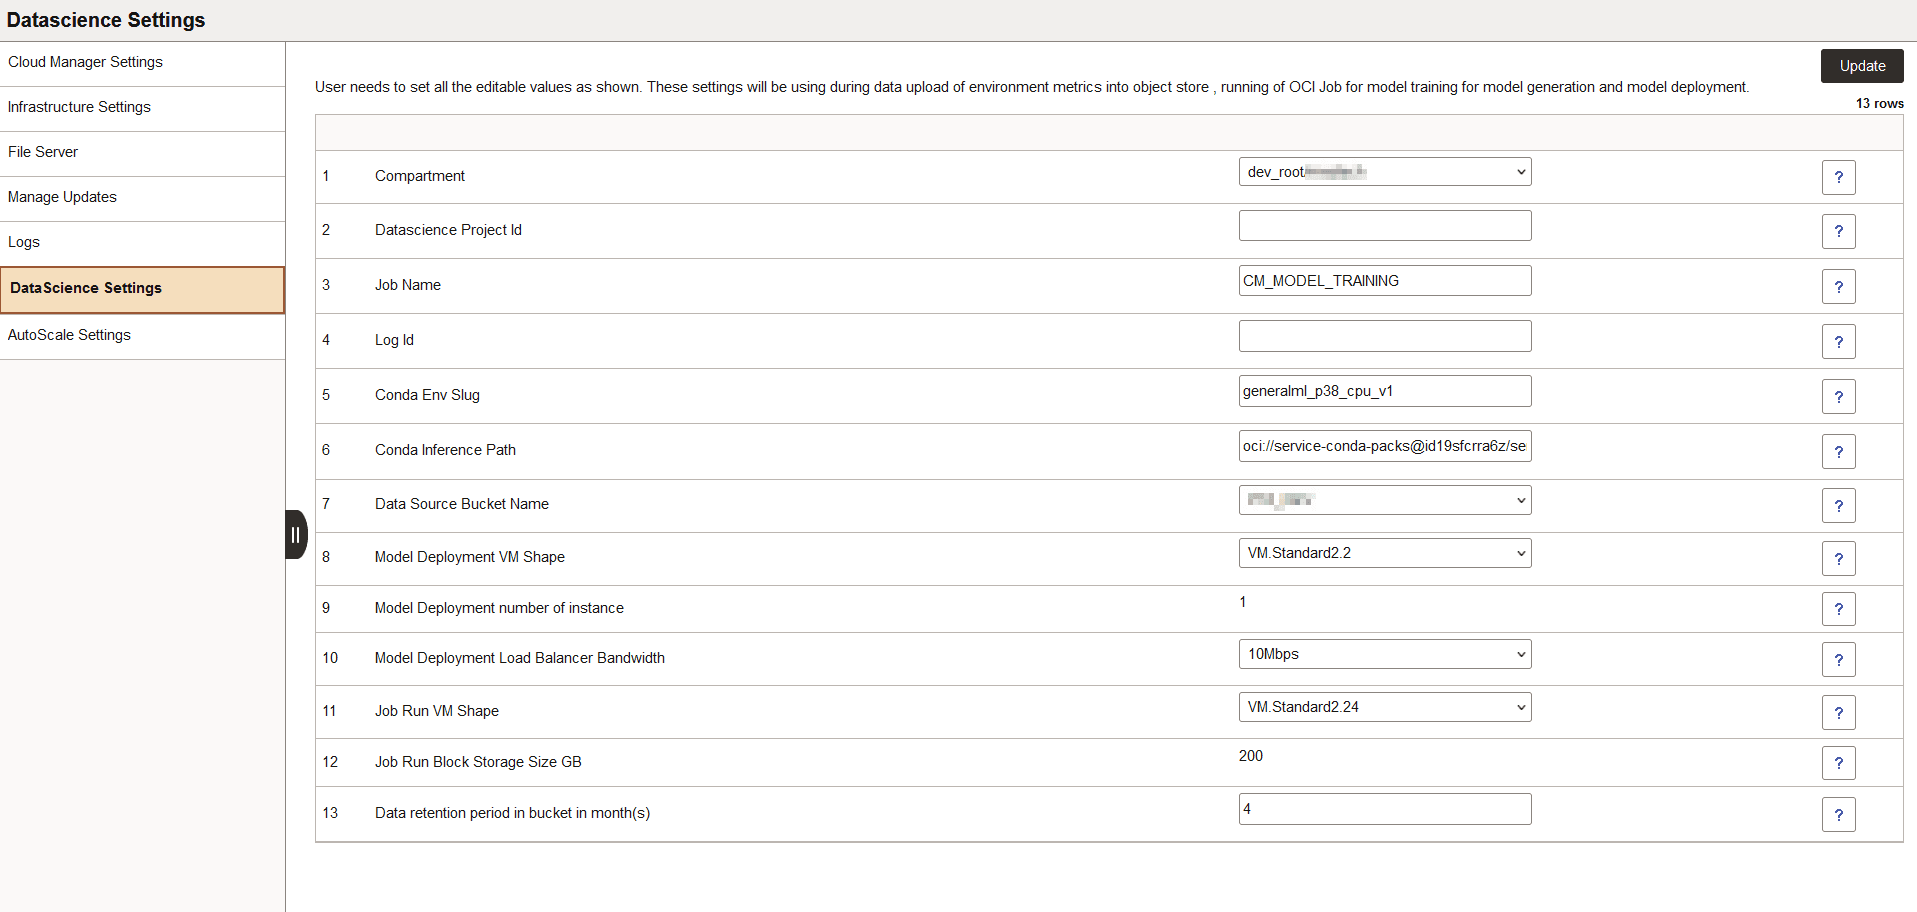
The Data Science page (ECL_CM_DS_SETNG_FL) is required in order to use the Auto Scaling feature with Oracle Data Science. Integration to Data Science is optional.
Navigation:
Click the Cloud Manager Settings tile on the delivered Cloud Manager Fluid home page. The Cloud Manager Settings page is displayed. On the Cloud Manager Settings page, click the Data Science Settings link displayed on the left panel.
This example illustrates the fields and controls on the DataScience Settings page.
|
Field or Control |
Description |
|---|---|
|
Compartment |
(Required) Compartment where Data Science is installed. |
|
VCN |
(Required) VCN for Data Science resource. |
|
Subnet |
(Required) The subnet used for Data Science must be a private subnet. |
|
Data Science Project ID |
(Optional) The project ID of the project created under selected compartment and subnet. If the project ID is not supplied the project name will be defaulted to CM_MODEL_TRAINING. |
|
Job Name |
(Required) A Name for the data science Job. This has a default value as CM_MODEL_TRAINING. |
|
Log ID |
(Optional) Specify the log ID where you want to direct the OCI logs. Keeping this empty will create a group name mltraininglogs and default log name as MODEL_TRAINING_<YYY-MM-DD>. |
|
Conda Env Slug |
The version of prebuilt Data Science conda environment. This value should not be modified. |
|
Conda Inference Path |
The path of the prebuilt Data Science conda environment package. This path is used for setting up a conda environment for model training. This value should not be modified. |
|
Data Source Bucket |
(Required) Specify the bucket that will be used for data upload and model training. |
|
Model Deployment VM Shape |
(Required) Specify VM shape to be used for model deployment. |
|
Model Deployment number of instance |
This is a read only field. Block storage to be used for Data Science job run. |
|
Model Deployment Load Balancer Bandwidth |
(Required) Specify load balancer bandwidth to be used for model deployment. |
|
Job Run VM Shape |
(Required) Specify the VM shape to be used for Data Science job run. |
|
Job Run Block Storage Size GB |
This is a read only field. Block storage to be used for Data Science job run. |
|
Data Retention period in bucket in month(s) |
(Required) Specify the data retention period in months. Any data file beyond this period will be purged. |
See the tutorial Create Data Science Resources for Auto Scaling in Cloud Manager (Optional) at https://docs.oracle.com/en/applications/peoplesoft/cloud-manager/index.html#InstallationTutorials.
Use the AutoScale Settings page (ECL_MLNOTF_SET_FL) to control the notifications for the following event types:
Monitoring: This notification event is triggered when an erroneous condition occurs during prediction flow.
Scaling: This event is triggered when you need to take an action or an action is already taken by the prediction flow.
This example illustrates the fields and controls on the AutoScale Settings page.
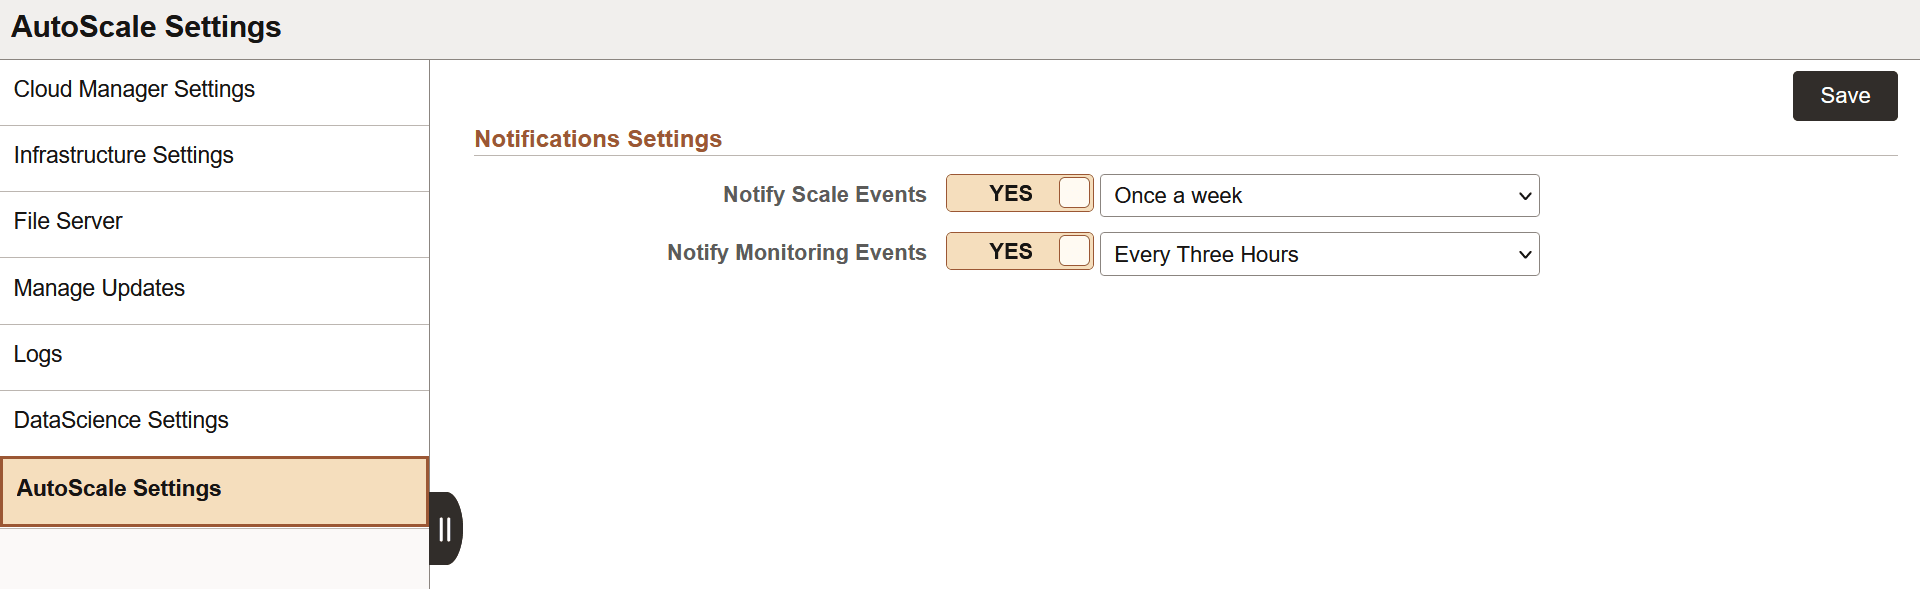
Auto Scale settings under Cloud Manager Settings are applicable to all environments by default. You can override this settings in Environment specific Auto Scale Settings. See Configuring AutoScale Settings.
Cloud Manager sends you an email notification about all the bookkeeping events at the end of the day at around 11:50 p.m.
You can select the following intervals in Notify Scale Events:
Every Six Hours
Every Three Hours
Every Time
Once Daily
Once a week
When you select the notification interval as Once a week, you will receive email notification only on Friday. You need to configure the Notification Topic OCID to receive the email notification.
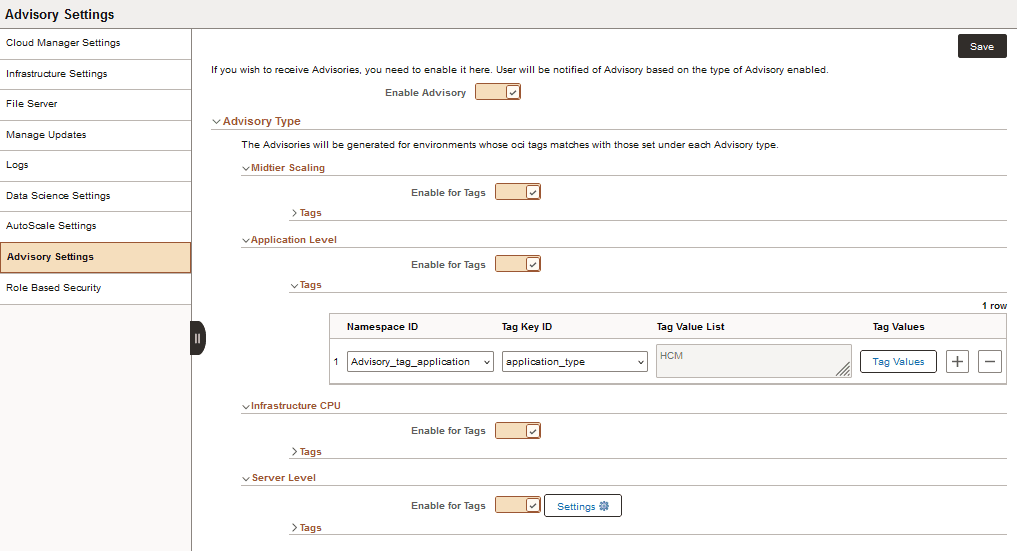
Use the Advisory Settings page (ECL_CMRECOM_SET_FL) to enable notifications for the advisories generated.
Whenever an action is completed or a specified issue is detected, Cloud Manager generates advisories to suggest the best course of action to be taken. The advisory settings on this page apply to all provisioned environments in Cloud Manager. See Configuring and Reviewing Advisories for information on enabling and viewing advisories at the environment level.
This example illustrates the fields and controls on the Advisory Settings page. Definitions for the fields and controls appear following the example.
|
Field or Control |
Description |
|---|---|
|
Enable Advisory |
Select to enable notifications for all advisories. This is the global setting for enabling or disabling advisories. The types of advisories are:
|
|
Enable for Tags |
Select to enable generation of advisories for environments whose tag matches any of the configured tags. Cloud Manager generates advisories only for environments that have tags. |
|
Tags |
Choose tags to identify the environments for which you want advisories. The latest values of Tag Namespace, Tag Key, and Tag Value are displayed in the Tags section for each advisory type, if you select Enable for Tags. See Configuring Tagging. Tag Value List is a non-editable field. On clicking Tag Values, you can set the tag value. |
|
Settings |
Click to open the Settings dialog box for Server Level advisories. Enter a value for the boot volume threshold. When the available boot volume space drops below this value, a Server Level advisory is generated. |
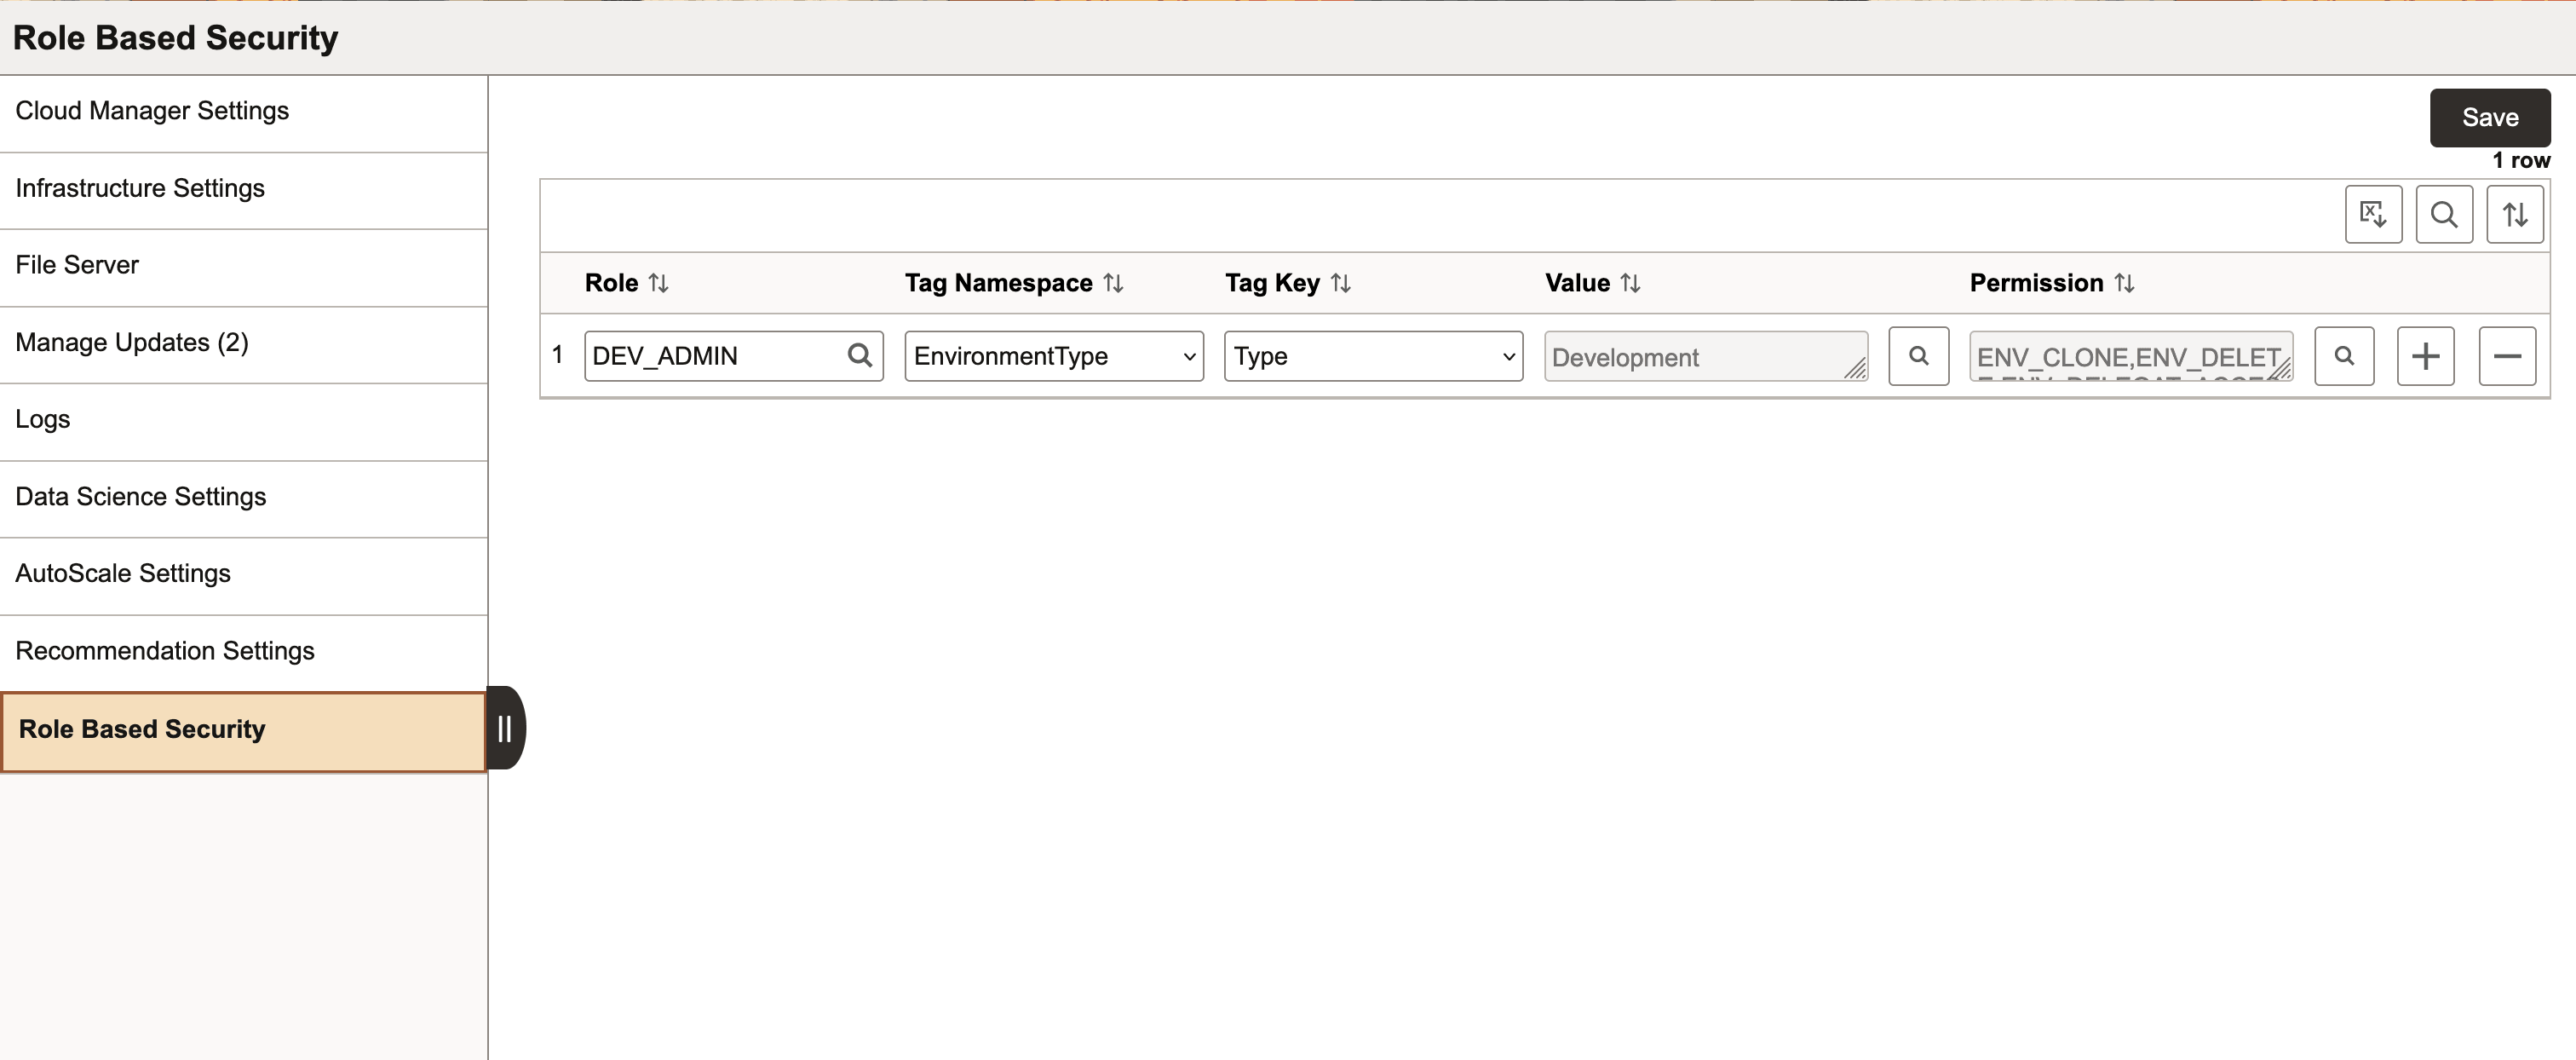
The Role Based Security page (ECL_ROL_BAS_FL) in Cloud Manager Settings tile provides the ability to delegate access to a group of users on environments that are logically grouped using environment tags.
This feature allows Cloud Manager administrators to map roles with tags and permissions. A user assigned to a role can thus access a set of actions associated with permissions on environments with a set of tags. On the Role Based Security page, Cloud Manager administrator maps each user with a particular role, and then each role with a tag is given corresponding permissions.
This example illustrates the fields and controls on the Role Based Security page. Definitions for the fields and controls appear following the example.
|
Field or Control |
Description |
|---|---|
|
Role |
Indicates the roles that have access to the environments. |
|
Tag Namespace |
Created in OCI as a container for the tag keys. This is a natural grouping that can be used to apply a policy. |
|
Tag Key |
Tag keys are created within a Tag Namespace. This is the name that refers to the tag. |
|
Value |
Value that the user applying the tag adds to the tag key. The tag values are Development, Test, and Production. |
|
Permission |
The permission names correspond to permission lists that determine which pages and menu items are visible to the user. |
This example illustrates the functionality of Role Based Security.
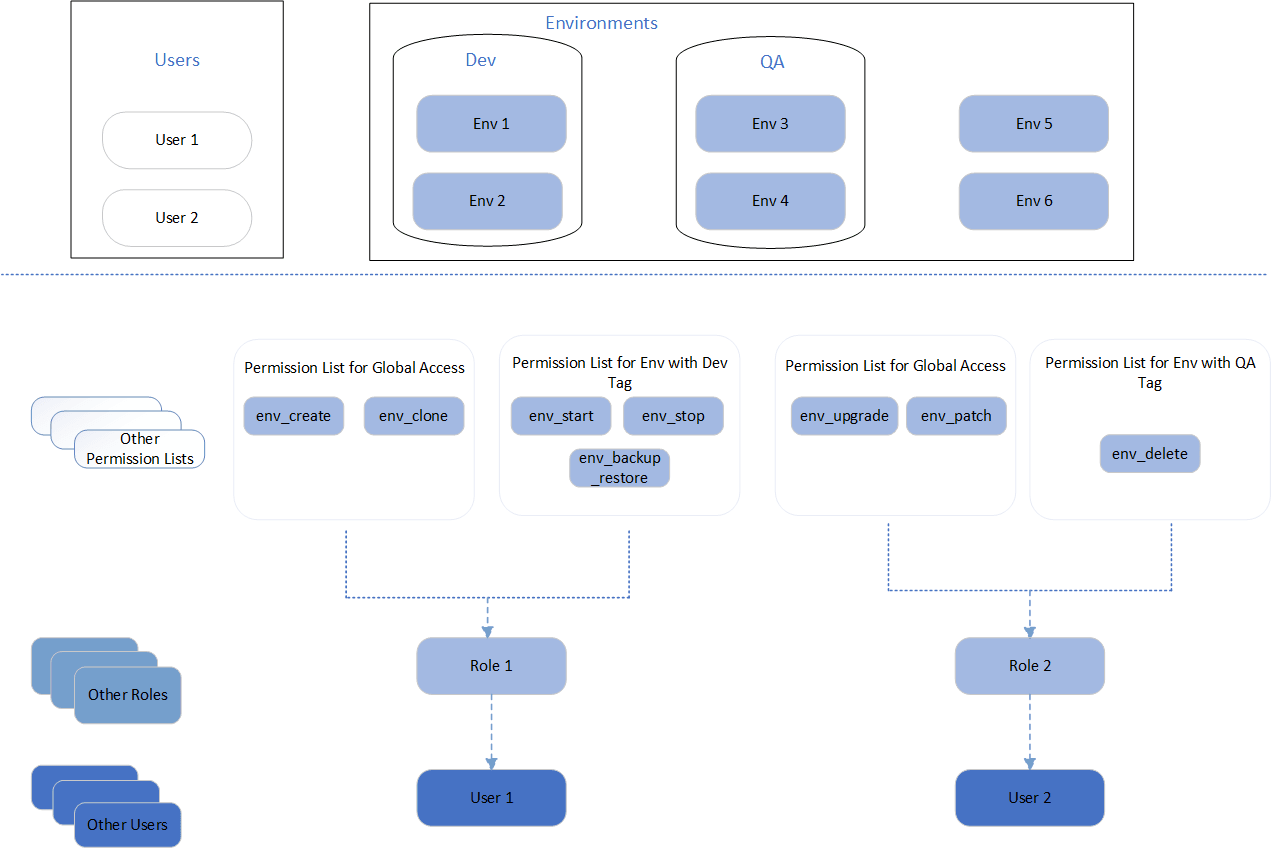
In this example, User 1 is mapped to Role 1 and User 2 is mapped to Role 2. User 1 gets create and clone access on all environments and Start, Stop and Backup-Restore access on environments with Dev tag. Similarly, User 2 gets Upgrade and Patch access on all environments and Delete access on environments with QA tag.
Note: Global permission for roles is given through Menu > PeopleTools > Security > Roles > Definition of a Role. Role Based Security page is used to provide specific permissions to a combination of roles and environments.
The following permission names correspond to permission lists that determine which pages and menu items are visible to the user.
|
Permission Name |
Permission List |
Description |
|---|---|---|
|
ENV_ATTRIBUTES |
PACL_ENV_ATTRIBUTES |
Manage environment attributes. |
|
ENV_BKUP_RESTOR |
PACL_ENV_BKUP_RESTOR |
Backup and restore the environment. |
|
ENV_CLONE |
PACL_ENV_CLONE |
Clone the environment. |
|
ENV_DELETE |
PACL_ENV_DELETE |
Delete the environment. |
|
ENV_DETAILS |
PACL_ENV_DETAILS |
View environment details. |
|
ENV_DR |
PACL_ENV_DR |
Create a standby environment for disaster recovery. |
|
ENV_IMPORT |
PACL_ENV_IMPORT |
Import an environment. |
|
ENV_IMPORT_NODE |
PACL_ENV_IMPORT_NODE |
Import an environment node. |
|
ENV_INFRA_PATCH |
PACL_ENV_INFRA_PATCH |
Apply an Infrastructure CPU patch to the environment. |
|
ENV_LB_SETTING |
PACL_ENV_LB_SETTING |
Manage load balancer settings for the environment. |
|
ENV_MANAGE_NODE |
PACL_ENV_MANAGE_NODE |
Manage environment nodes. |
|
ENV_MANAGE_PUM |
PACL_ENV_MANAGE_PUM |
Manage PUM environments. |
|
ENV_MANAGE_TAG |
PACL_ENV_MANAGE_TAG |
Manage Tags for the environment. |
|
ENV_PASSWORD |
PACL_ENV_PASSWORD |
Manage passwords on the environment. |
|
ENV_PATCH |
PACL_ENV_PATCH |
Apply a patch to the environment. |
|
ENV_POLICY |
PACL_ENV_POLICY |
Manage policies for the environment. |
|
ENV_REFRESH |
PACL_ENV_REFRESH |
Refresh the environment. |
|
ENV_START |
PACL_ENV_START |
Start the environment |
|
ENV_STOP |
PACL_ENV_STOP |
Stop the environment |
|
ENV_UPGRADE |
PACL_ENV_UPGRADE |
Upgrade the environment. |