Creating a Template
Use the Environment Template wizard to create a new template using a step by step guided process.
By default, the create template guided process involves the following steps:
Entering general details.
Selecting topologies.
Defining security and policies.
Submitting the details.
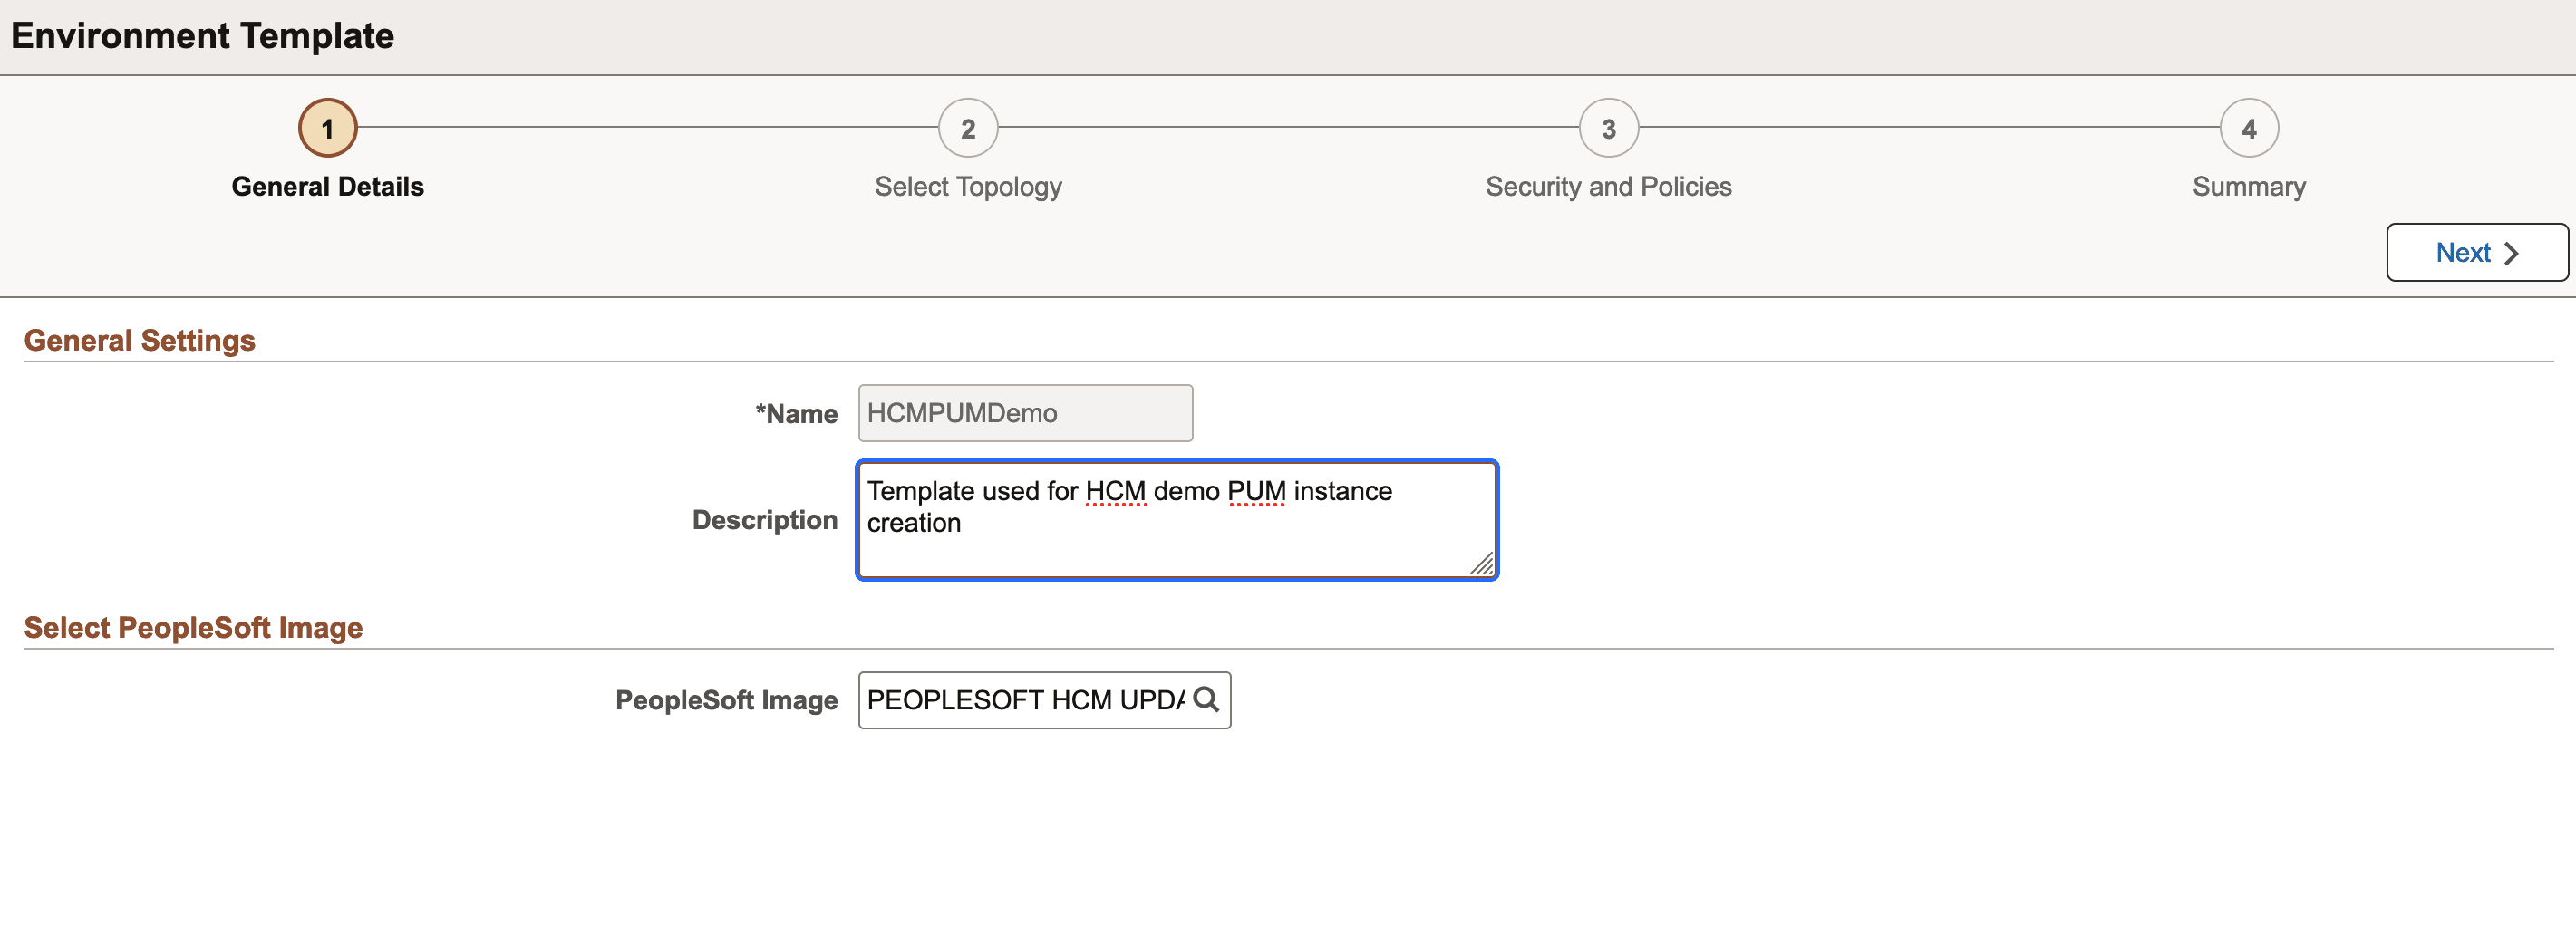
Use the Environment Template – General Details page to enter the template name, description, and select a database.
Navigation:
Click the Add New Template button on the Environment Template landing page.
This example illustrates the fields and controls on the Environment Template – General Details page. You can find definitions for the fields and controls later on this page.
|
Field or Control |
Description |
|---|---|
|
Name |
Name of the template which you want to create. It is a required field. |
|
Description |
Add a description for the template. |
|
PeopleSoft Image |
Select a PeopleSoft application DPK from the list of DPKs available in the Repository. |
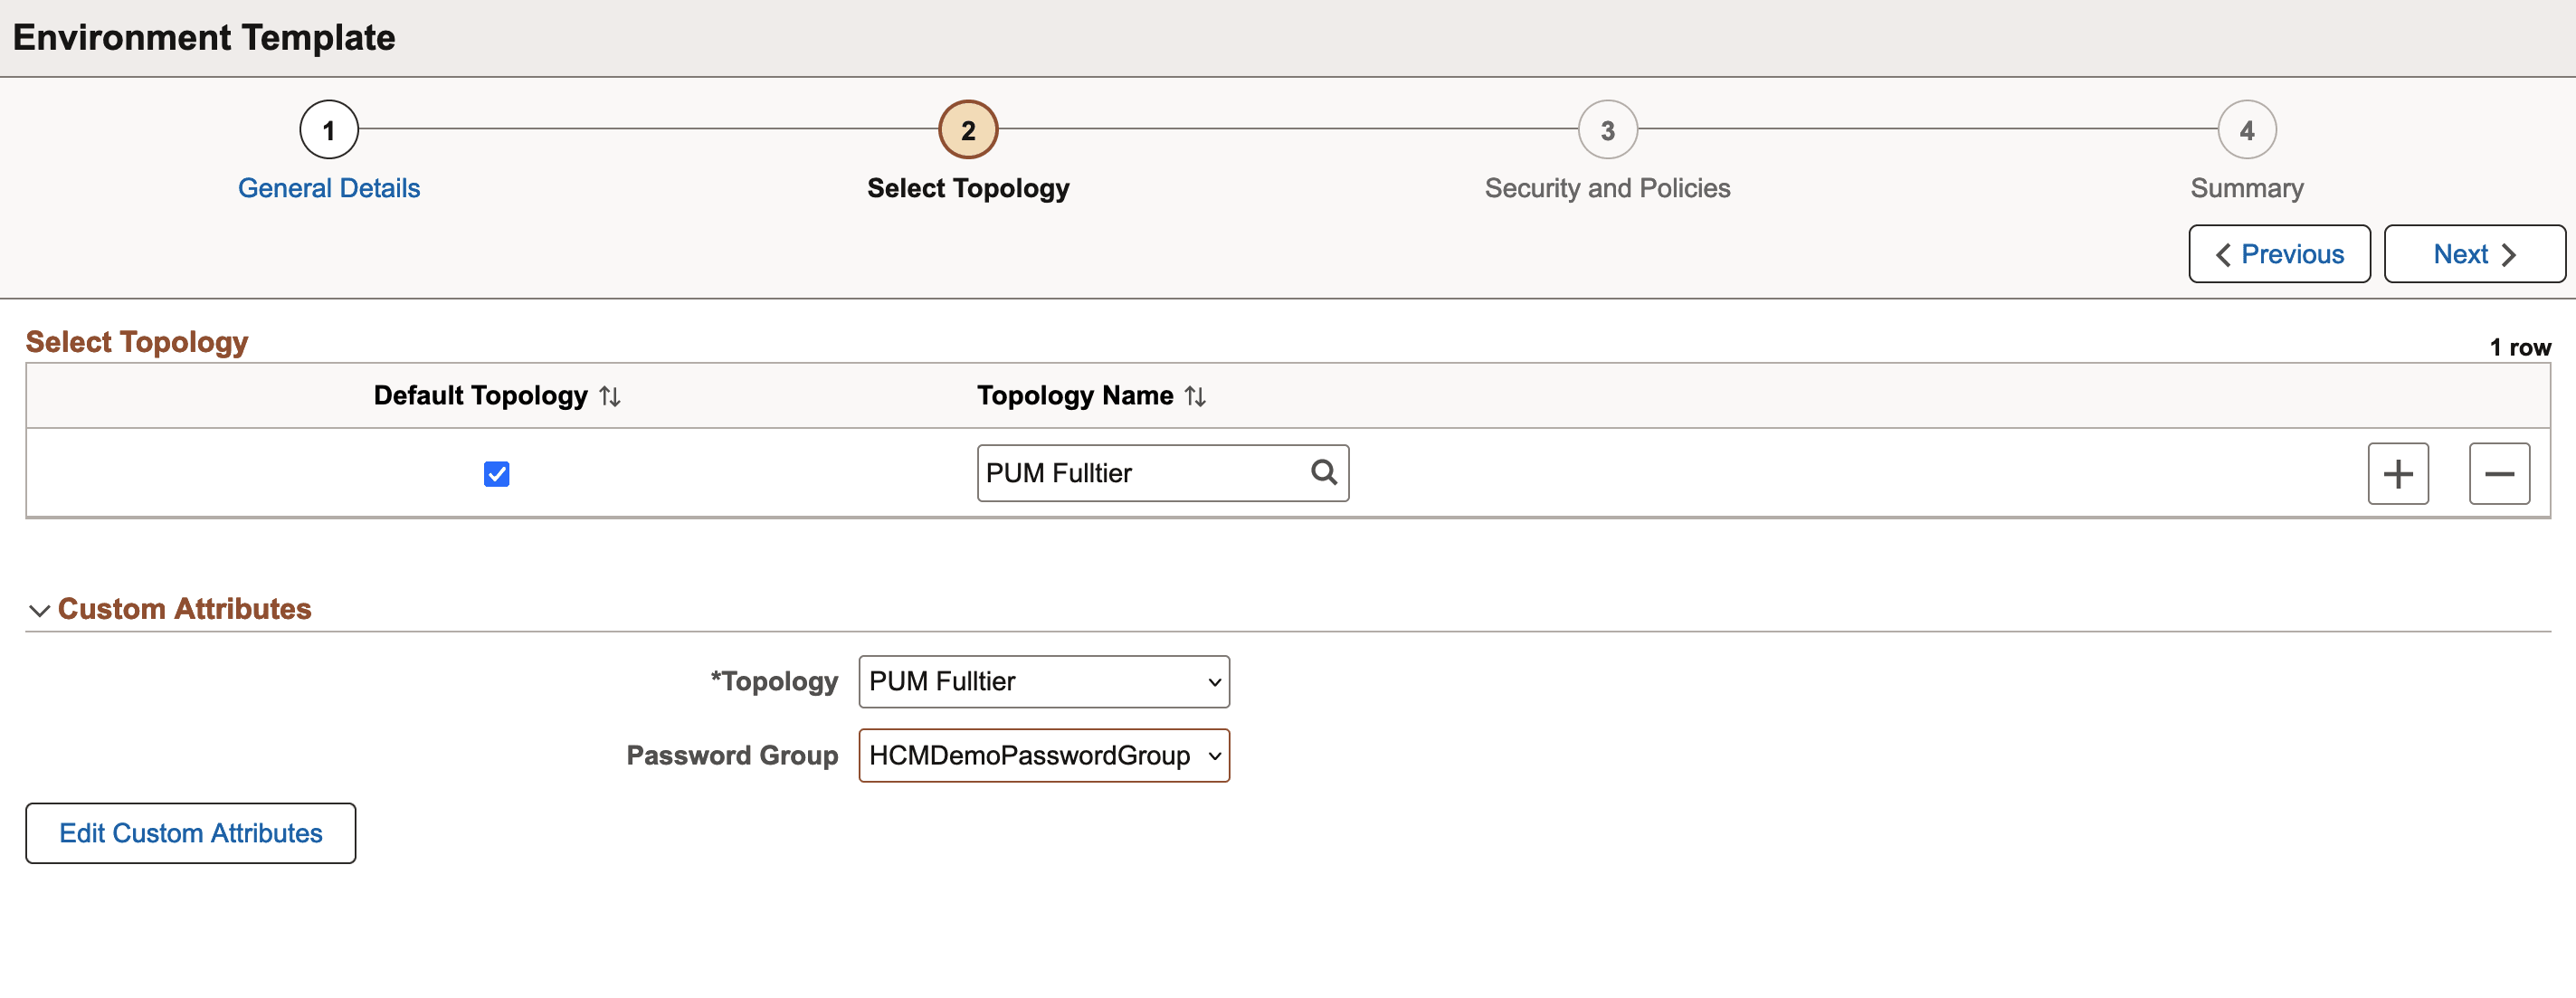
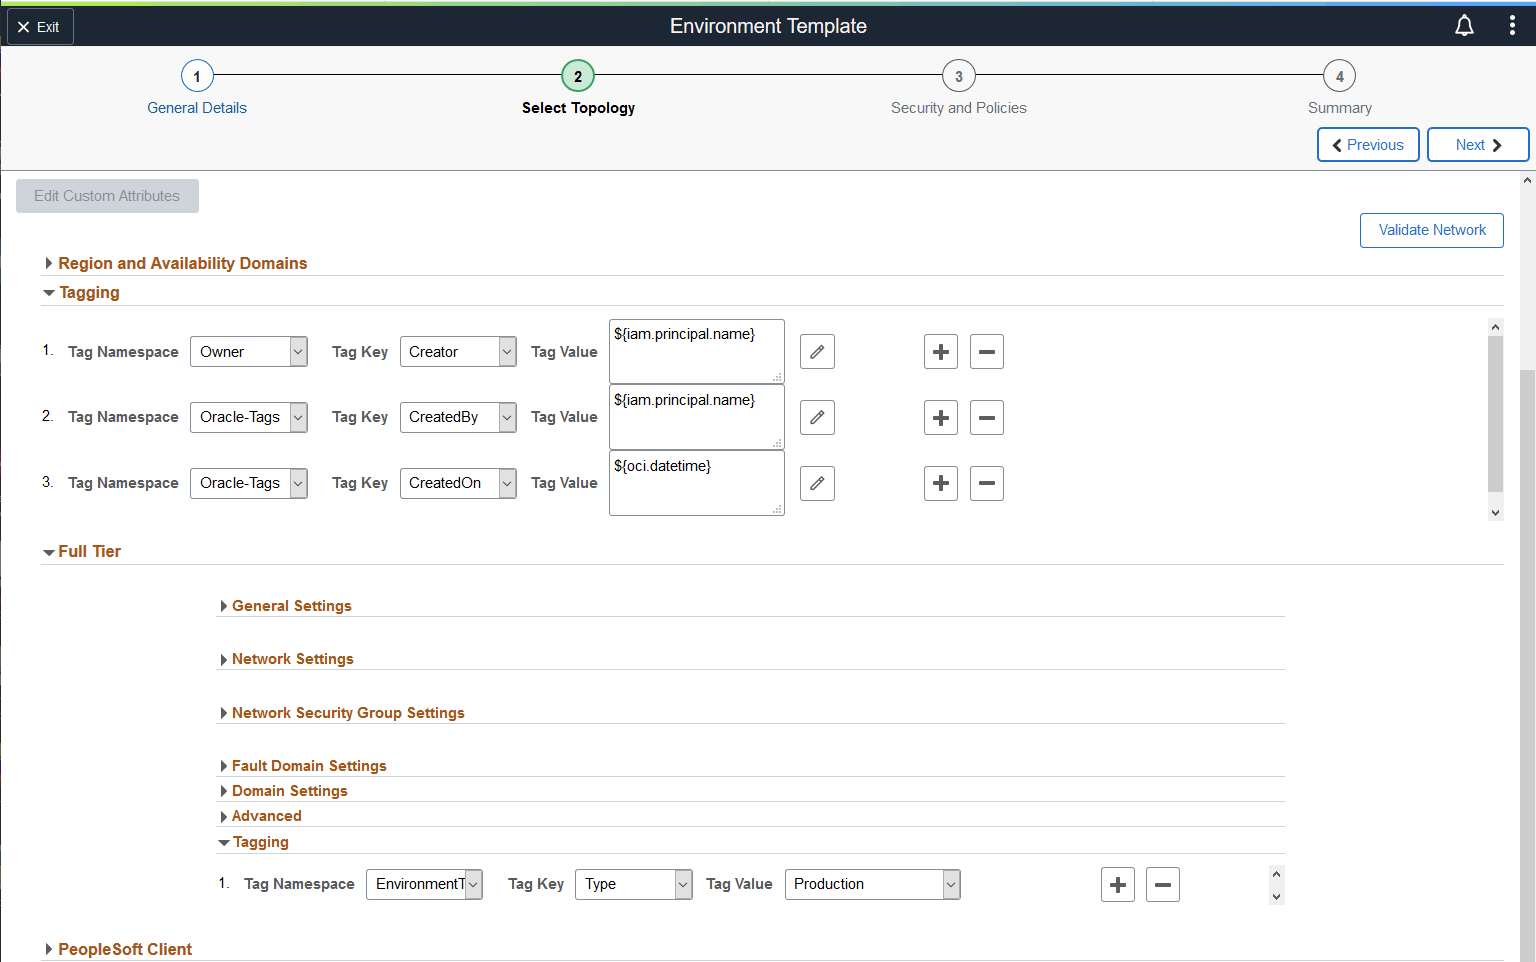
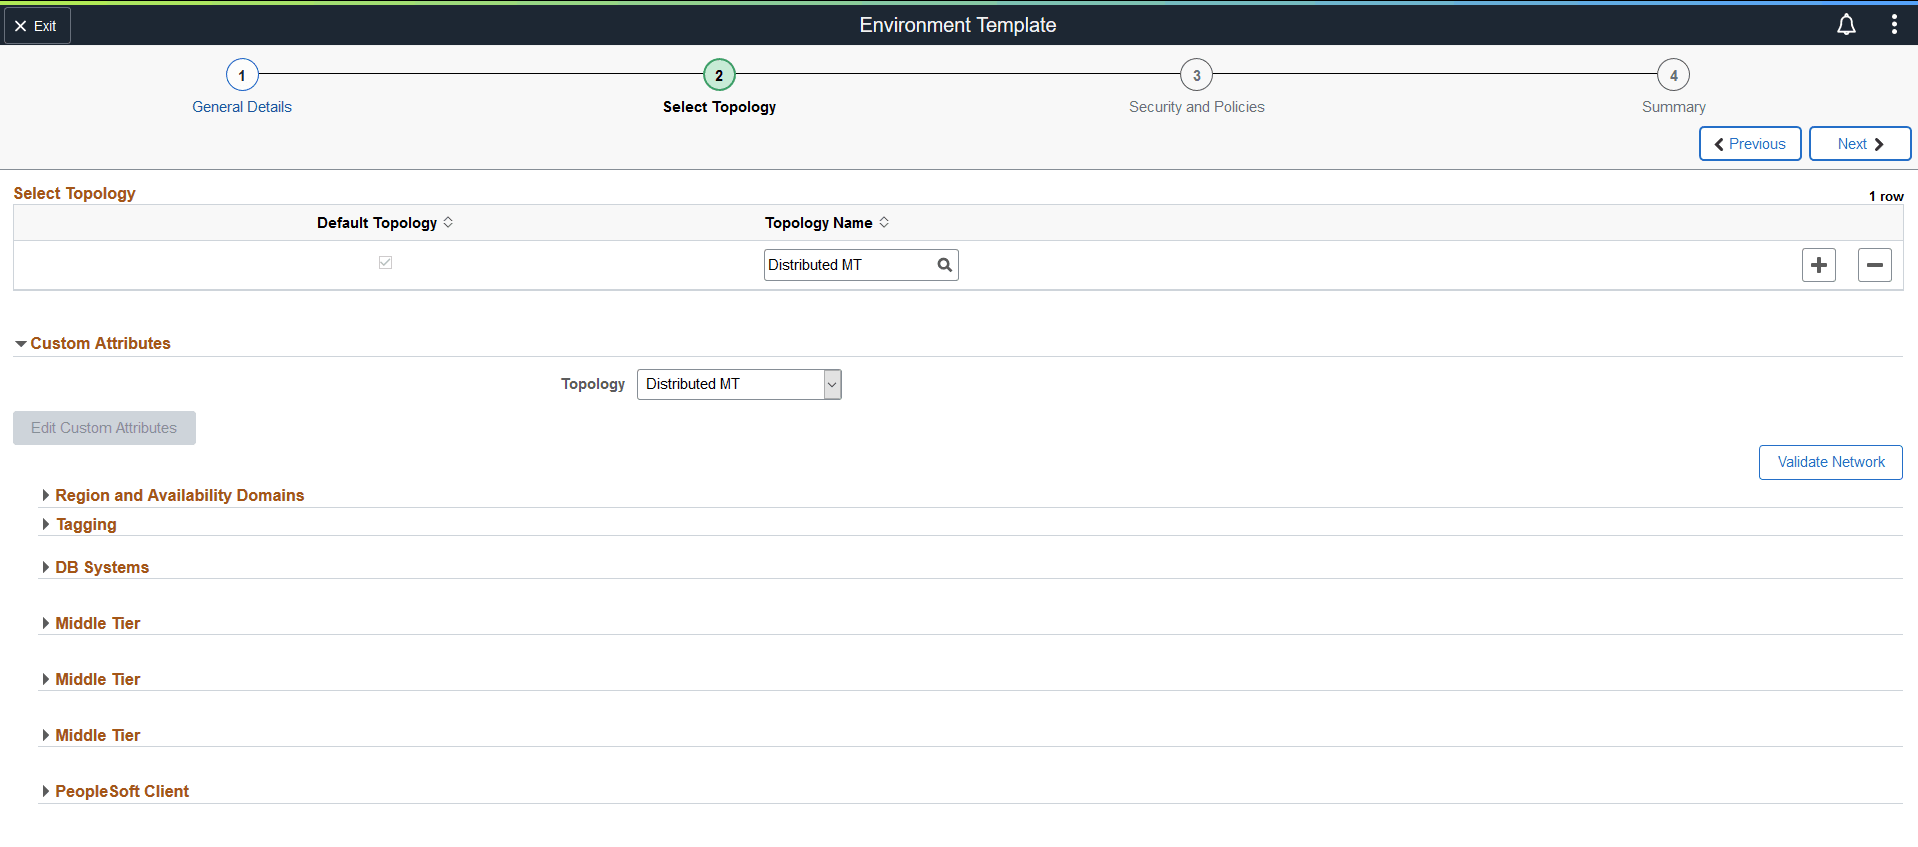
Use the Environment Template – Select Topology page to select the topology that you have already defined. You may edit the default attributes associated with the selected topology.
Navigation:
Click Next in the Environment Template – General Details page.
Click Step 2, Select Topology, at the top of the page.
This example illustrates the fields and controls on the Select Topology page. You can find definitions for the fields and controls later on this page.
|
Field or Control |
Description |
|---|---|
|
Default Topology |
Users can mark one of the topology associated with the template as the default topology. During the environment creation process using a template, you can override this default topology and select any other topology associated with that template. If you don’t want to override, then the default topology will get used automatically. Click + to add more topologies. A new row of empty fields appears below the existing record. You can configure the fields based on the requirements. Note: Be sure to select the topology under the Override Topology section and then continue with the template creation. |
|
Topology Name |
Select the required topology that you want to include in the template. Note: While selecting a topology, the custom attributes associated with the selected topology is displayed. It is possible to override the default attributes based on the requirements. |
If the selected topology that includes the Search Stack is selected, a Monitoring Services section is available to enable monitoring.
Note: Monitoring must be enabled for auto scaling. See Setting Up Auto Scaling.
This example illustrates the fields and controls on the Select Topology page when the topology includes Search Stack.
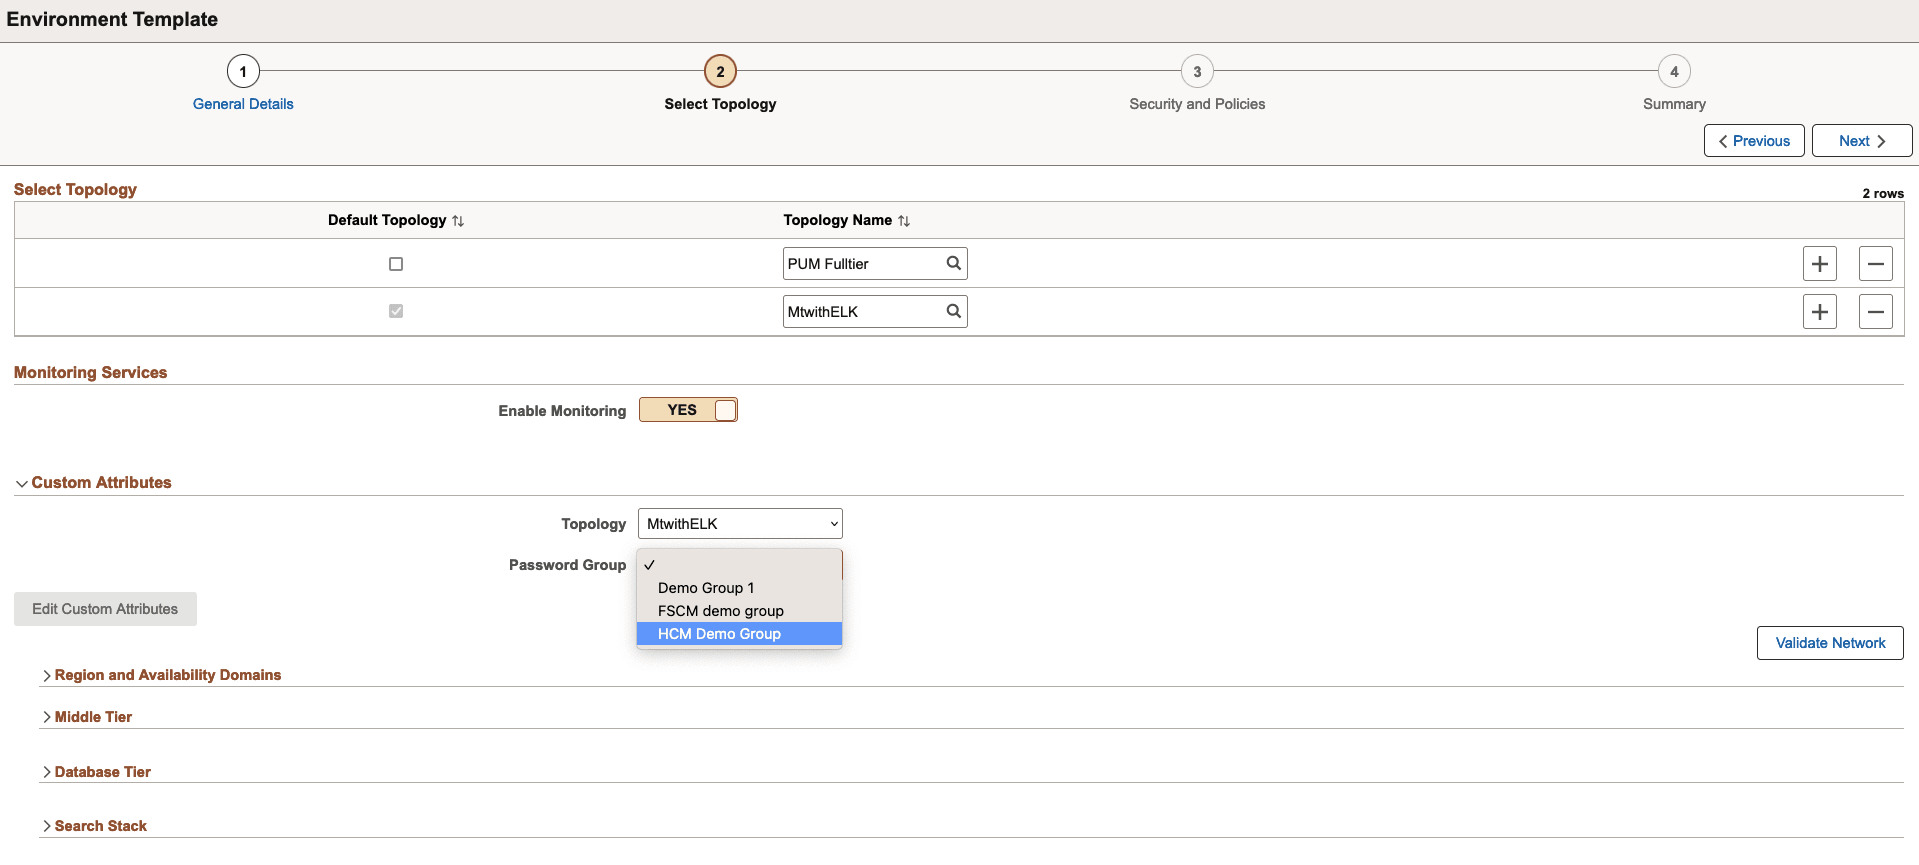
Expand the Custom Attributes section.
Select the required topology.
Select the required password group. See Password Groups.
Enter the required attributes and click Next.
Note: Cloud Manager allows users to add customization during template creation under Edit Custom Attributes section. This customization can be added only to middle tier and database tier. The customization will be available to users when they select this template. This facilitates the user to define custom attribute values for the environment being deployed.
After entering the required attributes, click the Validate Network button to ensure your infrastructure settings are correct and the network is valid.
This validates whether the port is open for an incoming/outgoing connection across different subnets and VCN. The connection can be:
From Cloud Manager to VM
From VM to Cloud Manager
From VM to VM
Some of the validations are based on user input (Jolt Port, WSL Port, Database Server Port, HTTP PIA Port, HTTPS PIA Port).
The following implicit validations are performed:
From
To
Every subnet
Cloud Manager subnet: NFS ports TCP - 2049, 111, 892, 32803
Cloud Manager subnet
Every subnet (including itself) except Windows VM subnet: ssh port 22
Cloud Manager subnet
Windows VM’s subnet: WinRM TCP Ports 5985, 5986
Cloud Manager subnet
Windows VM’s subnet: CIFS ports TCP 445, 139, 138, 137
The following sections must be configured in every template.
Region and Availability. See Configuring Region and Availability Domains
Network for node. See Configuring Network Settings
Network Security Groups (optional) for node. See Configuring Network Security Group Settings
Fault domain for the node. See Configuring the Fault Domain
Note: DB Systems node does not have fault domain setting.
Advanced section. See Configuring Advanced Section
Note: Add Node operation and Search nodes do not include an Advanced section.
The General Setting and Domain Settings depend on the type of node.
Fulltier. See Configuring Full Tier Template Settings.
DB Systems. See Configuring DB Systems Settings.
Web Server. See Configuring Web Server Tier Settings.
Application Server. See Configuring AppServer Tier Domain Settings.
Process Scheduler. See Configuring Process Scheduler General Setting and Configuring Process Scheduler Domain Settings.
Windows. See Configuring Windows Middle Tier General Settings.
PeopleSoft Client. See Configuring PeopleSoft Client General Settings.
Database Tier. See Configuring Database Tier.
Search Stack. See Configuring Search Stack General Settings.
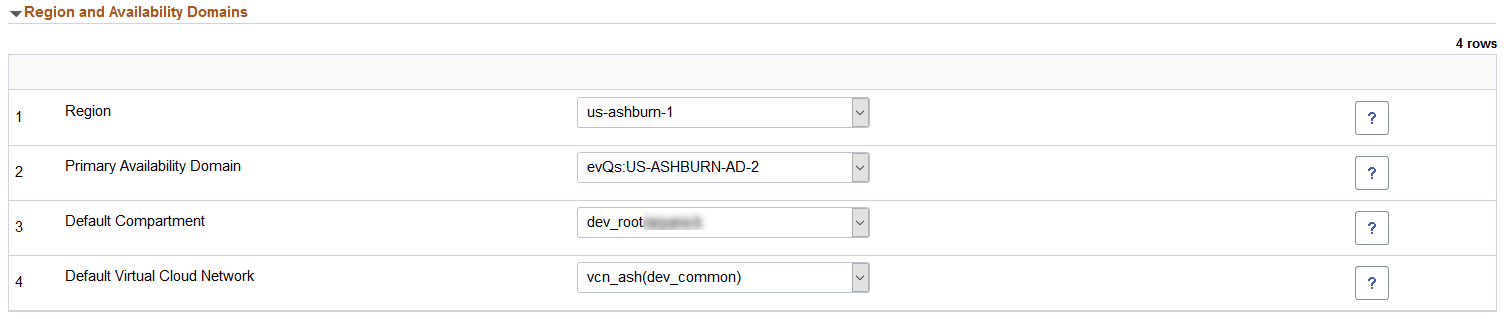
This example illustrates the fields and controls on the Region and Availability Domains section. You can find definitions for the fields and controls later on this page.
|
Field or Control |
Description |
|---|---|
|
Region |
A region is a localized geographic area, and an availability domain is one or more data centers located within a region. A region is composed of several availability domains. Note: Cloud Manager will provision and manage environments only in the region where it is deployed. See Infrastructure Settings Page. |
|
Primary Availability Domain |
Availability domain in OCI. |
|
Default Compartment |
Compartments allow you to organize and control access to your cloud resources. A compartment is a collection of related resources (such as instances, virtual cloud networks, block volumes) that can be accessed only by certain groups that have been given permission by an administrator. Select a default compartment, this compartment will be used for all tiers in the template. |
|
Default Virtual Cloud Network |
Virtual Cloud Network within OCI. A virtual cloud network is a virtual version of a traditional network—including subnets, route tables, and gateways on which your instances run. Select the default Virtual Cloud Network, this will be the default VCN used for all tiers in the template. |
For details on setting up the OCI environment, refer to the tutorial Prepare to Install PeopleSoft Cloud Manager.
Note: In OCI, the templates will not have any default values for Region and Availability Domains section. All templates must be updated with these settings before the template can be used to deploy an environment. See Creating an Environment.
Tags are created in a Compartment in OCI. Tags are optional and can be added to an environment. To create tags in OCI see the tutorial on creating tags, at https://docs.oracle.com/en/applications/peoplesoft/cloud-manager/index.html#InstallationTutorials.
Use the Tagging section to associate a tag with a template or node in the template.
Note: If default tags are created in a compartment in OCI, the tags are automatically applied to all resources in that compartment at the time of creation, regardless of the permissions of the user who creates the resource.
This example illustrates the fields and controls in the Tagging section for a template or node in a template. You can find definitions for the fields and controls later on this page.
|
Field or Control |
Description |
|---|---|
|
Tag Namespace |
Created in OCI as a container for the tag keys. This is a natural grouping that can be used to apply a policy. |
|
Tag Key |
Tag keys are created within a Tag Namespace. This is the name that refers to the tag. |
|
Tag Value |
The tag value is the value that the user applying the tag adds to the tag key. This may be a list of values or user may be allowed to enter any value when the tag is applied. Tag values are listed below. |
OCI Tag Variables
This table lists OCI tag variables.
|
Variable |
Description |
|---|---|
|
${iam.principal.name} |
The name of the principal that tagged resource. |
|
${iam.principal.type} |
Type of principal that tagged resource. |
|
${oci.datetime} |
The date and time that the tag was created. |
Cloud Manager Tag Variables
The following variables are supported for Cloud Manager.
|
Variable |
Description |
|---|---|
|
${cloudmanager.env_name} |
Name of provisioned Cloud Manager environment. |
|
${cloudmanager.app_type} |
Application type (HRMS, FSCM, and so on). |
|
${cloudmanager.tools_ver} |
PeopleTools version. |
|
${cloudmanager.app_ver} |
Application Version. |
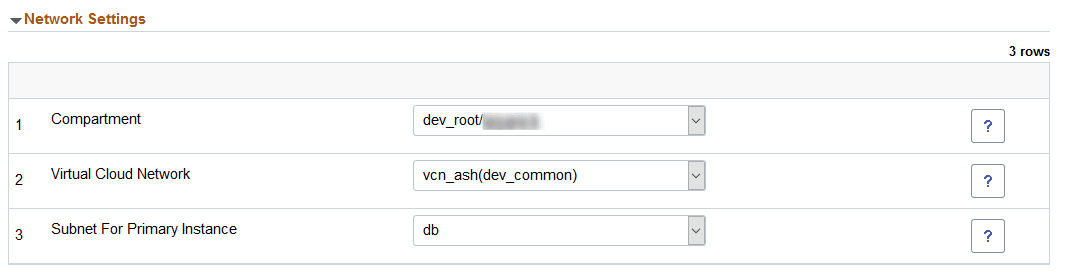
Each node in the template must be configured for subnet where it will run. The compartment and VCN default to the values entered in the Region and Availability Domain section, these values can be changed to run in a different compartment or VCN. For more information on VCN peering see the tutorial Use Custom or Private Network Resources with PeopleSoft Cloud Manager at https://docs.oracle.com/en/applications/peoplesoft/cloud-manager/index.html#InstallationTutorials.
This example illustrates the fields and controls on the Network Setting section. You can find definitions for the fields and controls later on this page.
|
Field or Control |
Description |
|---|---|
|
Compartment |
The default compartment is displayed, you can select a different compartment for the network. |
|
Virtual Cloud Network |
The default VCN is displayed, you can select a different VCN for this node. |
|
Subnet For Primary Instance |
Select the subnet where this node will run. |
Cloud Manager supports Network Security Groups (NSG). Network Security Groups are set up outside of Cloud Manager. Up to 5 Network Security Groups can be assigned to a node.
See tutorial Use Custom or Private Network Resources with PeopleSoft Cloud Manager.
This example illustrates the fields and controls on the Network Security Group Settings section.

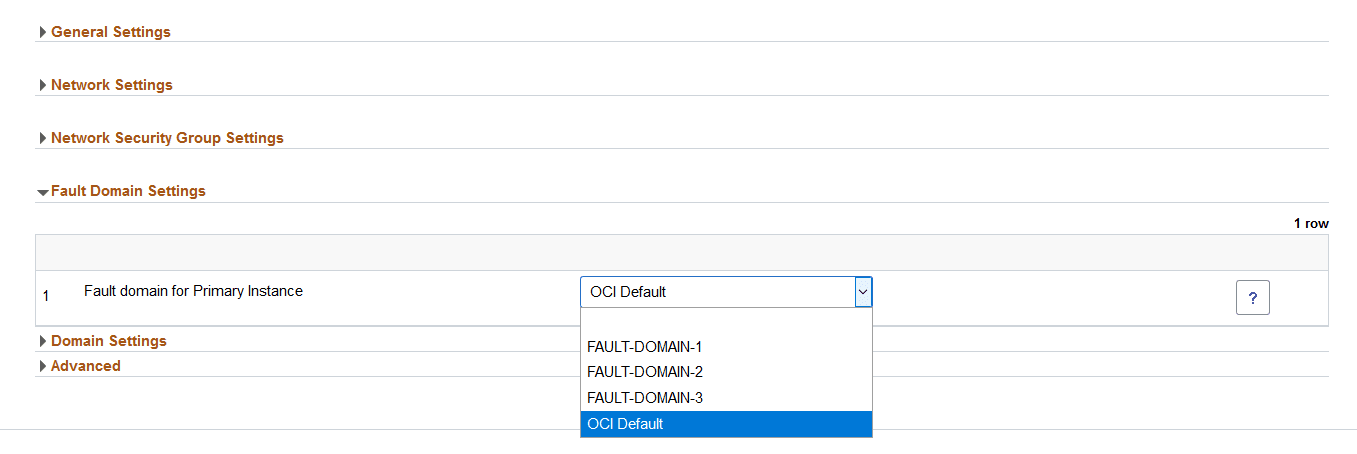
Each availability domain in OCI contains three fault domains for high availability. OCI randomizes the availability domains by tenancy to help balance capacity in data centers.
Use the Fault Domain Settings section to select which fault domain to use for a specific node. Select the fault domain from the drop down list, only fault domains in the availability domain for the node are listed and available.
If OCI Default is selected, OCI randomly selects the fault domain to use and customer is not aware of which fault domain is being used.
Note: DB Systems node does not have fault domain settings.
For more information on faults domains see Regions and Availability Domains.
This example illustrates the fields and controls on the Fault Domain section.
The Advanced section contains kernel parameters and Ulimit values. Expert administrators have the option to change these values.
Important! No validation is performed on these fields. Only operating system experts should change these values.
Note: Add Node operation and Search nodes do not include an Advanced section.
This example illustrates the fields and controls on the Advanced section.
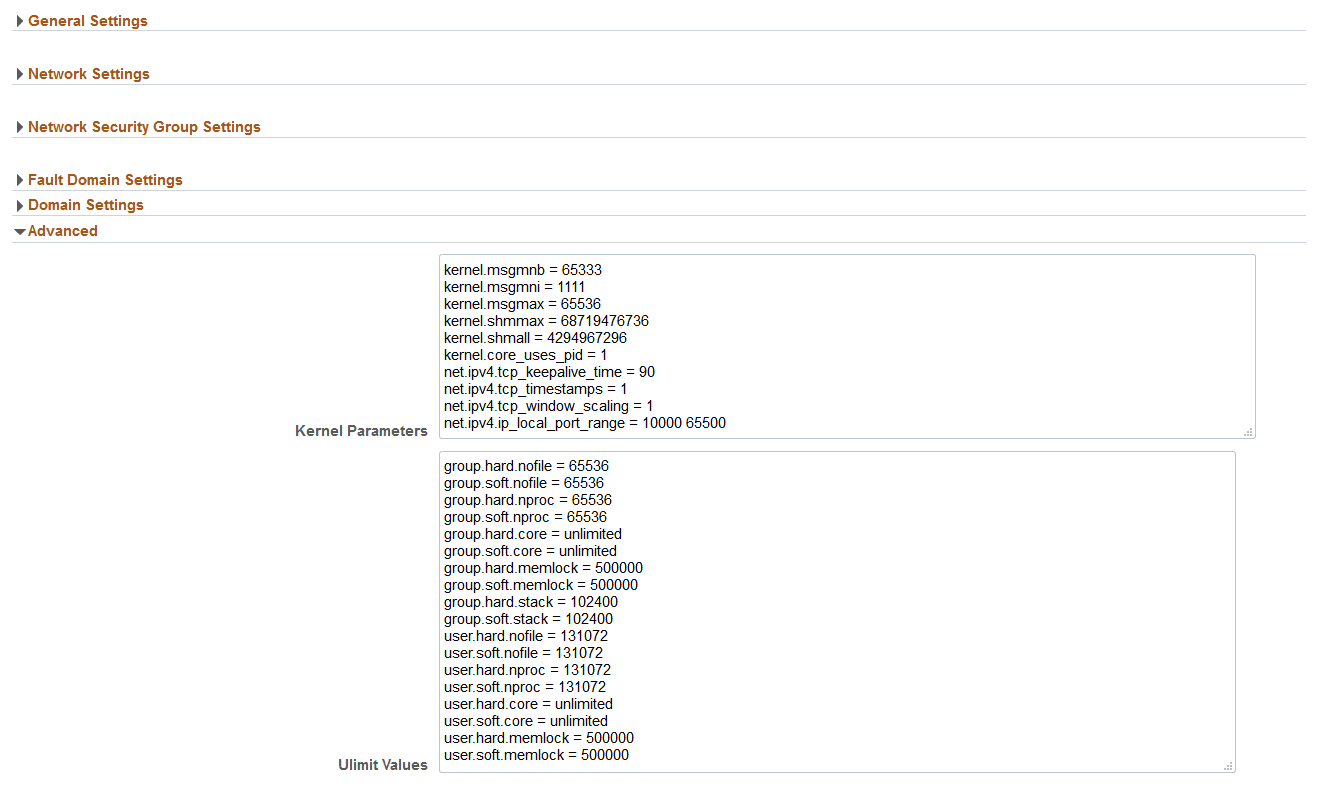
Ulimits
This input field allows you to set ulimit values for the Linux node. Each line of the input represents one ulimit entry. The format to be used for each line is as follows:
[user|group].[soft|hard].<limit name> = <value>The left side of the expression represents a ulimit, and the right side of the expression is a value of that ulimit. They are separated by an equal sign (=).
|
Field or Control |
Description |
|---|---|
|
user or group |
The key word “user” represents a limit for a Linux user, and the key word “group” represents a limit for a user group. Exactly which users and groups are added to the Linux configuration files is internally determined by the environment deployment process. You cannot set those actual user/group names here. |
|
soft or hard |
The keyword “soft” denotes the limit a process can use. It can later be increased by the corresponding user or group. The keyword “hard” denotes the maximum limit to which the soft limit can be raised to. |
|
limit name |
This is the name of the limit. Refer to the table below for the list of names |
|
value |
This is either a numeric value or the string “unlimited”. Refer to table below for a list of values and the units in which they have to be expressed |
This table lists the ulimit names.
|
Name |
Unit |
|---|---|
|
cpu |
Seconds |
|
fsize |
Blocks |
|
data |
Kilobytes |
|
stack |
Kilobytes |
|
core |
Blocks |
|
rss |
Kilobytes |
|
nofile |
Number of file descriptors |
|
as |
Kilobytes |
|
nproc |
Number of processes |
|
memlock |
Kilobytes |
|
lock |
Number of locks |
|
sigpending |
Number of queued signals |
|
nice |
Nice level (an integer) |
|
rtprio |
Realtime priority (an integer) |
|
rttime |
Number |
Kernel Parameters
The kernel parameters input field can be used for setting Linux kernel parameters. Each line represents one Linux parameter. The format of each line should be as follows:
<kernel parameter name> = <value>The list of all kernel parameters can be found from the main page of the Linux sysctl command.
Example Full Tier Node with Search Stack and COBOL
Based on the topology selected, the full tier contains the appropriate settings for the node. The examples in this section display full tier topology that includes Search Stack and COBOL.
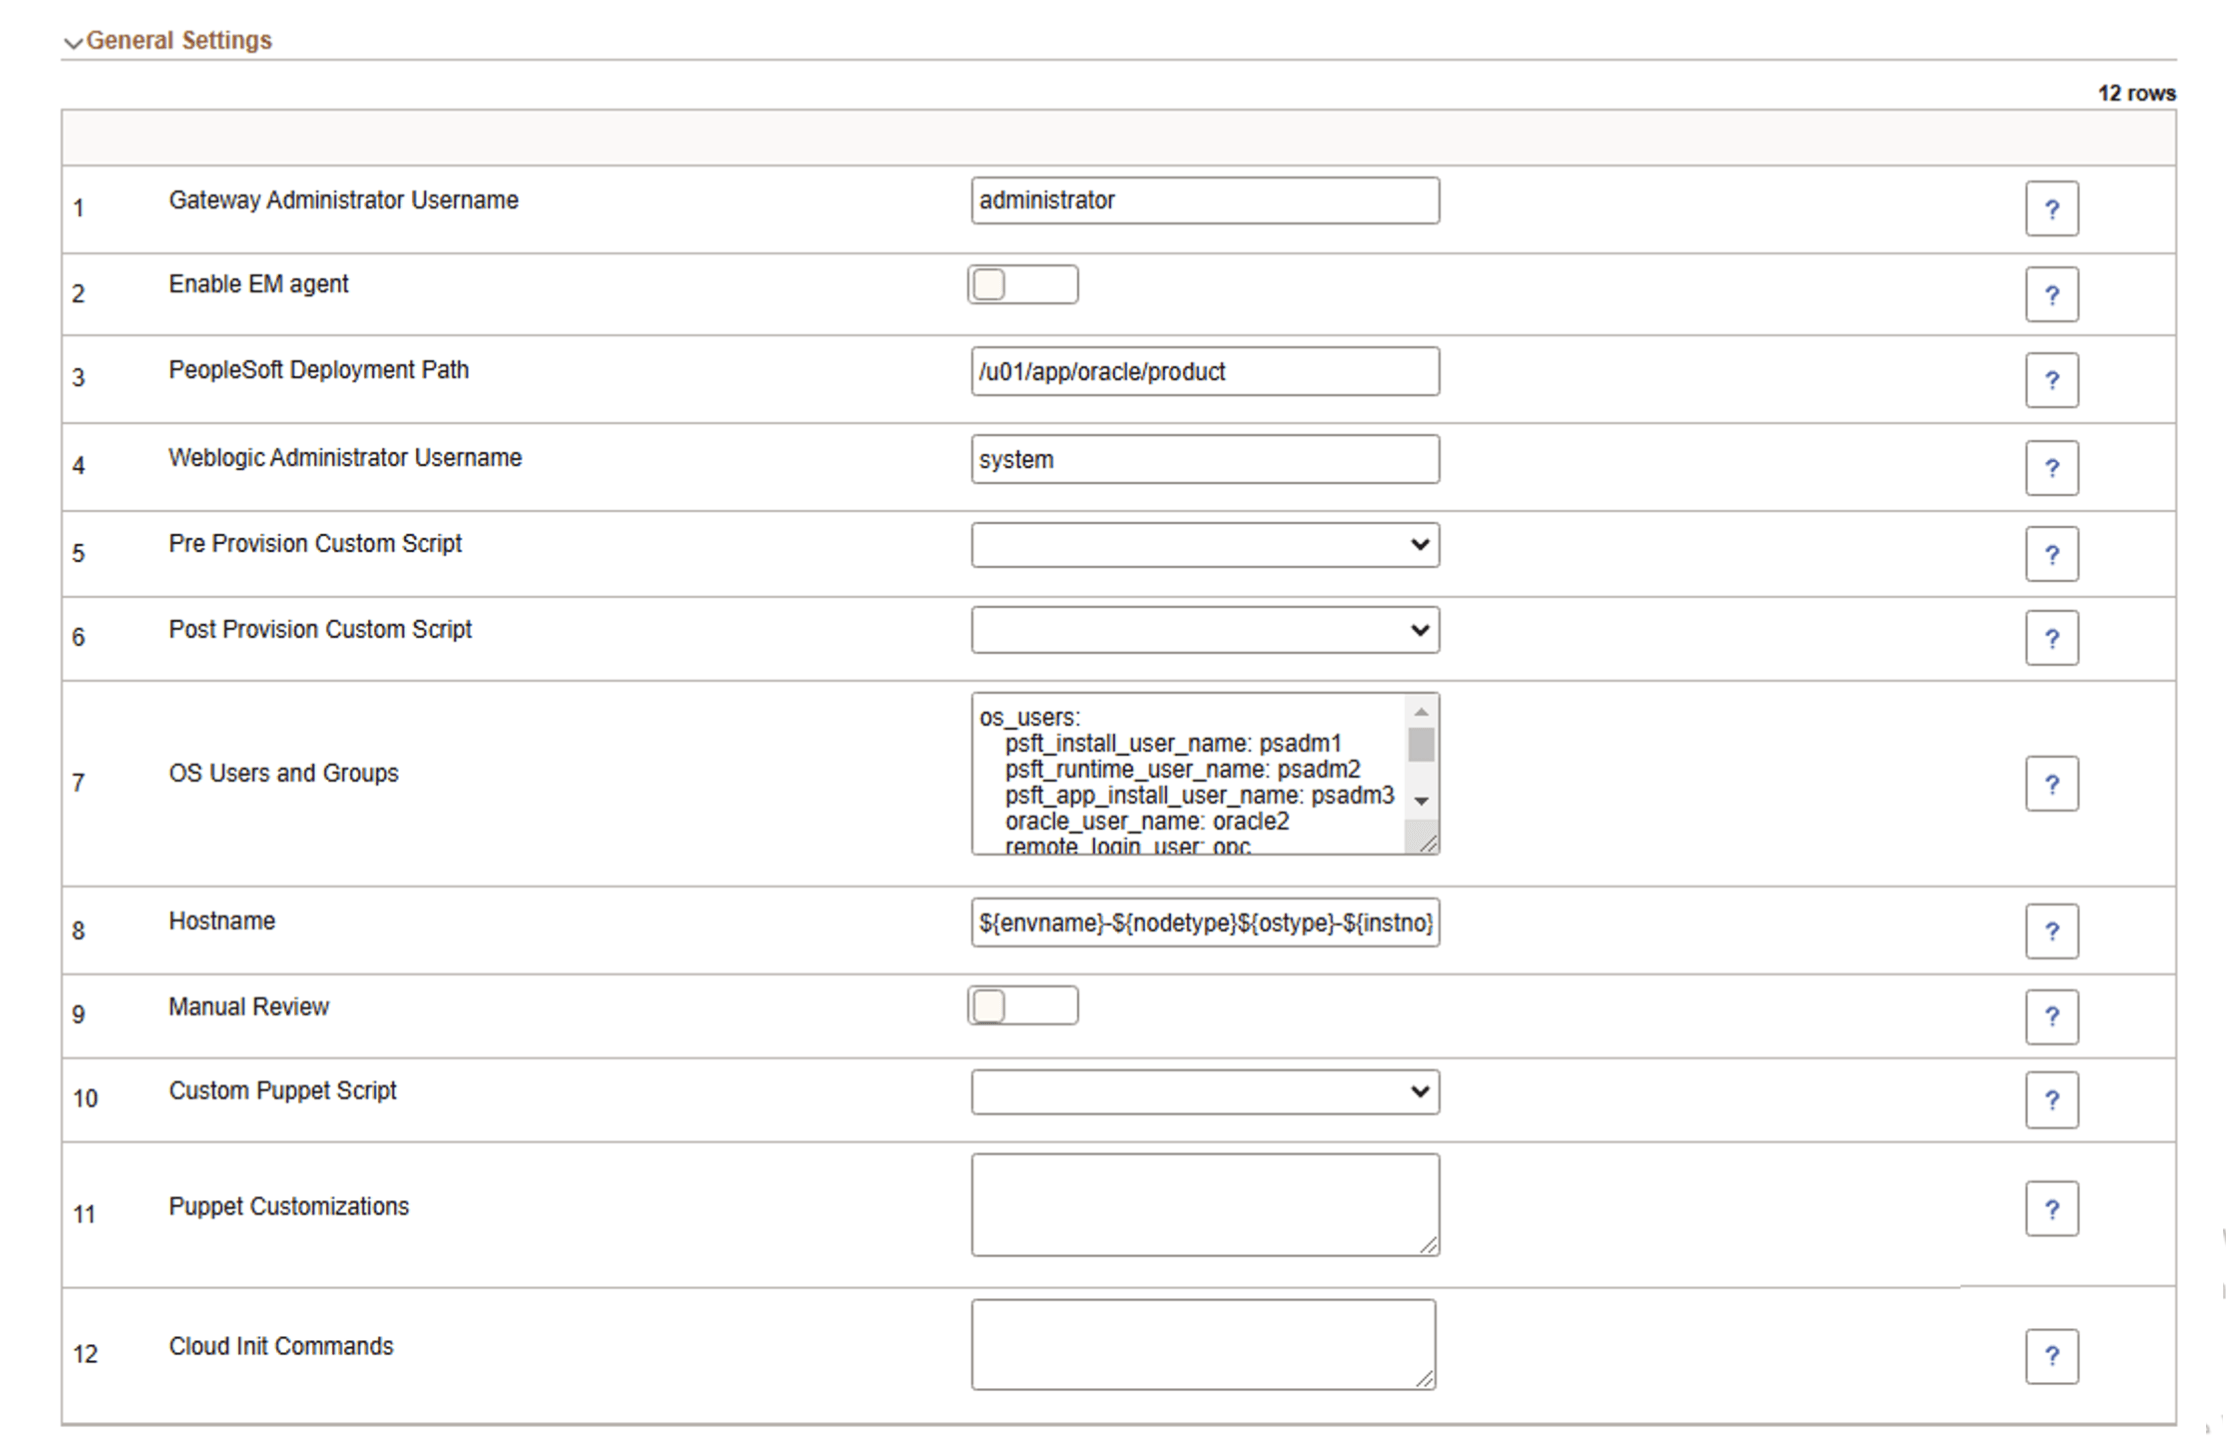
This example illustrates the fields and controls on the Full Tier - General Settings section (1 of 2). You can find definitions for the fields and controls later on this page.
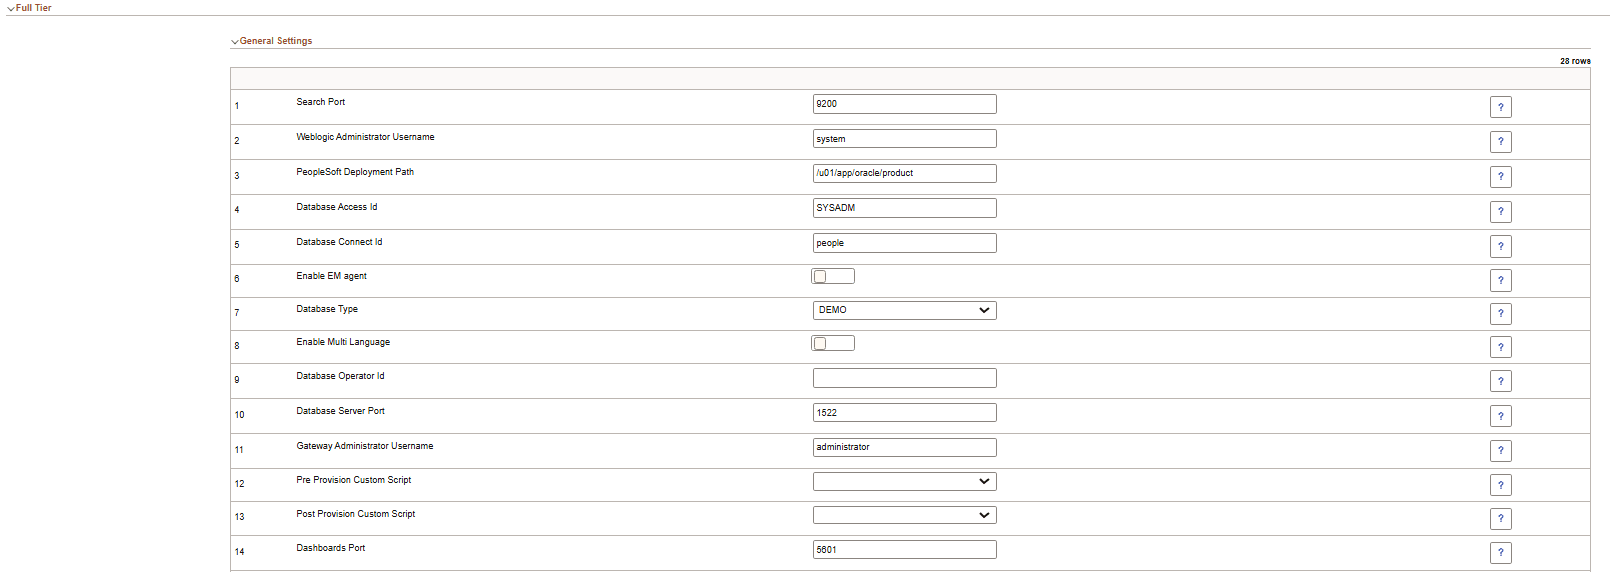
This example illustrates the fields and controls on the Full Tier - General Settings section (2 of 2). You can find definitions for the fields and controls later on this page.
|
Field or Control |
Description |
|---|---|
|
Search Port |
Elasticsearch or OpenSearch port. |
|
Weblogic Administrator Username |
User name of the Oracle WebLogic administrator. This is used for accessing WebLogic console. |
|
PeopleSoft Deployment Path |
Location where the PeopleSoft application is deployed. Note: PeopleSoft Deployment Path must not end with a slash. |
|
Database Access Id |
Access ID for the database. The default is SYSADM. |
|
Database Connect Id |
Connect ID for the database. The default is people. |
|
Enable EM agent |
Select either Yes to enable Environment Management agent, or No to disable the EM agent. |
|
Database Type |
Select the required database type. Available database types are DEMO or SYS. |
|
Enable Multi Language |
Select either Yes to enable, or No to disable, multi language support. |
|
Database Operator Id |
Database Operator ID. For HCM, CS, and ELM, the default is PS. For FSCM, IH, and CRM, the default is VP1. |
|
Database Server Port |
Listener port number. |
|
Gateway Administrator Username |
User name of the Integration Gateway administrator. |
|
Pre Provision Custom Script |
Select an uploaded script to run prior to provisioning the environment. The environment variable defined in the puppet customization can be accessed in Pre Provision Custom Script. |
|
Post Provision Custom Script |
Select an uploaded script to run post provisioning. The environment variable defined in the puppet customization can be accessed in Post Provision Custom Script. |
|
Dashboards Port |
Search dashboards port. |
|
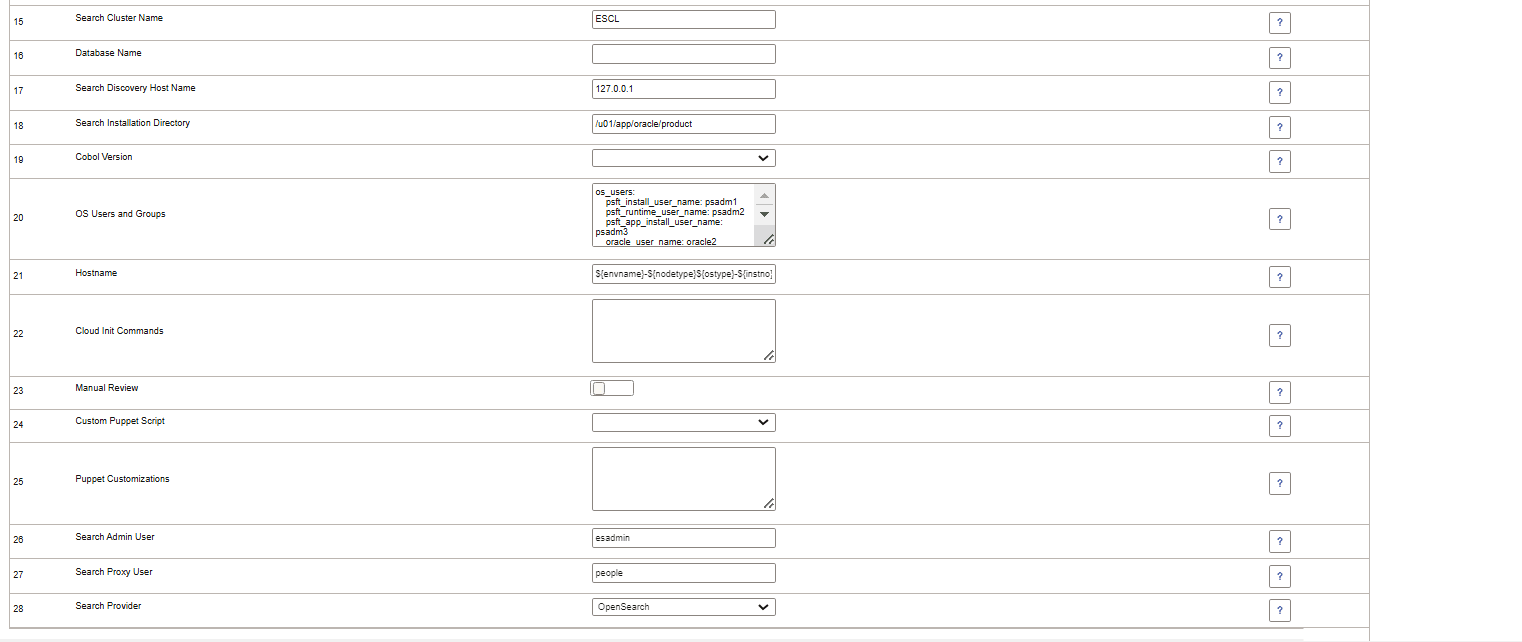
Search Cluster Name |
Name of the search cluster. |
|
Database Name |
Name of the database. |
|
Search Discovery Host Name |
Host names for any nodes that are already members of a cluster. Host names (or IP/DNS) are required for letting each search server (Elasticsearch or OpenSearch) know where it can ping and find other search servers during booting up. |
|
Search Installation Directory |
Installation directory for search components. |
|
Cobol Version |
If COBOL is enabled in the selected topology, you must select the Cobol version. Note: The COBOL license must be configured on the Cloud Manager Settings page. See Cloud Manager Settings Page |
|
OS Users and Groups |
Use this field to specify custom users and groups to set up the full-tier instance. The field is populated with the default Linux users and groups in the form of a YAML customization field. All entries are mandatory. Do not modify the format. The format (for example, spacing and punctuation) and values are validated when you move to another field on the page. User names or groups should be between 1 and 32 characters long and may contain only lower and upper case letters, digits (1-9), periods (.), underscores (_), or dashes (-). They can end with a dollar sign ($). Dashes and periods are not allowed at the beginning of the user name. Fully numeric names are not allowed. The remote_login_user is required to access the instance. If you want to specify a remote_login_user other than opc, you must first create a custom Linux image with the custom user. The custom user must have root (sudo) privileges. |
|
Hostname |
Accept the default or enter a custom Hostname. Note: Hostnames are validated when template is submitted. The text ${envname}-${nodetype}${ostype}-${instno} represents macros that Cloud Manager expands.
For example, suppose you are provisioning an environment with the name HCM03, with a single full-tier node on Linux. If you do not change the default text in the Hostname field, the value of hostname would be hcm03-fulltierlinux-1. If you want to enter a custom hostname, you can replace one or more of the macros. For example, replace ${envname} with Test02, but retain the other values: Test02-${nodetype}${ostype}-${instno} This will result in the hostname value: Test02-fulltierlinux-1. |
|
Cloud Init Commands |
Enter the OS level settings like package installation or OS upgrade/ update that you need to customize when you create the infrastructure. The commands/statements must be separated by semicolon (;). Some sample commands: |
|
Manual Review |
Select to enable manual review. On enabling the Manual Review field, new manual stop steps are added to Customer DPK processing activity as the final step. This field is disabled by default. When the field is enabled, the activity execution pauses on reaching this step. See Manually Reviewing Steps During Processing. |
|
Custom Puppet Script |
Select a script that includes the custom DPK. The scripts are shown as Zip files. |
|
Puppet Customizations |
Enter DPK customization values or custom environment variables that can be accessed in Custom Puppet Script as well as the Post and Pre Provision Custom Scripts. The values are provided in the form of YAML. Sample YAML input data for puppet customization: To refer the usage of environment variables and DPK YAML values, see Upload Custom Scripts Page |
|
Search Admin User |
Enter the search admin user name. |
|
Search Proxy User |
Enter the search proxy user name. |
|
Search Provider |
Select the search provider. You can select either Elasticsearch or OpenSearch. |
Domain Settings Section
Full tier includes Web Server, Appserver and Process Scheduler.
|
Field or Control |
Description |
|---|---|
|
Web Server Settings |
For Web Server setting see Configuring Web Server Tier Settings. |
|
Appserver Setting |
For App Server Setting see Configuring AppServer Tier Domain Settings. |
|
Process Scheduler Settings |
For Process Scheduler Setting see Configuring Process Scheduler Domain Settings. |
|
Process Scheduler Server Definition Parameters |
For Process Scheduler Setting see Configuring Process Scheduler General Setting. |
DB Systems General Settings
The DB System options differ depending on whether the database system is on a VM or Exadata.
This example illustrates the fields and controls on the DB Systems – General Settings. You can find definitions for the fields and controls later on this page.

|
Field or Control |
Description |
|---|---|
|
National Character Set |
The national character set for the database. |
|
Database Operator ID |
Default database operator ID. For HCM, CS, and ELM, the default is PS. For FSCM, IH, and CRM, the default is VP1. |
|
Database AccessID |
Access ID for the database. The default is SYSADM. |
|
Database Server Port |
Listener port number. |
|
Character Set |
The character set for the database. |
|
Database Connect Id |
Connect ID for the database. The default is people. |
|
Enable EM Agent |
Select Yes to enable Environment Management agent for creating the infrastructure that is required to deploy an EM agent. |
|
Database Type |
Select the required database type. Available database types are DEMO or SYS. |
|
Enable Multi Language |
Select either Yes or No to enable multi language support. |
|
Post Provision Custom Script |
Select an uploaded script to run post provisioning. The environment variable defined in the puppet customization can be accessed in Post Provision Custom Script. |
|
Pre Provision Custom Script |
Select an uploaded script to run prior to provisioning the environment. The environment variable defined in the puppet customization can be accessed in Pre Provision Custom Script. |
|
Hostname |
Accept the default or enter a custom Hostname. Note: Hostnames are validated when template is submitted. The text ${envname}-${nodetype}${ostype}-${instno} represents macros that Cloud Manager expands.
For example, suppose you are provisioning an environment with the name HCM03, with a single full-tier node on Linux. If you do not change the default text in the Hostname field, the value of hostname would be hcm03-fulltierlinux-1. If you want to enter a custom hostname, you can replace one or more of the macros. For example, replace ${envname} with Test02, but retain the other values: Test02-${nodetype}${ostype}-${instno} This will result in the hostname value: Test02-fulltierlinux-1. |
|
Custom Puppet Script |
Select a script that includes the custom DPK. The scripts are shown as Zip files. |
|
Puppet Customizations |
Enter DPK customization values or custom environment variables that can be accessed in Custom Puppet Script as well as the Post and Pre Provision Custom Scripts. The values are provided in the form of YAML. Sample YAML input data for puppet customization: To refer the usage of environment variables and DPK YAML values, see Upload Custom Scripts Page. |
|
Manual Review |
Select to enable manual review. On enabling the Manual Review field, new manual stop steps are added to Customer DPK processing activity as the final step. This field is disabled by default. When the field is enabled, the activity execution pauses on reaching this step. See Manually Reviewing Steps During Processing. |
DB System Options
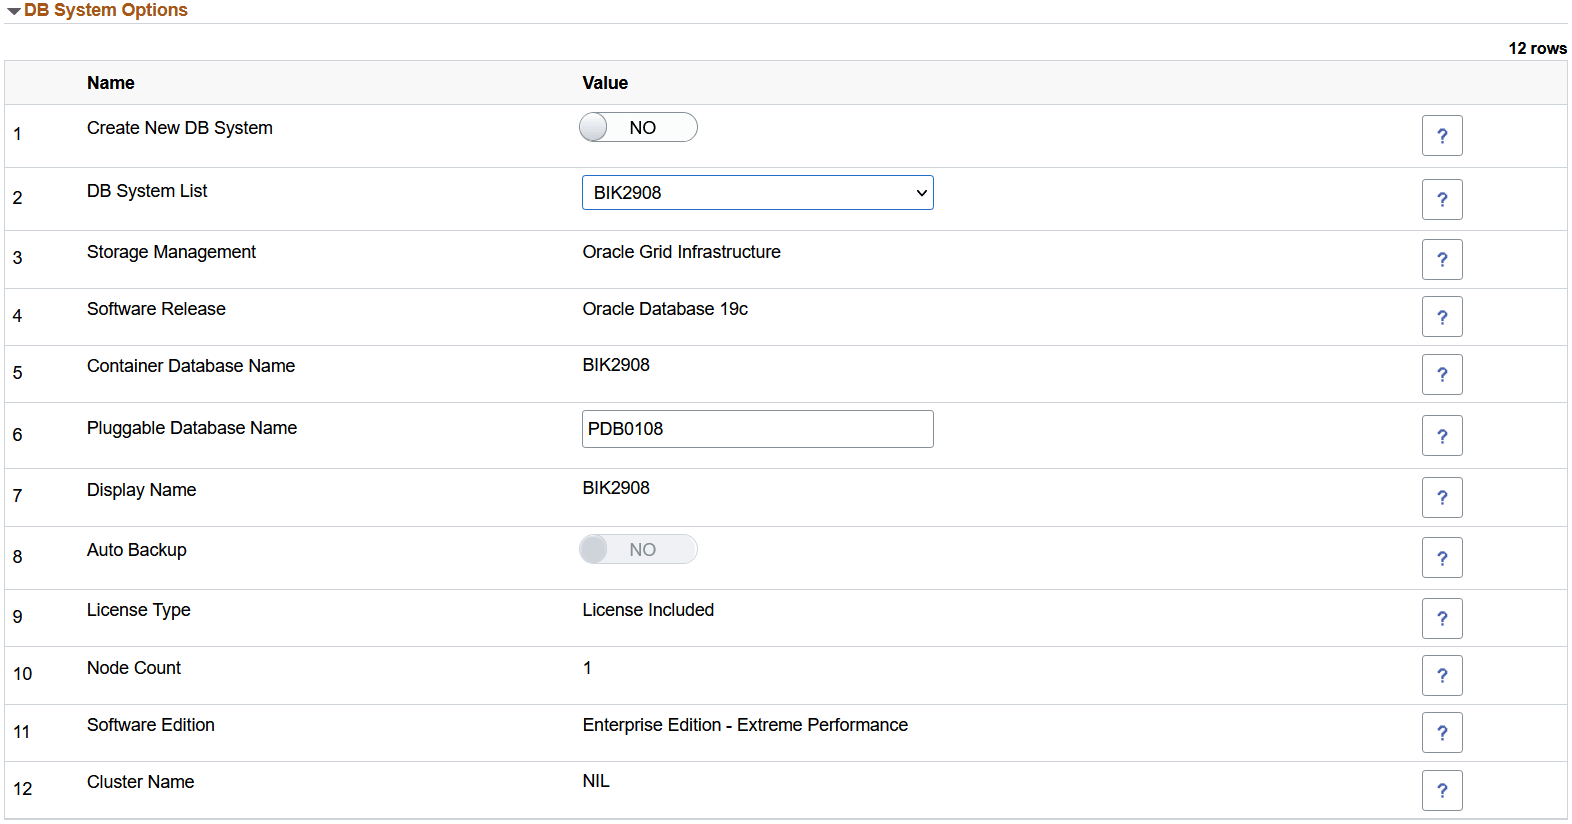
This example illustrates the fields and controls on the DB System Options section. You can find definitions for the fields and controls later on this page.
|
Field or Control |
Description |
|---|---|
|
Create New DB System |
Select Yes to create a new DB system. Select No to use one of the available DB systems, within which Pluggable Databases (PDB) can be attached to the existing Container Database (CDB). Note: This feature is supported for VM-based DB systems only and not Exadata. If you use a DB system that is not created by Cloud Manager for PUM provisioning or Remote Clone, you must update Cloud Manager SSH Key to the target DB system. |
|
DB System List |
Displays a list of databases if you select No in the Create New DB System field. When you select an existing DB system, all the fields except Pluggable Database Name are automatically populated with corresponding values. |
|
Storage Management |
Select the Storage Management System.
|
|
Software Release |
Oracle database release version. Select the software release from the drop-down list. The following software releases are currently supported for DB systems.
Note: Oracle 23ai is currently not supported for full-tier nodes and database tier nodes on Compute. It is supported for DB System, Exadata, and Autonomous Database, or ADB. The database release version must be chosen based on the database version in the PeopleSoft Update Image or customer's lifted database version. Note: Oracle Database versions are certified by PeopleTools release. The Oracle Database version and PeopleTools release are listed in the PeopleSoft Update Image manifest. See the My Oracle Support Certifications area and the PeopleSoft Cloud Manager Home Page, My Oracle Support, Doc ID 2231255.2 for support information. |
|
Container Database Name |
Name of the container database in the DB system. The name of CDB is automatically filled if you choose an existing DB system. You can edit the name of CDB if you opt to create a new DB system. |
|
Pluggable Database Name |
Name of the pluggable database within the CDB. This name must be unique within a CDB. |
|
Display Name |
Display name for the DB system. The name doesn't need to be unique. An Oracle Cloud Identifier (OCID) will uniquely identify the DB system. |
|
Auto Backup |
Displays whether automatic incremental backups for this database are enabled or disabled. |
|
License Type |
The type of license you want to use for the DB system. Your choice affects metering for billing. License included means the cost of the cloud service includes a license for the Database service. Bring Your Own License (BYOL) means you are an Oracle Database customer with an Unlimited License Agreement or Non-Unlimited License Agreement and want to use your license with Oracle Cloud Infrastructure. This removes the need for separate on-premises licenses and cloud licenses. |
|
Node Count |
The number of nodes in the DB system. The number depends on the shape you select. You can specify 1 or 2 nodes for virtual machine DB systems, except for VM.Standard2.1 and VM.Standard1.1, which are single-node DB systems. Note: Some shapes may not be available in new tenancies. Note: Except 1.1 and 2.1, all other shapes seem to be supported for RAC (2-node DB system). Note: Multi-node Virtual Machine DB systems require Oracle Automatic Storage Management and cannot be created using Logical Volume Manager option. |
|
Software Edition |
The database edition supported by the DB system. |
|
Cluster Name |
A unique cluster name for a multi-node DB system. The name must begin with a letter and contain only letters (a-z and A-Z), numbers (0-9) and hyphens (-). The cluster name can be no longer than 11 characters and is not case sensitive. |
|
Fault domain |
Select the fault domain for the database node, if the DB System contains 2 nodes, you will be able to configure the fault domain for each node. |
Example Database System on Exadata
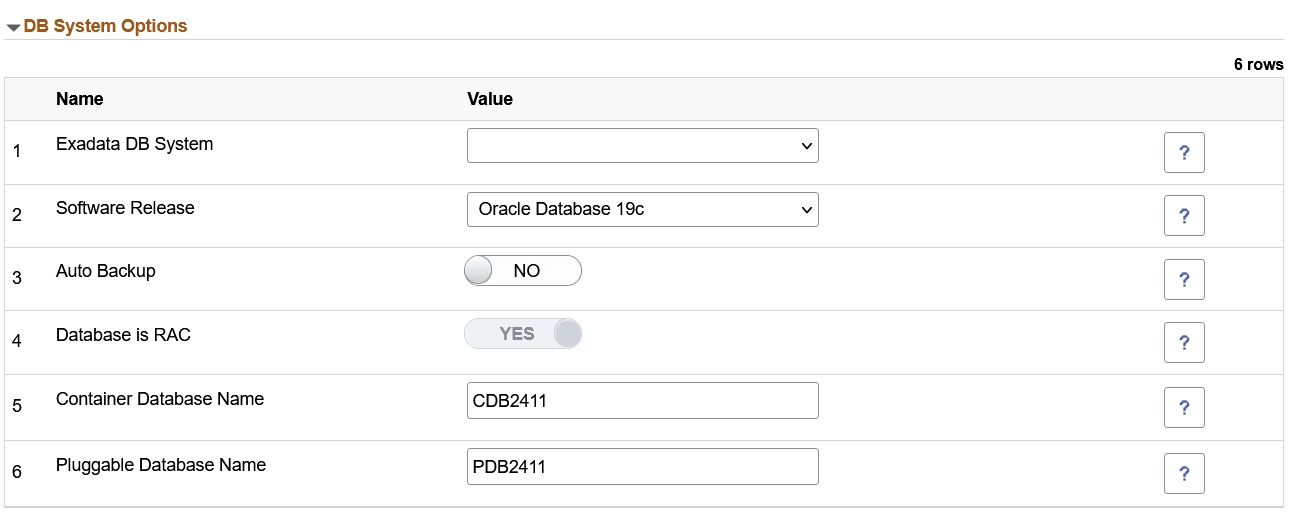
This example illustrates the fields and controls on the database system options on Exadata. You can find definitions for the fields and controls later on this page.
|
Field or Control |
Description |
|---|---|
|
Exadata DB System |
Displays a list of Exadata DB systems that are available in your availability domain. If there is only one Exadata DB System, the value is auto-populated. |
|
Software Release |
Oracle database release version. The database release version must be chosen based on the database version in the PeopleSoft Update Image or customer's lifted database version. |
|
Auto Backup |
Displays whether automatic incremental backups for this database is enabled or disabled. |
|
Database is RAC |
Displays whether database is RAC. |
|
Container Database Name |
Name of the container database. |
|
Pluggable Database Name |
Name of the pluggable database. |
For templates using a topology with multiple middle tiers, you will configure the custom attributes for each middle tier.
This example illustrates the fields and controls on the Custom Attributes section showing multiple middle tiers.
General Settings
This example illustrates the fields and controls on Middle Tier - General Settings for Web Server.
|
Field or Control |
Description |
|---|---|
|
Gateway Administrator Username |
User ID of the Integration Gateway administrator. |
|
Enable EM Agent |
Select either Yes or No to enable or disable EM agent. |
|
PeopleSoft Deployment Path |
Location where the PeopleSoft application is deployed. Note: PeopleSoft Deployment Path must not end with a slash. |
|
Weblogic Administrator Username |
User name of the WebLogic administrator. This is used for accessing the Oracle WebLogic console. |
|
Pre Provision Custom Script |
Select an uploaded script to run prior to provisioning the environment. The environment variable defined in the puppet customization can be accessed in Pre Provision Custom Script. |
|
Post Provision Custom Script |
Select an uploaded script to run after the environment provisioning. The environment variable defined in the puppet customization can be accessed in Post Provision Custom Script. |
|
OS Users and Groups |
Use this field to specify custom users and groups to set up the middle tier instance. The field is populated with the default Linux users and groups in the form of a YAML customization field. All entries are mandatory. Do not modify the format. The format (for example, spacing and punctuation) and values are validated when you move to another field on the page. User names or groups should be between 1 and 32 characters long and may contain only lower and upper case letters (a-z and A-z), digits (1-9), periods (.), underscores (_), or dashes (-). They can end with a dollar sign ($). Dashes and periods are not allowed at the beginning of the user name. Fully numeric names are not allowed. The remote_login_user is required to access the instance. If you want to specify a remote_login_user other than opc, you must first create a custom Linux image with the custom user. The custom user must have root (sudo) privileges. |
|
Hostname |
Accept the default or enter a custom Hostname. Note: Hostnames will be validated when template is submitted. The text ${envname}-${nodetype}${ostype}-${instno} represents macros that Cloud Manager expands.
For example, suppose you are provisioning an environment with the name HCM03, with a single full-tier node on Linux. If you do not change the default text in the Hostname field, the value of hostname would be hcm03-fulltierlinux-1. If you want to enter a custom hostname, you can replace one or more of the macros. For example, replace ${envname} with Test02, but retain the other values: Test02-${nodetype}${ostype}-${instno} This will result in the hostname value: Test02-fulltierlinux-1. |
|
Manual Review |
Select to enable manual review. On enabling the Manual Review field, new manual stop steps are added to Customer DPK processing activity as the final step. This field is disabled by default. When the field is enabled, the activity execution pauses on reaching this step. See Manually Reviewing Steps During Processing. |
|
Custom Puppet Script |
Select a script that includes the custom DPK. The scripts are shown as Zip files. |
|
Puppet Customizations |
Enter DPK customization values or custom environment variables that can be accessed in Custom Puppet Script as well as the Post and Pre Provision Custom Scripts. The values are provided in the form of YAML. Sample YAML input data for puppet customization: To refer the usage of environment variables and DPK YAML values, see Upload Custom Scripts Page |
|
Cloud Init Commands |
Enter the OS level settings like package installation or OS upgrade/ update that you need to customize when you create the infrastructure. The commands/statements must be separated by semicolon. |
Domain Settings
This example illustrates the fields and controls on the Middle Tier - Domain Settings for Web Server. You can find definitions for the fields and controls later on this page.
|
Field or Control |
Description |
|---|---|
|
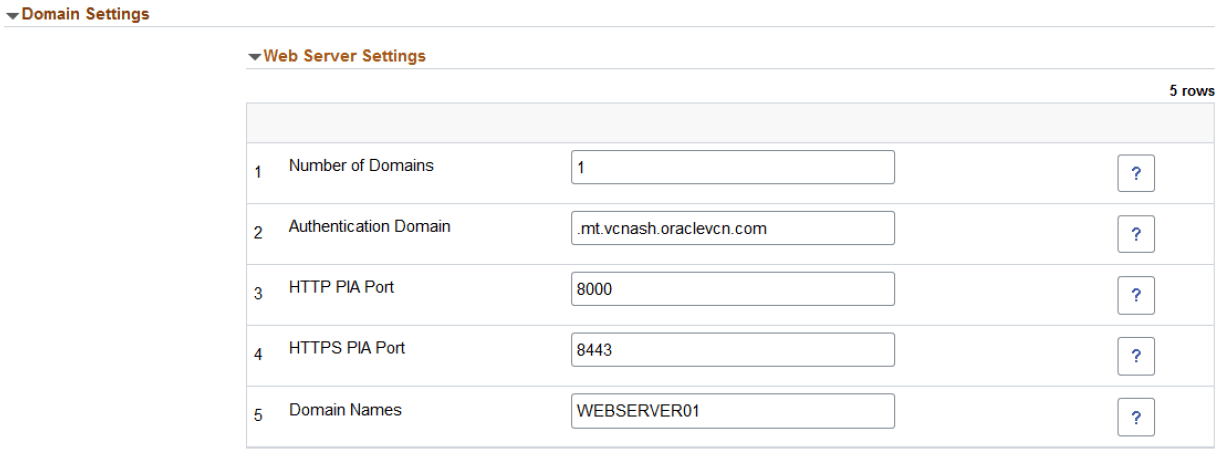
Number of Domains |
Enter the number of web server domains. Number of domains can be 1 to 5. |
|
Authentication Domain |
The domain in which the portal is running and across which the single sign-on authentication token is valid. Note: The PIA URL must be modified appropriately to access the environment if you have entered a custom authentication token domain value. |
|
HTTP PIA Port |
There will be as many ports, equal to the given number of domains, separated by comma. |
|
HTTPS PIA Port |
There will be as many ports, equal to the given number of domains, separated by comma. |
|
Domain Names |
Accept the default or enter a custom domain name. |
The General Settings fields for AppServer tier are the same as those described in Configuring Web Server Tier Settings.
This example illustrates the fields and controls on the Domain Settings for AppServer. You can find definitions for the fields and controls later on this page.

|
Field or Control |
Description |
|---|---|
|
Number of Domains |
Number of application server domains. Number of domains can be 1 to 5. |
|
Number of App Server Instance Per Domain |
Number of PSAPPSRV instances required. This configuration is applied to all App Server domains. |
|
Number of Query Server Instances Per Domain |
Number of PSQRYSRV instances required. This configuration is applied to all App Server domains. |
|
Number of SQL Access App Server(PSSAMSRV) Per Domain |
Number of PSSAMSRV instances required. This configuration is applied to all App Server domains. |
|
Number of Jolt Listener per Domain |
Number of Jolt Listener per Domain. |
|
Jolt Port |
There will be as many ports, equal to the given number of domains, separated by comma. |
|
WSL Port |
There will be as many ports, equal to the given number of domains, separated by comma. |
|
Enable IB Domain on first Domain |
If Yes is selected IB will be enabled in the first App Domain. |
|
Number of App Server Instance (PSAPPSRV services) for IB |
Number of App Server Instance (PSAPPSRV services) for IB. |
|
Number of SQL Access App Server (PSSAMRSRV services) for IB |
Number of SQL Access App Server (PSSAMRSRV services) for IB |
|
Number of PSBRKHND instances for IB |
Number of PSBRKHND instances for IB |
|
Number of PSSUBHND instances for IB |
Number of PSSUBHND instances for IB |
|
Number of PSPUBHND instances for IB |
Number of PSPUBHND instances for IB |
|
Domain Names |
Accept the default or enter a custom domain name. Separate multiple domain names with a comma. |
If the middle tier is Process Scheduler and COBOL is enabled in the topology, the General Settings will include Cobol Version. The other General Settings fields for Process Scheduler are essentially the same as those described in Configuring Web Server Tier Settings.
|
Field or Control |
Description |
|---|---|
|
Cobol Version |
If COBOL is enabled in the selected topology, you must select the Cobol version. Note: The COBOL license must be configured on the Cloud Manager Settings page. See Cloud Manager Settings Page |
This example illustrates the fields and controls on the Domain Settings for Process Scheduler Settings and Process Scheduler Server Definition Parameters. You can find definitions for the fields and controls later on this page.
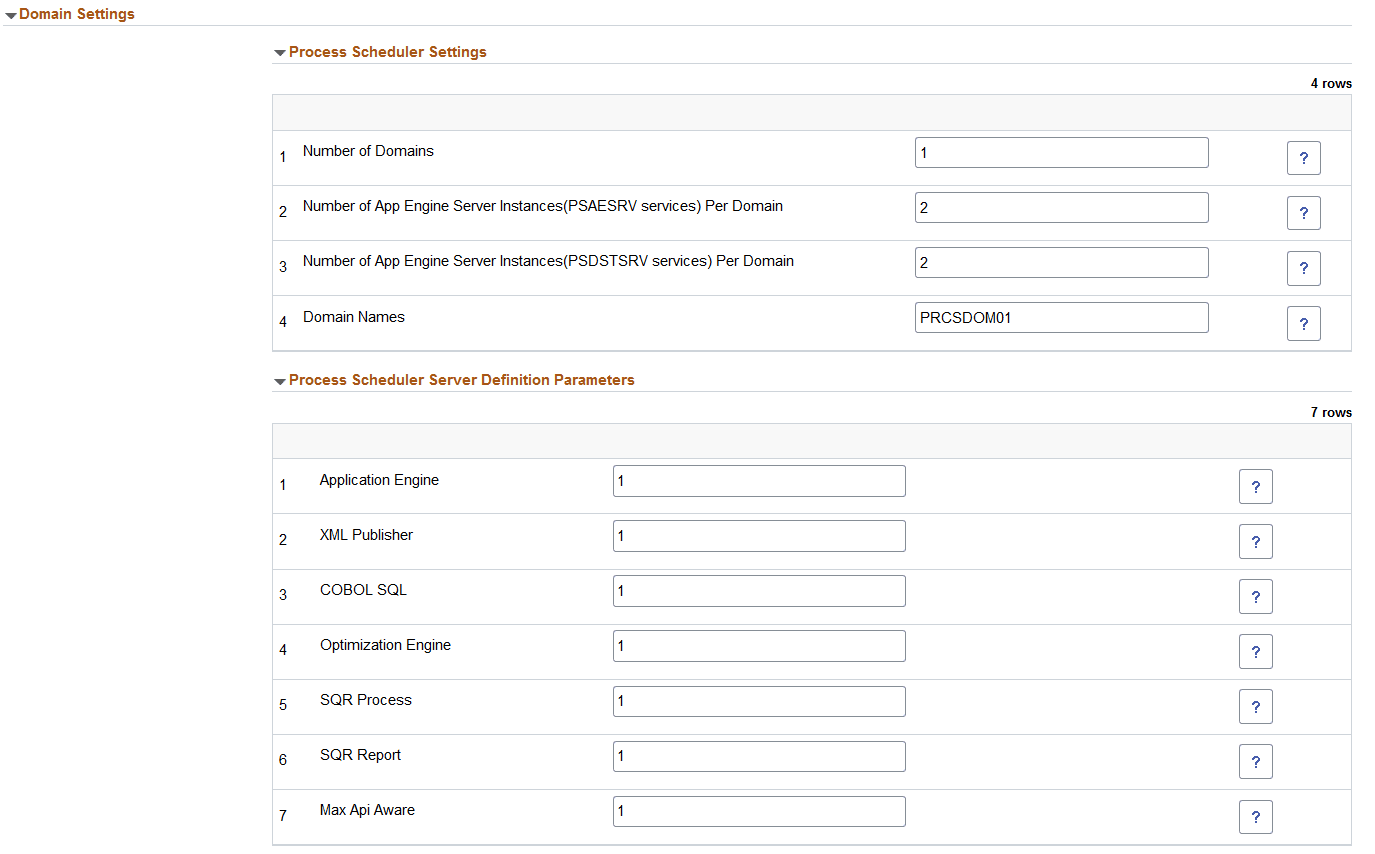
Process Scheduler Settings
|
Field or Control |
Description |
|---|---|
|
Number of Domains |
Number of process scheduler domains. |
|
Number of App Engine Server Instances(PSAESRV services) Per Domain |
Number of application engines required. |
|
Number of App Engine Server Instances(PSDSTSRV services) Per Domain |
Number of application servers required. |
|
Domain Names |
Accept the default or enter a custom domain name. |
Process Scheduler Server Definition Parameters
|
Field or Control |
Description |
|---|---|
|
Application Engine |
Number of application engine processes. |
|
XML Publisher |
Number of XML publishers. |
|
COBOL SQL |
Number of COBOL SQL processes. |
|
Optimization Engine |
Number of optimization engines. |
|
SQR Process |
Number of SQR processes. |
|
SQR Report |
Number of SQR reports. |
|
Max Api Aware |
Number of Max Api Aware. |
This example illustrates the fields and controls on the Middle Tier - General Settings section for Windows Middle Tier.

|
Field or Control |
Description |
|---|---|
|
WebLogic Administrator Username |
User name of the WebLogic administrator. This is used for accessing Oracle WebLogic console. The default is system. |
|
Gateway Administrator Username |
User ID of Integration Broker Gateway. |
|
Enable EM Agent |
Select Yes to enable or No to disable Environment Management agent. |
|
PeopleSoft Deployment Path |
Location where the PeopleSoft application is deployed. Note: PeopleSoft Deployment Path must not end with a slash. |
|
Pre Provision Custom Script |
Select an uploaded script to run prior to provisioning the environment. The environment variable defined in the puppet customization can be accessed in Pre Provision Custom Script. |
|
Post Provision Custom Script |
Select an uploaded script to run after environment provisioning. The environment variable defined in the puppet customization can be accessed in Post Provision Custom Script. |
|
Custom Puppet Script |
Select a script that includes the custom DPK. The scripts are shown as Zip files. |
|
Puppet Customizations |
Enter DPK customization values or custom environment variables that can be accessed in Custom Puppet Script as well as the Post and Pre Provision Custom Scripts. The values are provided in the form of YAML. Sample YAML input data for puppet customization: To refer the usage of environment variables and DPK YAML values, see Upload Custom Scripts Page |
|
Manual Review |
Select to enable manual review. On enabling the Manual Review field, new manual stop steps are added to Customer DPK processing activity as the final step. This field is disabled by default. When the field is enabled, the activity execution pauses on reaching this step. See Manually Reviewing Steps During Processing. |
|
Windows Administrator User |
The Windows Administrator User is required to access the instance. If you want to specify a user other than the default, opc, you must first create a custom Windows image and add the custom user. The custom user must have administrative privileges. See the tutorial Create a Custom Windows Image for PeopleSoft Cloud Manager in Oracle Cloud Infrastructure (Optional) at https://docs.oracle.com/en/applications/peoplesoft/cloud-manager/index.html#InstallationTutorials. |
|
Hostname |
Accept the default or enter a custom Hostname. Note: Hostnames will be validated when template is submitted. The text ${envname}-${nodetype}${ostype}-${instno} represents macros that Cloud Manager expands.
For example, suppose you are provisioning an environment with the name HCM03, with a single full-tier node on Linux. If you do not change the default text in the Hostname field, the value of hostname would be hcm03-fulltierlinux-1. If you want to enter a custom hostname, you can replace one or more of the macros. For example, replace ${envname} with Test02, but retain the other values: Test02-${nodetype}${ostype}-${instno} This will result in the hostname value: Test02-fulltierlinux-1. |
|
Cloud Init Commands |
Enter the operating system-level settings, like package installation or OS upgrade or update, that you need to customize when you create the infrastructure. The commands and statements must be separated by semicolons. |
The PeopleSoft Client uses a Microsoft Windows operating system.
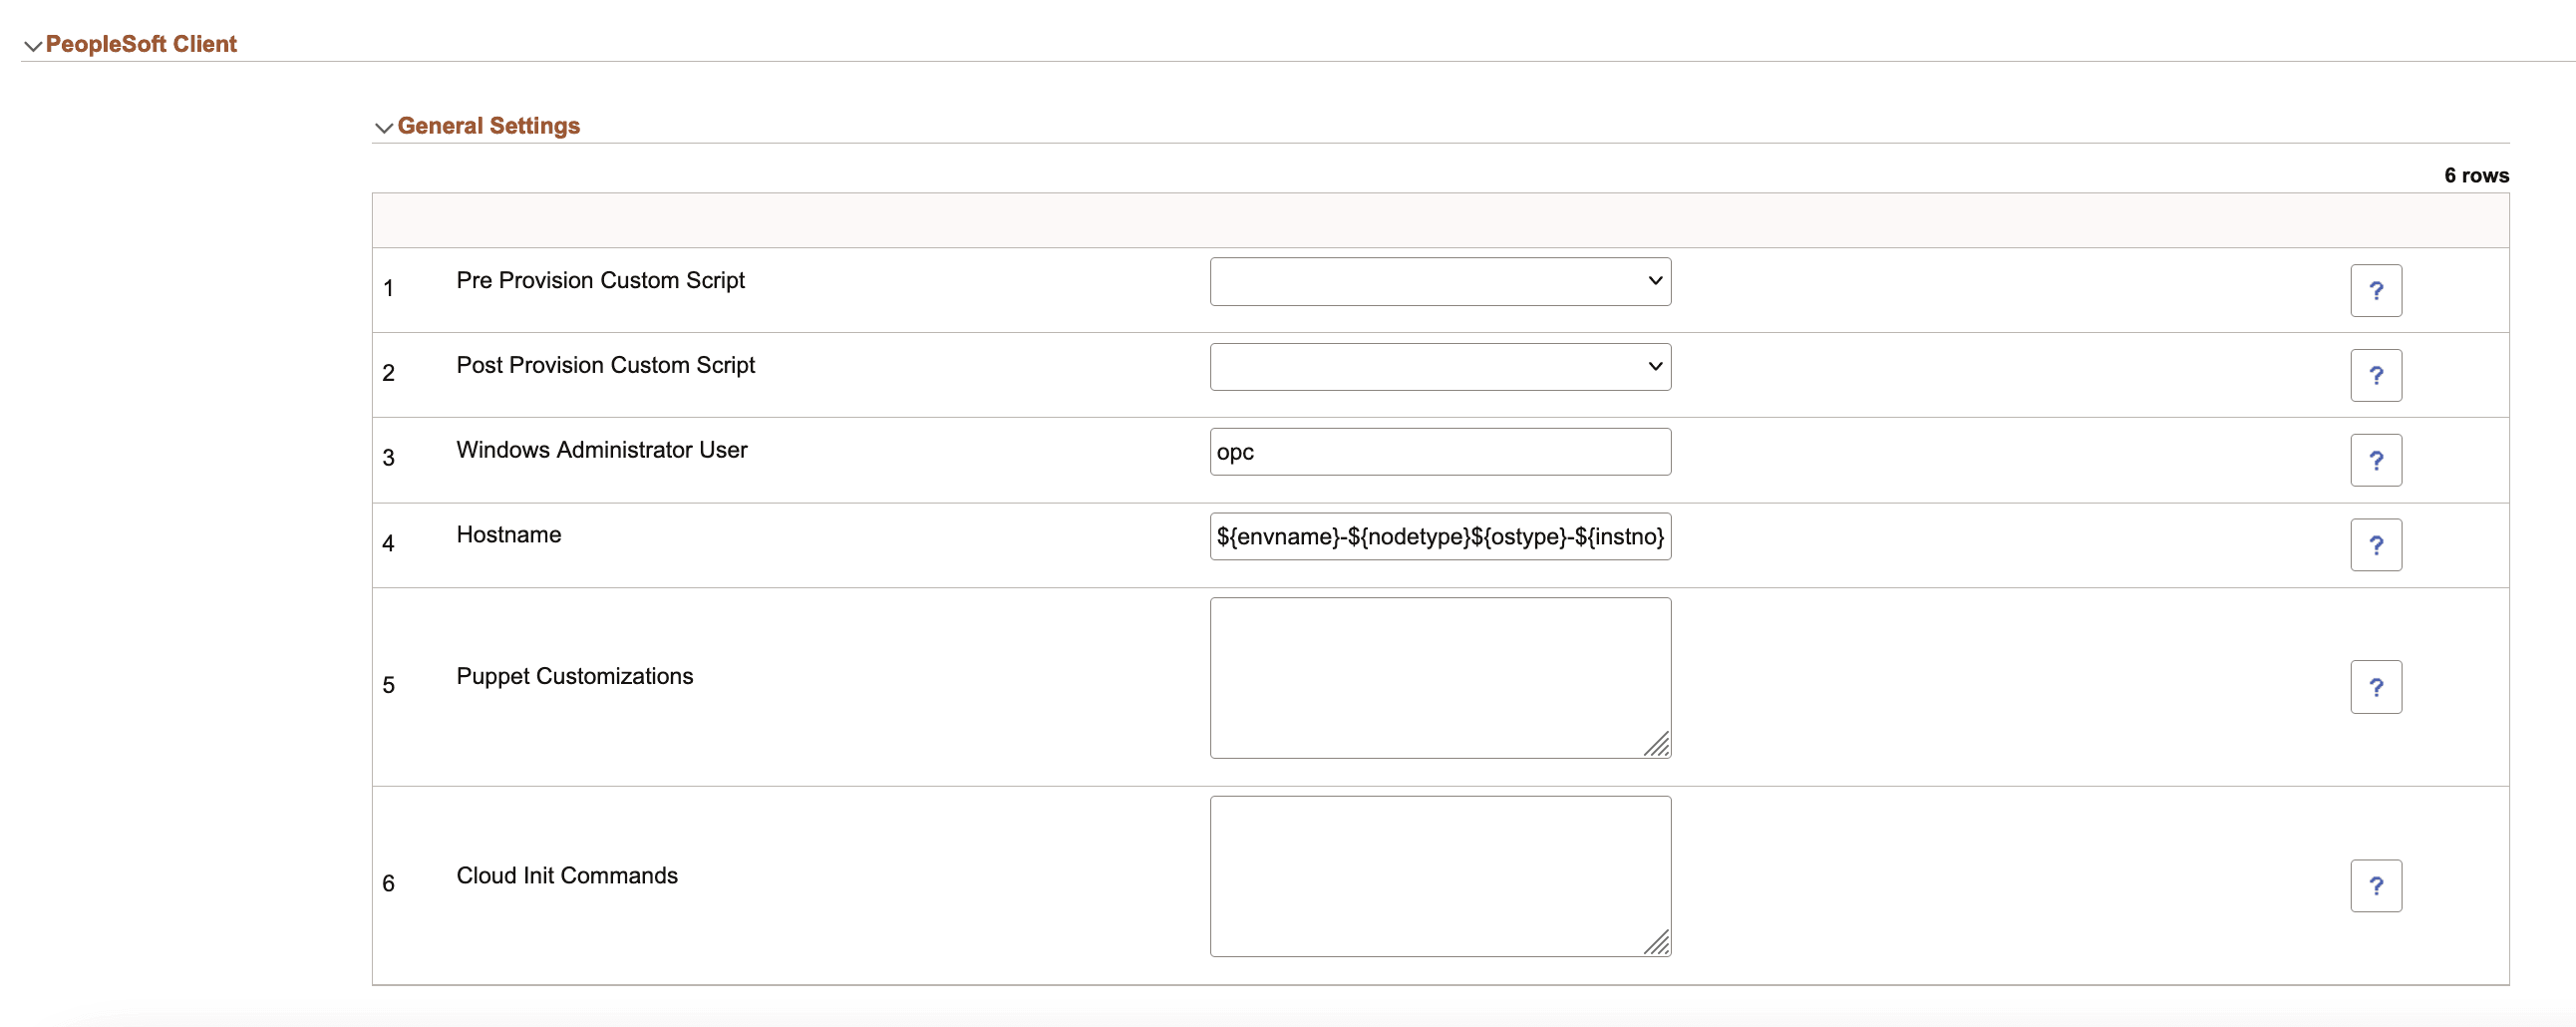
This example illustrates the fields and controls on the PeopleSoft Client - General Settings section.
|
Field or Control |
Description |
|---|---|
|
Pre Provision Custom Script |
Select an uploaded script to run prior to provisioning the environment. The environment variable defined in the puppet customization can be accessed in Pre Provision Custom Script. |
|
Post Provision Custom Script |
Select an uploaded script to run after the environment provisioning. The environment variable defined in the puppet customization can be accessed in Post Provision Custom Script. |
|
Windows Administrator User |
The Windows Administrator User is required to access the instance. If you want to specify a user other than opc, you must first create a custom Windows image and add the custom user. The custom user must have administrative privileges. See the tutorial Create a Custom Windows Image for PeopleSoft Cloud Manager in Oracle Cloud Infrastructure (Optional) at https://docs.oracle.com/en/applications/peoplesoft/cloud-manager/index.html#InstallationTutorials. |
|
Hostname |
Accept the default or enter a custom Hostname. Note: Hostnames will be validated when template is submitted. The text ${envname}-${nodetype}${ostype}-${instno} represents macros that Cloud Manager expands.
For example, suppose you are provisioning an environment with the name HCM03, with a single full-tier node on Linux. If you do not change the default text in the Hostname field, the value of hostname would be hcm03-fulltierlinux-1. If you want to enter a custom hostname, you can replace one or more of the macros. For example, replace ${envname} with Test02, but retain the other values: Test02-${nodetype}${ostype}-${instno} This will result in the hostname value: Test02-fulltierlinux-1. |
|
Puppet Customizations |
Enter DPK customization values or custom environment variables that can be accessed in Custom Puppet Script as well as the Post and Pre Provision Custom Scripts. The values are provided in the form of YAML. Sample YAML input data for puppet customization: To refer the usage of environment variables and DPK YAML values, see Upload Custom Scripts Page |
|
Cloud Init Commands |
Enter the operating system-level settings, like package installation or OS upgrade or update, that you need to customize when you create the infrastructure. The commands and statements must be separated by semicolons. |
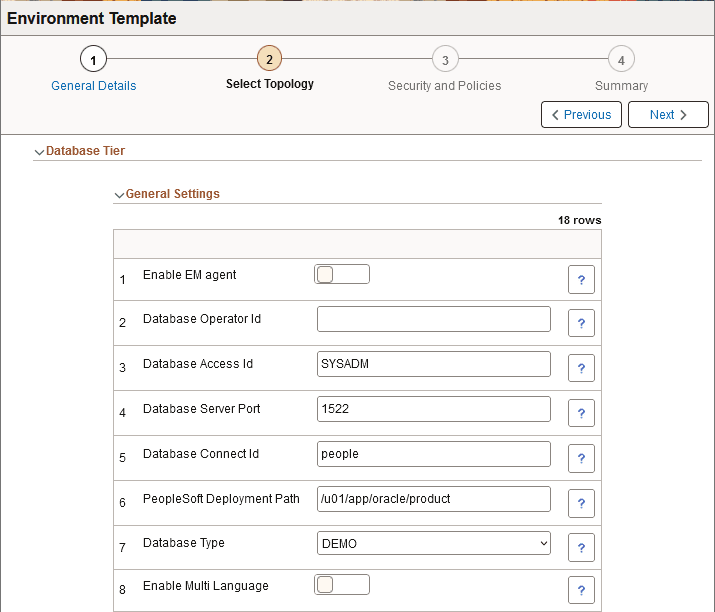
The database tier includes general settings and subnet settings.
This example illustrates the fields and controls on the Database Tier – General Settings page (1 of 2). You can find definitions for the fields and controls later on this page.
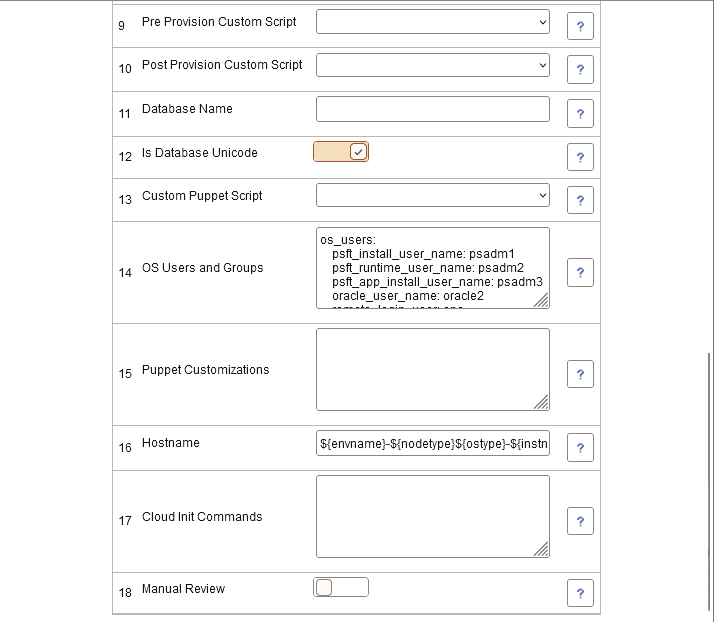
This example illustrates the fields and controls on the Database Tier – General Settings page (2 of 2). You can find definitions for the fields and controls later on this page
|
Field or Control |
Description |
|---|---|
|
Enable EM agent |
Select Yes to enable Environment Management agent for creating the infrastructure that is required to deploy an EM agent. |
|
Database Operator Id |
Default database operator ID. For HCM, CS, and ELM, the default is PS. For FSCM, IH, and CRM, the default is VP1. |
|
Database Access Id |
Access ID for the database. The default is SYSADM. |
|
Database Server Port |
Listener port number. The default is 1522. |
|
Database Connect Id |
Connect ID for the database. The default is people. |
|
PeopleSoft Deployment Path |
Location where the PeopleSoft application is deployed. The default is /u01/app/oracle/product. Note: PeopleSoft Deployment Path must not end with a slash. |
|
Database Type |
Select the required database type. Available database types are DEMO or SYS. |
|
Enable Multi Language |
Select either Yes or No to enable multi language support. |
|
Pre Provision Custom Script |
Select an uploaded script to run prior to provisioning the environment. The environment variable defined in the puppet customization can be accessed in Pre Provision Custom Script. |
|
Post Provision Custom Script |
Select an uploaded script to run post provisioning. The environment variable defined in the puppet customization can be accessed in Post Provision Custom Script. |
|
Database Name |
Name of the database. |
|
Is Database Unicode |
Select either Yes or No. |
|
Custom Puppet Script |
Select a script that includes the custom DPK. The scripts are shown as Zip files. |
|
OS Users and Groups |
Use this field to specify custom users and groups to set up the full-tier instance. The field is populated with the default Linux users and groups in the form of a YAML customization field. All entries are mandatory. Do not modify the format. The format (for example, spacing and punctuation) and values are validated when you move to another field on the page. User names or groups should be between 1 and 32 characters long and may contain only lower and upper case letters, digits (1-9), periods (.), underscores (_), or dashes (-). They can end with a dollar sign ($). Dashes and periods are not allowed at the beginning of the user name. Fully numeric names are not allowed. The remote_login_user is required to access the instance. If you want to specify a remote_login_user other than opc, you must first create a custom Linux image with the custom user. The custom user must have root (sudo) privileges. |
|
Puppet Customizations |
Enter DPK customization values or custom environment variables that can be accessed in Custom Puppet Script as well as the Post Provision and Pre Provision Custom Scripts. The values are provided in the form of YAML. Sample YAML input data for puppet customization: To refer the usage of environment variables and DPK YAML values, see Upload Custom Scripts Page |
|
Hostname |
Accept the default or enter a custom Hostname. Note: Hostnames will be validated when template is submitted. The text ${envname}-${nodetype}${ostype}-${instno} represents macros that Cloud Manager expands.
For example, suppose you are provisioning an environment with the name HCM03, with a single full-tier node on Linux. If you do not change the default text in the Hostname field, the value of hostname would be hcm03-fulltierlinux-1. If you want to enter a custom hostname, you can replace one or more of the macros. For example, replace ${envname} with Test02, but retain the other values: Test02-${nodetype}${ostype}-${instno} This will result in the hostname value: Test02-fulltierlinux-1. |
|
Cloud Init Commands |
Enter the operating system-level settings, like package installation or OS upgrade or update, that you need to customize when you create the infrastructure. The commands and statements must be separated by semicolons. |
|
Manual Review |
Select to enable manual review. On enabling the Manual Review field, new manual stop steps are added to Customer DPK processing activity as the final step. This field is disabled by default. When the field is enabled, the activity execution pauses on reaching this step. See Manually Reviewing Steps During Processing. |
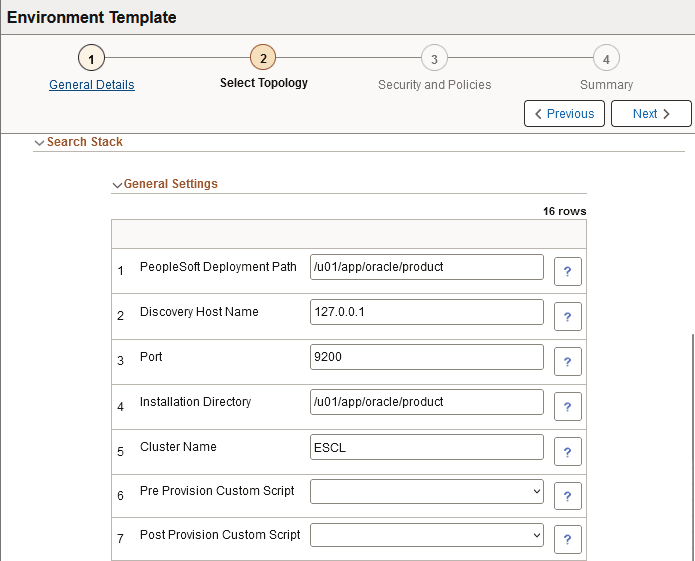
See Provisioning and Sharing Search Clusters for information on setting up search clusters.
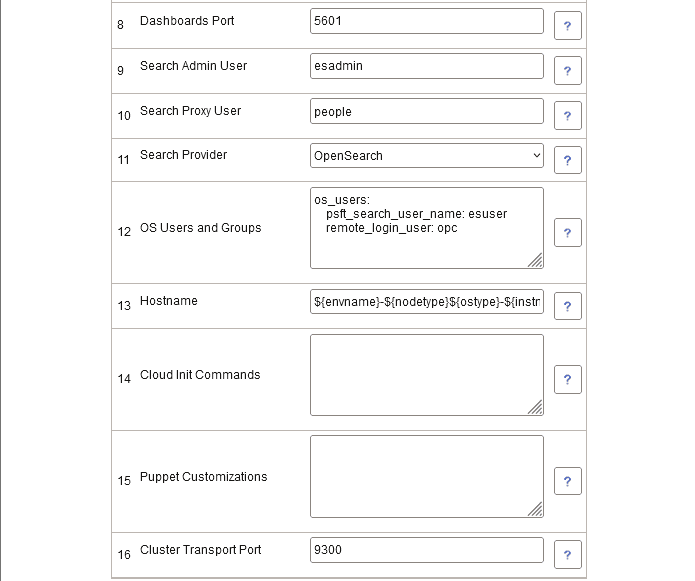
This example illustrates the fields and controls on the General Settings for Search Stack tier (1 of 2). You can find definitions for the fields and controls later on this page.
This example illustrates the fields and controls on the General Settings for Search Stack tier (2 of 2). You can find definitions for the fields and controls later on this page.
|
Field or Control |
Description |
|---|---|
|
PeopleSoft Deployment Path |
Location where the PeopleSoft application is deployed. Note: PeopleSoft Deployment Path must not end with a slash. |
|
Discovery Host Name |
The host name for any nodes that are already members of a cluster. |
|
Port |
Elasticsearch or OpenSearch port. The default is 9200. |
|
Installation Directory |
The path to install Elasticsearch (or OpenSearch) and/or Kibana (or OpenSearch Dashboards). |
|
Cluster Name |
The name of the OpenSearch cluster. The default is ESCL. |
|
Pre Provision Custom Script |
Select an uploaded script to run prior to provisioning the environment. The environment variable defined in the puppet customization can be accessed in Pre Provision Custom Script. |
|
Post Provision Custom Script |
Select an uploaded script to run post provisioning. The environment variable defined in the puppet customization can be accessed in Post Provision Custom Script. |
|
Dashboards Port |
Port for OpenSearch Dashboards or Kibana. The default is 5601. |
|
Search Admin User |
Enter the admin user for search stack. The default is esadmin. |
|
Search Proxy User |
Enter the proxy user for search stack. The default is people. |
|
Search Provider |
Select the search provider. You can select either Elasticsearch or OpenSearch. |
|
OS Users and Groups |
Use this field to specify custom users to set up the search stack instance. The field is populated with the default Linux users in the form of a YAML customization field. All entries are mandatory. Do not modify the format. The format (for example, spacing and punctuation) and values are validated when you move to another field on the page. User names should be between 1 and 32 characters long and may contain only lower and upper case letters, digits (1-9), periods (.), underscores (_), or dashes (-). They can end with a dollar sign ($). Dashes and periods are not allowed at the beginning of the user name. Fully numeric names are not allowed. The remote_login_user is required to access the instance. If you want to specify a remote_login_user other than opc, you must first create a custom Linux image and add the custom user. The custom user must have root (sudo) privileges. See the tutorial Create a Custom Linux Image for PeopleSoft Cloud Manager (Optional) at https://docs.oracle.com/en/applications/peoplesoft/cloud-manager/index.html#InstallationTutorials. |
|
Hostname |
Accept the default or enter a custom Hostname. Note: Hostnames will be validated when template is submitted. The text ${envname}-${nodetype}${ostype}-${instno} represents macros that Cloud Manager expands.
For example, suppose you are provisioning an environment with the name HCM03, with a single full-tier node on Linux. If you do not change the default text in the Hostname field, the value of hostname would be hcm03-fulltierlinux-1. If you want to enter a custom hostname, you can replace one or more of the macros. For example, replace ${envname} with Test02, but retain the other values: Test02-${nodetype}${ostype}-${instno} This will result in the hostname value: Test02-fulltierlinux-1. |
|
Cloud Init Commands |
Enter the operating system-level settings, like package installation or OS upgrade or update, that you need to customize when you create the infrastructure. The commands and statements must be separated by semicolons. |
|
Puppet Customizations |
Enter DPK customization values or custom environment variables that can be accessed in Custom Puppet Script as well as the Post and Pre Provision Custom Scripts. The values are provided in the form of YAML. Sample YAML input data for puppet customization: To refer the usage of environment variables and DPK YAML values, see Upload Custom Scripts Page |
|
Cluster Transport Port |
The port for communication for shared OpenSearch search clusters. The default is 9300. |
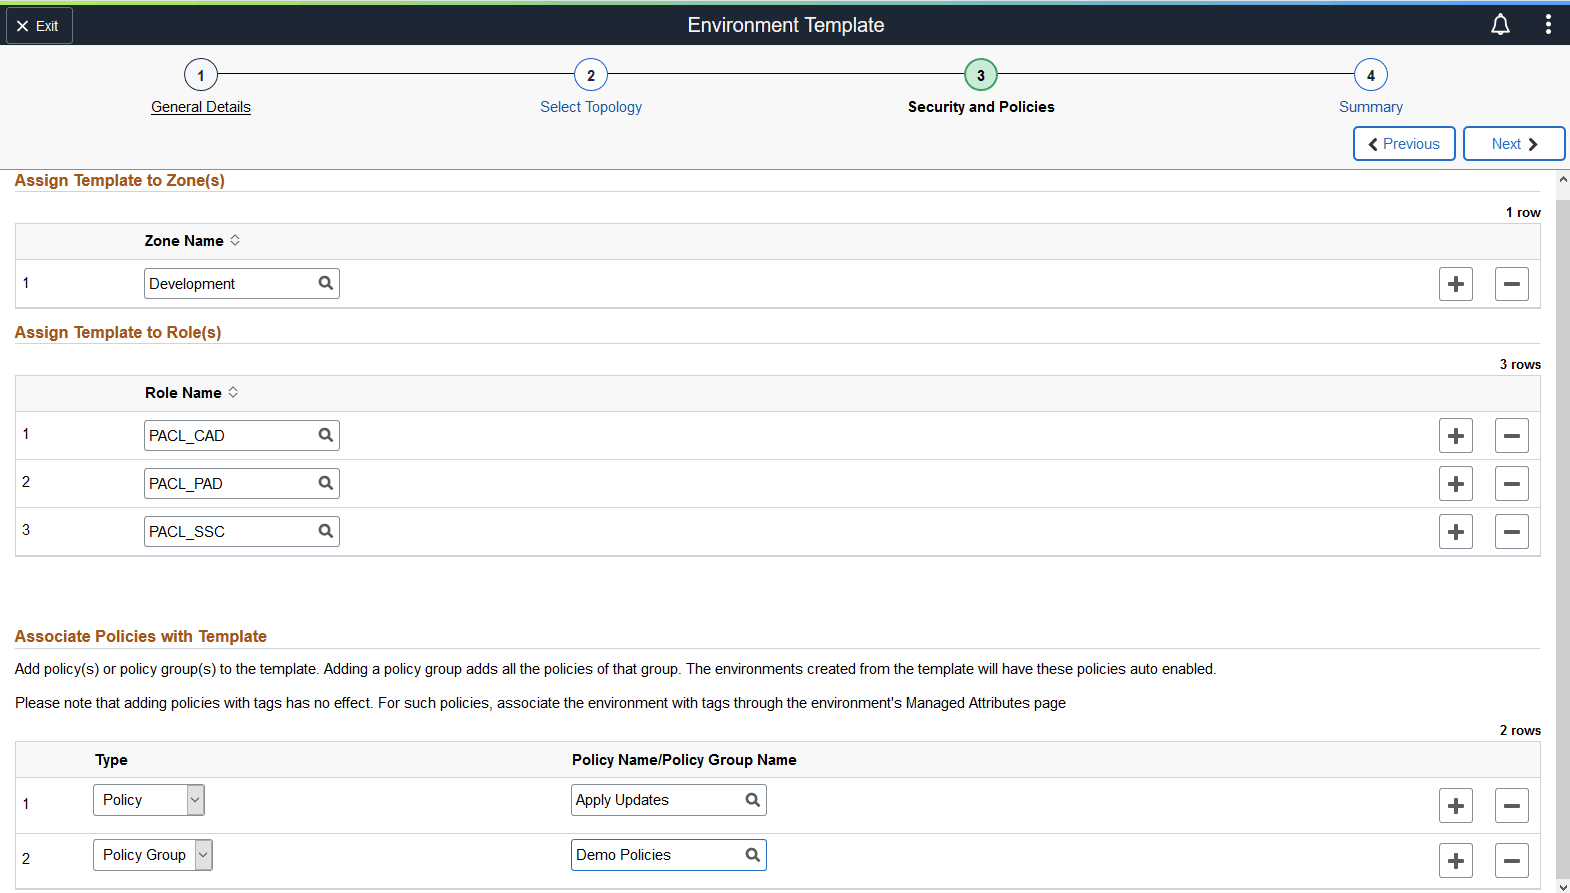
Use the Environment Template – Security and Policies page to associate the zone in which the environment is created, the role that will have access to the template and policies associated with the template.
Navigation:
Click Next on the Select Topology step.
Click Step 3, Security and Policies, at the top of the page to navigate to the Environment Template – Security and Policies page in the guided process.
This example illustrates the fields and controls on the Environment Template — Security and Policies page. You can find definitions for the fields and controls later on this page.
|
Field or Control |
Description |
|---|---|
|
Zone Name |
Indicates the zone in which the environment is created. |
|
Role Name |
Indicates the roles that have access to the template for creating environments. Only the users belonging to the role specified will be able to access the template while creating environment. The delivered Cloud Manager roles are:
|
|
Type |
Select the policy type:
Note: Adding a policy group adds all the policies of that group. |
|
Policy Name/Policy Group Name |
Select policy name or policy group name for this template. The environments created from the template will have these policies auto enabled. See Using Policy Editor. |
Use the Environment Template – Summary page (ECL_TEMPL_REV_FL) to review and submit the template details.
Navigation:
Click Next on the Security and Policies step.
Click step 4, Summary, at the top of the page to navigate to the Environment Template – Summary page in the guided process.
This example illustrates the fields and controls on the Environment Template – Summary page. You can find definitions for the fields and controls later on this page.
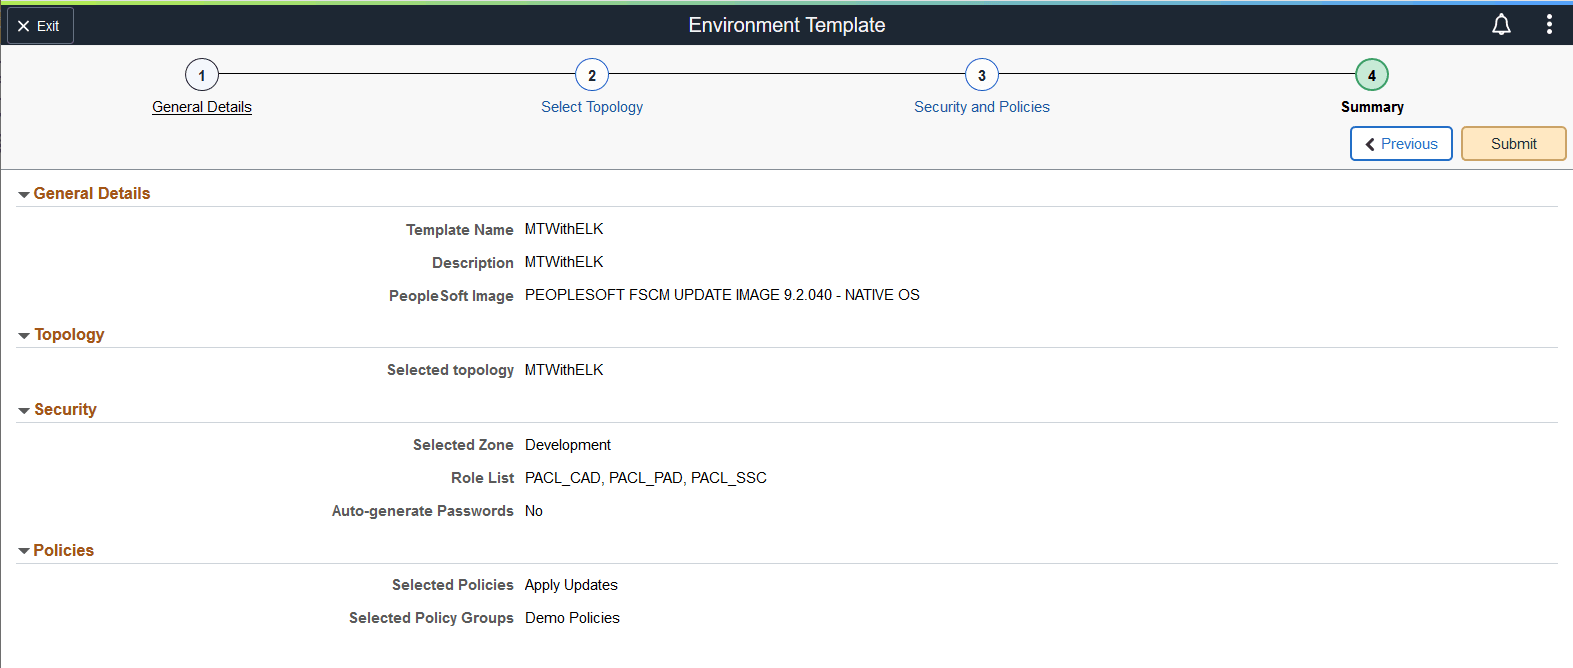
The details provided in all the pages in the Environment Template wizard is displayed here.
|
Field or Control |
Description |
|---|---|
|
Submit |
Click this button to submit the details for template creation. |