Using Policy Editor
To access the Policy Editor page (ECL_POLICY_EDITOR), select the Orchestration Manager tile.
Use the Policy Editor page to add policies, as well as manage existing policies.
See Managing Policies.
Policies will be displayed by Policy Group when available. Policy groups are optional and can be used to group policies together for display, and to facilitate associating related policies. Any policies that are not associated with a specific policy group will be shown under Default Policies.
When you add a policy, the owner is the user who defined the policy. The owner can be an administrator user or a self-service user.
Policies defined by an administrator can be applied on any policy object artifact. For example, if an administrator adds a policy for stopping environments, then all the environments available in the Cloud Manager instance (irrespective of which user created the environment) can be associated with the policies.
Policies created by a self-service user can be applied to the environments created by that user.
To add a policy:
Select the Orchestration Manager tile.
Click the Add Policy button.
Define and save the policy on the Policy Editor page.
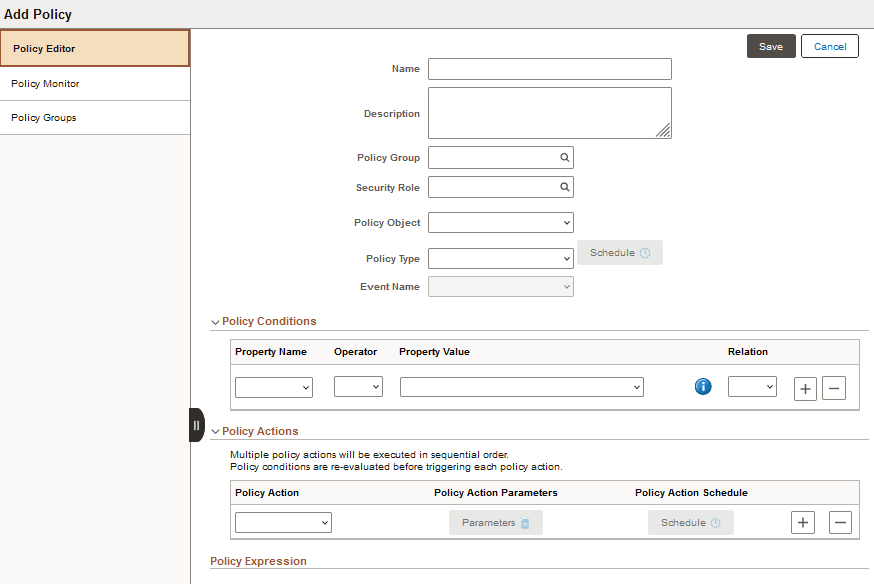
This example illustrates the fields and controls on the Add Policy page.
Field or Control |
Description |
|---|---|
Name |
Enter a name for the policy. |
Description |
Enter a description for the policy. |
Policy Group |
Select an existing policy group. Policy groups are used to group policies together. The policy does not need to belong to a group. |
Security Role |
Select the security role that can edit the policy. |
Policy Type |
Select the policy type.
|
Schedule |
This button is available when the policy type is Schedule. Select to set the policy schedule. |
Policy Object |
A Policy object exposes properties and actions, which are used by the Policy editor to set policy conditions and action for the policy. Built-in policy objects are:
|
|
Event Name |
If Policy Type is Event and Policy Object is Environment, select one of these Event Names.
If Policy Type is Event and Policy Object is Repository Artifact, select one of these Event Names:
|
|
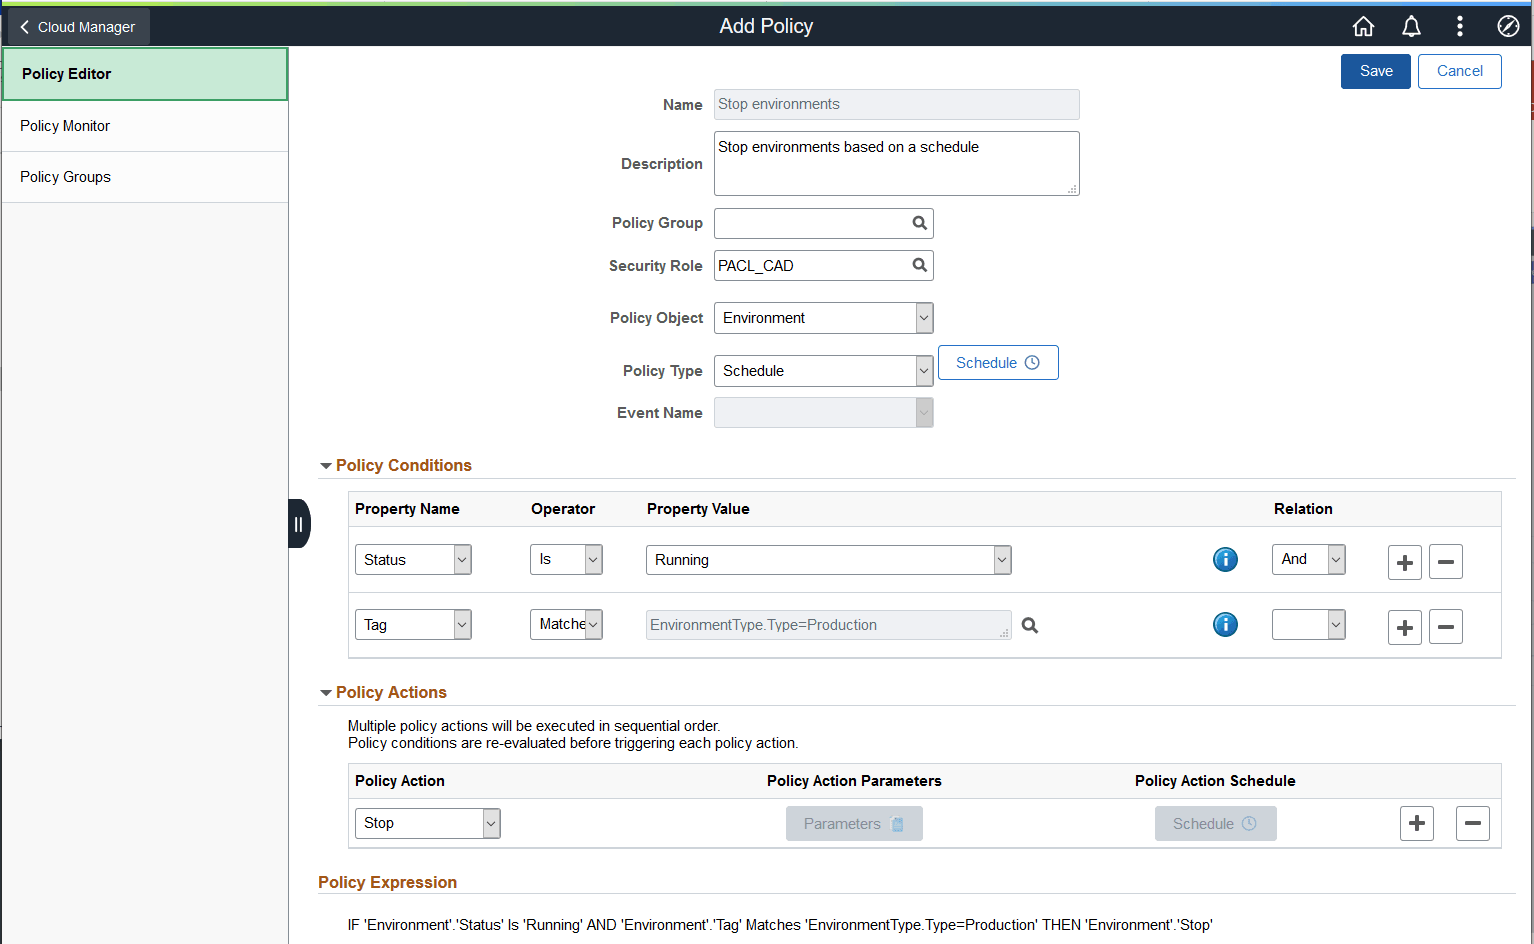
Policy Expression |
When you save a policy, this field displays a statement representing your choices. This field also displays error messages in case of incorrect choices. |
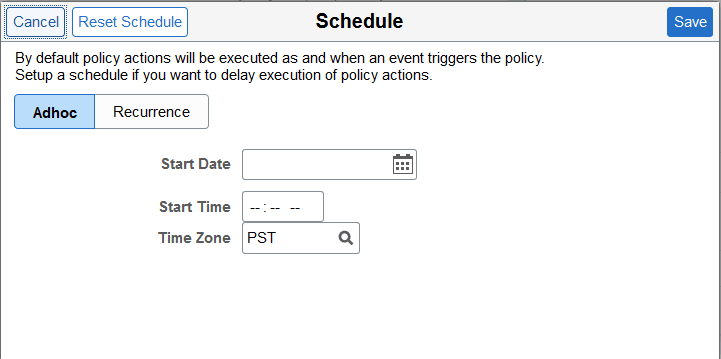
When you select the Schedule button from the Add Policy page, you can select to create an ad hoc schedule or a recurrence.
Important! Set the base time zone in PIA () to match the time zone of the Cloud Manager Database.
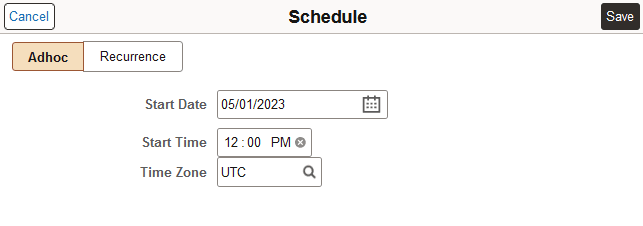
Adhoc
Select Adhoc if you want to schedule the policy for a specific data and time.
This example illustrates the fields and controls on the Schedule page for an Adhoc policy schedule.
Field or Control |
Description |
|---|---|
Start Date |
Select the start date. |
Start Time |
Enter the start time. |
Time Zone |
Select the time zone. |
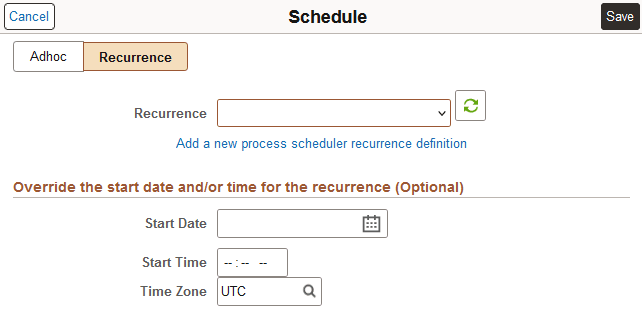
Recurrence
Select Recurrence if you want the policy to be run on a recurring schedule.
This example illustrates the fields and controls on the Schedule page for a Recurrence policy schedule.
Field or Control |
Description |
|---|---|
Recurrence |
Select an existing Process Scheduler recurrence schedule. |
Add a new process scheduler recurrence definition |
Select this link if you want to add a new recurrence definition. This link will open the Process Scheduler Recurrence Definition page. |
Start Date |
Optionally, you can enter a start date for this recurrence. |
Start Time |
Optionally, you can enter a start time for this recurrence. |
Time Zone |
Optionally, you can enter a time zone for this recurrence. |
See the product documentation PeopleTools: Process Scheduler, Defining Recurrence Definitions.
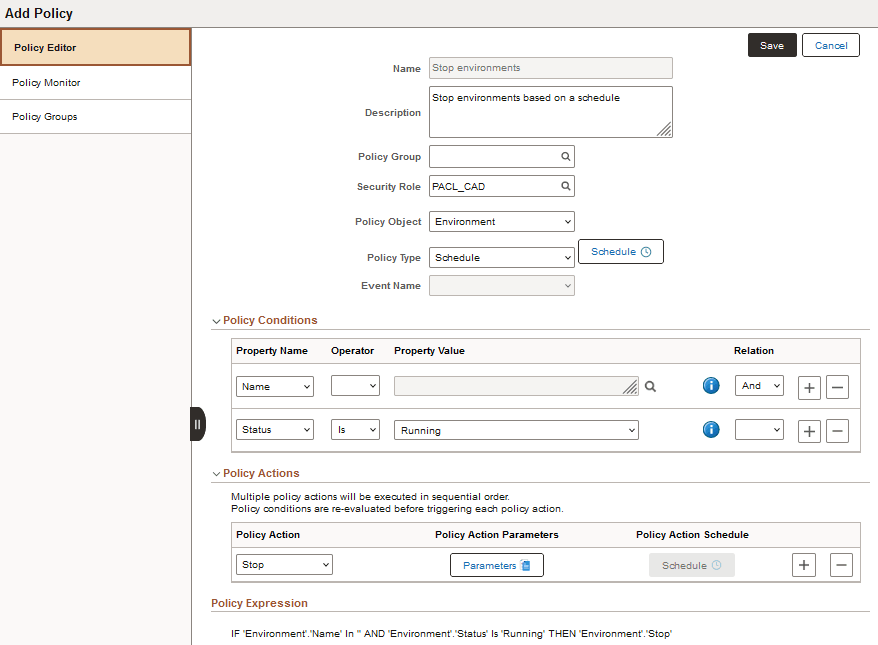
Environment policies can be based on a schedule or an event. Policies where the Policy Object is Environment, the Policy Type is Event, and the Event names are ScaleUp and ScaleDown, are used for auto scaling. See Setting Up Auto Scaling.
This example illustrates the fields and controls on the Add Policy page where the Object Type is Environment.
|
Field or Control |
Description |
|---|---|
|
Property Name |
Available Property Names are:
Note: Status is not applicable for Delete events. |
|
Operator |
Depends on Property Name, operators include:
|
|
Property Value |
Select the Property Value(s) from the drop-down list or lookup depending on the Property Name. Enter a single value or a comma separated list of values. |
|
|
Mouse over this icon for an explanation of the property and example values. |
|
Relation |
Specify the relationship between one condition and the next with operators And, Or. You can also use parentheses to group conditions. |
|
|
Select to add another condition. |
|
|
Select to delete a condition. |
|
Policy Action |
Select the Policy Actions for Environment Policy Objects. The available Policy Actions and Action Parameters are listed in the next section. |
|
Parameters |
Use to select the action parameters for the selected Action. Actions and Action Parameters are listed in the next section. |
|
Policy Action Schedule |
Select this button to schedule policy actions. For scheduled environment policies, this button is not available for use. Use the Schedule button next to Policy Type. |


Policy Actions for Environment Policy Object
Depending on the policy action selected, the action parameters are displayed. Mandatory actions parameters are prefixed with an asterisk (*) and must be entered. Mouse over the information icon for the action parameter for information on how to enter the parameter value.
|
Policy Action |
Action Parameters |
|---|---|
|
Backup |
Backup Prefix: Enter a text string to be appended to the database backup. |
|
Custom Action |
Define Source (Define any one): Select one of the following as the source for the custom action.
Set Execution Content: Enter the content needed to run the custom action.
|
|
Health Check |
Environment Names Check All Domains are All (Required) Check if PIA is Accessible (Required) Check Load Balancer Status (Required) Health Check action must be followed by Send Email Notification action, so that the user receives the Health Check Status by email. Note: This action is not applicable for Delete, ScaleUp, or ScaleDown events. |
|
Refresh |
Environment Name (Required) Use Latest Backup Backup OCID Perform Middle Tier Refresh Source TDE KeyStore (Wallet) Password (Required) Pre Refresh Custom Script Post Refresh Custom Script Target MT DMS Path File Server App DPK Location |
|
RefreshADBWallet |
Expiry Day Count |
|
ScaleDown |
Scale Type (Required) –- Auto Scale Nodes to Scale Scale Limit (Required) Day 01 (Monday) through Day 07 (Sunday) Application Server Domain (Required) Process Scheduler Domain PIA Domain |
|
ScaleUp |
Scale Type (Required) –- Auto Scale Nodes to Scale Scale Limit (Required) Day 01 (Monday) through Day 07 (Sunday) Application Server Domain (Required) Process Scheduler Domain PIA Domain |
|
Send Email Notification |
Notification Topic OCID To use this action, enable External Notifications on the Infrastructure Settings page. If the Notification Topic OCID is not supplied here, the value will be taken from the Infrastructure Settings page. If there is no value in either place, no email will be sent. See Notifications in Infrastructure Settings Page. If the previous action is Health Check, the user will receive an email with the Environment Health Check Status report. if the previous action is any other action, then the user will receive an email informing them that the action is completed. If this is the first action, then the user will receive an email informing them that the Life Cycle process is complete. |
|
Start |
None |
|
Stop |
None |
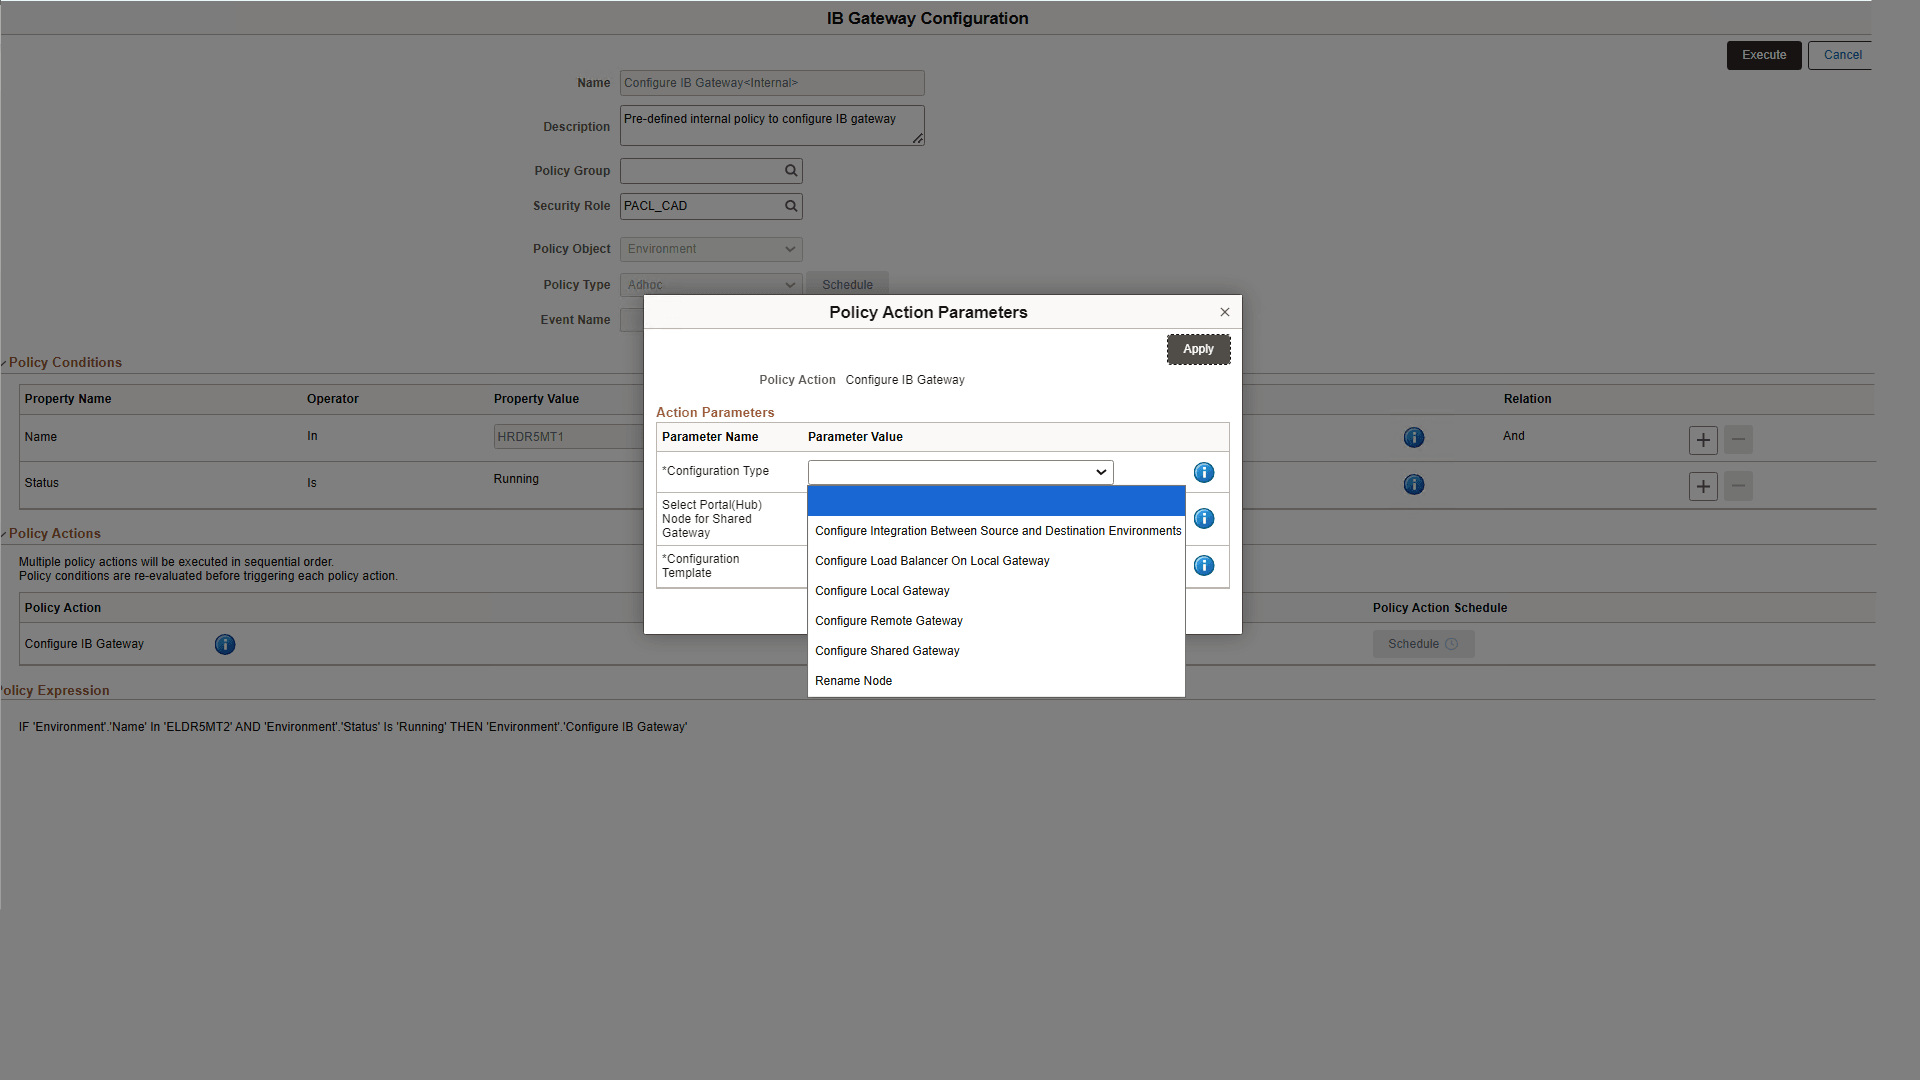
Adhoc Policy for Configuring IB Gateways
Cloud Manager enables you to define and run on-demand policies using the Adhoc policy type. You can run Adhoc policies, used for purposes such as restarting a group of environments, at any time without waiting to schedule an event. The pre-defined internal policies can be used to perform IB configurations on managed environments.
This example illustrates the fields and controls in the Configuration Type field on IB Gateway Configuration.
|
Policy Action Parameter |
Definition |
|---|---|
|
Configuration Type |
Select a configuration type according to the requirement. The available options are:
|
|
Configuration Template |
This value is partly pre-populated from the environment stack and depends on the Configuration Type selected. It is displayed in the form of JSON data. You can modify the content, if needed. |
|
Select Portal (Hub) for Shared Gateway |
Select the portal or hub node from the drop-down list with the environment names associated with the policy. This parameter is applicable only for Shared Gateway configuration type. |
Starting and Stopping Individual Nodes
To apply the Start/Stop Policy Action on individual nodes from an environment:
Select Name as the first Property Name on the Policy Conditions section.
Select the Operator.
Select the environments where you want to start or stop individual nodes from Property Value drop-down.
Select Start or Stop from the Policy Action drop-down. Using the + button you can create multiple policy actions, which are run in sequence.
Note: To start a node, the environment that contains the node must be in Running state.
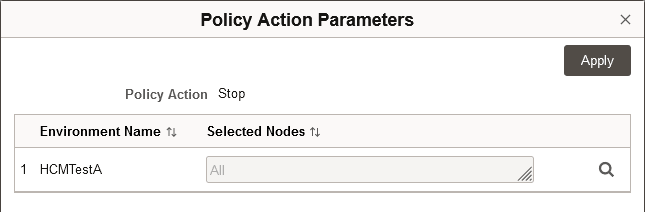
Click Parameters button on the Policy Action Parameters field. Policy Action Parameters dialog box appears. The environments you selected are listed.
Select the desired nodes from the listed environments. The default value is All on the Selected Nodes field. If you keep the default value, it becomes an environment start/stop policy action.
Click the lookup icon to select other nodes.
This example illustrates the fields and controls on Policy Action Parameters dialog box when Stop policy action is selected.
If the Policy Type is selected as Event, select the Policy Action Schedule to schedule the policy action.
Click Save. The policy for starting or stopping nodes is successfully added.
When you select Repository Artifact, the only Policy Type is Event. An event-based policy can be triggered by the event or the policy action can be scheduled for a specific time or recurrence.
Repository Artifact events are:
Patch Download
Infra DPK Download
PUM DPK Download
By default when you create a policy for a repository artifact, the policy is triggered when the artifact is downloaded. Use the scheduling option to delay running the event.
Important! You must not apply Infra DPK Download event-based policies directly. It is recommended to apply such policies by setting a schedule for the policy action.
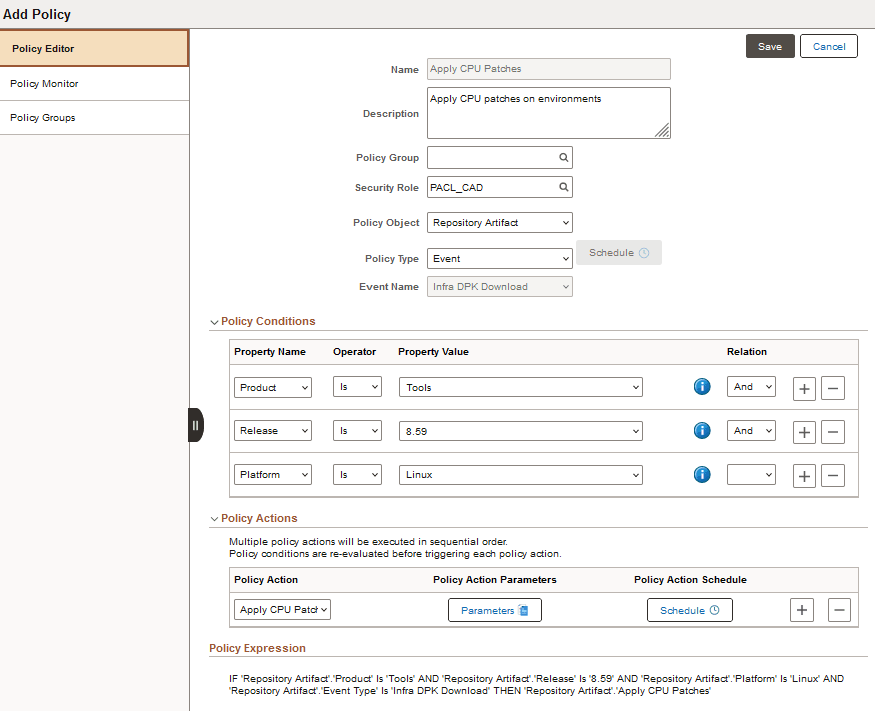
Infrastructure DPK Download example:
You do not want to disrupt the environments during normal business hours when the download takes place.
Set a schedule to run the apply on the weekend.
If Infrastructure DPK gets downloaded in the middle of a week, CPU patches will be applied on the environments only during the weekend.
This example illustrates the fields and controls on the Add Policy page where the Object Type is Repository Artifact.
Policy Conditions for Repository Artifact
|
Field or Control |
Description |
|---|---|
|
Property Name |
For Policy Object Repository Artifact, property names are:
|
|
Operator |
Is |
|
Property Value |
Select value from the drop-down list. |
|
Relation |
Specify the relationship between one condition and the next with operators And, Or. You can also use parentheses to group conditions. |
|
|
Select to add another condition. |
|
|
Select to delete a condition. |
Policy Actions for Repository Artifact
An event-based policy will run when the event triggers the policy. Select the Schedule button to schedule the policy action for a specific time or recurrence.
|
Policy Action |
Parameters |
|---|---|
|
Apply CPU Patches |
Environment Names |
|
Apply PRPs |
Environment Names |
|
Backup |
Environment Names Backup Prefix |
|
Custom Action |
Environment Names (Required) PeopleCode Handler (Required) Input (JSON) |
|
Define and Upload Target |
Select PUM Target (Required) Custom IB Local Gateway Node of Target |
|
Delete Old PUM Source |
None |
|
Health Check |
Environment Names Check All Domains are up (Required) Check if PIA is Accessible (Required) Check Load Balancer Status (Required) Health Check action must be followed by Send Email Notification action, so that the user receives the Health Check Status by email. |
|
Migrate PUM Metadata |
Select Old PUM Source (Required) Custom IB Local Gateway Node of Old PUM Source Auto Discover Old PUM SOurce on next policy run (Required) Migrate PUM Metadata from Old PUM Source (Required) Upload Targets from Old PUM Source (Required) |
|
Provision PUM |
Environment Name Prefix (Required) Environment Template Name (Required) Environment Database Name Prefix (Max length 3) |
|
Send Email Notification |
Environment Names Notification Topic OCID (Optional) To use this action, enable External Notifications on the Infrastructure Settings page. If the Notification Topic OCID is not supplied here, the value will be taken from the Infrastructure Settings page. If there is no value in either place, no email will be sent. See Notifications in Infrastructure Settings Page. This action must follow another policy action, or no email will be sent. If the previous action is Health Check, the user will receive an email with the Environment Health Check Status report. If the previous action is any other action, then the user will receive an email informing them that the action is completed. |
|
Start |
Environment Names |
|
Stop |
Environment Names |
Setting Parameters When Selecting Environments for Policy Actions
The required parameters vary depending upon the Policy Actions. For actions such as Start, Stop, Apply PRP, or Apply CPU, you must select an environment for the policy to work on. To set the parameters:
Click the Parameters button for the Policy Action.
Click the Lookup icon.
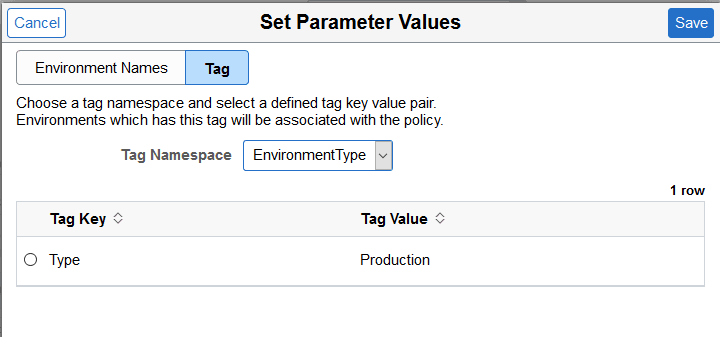
You can select an environment based on Environment Name or Tag.
For an environment, click the Lookup icon and select the environment.
For a Tag, select a Tag Namespace from the drop-down list, and then select a tag.
This is an example of the Set Parameter Values page when Tag is selected.
Click Save.
The policy action parameter value is updated.
This is an example of the Policy Action Parameters page
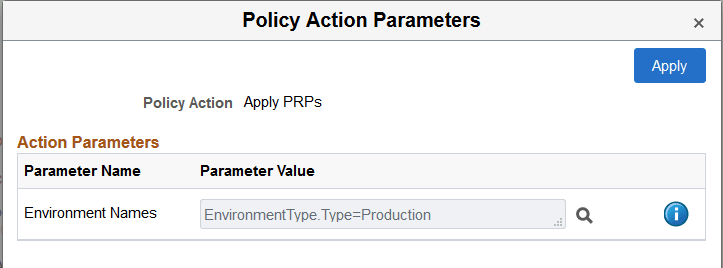
Click Apply to save the parameters.
Scheduling Event Based Policy
Select the Schedule button to schedule the policy for a specific time or recurrence.
Setting a schedule for an event based policy is completely optional. By default an event based policy will run in real time as and when the event occurs. Add a schedule for an event based policy only when needed.
This example illustrates the fields and controls on the Schedule page.
Select Adhoc or Recurrence to schedule the policy. Use the Reset Schedule to reset the schedule.
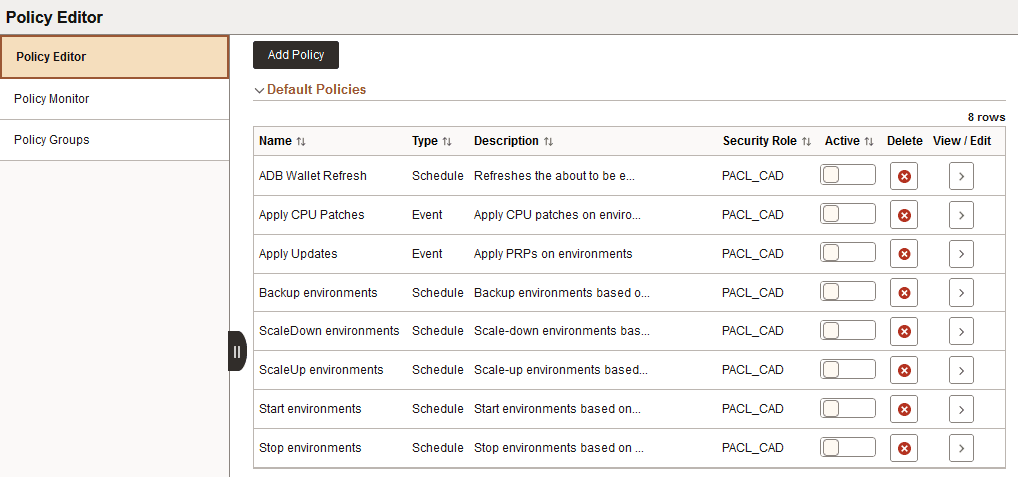
All defined policies are available and grouped by policy group.
You can edit the delivered default policies for your requirements and save them to a new name, or use them as examples to create new policies.
The Default Policies section shows policies that are not associated with a policy group.
This example illustrates the fields and controls on the Policy Editor page. You can find definitions for the fields and controls later on this page.
Field or Control |
Description |
|---|---|
Active |
Enable the switch to activate or inactivate a policy. When a policy is active the switch displays a check mark. Once a policy is inactivated, it will be suspended and will not be run. |
Delete |
Use the Delete icon to remove a policy. |
View/Edit |
Click the icon (>) to view or edit a policy. The user must belong to the security role assigned to the policy in order to edit the policy. If the user does not belong to the security role, the user can view the policy, but can not edit it. |
Editing the Policy
When you select to edit or view the policy, the policy is displayed.
This example illustrates the fields and controls on the Add Policy page when you select to edit or view a policy.
Note: Environments can be added to or removed from a policy directly from the Environment Details page. See Associating Policies with Environment.