5.5.3 IDIH Deployment on OpenStack with RAW Images
Perform the following procedure for IDIH Deployment on OpenStack with RAW Images:
- Login to OpenStack with valid credentials.
- Ensure appropriate flavors are available before launching instances.
- Launch MySQL VM:
- Navigate to Compute, Instances and click Launch Instance.
- Provide an instance name, example: mysql-openstack
- Select the image (preferably ol8.10) and ensure
Create New Volume is set to
NO.
Figure 5-24 Source

- Select the appropriate flavor for the MySQL VM as specified in
the following table.
Table 5-13 IDIH Flavor Value
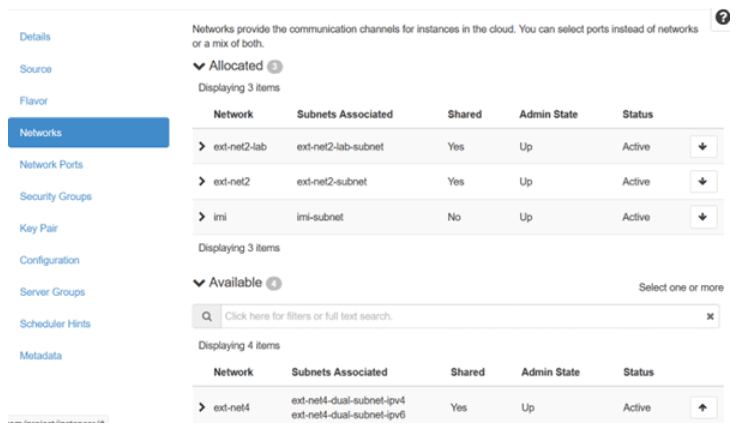
Flavor Name VCPUs RAM(GB) Root Disk(GB) Ephemeral Swap Disk kafka_flavor 6 16 170 0 0 Mysql-DB-DataNode 6 16 220 0 0 service_profile 6 16 120 0 0 - Add XMI, IMI, and XSI networks to the VM.
Figure 5-25 Networks

- Click Launch Instance to create the MySQL VM.
- Configure Network Interfaces:
- Once the VM is created, access the console and log in with
root/changemecredentials. - Run nmcli con show to list network interfaces.
Figure 5-26 Command

- Once the VM is created, access the console and log in with
- Disable IPv6 and configure IPv4 for the XMI interface (Optional
step):
- nmcli con mod <xmi_interface_name> ipv6.method disabled
- nmcli con mod <xmi_interface_name> ipv4.address <xmi_ip_address/cidr> ipv4.gateway <xmi_gateway> ipv4.route-metric 1 ipv4.method manual
- nmcli con up <xmi_interface_name>
SSH to the MySQL VM using the XMI IP and configure IMI and XSI interfaces similarly.
- Repeat for Kafka and Service VMs: Perform steps 1 to 12 for Kafka and Service VMs (Mandatory step).
- Verify Connectivity:
- Ensure all VMs can reach each other using their IMI IPs:
- On all VMs, check firewall status:
sudo systemctl status firewalld - If not running, start and enable
it:
sudo systemctl start firewalld sudo systemctl enable firewalld - Edit
/etc/resolv.confto include:# Generated by NetworkManager search openstack.internal novalocal nameserver <nameserver_ip - Edit
/etc/dnf/dnf.confto ensure no ash proxy is present:[main] gpgcheck=1 installonly_limit=3 clean_requirements_on_remove=True best=True proxy=http://www-proxy.us.oracle.com:80 retries=100 - Clean DNF
cache:
sudo dnf clean all - Install utilities:
sudo dnf install tar dos2unix
- On all VMs, check firewall status:
- Ensure all VMs can reach each other using their IMI IPs:
- Installation and Extraction:
- Download and extract the installation TAR file on any VM.
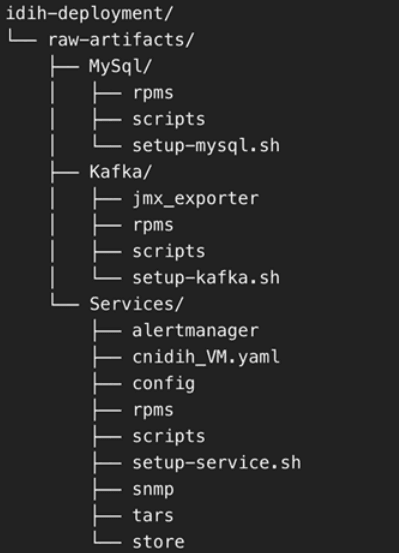
- Directory structure post extraction:
Figure 5-27 Directory Structure post Extraction

- Distribute directories:
- MySQL directory to MySQL VM
- Kafka directory to Kafka VM
- Services directory to Service VM
- MySQL Setup
- Access the MySQL VM:
- Log in and navigate to the MySQL directory.
- Run the MySQL Setup Script
- Locate
setup-mysql.sh. - Run the below command to run the script:
./setup-mysql.sh
- Locate
- Configuration During Execution: Enter the IMI IP of the
MySQL VM when prompted for the MySQL bind address.
Completion: After the script is complete, MySQL will be successfully set up on the VM.
- Access the MySQL VM:
- Kafka Setup
- Access the Kafka VM: Log in and navigate to the Kafka directory.
- Run the Kafka Setup Script
- Locate the setup-kafka.sh script
- Run the below command for the
script:
./setup-kafka.sh
- Configuration during execution
- When prompted, enter the Kafka IMI IP and Kafka XSI IP. when prompted by the script.
- Kafka and Kraft services will be initiated on the specified IPs.
- Optional step, only if you need to use Kafka XMI IP instead of
the default Kafka IMI IP for communication with DSR.
- Uncomment:
advertised.listeners=INTERNAL_PLAINTEXT://192.168.1.237:9092,INTERNAL_SSL://192.168.1.237:9093,EXTERNAL://[kafka_xmi]:9094 line in broker.properties file(path: /opt/kafka/config) and replace[kafka_xmi] with Kafka XMI IP - Comment:
advertised.listeners=INTERNAL_PLAINTEXT://192.168.1.237:9092,INTERNAL_SSL://192.168.1.237:9093, EXTERNAL://10.196.84.46:9094 line. - Run the below command to restart Kraft and Kafka
services:
systemctl restart kafka
After successful execution of the health check, Kafka is successfully set up on VM.
- Uncomment:
- Service Setup
- Access the Service VM
- Navigate to the directory where the
setup-service.shscript is located. - Move the store Directory to the
/opt/path using the following command:mv store /opt/ - Edit the Docker-compose file:
- Navigate to the
Services/ directory. - Edit
cnidih_VM.yamlfile:- <REPLACE WITH SOAM VIP> must be replaced with a valid active SOAM IP.
- Navigate to Protrace section and enable the
following property:
NFCONFIG_CLIENT_ENABLEDto True. - Save and exit.
- Run the following command for the Service Setup
Script:
./setup-service.sh
- Navigate to the
- Configuration during execution: The script will prompt for
several inputs during execution:
- Enter Service IMI IP, Service XMI IP, Kafka IMI IP, and
MySQL IMI IP.
Note:
For IPv6 setups, the above IPs must be entered in square brackets ( [] ).After these inputs are provided, the script will start the required services and proceed with the health check.
- Run the following command to verify if all services are
running:
podman ps -aAccess the UI at:
https://<SERVICE XMI
                                        IP>/#/
This completes the setup for MySQL, Kafka, and Services. The deployment is now ready for use.
- Enter Service IMI IP, Service XMI IP, Kafka IMI IP, and
MySQL IMI IP.