Viewing and Maintaining Relationships and Roles
These topics discuss how to:
View and maintain relationships.
View and maintain roles.
|
Page Name |
Definition Name |
Usage |
|---|---|---|
|
BO_REL_VIEW |
View and maintain current relationships for a specified business object. |
|
|
Company - Relationships |
RD_COMPANY_REL |
View and maintain current relationships for a specified business object. |
|
Consumer - Relationships |
RD_PERSON_REL |
View and maintain current relationships for a specified business object. |
|
Contact - Relationships |
RD_PERSON_REL |
View and maintain current relationships for a specified business object. |
|
Site - Relationships |
RD_SITE_REL_2 |
View and maintain current relationships for a specified business object. |
|
Business Object - Relationships |
BO_REL |
View and maintain current relationships for a specified business object. |
|
360-Degree View - Relationship Viewer |
RB_TD_REL_VIEWER |
View and maintain current relationships for a specified business object. |
|
Create New <relationship> of <object> |
BO_REL_VIEW_3 |
Add a new relationship. |
|
Relationship Viewer - Update <relationship> |
BO_REL_VIEW_2 |
Update the relationship. You can modify the start date or end date for the relationship. |
|
MAINTAIN_ROLE_SEC |
Maintain roles for a specified business object. |
|
|
360-Degree View |
RB_TD_AGENT_VIEW |
Access the 360-degree view of the specified business object. |
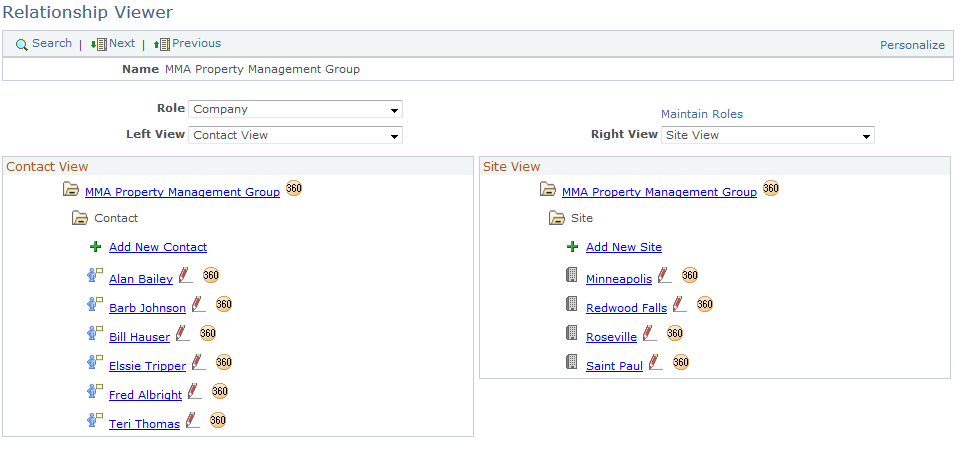
Use the Relationship Viewer page (BO_REL_VIEW) to view and maintain current relationships for a specified business object.
Navigation
Image: Relationship Viewer page
This example illustrates the fields and controls on the Relationship Viewer page. You can find definitions for the fields and controls later on this page.
|
Field or Control |
Definition |
|---|---|
| Role |
Select the role for which you want to view relationships. |
| Select View |
Select a relationship view that you want to appear in the corresponding pane of the page. The views that appear as selection criteria for this field are defined on the Role Type - Default Views page. |
| Maintain Roles |
Click to access the Maintain Roles page for the specified business object. |
View Detail
The View Detail page regions show the relationships that are associated with the business object that is selected in a tree format. The default relationship view trees are based on the business object's roles and role priorities.
Click any link that is in the tree to view detail information for that business object. A PeopleSoft CRM Business Object Relationship Model page for the business object type appears in a new browser. For example, if you click a contact link, the Contact - Contact page appears. If you click a site link, the Site - Site page appears.
The icons that appear to the left of the business object detail vary by business object. If no icon is specified for the business object, then a leaf icon appears in the relationship viewer for that business object.
See Role Type Page.
|
Field or Control |
Definition |
|---|---|
| Add New <relationship> |
Click to add a new relationship. The Add New Relationship link appears at the beginning of every node that you configure with a folder label when you configure the relationship view. If the node is configured with a quick create template, the quick create page appears when the user clicks this link. See Configure Relationship Views Page. If the node is configured with a BO search criteria, the Add New <relationship> page appears. |
 |
Click to update the relationship. |
 |
Click to display the 360-Degree View for the business object in a new browser window. Note: The 360-Degree button only appears on the tree detail for role types that are supported by the 360-Degree View. See role type category 43 (360 Transfer Roles) for the list of valid role types. |
Use the Maintain Roles page (MAINTAIN_ROLE_SEC) to maintain roles for a specified business object.
Navigation
Click the Maintain Roles link on the Relationship Viewer page or a Relationships page for a component or a Relationships page for a component.
Image: Relationship Viewer - Maintain Roles page
This example illustrates the fields and controls on the Relationship Viewer - Maintain Roles page. You can find definitions for the fields and controls later on this page.
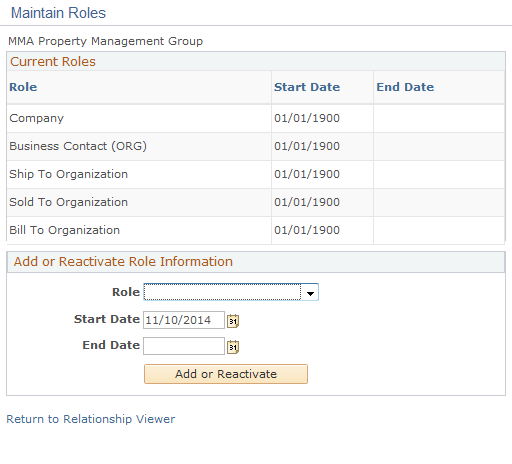
When this page initially appears, all the roles that pertain to the specified business object and its start and end dates are listed in the Current Roles group box. Roles that were added by the system do not have an end date. If a user-added role does not have an end date, an Inactivate button appears next to the role.
|
Field or Control |
Definition |
|---|---|
| Inactivate |
Click this button to inactivate the role. When you click this button, the Maintain Roles - Inactivate Role page appears. Enter the End Date for this role and then click the OK button. |
Add or Reactivate Role Information
|
Field or Control |
Definition |
|---|---|
| Role |
Select the role to add or reactivate for this business object. |
| Start Date and End Date |
Enter the start and end date that this role is in effect. |
| Add or Reactivate |
Click this button after you select the role and the start and end date to add or reactivate the role that is for the specified business object. |