Creating Cases
The Case Creation process is a simplified user interface through which a self service user can create a case. Instead of showing all case fields on a single page, an administrator can configure multiple steps for the case creation process. The administrator can specify the fields that will be displayed on each page and a description of each step. Display Template is used to set this up. This topic discusses how to create cases.
|
Page Name |
Definition Name |
Usage |
|---|---|---|
|
RC_CASE_SS_RPT1 RC_CASE_SS_RPT2 RC_CASE_SS_RPT3 |
Describe and submit a new problem. |
|
|
RC_CASE_HD_SS_DIRR |
Look up and select an employee for whom you are adding a case. The Add Case for Direct Report link is only available for PeopleSoft HR Service Center and the Add Case for Someone Else link is only available for PeopleSoft IT Service Center. |
|
|
RC_CASE_HD_SS_CNTC |
Update contact information for the employee that is the contact on the case. |
Use the Create Case page (RC_CASE_SS_RPT1, RC_CASE_SS_RPT2, or RC_CASE_SS_RPT3) to describe and submit a new problem.
Navigation
On the HR Service Center Home Page, click the Create Case link on the Quick Links pagelet.
On the IT Service Center Home Page, click the Create Case link on the Quick Links pagelet.
On the Campus Service Center Home Page, click the Create Case link on the Quick Links pagelet.
Image: HR Service Center - Create Case page (1 of 3)
This example illustrates the fields and controls on the HR Service Center - Create Case page (1 of 3).
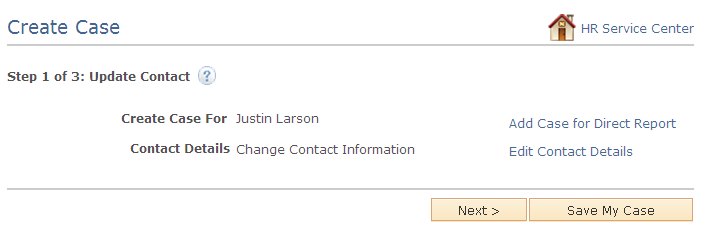
Image: HR Service Center - Create Case page (2 of 3)
This example illustrates the fields and controls on the HR Service Center - Create Case page (2 of 3) of the three step case creation process.
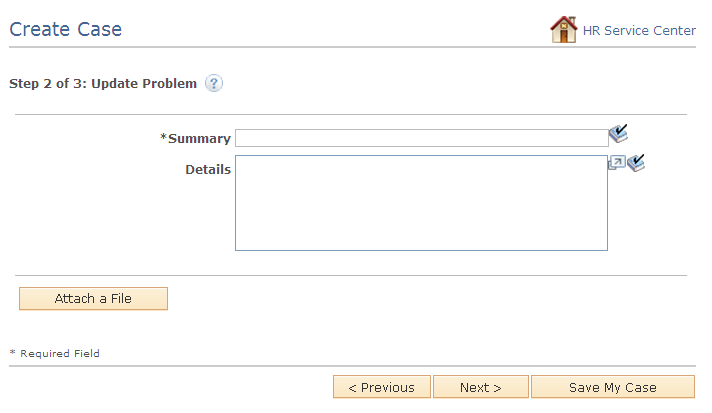
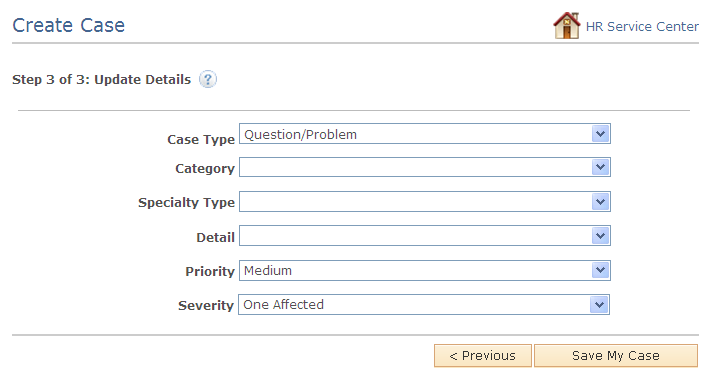
Image: HR Service Center - Create Case page (3 of 3)
This example illustrates the fields and controls on the HR Service Center - Create Case page (3 of 3) of the three step case creation process.
|
Field or Control |
Definition |
|---|---|
| Create Case For |
This read-only field displays the name of the customer. It can be the name of the company where the self-service application user works. |
| Add Case for Direct Report |
Click this link if you want to report a case on behalf of one of the people reporting directly to you. The system displays a list of your direct reports. To return to this page, select the employee for whom you want to report a case. Note: The system displays this field for HR Service Center cases only. PeopleSoft delivers this field as enabled with a security option that allows managers with roles that are associated with the Choose Direct Report (RC_CHOOSE_DIRECT_REPORT) functional option to enter cases on behalf of their direct reports. You can use the CRM_HHD display template for the RC_CASE_HD_SS_RPT case component to disable this field or change the security option. |
| Add Case for Someone Else |
Click this link if you want to report a case on behalf of someone else. The system displays a list of workers that are already entered into PeopleSoft CRM. To return to this page, select the worker for whom you want to report a case. Note: The system displays this field for HelpDesk cases only. PeopleSoft delivers this field as enabled with a security option that allows managers with roles that are associated with the On Behalf Of (RC_ON_BEHALF_OF) functional option to enter cases on behalf of other workers. You can use the RC_HELPDESK display template for the RC_CASE_HD_SS_RPT case component to disable this field or change the security option. |
| Contact Details |
This read-only field displays the contact's primary contact method. |
| Edit Contact Details |
Click this link to change the contact person specified in the Customer field or the Employee field. |
| Attach a File |
Click this button to attach a file to the case. |
| Summary, Details, Case Type, Category, Specialty Type, Detail, Priority, and Severity |
Select or enter information in these fields to describe the type of problem you are having. |
| Save My Case |
When the user clicks the Save My Case button, depending on Display Template Details setup, the user is presented with a Submit Confirmation page with the case ID. The user can click the OK button to confirm the submission and view the Case <ID> - Case Information page or the Case ID - Solutions Search page depending on the page set by the Administrator. |
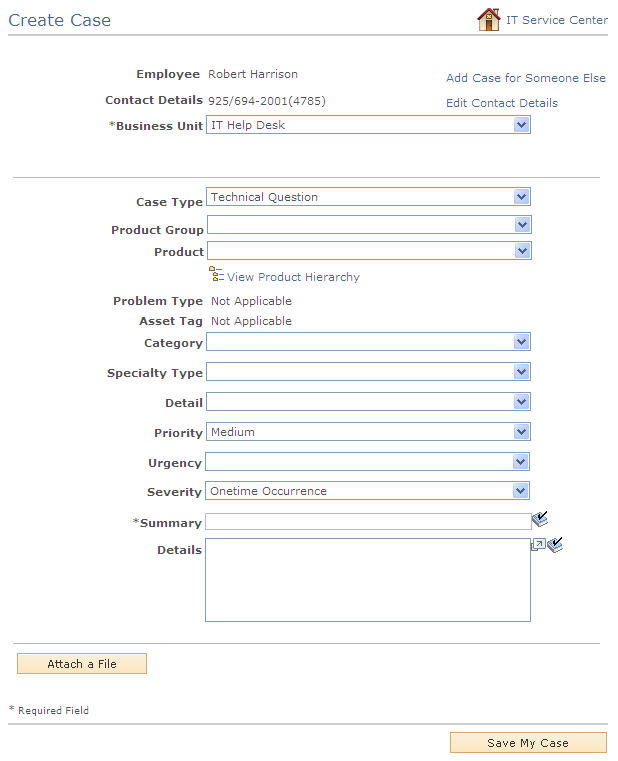
Image: IT Service Center - Create Case page
This example illustrates the fields and controls on the IT Service Center - Create Case page (single step case creation process).
The visibility of page elements depends on how you configure the display template for this component. Also, some fields can be assigned default values based on business unit settings. The system enters default values even if the fields are hidden.
The Add Case page appears as a single step, two step, or three step process based on how it has been set up by the Administrator in the Display Template for the RC_CASE_SS component.
The display template for Self Service Case allows the administrator to:
Indicate the number of steps in the case creation process.
Select the fields to be displayed in each step.
Enter the label for each step.
See Configuring Display Templates for Components.
See Understanding Call Center Business UnitsUnderstanding Display Templates.
|
Field or Control |
Definition |
|---|---|
| Employee |
This read-only field displays the name of the employee who entered the case. |
| Contact Details |
This read-only field displays the contact's primary contact method. |
| Edit Contact Details |
Click this link to change the contact person specified in the Customer field or the Employee field. |
| Business Unit |
This field may have a different label, depending on how you configure self-service. This is a required field for cases. If you do not show business units on the self-service pages, the user must have a default self-service business unit established on the User Preferences - Call Center page. Note: If the user creates a case using a Business Unit that is different from the default self-service business unit established on the User Preferences - Call Center page, the system will update the user's default self-service business unit value with the newly selected value. |
| Case Type |
Select the type of case you are adding. |
| Product Group |
Select the product group associated with the case you are adding. The system filters the values for product and installed product to only display the products and installed products contained within the specified product group. |
| Product |
Select the product associated with the case you are adding. PeopleSoft Support and PeopleSoft HelpDesk derive the list of products differently:
|
| View Product Hierarchy |
Click this link to go to the Installed Product Hierarchy page where you can search for installed products by product ID, product name, site name, and installed status. |
| Problem Type |
Select the problem type associated with the case you are adding. Problem types are defined by product. This gives you an additional level of categorization for the problem. Because problem type is a child of Product, the Problem Type field on the Case page derives its values from product. If the Problem Type field is visible, be sure that the descriptions of your product competencies make sense to a self-service user who is selecting a problem type. Valid problem types depend on the product that the user selects. |
| Serial Number and Asset Tag |
The serial number appears in PeopleSoft Support and PeopleSoft Service Center for Higher Education. The asset tag appears in PeopleSoft IT Service Center and PeopleSoft Campus Service Center. Both fields prompt against the user's installed products. Valid values are limited based on the product that the user selects. Blank values might appear if the user has installed products that do not have serial numbers or asset tags. |
| Category, Specialty Type, Detail, Priority, Urgency, Severity, Summary, and Details |
Select or enter information in these fields to describe the type of problem you are having. |
Use the Direct Report page or Look Up Employee page (RC_CASE_HD_SS_DIRR) to look up and select an employee for whom you are adding a case.
The Add Case for Direct Report link is only available for PeopleSoft HR Service Center and the Add Case for Someone Else link is only available for PeopleSoft IT Service Center..
Navigation
Click the Add Case for Direct Report link on the Create Case page.
Click the Add Case for Someone Else link on the Create Case page.
Image: Direct Report page
This example illustrates the fields and controls on the Direct Report page.
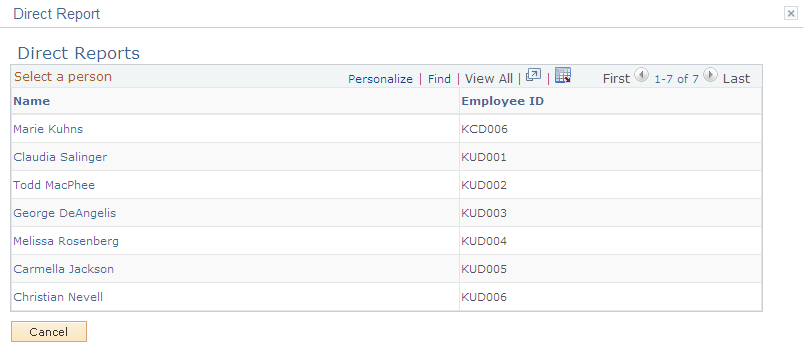
In the Lookup Employee page, enter your search criteria in the fields at the top of the page and then click Look Up. Click the name of the employee for whom you are reporting a case. The system returns to the Create Case page.
In the Direct Report page, select the Name link for the person you want to create the case for. The name appears in the Create Case for field in the Create Case page.
Note: This page is part of the HelpDesk for Human Resources reported-by feature. The system displays this page, when you click the Add Case for Direct Report or Add Case for Someone Else link. PeopleSoft enables this link for HelpDesk for Human Resources customers when you first install the application. This field is used to report cases for your direct reports. If you have properly set up the integration between HCM and CRM, then the system retrieves the direct report details directly from the PeopleSoft HCM database.
Use the Edit Contact Information page (RC_CASE_HD_SS_CNTC) to update contact information for the employee that is the contact on the case.
Navigation
Click the Edit Contact Details link on the Create Case page.
Image: Edit Contact Information page
This example illustrates the fields and controls on the Edit Contact Information page.
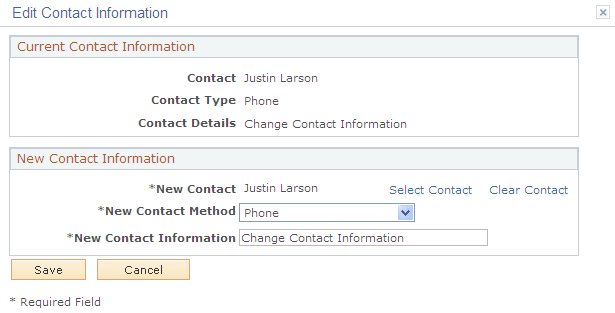
Use the fields in the New Contact Information section to change contact information for the case on which you are currently working. To add another contact click the Select Contact link. To erase the contact that is displayed, click the Clear Contact link. Click Save when you are finished. The system returns you to the Create Case page.