Configuring Actions and Transactions for the 360-Degree View
To configure transactions for the 360-degree view, use the Define Action (RB_TD_ACT_DFN), Define Action Category (RB_TD_ACT_CAT) and Define Transaction Group (RB_TD_TRANS_SETUP) components.
This topic provides an overview of transactions in the 360-Degree View.
|
Page Name |
Definition Name |
Usage |
|---|---|---|
|
RB_TD_ACT_CAT |
Create an action category for populating the Action drop down list. |
|
|
RB_TD_ACT_DFN |
Assign actions to Action Categories. |
|
|
RB_TD_DYNGRD_SUM |
View the dynamic grids with which an action is associated. |
|
|
RB_TD_ACT_DFN |
View the related group grids with which an action is associated. |
|
|
RB_TD_TRANS_SETUP |
Set up transaction groups and assign actions to them. |
|
|
Copy Transaction Group As Page |
RB_TD_TRANS_CLONE |
Clone an existing transaction group. Cloning an existing transaction group makes a copy of it. |
The 360-Degree View page that PeopleSoft delivers enables you to view or perform transactions on behalf of the customer or company. The transactions that you can perform appear in the Action drop-down box on the upper right corner of the 360-Degree View page.
When you create a transaction, you also create an object in the system. Transactions that you can create in the 360-Degree View include case, lead, sales opportunity, sales order or quote, service order, agreement, RMA, product registration, defect, and installed product. You can modify this set of transactions by using PeopleSoft CRM setup pages.
Actions are the tasks that create the transactions. You must associate actions to a Transaction Group when configuring a transaction.
Use the Action Category page (RB_TD_ACT_CAT) to create an action category for populating the Action drop down list.
Navigation
Image: Action Category page (1 of 3)
This example illustrates the fields and controls on the Action Category page (1 of 3).
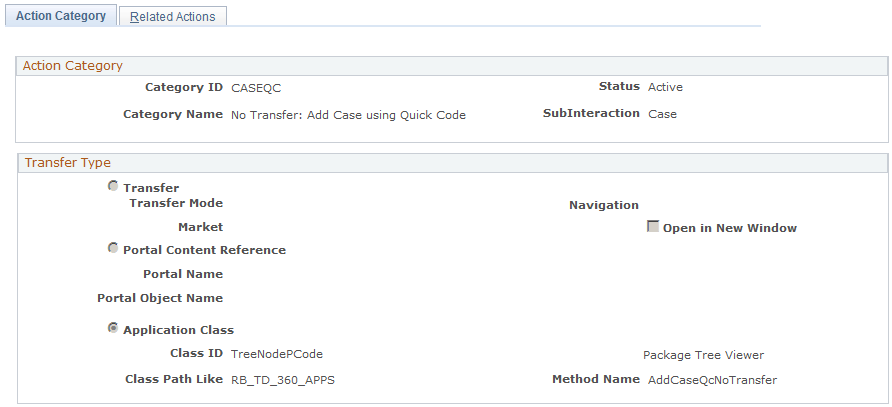
Image: Action Category page (2 of 3)
This example illustrates the fields and controls on the Action Category page (2 of 3).
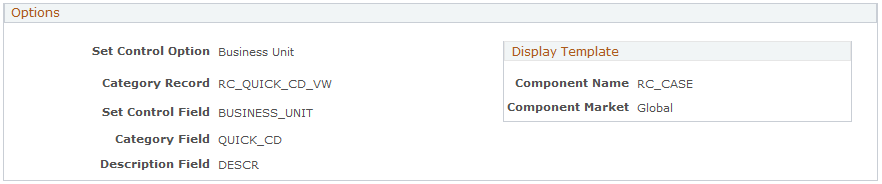
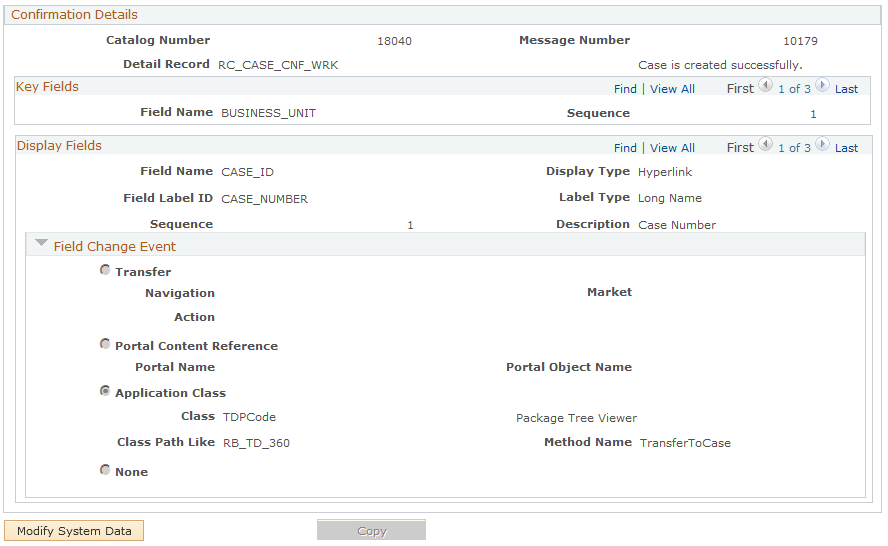
Image: Action Category page (3 of 3)
This example illustrates the fields and controls on the Action Category page (3 of 3).
Action Category
This section defines the method that will be invoked by the actions that are associated with this Action Category. It can be a Component transfer or a Portal reference or an Application Class. Action Category that requires additional context to be passed must always have an Application Class. For example, passing Quick Codes in addition to Display Template information for creating a Case.
|
Field or Control |
Definition |
|---|---|
| Status |
Defines the Action Category status; either Active or Inactive. Only action categories that are active appear in the Action drop down. |
| Subinteraction |
Select a subinteraction to correspond to the Action Category. The subinteraction appears on the Subinteraction list of the associated interaction, if any. |
Transfer Type
|
Field or Control |
Definition |
|---|---|
| Transfer |
Select to transfer to another PeopleSoft CRM component and page. If you select Transfer, use the Component Navigation and Component Market fields to select the transaction to transfer to. |
| Transfer Mode |
Select the mode in which to open this page for the transaction. Values are Add, Correction, and Update/Display. |
| Market |
Select the desired market associated with the component to which the system transfers. A component is uniquely identified by its name and its market association. You can add records for each market. |
| Navigation |
Select the Navigation Path to the desired component page. |
| Portal Content Reference |
Select to transfer to a PeopleSoft CRM portal page that you define. If you select Portal Content Reference, use the Portal Name and Portal Object Name fields to select the destination portal page. |
| Application Class |
Select Application Class to specify a PeopleCode application class to control the transfer. You can click the Package Tree Viewer link to search for application classes. |
Options
Use the Options fields to specify data retrieval information and additional context for the category's actions as well as display options. The Display Template fields determine the display template for the component that the action transfers to (if applicable).
|
Field or Control |
Definition |
|---|---|
| Set Control Option |
Select Business Unit, Set ID or None to specify the basis for tableset sharing for the action category. The default value is None. This is a required field. |
| Category Record |
Select the category record that returns the additional context to be passed to the method, such as the set control value or Quick Code. |
| Set Control Field |
Select the name of the set control field that appears in the Category Record. Available fields are determined by the Category Record selected. |
| Category Field |
Select the category identifier field to appear in the Category Record. Available fields are determined by the Category Record selected. |
| Description Field |
Select the description field that displays the desired text description of the action category when it is presented for selection during setup tasks. Available fields are determined by the category record selected. |
| Display Template |
If the action requires a display template, select a component or a market, or a component and a market, to determine the display template to be used by the action. |
Confirmation Details
Some actions transfer the system to another component. This would be typical if the user selected the Add Service Order action that requires further data entry on the Service Order page before it can be submitted. It is evident that the action was completed successfully when the 360-Degree View is replaced by the page of the component used in the action. Use the fields in the Confirmation Details group to specify how the system responds when an action that does not transfer the user to another component is completed.
In a confirmation, you can specify:
Text message
The text message is shown in the figure as the single line, “Case was successfully created.”
Action details
Action details are the information that appears in the white panel. They are the fields defined in the Category Record. In the figure, this is the Case Number, Problem Summary, and Status fields. You can specify up to three fields.
The links are the bottom of the confirmation are not configurable.
In the page examples in this topic, in which the action creates a case in the background using Quick Code, the confirmation includes a text message, the case number and summary, and a link to the case. Note that the Transfer option is not selected, as transfer is defined by the Quick Code.
Note: Before you can configure a confirmation, there must be a record in the database for storing the transaction's runtime information (the Detail Record). Records are created in Application Designer.
See PeopleTools: Application Designer Developer's Guide product documentation.
|
Field or Control |
Definition |
|---|---|
| Catalog Number and Message Number |
Select the Catalog Number and Message number to display the desired text on the confirmation message. |
| Detail Record |
Select the record that defines the structure of the confirmation message. You can display a maximum of three fields. |
Key Fields
Specify search criteria for retrieving data from the Category Record. Define additional keys using the Add mode.
|
Field or Control |
Definition |
|---|---|
| Field Name |
Select the name of a key field from those available for the Category Record. |
| Sequence |
Specify the order of the key field in the search sequence. |
Display Fields
Use Display Fields options to specify the fields containing the information in the Detail Record that you want to appear on the confirmation.
|
Field or Control |
Definition |
|---|---|
| Field Name |
Select the name of the field whose values you want to appear in the confirmation detail (white panel). Available fields are determined by the Detail Record selected. |
| Display Type |
Select one of the following to indicate how the field name value is to be displayed on the confirmation:
|
| Field Label ID |
If you want the field to be displayed by its label, select Field Label ID. |
| Label Type |
If you selected Field Label ID, specify whether to display the Long Name or Short Name for the field label. |
| Sequence |
Enter 1, 2, or 3 to indicate the position of the text field in relation to the other text fields. |
| Description |
The text description specified for the Display Field. It is not editable here. |
Field Change Event
This section appears if you select Hyperlink as the Display Type.
|
Field or Control |
Definition |
|---|---|
| Transfer |
Select to transfer to another PeopleSoft CRM component and page. |
| Navigation |
Select the navigation path to the desired component page. |
| Market |
Select the desired market associated with the component being transferred to. A component is uniquely identified by its name and its market association. You can add records for each market. |
| Action |
Select the mode in which to open the component page being transferred to. Values are Add, Correction, and Update/Display. |
| Portal Content Reference |
Select to transfer to a PeopleSoft CRM portal page that you define. If you select Portal Content Reference, use the Portal Name and Portal Object Name fields to select the destination portal page. |
| Application Class |
Select to launch an application class that controls the transfer. You can click the Package Tree Viewer link to search for application classes. |
| Copy |
Click to clone the Action Category. Any changes you made to the original action category are then saved, and the Copy Action Category page appears. The page contains a prompt for a new action category ID. Clicking the OK button creates the cloned action category and gives it the name of the original Action Category with the prefix Copy of. |
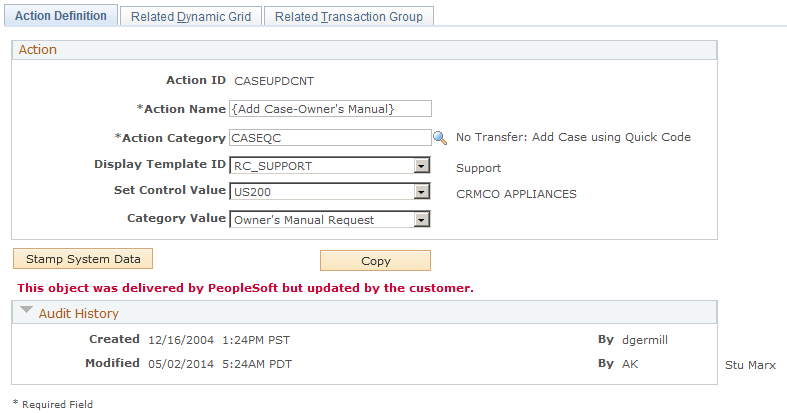
Use the Action Definition page (RB_TD_ACT_DFN) to assign actions to Action Categories.
Navigation
Image: Action Definition page
This example illustrates the fields and controls on the Action Definition page.
|
Field or Control |
Definition |
|---|---|
| Action Name |
Enter the name that you want to appear in the Actions drop down list. |
| Action Category |
Select an action category to associate the action with. You must associate an action with an action category so that it appears on the Actions drop down list. |
| Display Template ID |
Select a display template to be used for the action. This field is hidden if the component for display template is not defined in the action category. |
| Set Control Value |
Select a set control value. This field is hidden if the Set Control option in the field is set to None. |
| Category Value |
Select a category value. Available category values are determined by the selected set control value. |
Use the Related Dynamic Grid page (RB_TD_DYNGRD_SUM) to view the dynamic grids with which an action is associated.
Navigation
Use the Related Transaction Group page (RB_TD_ACT_DFN) to view the transaction grids with which an action is associated.
Navigation
Use the Transaction Group page (RB_TD_TRANS_SETUP) to set up transaction groups and assign actions to them.
Navigation
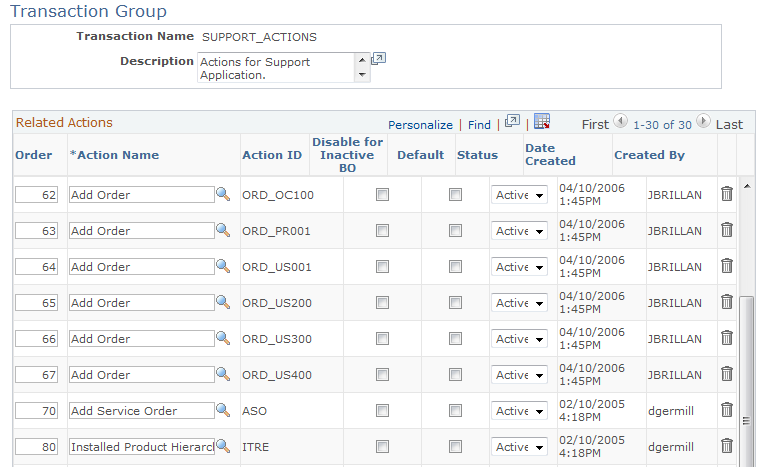
Image: Transaction Group page
This example illustrates the fields and controls on the Transaction Group page.
|
Field or Control |
Definition |
|---|---|
| Transaction Name (transaction group name) |
The transaction group is the set of transactions that is available in the 360-Degree View. |
Related Actions
|
Field or Control |
Definition |
|---|---|
| Order |
Specifies the order in which the Actions will be displayed in the drop-down. |
|
Field or Control |
Definition |
|---|---|
| Action Name |
Select an action from the list of those that are available. You can insert a separator action to indicate actions that do not transfer the agent to another page. At run time, the separator action appears as a dotted line in the drop down list. For example, the system supplies a separator action in the Support Transaction Group. The sample action Add Case - Contact Updated will be added below this separator action. Note the dotted line entry {– – – – – – – – }. This is not an action but a text separator for the run time drop down list. As delivered, the separator divides the actions that transfer the agent to another component—the first group of actions—from those that don't. If you want to preserve this distinction, place new actions above or below the separator as appropriate. You can't delete the separator, and at run time, the user can't select it. |
|
Field or Control |
Definition |
|---|---|
| Disable for Inactive BO |
Select to disable actions for business objects that are specified as Inactive on the page. A worker who is no longer employed is an example of an inactive object. |
|
Field or Control |
Definition |
|---|---|
| Default |
Specifies the default actions for the drop-down. |
|
Field or Control |
Definition |
|---|---|
| Status |
Specifies whether the action is Active or Inactive. The default is Active. Only active actions are displayed in the drop-down list box. |
|
Field or Control |
Definition |
|---|---|
| Add Action |
Click to append a new action row to the list of related actions. |