Configuring the 360-Degree View
To configure the 360–Degree View, use the Set Up Profile (RB_TD_PROF_SET) and Configure Role (RB_TD_ROLE_TREE) components.
This topic discusses how to configure the 360–Degree View.
|
Page Name |
Definition Name |
Usage |
|---|---|---|
|
RB_TD_PROF_SETUP |
Define a profile that appears on the 360-Degree View. |
|
|
RB_TD_ROLE_TREE |
Configure tree information for a role. |
|
|
RB_TD_SUB_TRANS |
Define the transactions for which to capture subinteractions. |
|
|
RB_TD_SUB_NODE |
Define the nodes for which to capture subinteractions. |
|
|
RB_TD_DYNGRD_PG |
Define the grid on which transaction information appears. |
|
|
Action Category Page |
RB_TD_ACT_CAT |
Define categories in which to group actions to display on the Action drop down. |
|
RB_TD_DYNGRD_ACT |
Relate actions to dynamic grids. |
Use the Set Up Profile page (RB_TD_PROF_SETUP) to define a profile that appears on the 360-Degree View.
Navigation
Image: Set Up Profile page (1 of 2)
This example illustrates the fields and controls on the Set Up Profile page (1 of 2).
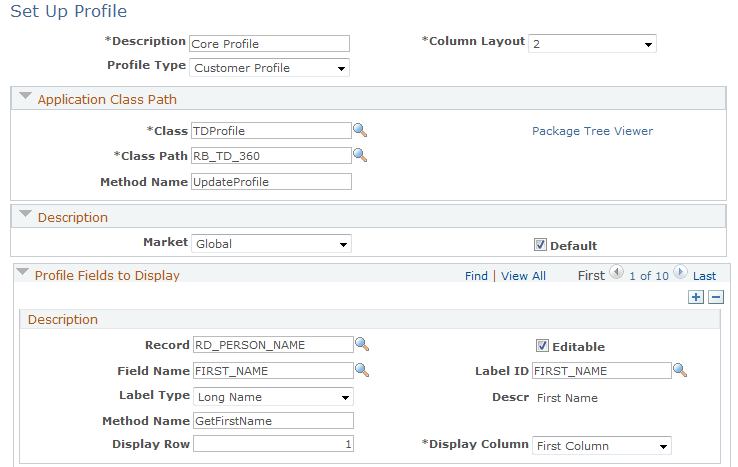
Image: Set Up Profile page (2 of 2)
This example illustrates the fields and controls on the Set Up Profile page (2 of 2).

|
Field or Control |
Definition |
|---|---|
| Column Layout |
Select the column layout for profile display. |
| Profile Type |
Select Customer Profile, Financial Profile, or Other. This field controls the information that is available for inclusion in profile data. |
Application Class Path
|
Field or Control |
Definition |
|---|---|
| Package Tree Viewer |
Click to search for and view all of the application packages that PeopleSoft CRM provides. |
Description
|
Field or Control |
Definition |
|---|---|
| Market |
Specify the market with which to associate this profile. A component is uniquely identified by its name and its market association. |
| Default |
Select to set this profile as the default profile for this market. |
Profile Fields to Display
Use the Add icon (+) to define multiple fields for the profile section.
|
Field or Control |
Definition |
|---|---|
| Record and Field Name |
Enter the record and field name that you want to appear in the 360-Degree View Profile group box. |
| Editable |
Select the Editable check box to allow an agent to update the field's value. Note: In this release, you can apply the Editable feature only to these fields: FIRST_NAME, LAST_NAME, EMAIL_ADDR, ADDRESS_PHONE, and EXTENSION. Also, profile fields for PeopleSoft HelpDesk for Human Resources are not editable because the profile information resides in the HR database. |
| Label ID |
Enter the label ID for this field in the Profile group box. |
| Label Type |
Select whether you want the Long Name or Short Nameto appear for this field in the Profile group box. |
| Method Name |
Enter the name of the method that fetches the data from the record that you have specified. This method comes from the application class defined Application class path section. |
| Display Row |
Enter a number to indicate the fields horizontal placement in the Profile group box relative to the other fields. Be sure that you take into account the number of Display columns when you plan the layout of the fields in the Profile group box. |
| Display Column |
Select First Column (left side) or Second Column (right side) to indicate the field's vertical placement. Note: If you want to move the Address field from the default first column to the second column, additional code change is required. |
First Button Details and Second Button Details
Use the fields in these sections to define the buttons in the 360-Degree View Profile group box. You can use these two to add any drill down actions like transferring to a transaction or opening a 360-Degree View page for the parent business object.
You can specify one, two, or no buttons. If there are any editable fields in the profile, the system automatically displays the Apply Changes button.
|
Field or Control |
Definition |
|---|---|
| Class ID, Class Path, and Method Name |
Enter information to locate and identify the method that is executed when a user clicks the first or second button in the 360-Degree View row. |
| Image Name |
Select a button image from the lookup list. |
| Display Image |
Select to enable the button's display. |
| Image Tool Tip |
Select an appropriate label for the popup tool tip. |
Use the Configure Role page (RB_TD_ROLE_TREE) to configure tree information for a role.
Navigation
Image: Configure Role page
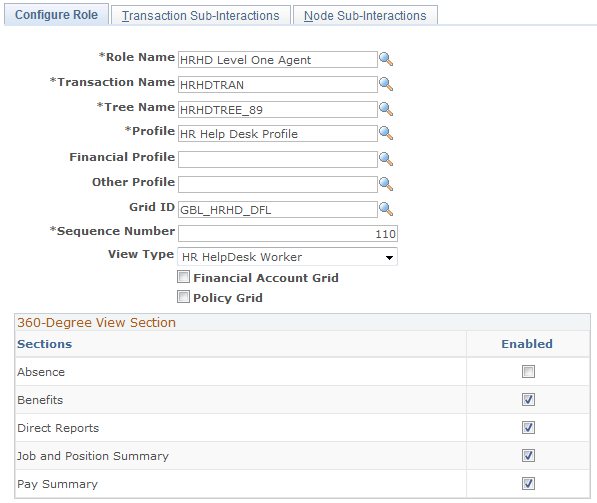
This example illustrates the fields and controls on the Configure Role page.
|
Field or Control |
Definition |
|---|---|
| Role Name |
Select a PeopleTools role. |
| Transaction Name |
Select the transaction group that you want to associate with this PeopleTools role. |
| Tree Name |
Enter the tree that you want to associate with this PeopleTools role. See Set Up Tree Page. |
| Profile |
Enter the profile that you want to associate with this PeopleTools role. These profiles are available as system data:
See Set Up Profile Page. |
| Sequence Number |
Enter a number that the system uses to determine which role information appears by default on the 360-Degree View when the user has more than one role in the system. For example, if a user has the PeopleSoft User role with sequence number 20 and the Support Manager role with sequence number 10, then the information that is related to the Support Manager role is used to initially populate the 360-Degree View because it has the lowest sequence number. The user can change the role that appears. See Configure Role Page. |
| View Type |
Select the type of view for this role. Values are:
If the View Type is Constituent or HR HelpDesk Worker, the 360-Degree View Section grid is displayed listing all the possible extra sections that can appear on the 360-Degree View page: select the corresponding Enabled check box for each section that should be displayed for that role. The system uses the view type to determine the role and related information that appears in the 360-Degree View. If the view type has any of the above values, the system selects only the role with the specified view type having the lowest sequence number. For example, a user has the PeopleSoft User (sequence number 10, view type of Customer), HR HelpDesk Agent (sequence number 20, view type of HR HelpDesk Worker), Support Admin (support administration; sequence number 25, view type of Customer), and IT HelpDesk Agent (sequence number 30, view type of Worker) roles. When launching the 360-Degree View from Case, if the view type is Worker, then the system selects the IT HelpDesk Agent role and shows the HelpDesk tree with HelpDesk Profile information. If the view type is Customer, the system selects the PeopleSoft User role because it has a sequence number less than that of the Support Admin role. |
Note: When integrating with PeopleSoft or E-Business HCM, the information on the Configure Role page determines in part the data that needs to be brought over from the corresponding Human Resource system. Unlike the integration to PeopleSoft HCM, no entity level security is imposed by Oracle E-Business. In E-Business, security is imposed by the virtue of the functions to which the user has access.
Use the Transaction Sub-Interactions page (RB_TD_SUB_TRANS) to define the transactions for which to capture subinteractions.
Navigation
Image: Transaction Sub-Interactions page
This example illustrates the fields and controls on the Transaction Sub-Interactions page.
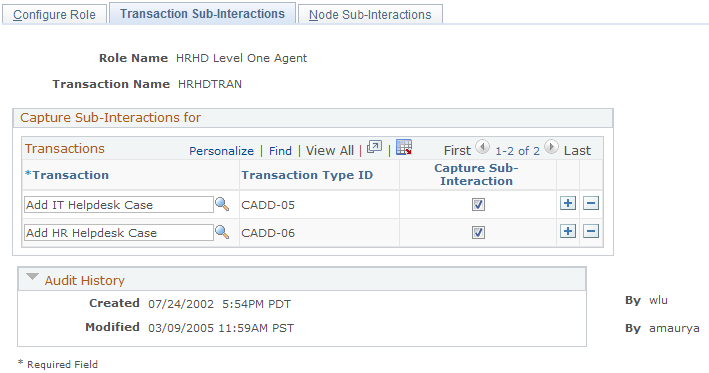
When you access this page, all transactions that are associated with the transaction group appear.
|
Field or Control |
Definition |
|---|---|
| Capture Sub-Interaction |
Select to enable the corresponding transaction to capture subinteractions for this role. Note: Not all transactions were designed to be able to capture sub-interactions. The Capture Sub-Interaction check box is disabled for any transaction for which it does not apply. |
Use the Node Sub-Interactions page (RB_TD_SUB_NODE) to define the nodes for which to capture subinteractions.
Navigation
Image: Node Sub-Interactions page
This example illustrates the fields and controls on the Node Sub-Interactions page.
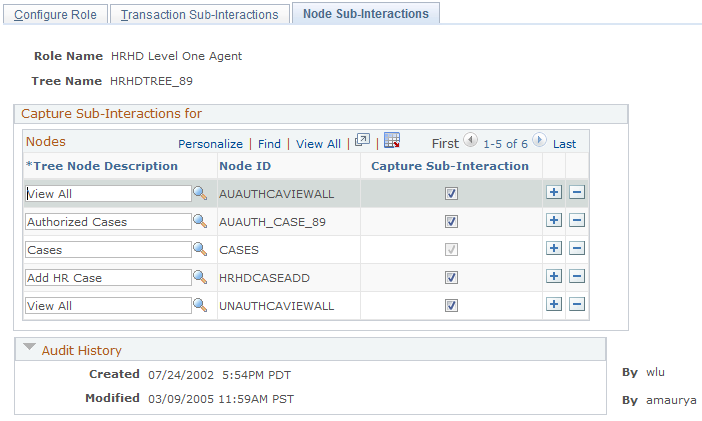
When you access this page, all tree node descriptions that are associated with the tree appear.
|
Field or Control |
Definition |
|---|---|
| Capture Sub-Interaction |
Select to enable the corresponding tree node to capture subinteractions. Note: Not all nodes were designed to be able to capture sub-interactions. The Capture Sub-Interaction check box is disabled for any transaction for which it does not apply. |
Use the Dynamic Grid page (RB_TD_DYNGRD_PG) to define the grid on which transaction information appears.
Navigation
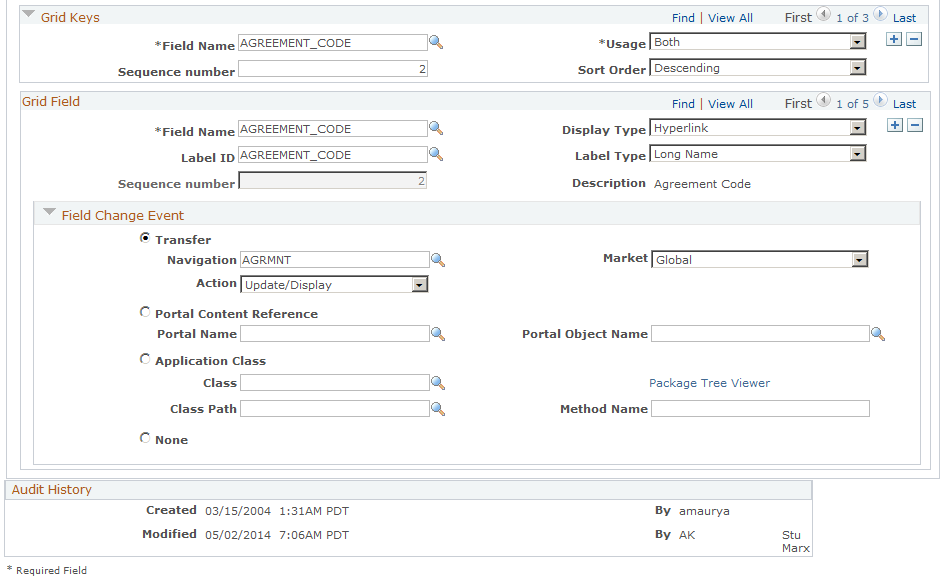
Image: Dynamic Grid page (1 of 2)
This example illustrates the fields and controls on the Dynamic Grid page (1 of 2).

Image: Dynamic Grid page (2 of 2)
This example illustrates the fields and controls on the Dynamic Grid page (2 of 2).
Retrieval Type
Specify either the database view or the application class that is the source of the data that populates the dynamic grid.
|
Field or Control |
Definition |
|---|---|
| View and View Name |
Select to indicate that the data source is a database view. Enter the name of the database view that holds data that is returned by the database view. |
| Application Class |
Select to indicate that an application class runs to provide the data that appears on the dynamic grid. |
| Record Name |
Enter the name of the record that holds data that is returned by the application class method. |
| Class, Class Path, and Method Name |
Enter the application class information for this application class. The method that your assign here is used to create the request message and populate the node with the requested information. |
| Package Tree Viewer |
Click to locate an application class. |
Grid Information
Enter data that names the grid and describes its appearance.
|
Field or Control |
Definition |
|---|---|
| Visible Columns |
Enter a number to specify how many of the fields defined in the Grid Field section will initially display in the dynamic grid. The first n fields (in order based on Sequence Number) from the Grid Field definitions will be displayed based on the number that is provided in the Visible Columns field. 360-Degree View users will be able to view the entire set of fields for the dynamic grid, if desired, by clicking the Show All Columns link. |
Grid Keys
|
Field or Control |
Definition |
|---|---|
| Field Name |
Enter the name of the field that the system uses as a key when transferring to another component. |
| Sequence number |
Enter the sequence of the key. |
Grid Field
Enter information that describes each field that appears in the grid. Add fields using the Add a new row (+) button.
|
Field or Control |
Definition |
|---|---|
| Field Name |
Select the name of the field whose values you want to appear in the grid. Available fields are based on the view name or the record name selected in retrieval type section. |
| Display Type |
Select one of the following to indicate how the Field Name value will be displayed on the grid:
|
| Label ID |
If you want the field to be displayed by its label, select Field Label ID. |
| Label Type |
If you selected Field Label ID, indicate if you want to display the Long Name or Short Name for the field label. |
| Sequence number |
Enter the a number 1 or greater number to indicate the position of the text field in relation to the other text fields you define. |
| Description |
The system displays the text description specified for the Label ID field. It is not editable here. |
Use the Related Actions page (RB_TD_DYNGRD_ACT) to relate actions to dynamic grids.
Navigation
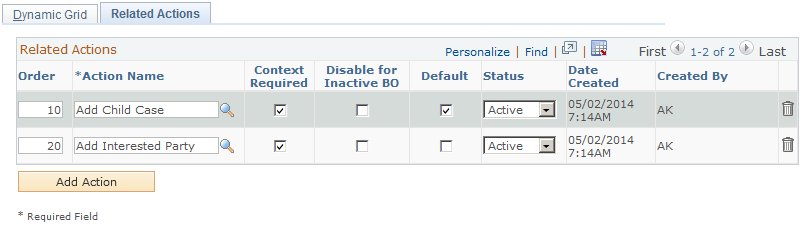
Image: Related Actions page
This example illustrates the fields and controls on the Related Actions page.
|
Field or Control |
Definition |
|---|---|
| Order |
Enter the number 1 or a greater number to indicate the order in which you want the action to appear in the Actions drop-down list at the top right corner of the dynamic grid page. |
| Context Required |
Select if you want the system to require the user to select a row from the grid when selecting this action. The context itself is specified in the action category to which the action belongs. When the user clicks the Go button for the Action drop-down list box, the default values defined in the actions are made available in a global record along with the selected rows in the grid. The system then triggers the method associated with the action category. See Action Category Page. |
| Disable for Inactive BO |
Select to prevent the action from being performed on business objects that are inactive. |
| Default |
Select to display the action in the drop-down list. |
| Status |
Select Active or Inactive. The default is Active. Only Active actions appear in the Action drop-down list box. |