Selecting Customer Contacts for a Lead or Opportunity
This topic discusses how to:
Search for customer contacts.
Use Quick Create to create a contact.
Update customer contact information.
|
Page Name |
Definition Name |
Usage |
|---|---|---|
|
RBQ_BOSRCH |
Search for a contact. You can optionally enter a first and last name on the component's Discover page to narrow the search. |
|
|
RBQ_QCREATE |
Create a new contact and save it in the database. |
|
|
Opportunity - Discover Page |
RSF_OPP_DETAIL |
Enter or view data for an opportunity. |
|
RSF_LEAD_ENTRY |
Enter or view data for a lead. |
Use the Search For Contact page (RBQ_BOSRCH) to search for a contact.
You can optionally enter a first and last name on the component's Discover page to narrow the search.
Navigation
Enter the first name and last name of a contact (optional) on the Lead - Discover page or the Opportunity - Discover page, and click the Add button.
Image: Search For Contact page
This example illustrates the fields and controls on the Search For Contact page.
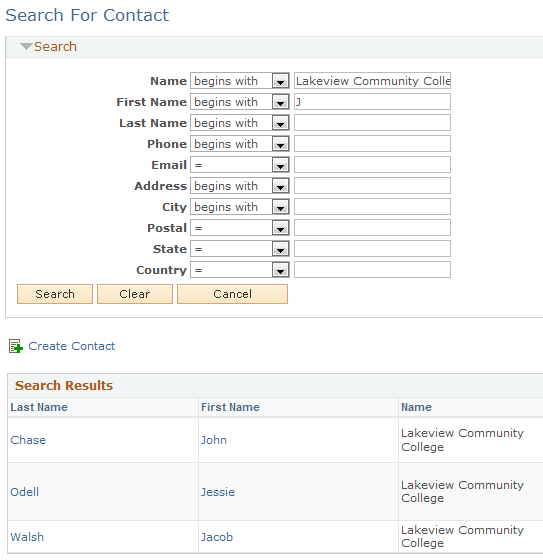
If you select a customer before searching for a contact, the system adds the name of the customer to the Name field. This limits the search to contacts of the specific customer. The system carries over the text that you enter on the Lead - Discover page or Opportunity - Discover page for the contact name to search. You can override the text here. You can also enter search criteria for a phone number, email address, or person ID. If you select a contact that is not associated with the customer specified on the lead or opportunity, the system adds the relationship of the contact to the customer when you save.
|
Field or Control |
Definition |
|---|---|
| Search |
Click Search to launch the search and display results in the grid at the bottom of the page. |
| Select (check box) |
Select the contacts to associate with the customer. If the system finds an exact match for the search criteria, it hides the Select check box and changes the Last Name and First Name field value into a link. Click the link to select the user and return to the Discover page. |
| Select (button) |
Click this button to associate the selected contacts with the customer and to return to the Discover page, where the system displays data for the contacts that you select. |
| Create a New Contact |
Click to access the Create Contact page to create a new contact if, after searching, you determine that a contact does not exist. |
Use the Create Contact page (RBQ_QCREATE) to create a new contact and save it in the database.
Navigation
Click the Create Contact link on the Search For Contact page.
Image: Create Contact page
This example illustrates the fields and controls on the Create Contact page.
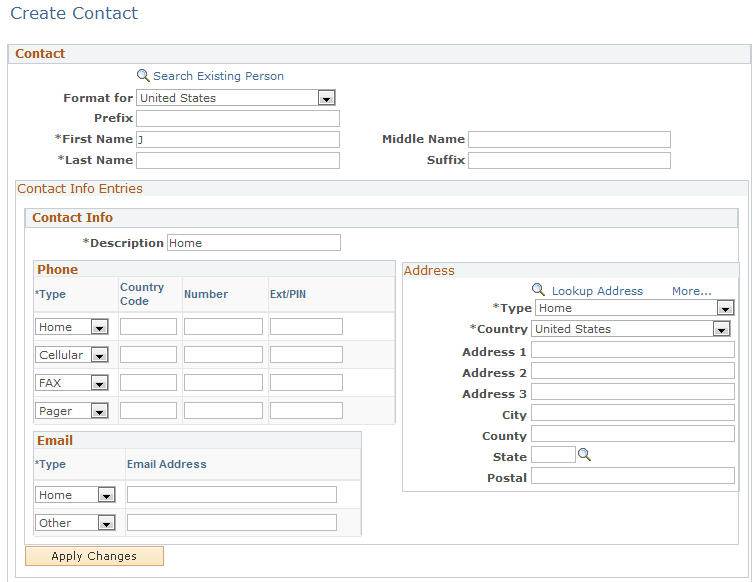
When you use the Quick Create feature, you enter the customer contact directly into the database, and that contact becomes available immediately for searching.
Note: When you use the Quick Create feature to create a new contact, only the first name and last name are passed to Quick Create. When the user returns from Quick Create, the information in the contact row is refreshed from the information that was entered on the Quick Create page. For example, if a user enters a work phone and email address in the contact grid, and then transfers to Quick Create and provides a different work phone, the work phone in the contact grid will be refreshed from the one that was provided in Quick Create. The email address still exists in the contact row and is saved to the Customer Data Model (CDM) when the user saves the lead.
Use the Lead - Discover page (RSF_LEAD_ENTRY) to enter or view data for a lead.
Navigation
Image: Lead - Discover page: Contact tab
This example illustrates the fields and controls on the Lead - Discover page: Contact tab.

Note: If you edit contact information in PeopleSoft Sales, the system updates the contact information in the Customer Data Model tables.
The Contacts section appears on the Discover page in the Lead and Opportunity components. Although the example shows lead details, the information here applies to both leads and opportunities.
Contact
|
Field or Control |
Definition |
|---|---|
| Primary |
Select to indicate the primary contact for this lead. You can create only one primary contact. |
| Pref Comm (preferred communication) |
Select the contact person's preferred method of communication. Communication methods are delivered as translate values that you can modify if you have the necessary permissions. |
| Work Phone and Ext (extension) |
Enter the contact's work phone number here. Enter additional phone numbers on the Phones tab. |
| Email Address |
Enter the contact's email address. This address is required if you plan to email the proposal. |
Phones
Select the Phones tab.
Image: Lead - Discover page: Phones tab
This example illustrates the fields and controls on the Lead - Discover page: Phones tab.
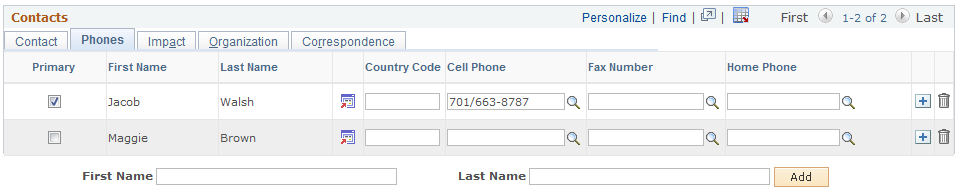
Enter all phone numbers except the contact's work phone number. Enter the contact's work phone number on the Contact tab.
Impact
Select the Impact tab.
Image: Lead - Discover page: Impact tab
This example illustrates the fields and controls on the Lead - Discover page: Impact tab.

Enter information to identify the contact's impact on the customer's decision to make the purchase.
Note: You identify the contact's decision-making role on the Contact tab, and the contact's business title on the Organization tab.
|
Field or Control |
Definition |
|---|---|
| Support |
Select the type of support that the contact shows for this purchase. Define support values on the Supports page. See Contact Support Page. |
| Impact |
Select the impact that this contact has on the customer's decision to make the purchase. Define impact values on the Impacts page. See Contact Impact Page. |
| Approval Required |
Select to indicate that the contact must grant approval on behalf of the customer for the sale to go through. For example, if the individual is influential in the company but does not have final approval, deselect this check box. |
Organization
Select the Organization tab.
Image: Lead - Discover page: Organization tab
This example illustrates the fields and controls on the Lead - Discover page: Organization tab.

Enter the contact's business title, department, and responsibilities. Set up contact titles and departments on the Titles page and the Departments page.
|
Field or Control |
Definition |
|---|---|
| Role |
Select a role that best identifies the role of the contact. Note: Do not confuse roles with business titles, which you enter on the Organization tab. |
See Contact Title Page.
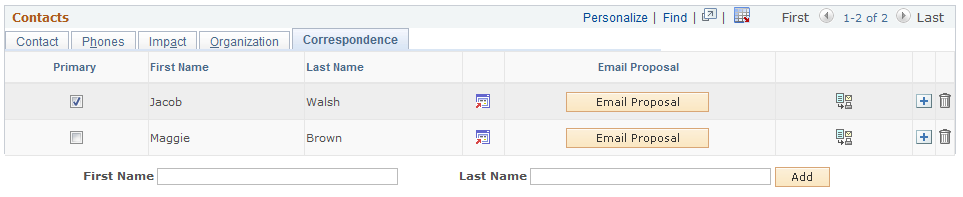
Correspondence
Select the Correspondence tab.
Image: Lead - Discover page: Correspondence tab
This example illustrates the fields and controls on the Lead - Discover page: Correspondence tab.