2 Discovering the Oracle Private Cloud Appliance

This chapter provides instructions for discovery of the Oracle Private Cloud Appliance (PCA) through Enterprise Manager Cloud Control 13c.

The following topics are provided:

2.1 Installing the Management Agent on Oracle PCA

Before discovering the Oracle Private Cloud Appliance (PCA) in Enterprise Manager, you must first prepare the appliance and install a Management Agent. Follow the steps below to properly configure your Oracle PCA:

  1. Change the oracle user password to a known password on both management nodes of the Oracle PCA Rack:
    # passwd oracle
    
  2. Verify the VIP and public Enterprise Manager IP are in the /etc/hosts file on both management nodes and on the Enterprise Manager Host:
    YOUR.VIP vip-host1.example.com vca1-vip-vip
    YOUR.EMIP  em-host1.example.com em01
    
  3. On an the active management node, create an agent directory on the shared NFS directory. The shared nfs directory is required for both availability and failover purposes.
    # mkdir /nfs/shared_storage/oemagent
    # chown oracle:dba /nfs/shared_storage/oemagent
    

    Note:

    • By default, the Enterprise Manager agent port 3872 is pre-populated by Oracle PCA software. If you use this default Enterprise Manager agent port 3872 for pushing the agent, then this step is not needed.

    • However, if the non-default port is used for Enterprise Manager agent, the steps do need to be executed on standby management node.

    • If the agent port is different to the default port (3872), you must configure the firewall for that particular port, as 3872 is set by default in the Oracle PCA management node setup.

  4. Open an Enterprise Manager agent port in the firewall by running the following command. Make sure you choose the same port while pushing the agent in step 5:
    iptables -I INPUT <line_num> -m state --state NEW -m tcp -p tcp --dport <agent_port> -j ACCEPT
    where line_num is any line number before the rule to block all traffic
    # service iptables save
    #service iptables reload
    
  5. Push the Management Agent from the Oracle Management Server (OMS). From Enterprise Manager Cloud Control:
    1. From the Setup menu, select Add Target, then select Add Targets Manually.
    2. In the Add Host Targets area of the Add Targets Manually page, click Install Agent on Host. The Add Host wizard will begin.
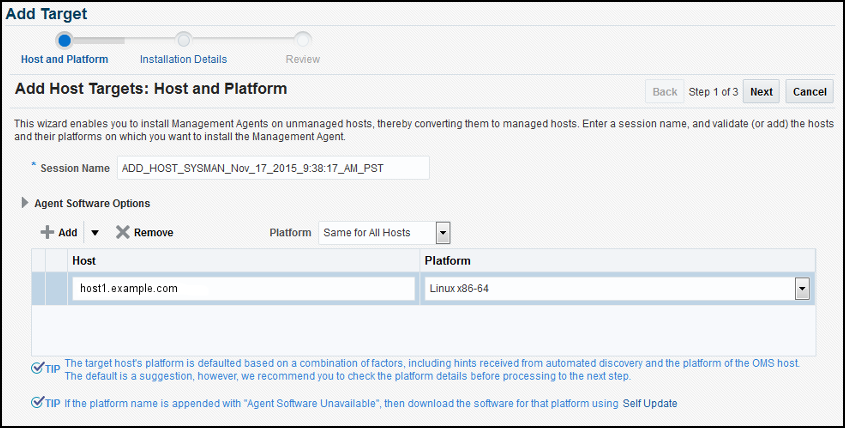
    3. Add a Host and Platform. On this page, click Add and select Manually. Enter a host name (fully qualified) in the Host field. This name should be the fully qualified virtual IP host name of the Oracle PCA rack for deploying the agent. Select Linux x86-64 from the Platform drop-down menu. Figure 2-1 shows an example:

      Figure 2-1 Add Host Target: Host and Platform


      Image showing Add Host Target

      Click Next.

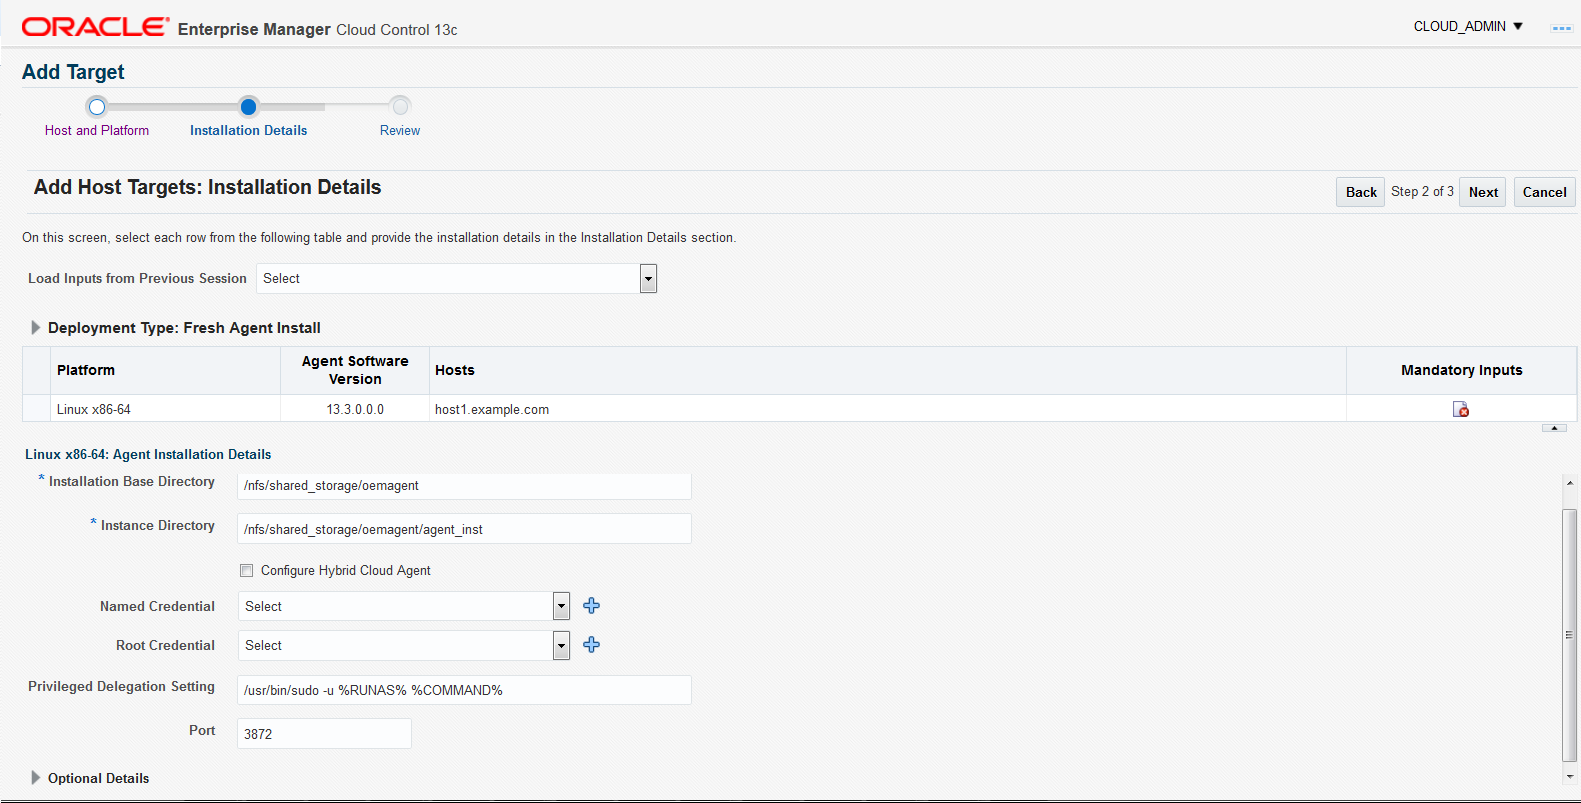
    4. On the Installation Details page (Figure 2-2), enter the following information:
      • Installation Base Directory: /nfs/shared_storage/oemagent
      • Instance Directory: /nfs/shared_storage/oemagent/agent_inst (This value is automatically completed based on the Installation Base Directory input.)
      • Named Credential: <agent_username>

        Note:

        If this is the first time you are adding a credential, an add icon (add named credential icon) appears. Click this icon for a dialogue box that prompts for the credentials of the agent user (oracle/password for example).

        Create a Named Credential for the oracle user with the password you set in step 1 above.

        Once created, that credential and any other credentials that have already been added to Enterprise Manager will be available for selection. For an existing installation of an Enterprise Manager, a user may already have the necessary credentials available for selection for Oracle PCA discovery.

        This root privileges field is located in between Name credential and Privileged Delegation Setting in Enterprise Manager 13.3.

      • Privileged Delegation Setting: Leave the default. By default, this field is populated with /usr/bin/sudo -u %RUNAS% %COMMAND%
      • Port: By default, this field is populated with 3872
      • Preinstallation Script: Leave this field blank.
      • Postinstallation Script: Leave this field blank.
      • Additional Parameters: Leave this field blank.

      Note:

      If you have not used default port of 3872, then you must ensure that on Installation Details page, you enter the particular port that you had used.

      Figure 2-2 Add Host Targets: Installation Details


      Image Add Target, installation details

      Once the fields are complete, click Next.

    5. On the Review page, review the details of the host information. Click Deploy Agent.

      Note:

      During the agent install as a non privileged user, the user interface will display a warning and state that privilege scripts need to be run manually as the root user. Select Continue All Hosts and once the agent install has completed, run the following privileged scripts as the root user on the Oracle PCA active management node:

      /nfs/shared_storage/oemagent/agent_13.3.0.0.0/root.sh

      /u01/app/oraInventory/orainstRoot.sh

      For more information, see Meeting the Generic Prerequisites for Installing Standalone Management Agents Using Add Host Targets Wizard or EM CLI

  6. On the active management node, set the emd property AgentListenOnAllNICs to false by running following command with the agent user (i.e., oracle):
    /nfs/shared_storage/oemagent/agent_inst/bin/emctl setproperty agent -name "AgentListenOnAllNICs" -value "false"
    
  7. Copy the following agent installation files to the passive management node (ovcamn06r1 is passive in this example):
    # scp /etc/init.d/gcstartup root@ovcamn06r1:/etc/init.d/
    # rsync -og /etc/oragchomelist root@ovcamn06r1:/etc/oragchomelist
    # rsync -rog /u01/app/oraInventory/ oracle@ovcamn06r1:/u01/app/oraInventory/
    
  8. On the active management node, remove all gc rc.d links (no startup of agent on startup):
    # for x in `find /etc/rc.*/rc* | grep gcstart`; do rm $x; done
    
  9. Restart the Enterprise Manager agent on the active management node as oracle from the agent's emctl command:
    % /nfs/shared_storage/oemagent/agent_inst/bin/emctl stop agent
    % /nfs/shared_storage/oemagent/agent_inst/bin/emctl start agent
    

2.2 Installing the Oracle Enterprise Manager VT (Virtualization) Plug-in on Oracle PCA

The Oracle Enterprise Manager VT Plug-in must be installed on the Enterprise Manager 13c Management Server and on the agent that is installed on the Oracle PCA active management node. It is recommended to use the latest version of the VT Plug-in on both the management server as well as the agent.

For more information, refer to Downloading, Deploying, and Upgrading Plug-Ins in Enterprise Manager Cloud Control Administrator's Guide.

2.3 Discovering the Oracle PCA in Enterprise Manager

Once the pre-requisites have been satisfied, the steps below provide the instructions to discover an Oracle Private Cloud Appliance (PCA) target in Enterprise Manager Cloud Control:

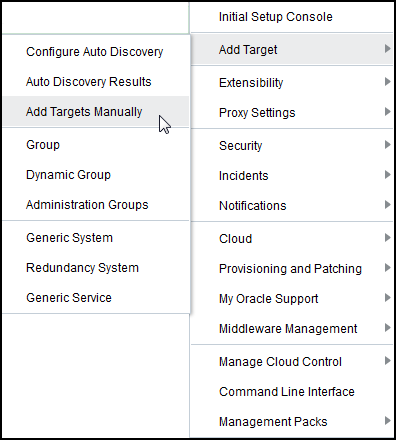
  1. From the Setup menu, select Add Targets, and then select Add Targets Manually (Figure 2-3):

    Figure 2-3 Add Targets Manually Menu


    Image: Add Targets Manually Menu

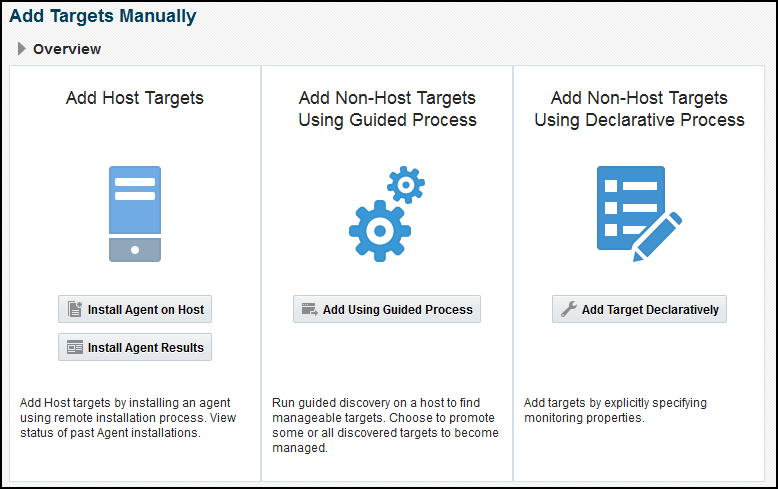
  2. On the Add Targets Manually page (Figure 2-4), click Add Targets Using Guided Process.

    Figure 2-4 Add Targets Manually


    Image Add Targets Manually

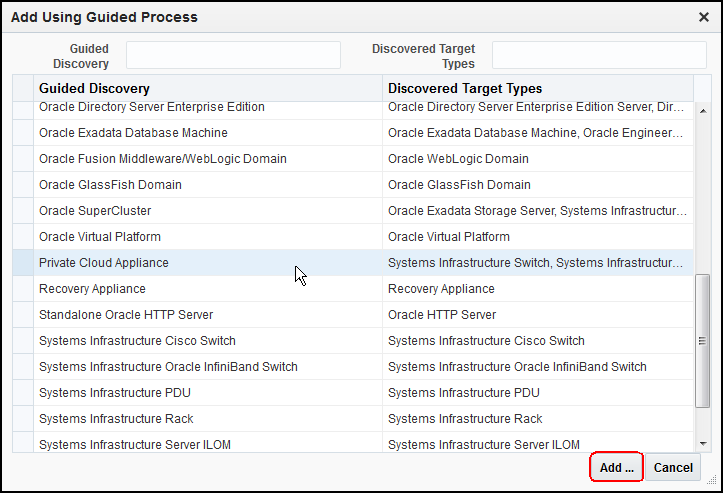
  3. On the Add Using Guided Process window, select Private Cloud Appliance. Click Add (Figure 2-5) to begin the discovery wizard.

    Figure 2-5 Select Private Cloud Appliance


    Image Select Private Cloud Appliance

  4. On the Discovery Inputs page (Figure 2-6), you will need to enter the Monitoring Agent host location.

    Figure 2-6 PCA Discovery Wizard: Discovery Input


    Image PCA Discovery Wizard: Discovery Input

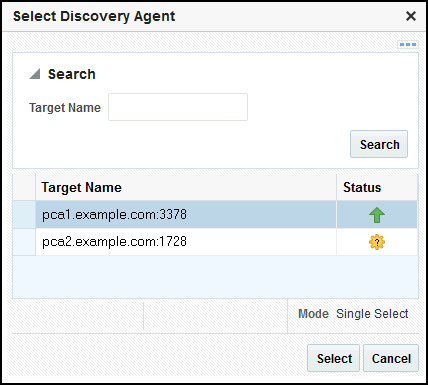
    Click the Search icon to display the Select Discovery Agent pop-up window:

    Figure 2-7 Select Discovery Agent


    Image Select Discovery Agent

    Select the URL from the available list. Once you select the URL, the Management Agent field on the Discovery Input page should auto-populate with the required information.

    Click Next.

  5. On the Discovery Prerequisites page (Figure 2-8), a series of checks are conducted automatically. Any errors returned must be resolved before continuing.

    Figure 2-8 PCA Discovery Wizard: Discovery Prerequisites


    PCA Image Discovery Wizard: Discovery Prerequisites

    Note:

    If you get error severity messages, you must resolve the errors then click Reload to run the prerequisites check again.

    Click Next.

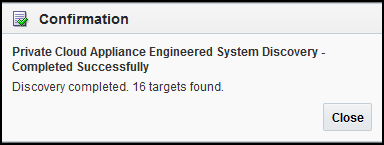
    A confirmation pop-up window (Figure 2-9) will appear to show how many targets to be discovered:

    Figure 2-9 Confirmation Window


    Image Confirmation Window

    Click Close to continue.

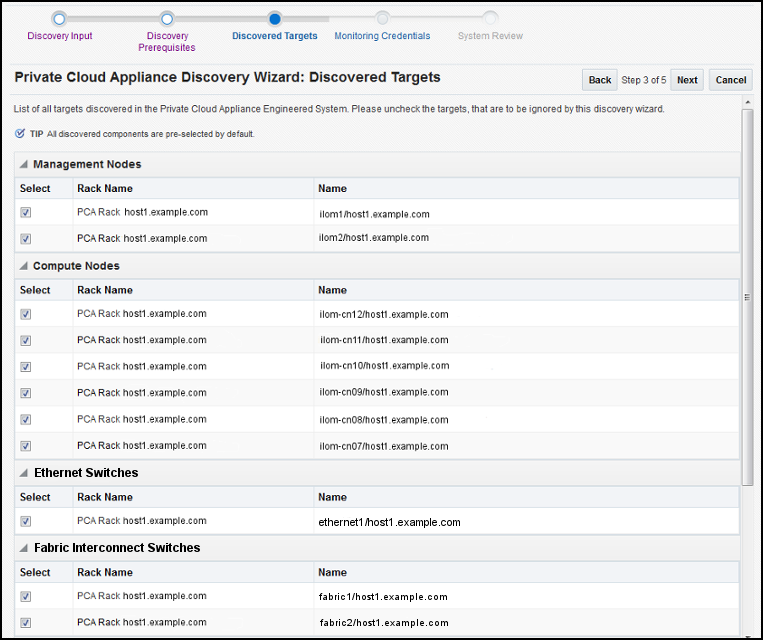
  6. On the Discovered Targets page (Figure 2-10), select the targets you want included in the discovered PCA rack. By default, all available targets are pre-selected.

    Figure 2-10 PCA Discovery Wizard: Discovered Targets


    Image PCA Discovery Wizard: Discovered Targets

    Click Next.

  7. On the Monitoring Credentials page, the credentials must be set for each component in the Oracle PCA rack. A red status flag is shown for all components where the credentials are not set.

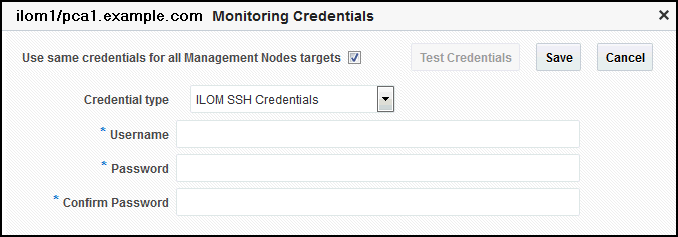
    For each component type, click the Edit icon. In the Monitoring Credentials pop-up (Figure 2-11), enter the user name and password for each component in the Oracle PCA rack:

    Figure 2-11 Component Monitoring Credentials


    Image Component Monitoring Credentials

    Note:

    In a default case, for the InfiniBand Switch, enter public in the Community String mandatory field input.

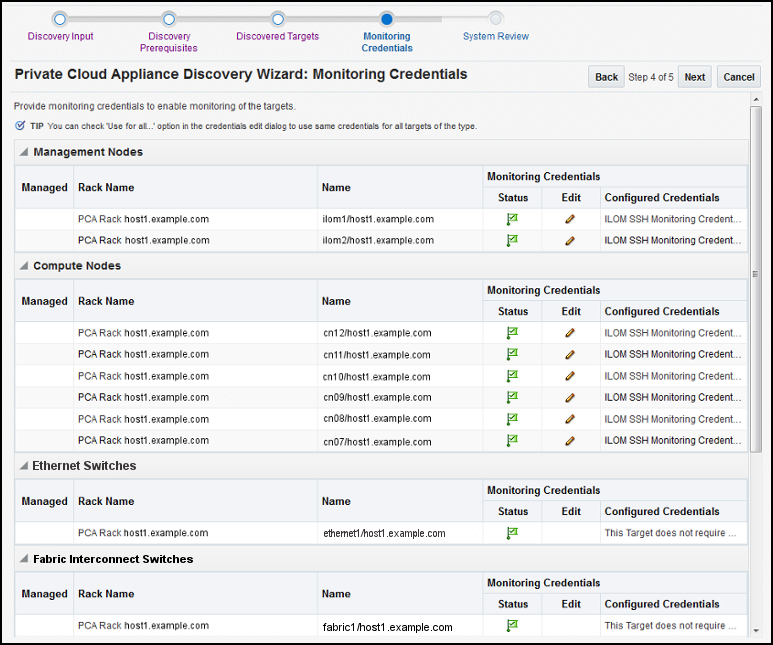
    You can select Use same credentials for all in the credential's edit dialog to use the same credentials for all targets of the type. Figure 2-12 shows an example of the Monitoring Credentials page with all credentials set:

    Figure 2-12 PCA Discovery Wizard: Monitoring Credentials


    Image PCA Discovery Wizard: Monitoring Credentials

    Click Next.

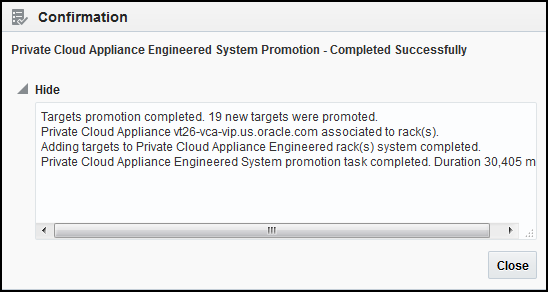
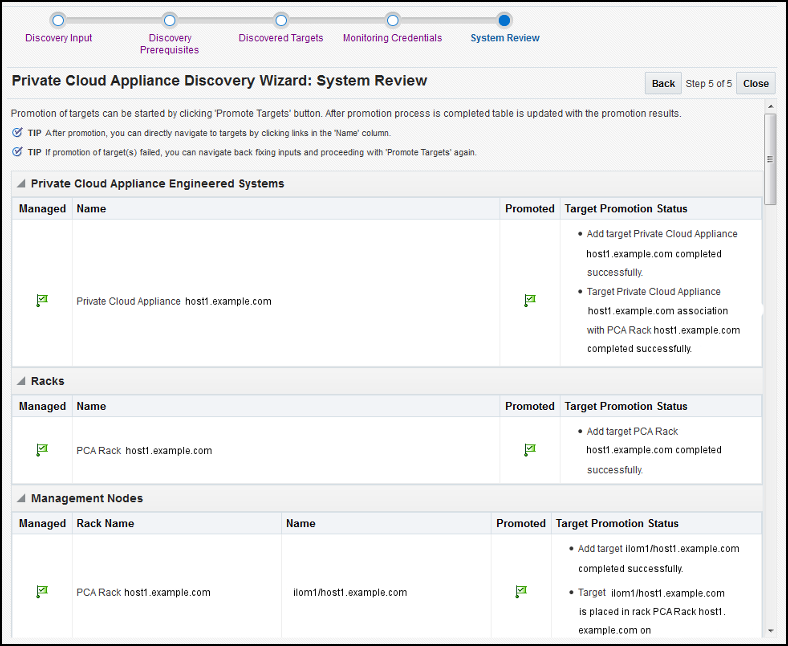
  8. On the System Review page, click Promote Targets to promote all components of the Oracle PCA rack. If any component fails the promotion process, click Back to update the inputs for that component. A pop-up window will appear to show the progress. Once complete (Figure 2-13), click Close.

    Figure 2-13 Target Promotion Confirmation


    Image Target Promotion Confirmation

    Figure 2-14 shows an example of completed promotion of all components:

    Figure 2-14 PCA Discovery Wizard: System Review


    Image PCA Discovery Wizard: System Review

    Click Close.

2.4 New Features in Oracle Fabric Interconnect Target

This section provides information about new features in Oracle Fabric Interconnect Target.

Enterprise Manager 13.3 introduces new features to the Oracle Fabric Interconnect Target. The following information can now be monitored:

  • Cumulative performance

  • The managed devices and their serial numbers

  • The discovered servers

  • The configured I/O templates

  • Network and storage clouds

  • The Alarms tracked by the Oracle Fabric Manager

To view this information, select the Fabric Interconnect Target from All Targets menu or click the Fabric Interconnects on the Private Cloud Appliance's Target Navigation Tree.

Figure 2-15 Oracle Fabric Interconnect Target Home Page
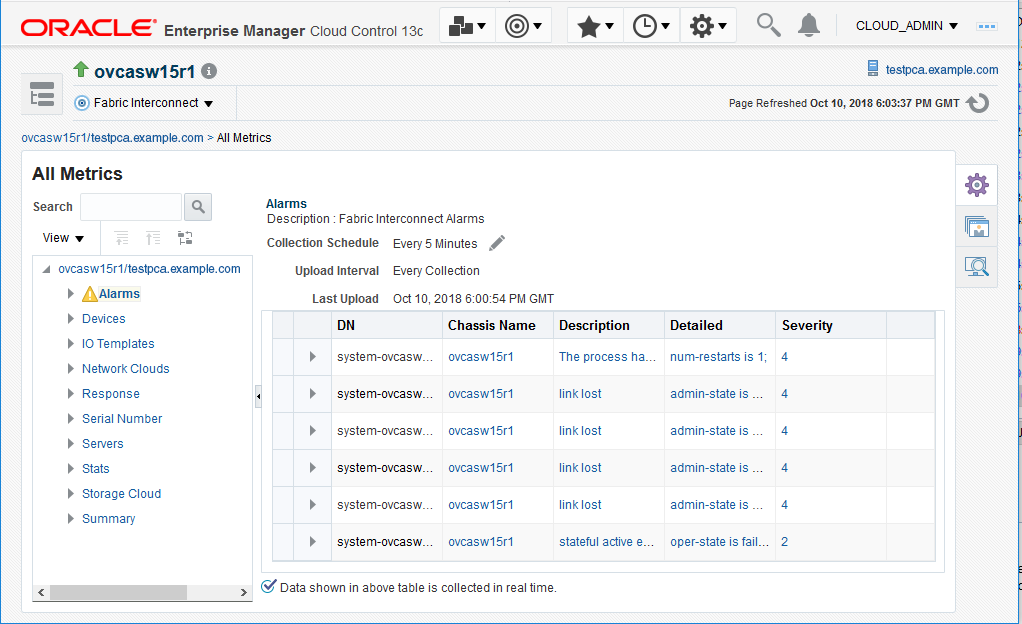

Fabric interconnect

Summary

Oracle Fabric Manager supports high availability mode, in which multiple Fabric Manager servers are associated with each other to provide a system of Fabric Manager servers that operate in active or passive roles. The summary section of the Fabric Interconnect home page lists the current Oracle Fabric Manager's status and version, and the high availability mode.

Cumulative Performance

When vNICs and vHBAs are configured and deployed on the host server, it can be seen in the graph of the network and storage total throughput.

Devices

Information about the Oracle Fabric Interconnect chassis and the Oracle SDN that are managed through the Oracle Fabric Manager is displayed in the Fabric Interconnect home page. The Devices table displays the host name of each managed device, the device IP address, the software version currently installed on each managed device, the current state of the managed device and the model of the device.

Servers

Oracle Fabric Manager discovers servers that are connected through the devices and have Oracle Virtual Networking Drivers installed. This table lists the host name of each server that Oracle Fabric Manager has discovered, the operating system currently in use on the host server, the name of the I/O profile bound to each server, and the total number of vNICs and vHBAs that are configured on the server.

I/O Templates

When I/O templates are configured, they are listed in the Fabric Interconnect home page regardless of whether they are deployed to a host server or not. This table lists the name of each configured I/O template, the total number of vNICs and vHBAs configured in each I/O template, and the description that was applied to the I/O template.

Network Clouds

Information about the Private Virtual Interconnect (PVI) clouds is displayed. If Oracle Fabric Interconnect is attached, this table lists the name of each configured cloud, the number of Ethernet ports, and link aggregation groups (LAGs) in the cloud.

Storage Clouds (only for Oracle Fabric Interconnect)

Information about the configured storage clouds is displayed. This table lists the name of each configured cloud, and the number of Fibre Channel ports in the storage cloud.

Alarms

The Oracle Fabric Interconnect target monitors system events and network management alarms tracked by the Oracle Fabric Manager.

The alarms shown in the Fabric Interconnect home page are of one of the following severities:

  • Critical

  • Major

  • Minor

  • Warning

To view critical, major, minor, and warning alarms go to the Target's All Metrics page, and select the Alarms metric. Critical alarms are displayed in the Incidents and Problems section of the Fabric Interconnect home page. Major, warning and minor alarms can also appear on the Incidents and Problems section, if the user activates a rule for this purpose.

Figure 2-16 Alarms Shown in the All Metrics Page
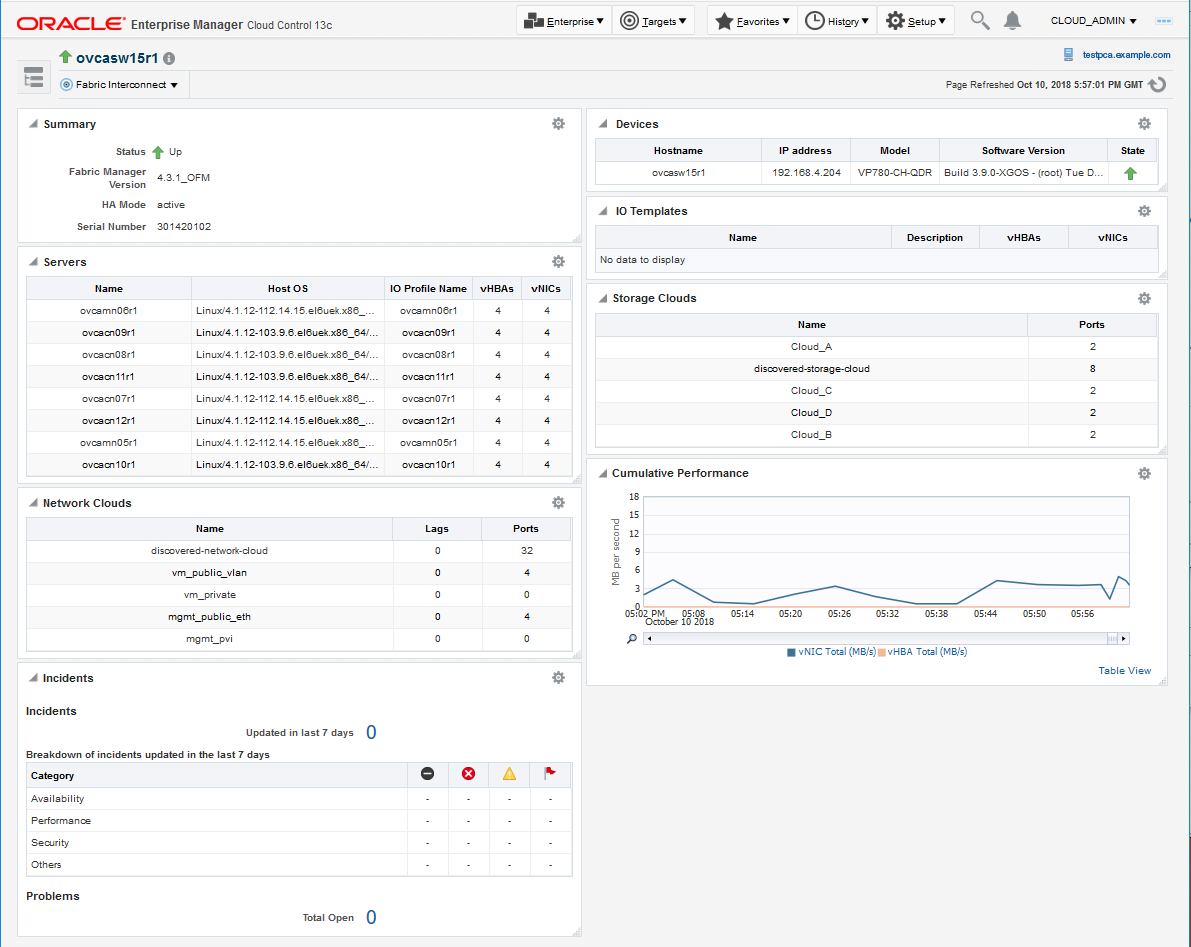

alarms shown

2.5 Registering Oracle VM Manager with Oracle Enterprise Manager 13c (Oracle Private Cloud Appliance Software Version 2.3.1 and above)

As the Oracle PCA version 2.3.1 has Oracle VM Server 3.4.2, a tcps certificate is not required for registration with Oracle Enterprise Manager. Oracle VM Manager version 3.4 contains an internal Certificate Authority (CA) that is used to perform certificate-based authentication and to sign the SSL certificate that is used for the web-based user interface. Certificates are generated automatically upon the install of the Oracle PCA 2.3.1 software. The export and import of the Oracle VM Manager Weblogic certificate is required and detailed below.

For a new install of Oracle PCA software 2.3.1 and above, follow this procedure:

  • As the root user, and on the Oracle PCA active management node, export the Oracle VM Manager certificate

    /u01/app/oracle/ovm-manager-3/ovm_upgrade/bin/ovmkeytool.sh exportca > /u01/app/oracle/ovm-manager-3/ws 
    
  • As the agent user, and on the Oracle PCA active management node, import the Oracle VM Manager certificate using password "welcome"

    /nfs/shared_storage/oemagent/agent_13.3.0.0.0/bin/emctl secure add_trust_cert_to_jks -trust_certs_loc /u01/app/oracle/ovm-manager-3/ws -alias ovmm 
    

To register Oracle VM Server 3.4.2 and above from the Oracle Enterprise Manager UI, follow these steps:

  1. From the Enterprise menu, select Cloud, then select Oracle VM Infrastructure Home.

  2. From the Infrastructure Cloud menu, select Register OVM Manager. The Add Oracle VM Manager page appears.

  3. Enter the Name for the Oracle VM Manager instance to be registered.

    For Example: PCA-OVMM

  4. Select the Management Agent to monitor and manage the Oracle VM Manager instance to be registered. Select the agent running on the management nodes.

  5. Enter the Oracle VM Manager URL.

    For example:

    - tcps:// (As tcps specification is not required for Oracle VM Manager 3.4.2 and later, enter a dummy URL such as tcps://here)

    Enter the Oracle VM Manager's Console URL. This is the URL to enable the VNC Console for the Guest VMs.

    The URL must be in the following format:

    https://<pca-oracle-vm-manager-FQDN>:7002/

    By default, data from Oracle VM Manager is automatically synchronized with Enterprise Manager at fixed intervals of time. If you do not wish to enable this option, you must disable the Automatic Synchronization checkbox and manually synchronize the data. For more information on the automatic and manual synchronization options, refer to Synchronizing the Oracle VM Manager Targets for details.

  6. Enter the administrator user name and password to connect to the Oracle VM Manager URL provided in Step 5. If you want to use separate credentials for managing Oracle VM Manager, check the Use Administration Credentials check box. If you do not specify separate credentials, the monitoring credentials are used by default.

  7. Click Submit to register the Oracle VM Manager. You can now use the Oracle VM Manager to monitor and manage the virtualization targets in Enterprise Manager.

For more information, refer to Registering the Oracle VM Manager in the Enterprise Manager Cloud Administration Guide.

2.6 Enterprise Manager Agent Recovery After Oracle PCA Upgrade

This procedure covers Enterprise Manager agent recovery for Oracle PCA upgrades from version 2.3.1. If your Oracle PCA is not 2.3.1 then refer to My Oracle Support note 2242177.1, which includes steps for Oracle Enterprise Manager.

Note:

It is recommended to upgrade the OMS and PCA management node agent to the latest version of the VT and supporting plugins.

  1. Backup the oraInventory agent to the NFS-shared location:
    # cd /u01/app
    # tar -cvf EMagent_oraInventory.tar oraInventory
    # cp EMagent_oraInventory.tar /nfs/shared_storage
    
  2. Create the full blackout on Oracle PCA rack.

    To create full blackout on Oracle PCA rack, login to the Enterprise Manager 13c UI as the Cloud Administrator and do the following:

    • From the Targets menu, select Private Cloud Appliance.

    • From the Private Cloud Appliance home page menu, select Control, and then select Create Blackout option.

    Enter suitable information describing the reason for the blackout.
  3. Update the Oracle PCA rack.
    For more information, refer to Updating Oracle Private Cloud Appliance.

    Note:

    If you are running or upgrading to Oracle Private Cloud Appliance Software v2.3.4 or higher, then Steps 4 to 10 are not required.

  4. The next step is to recover the Oracle Enterprise Manager agent installed on the NFS shared storage which is presented to both active and passive management nodes.
    You should restore the oraInventory backup taken in the first step as the root user on the active management node:
    [root@ovcamn06r1 ~]# pca-check-master
    NODE: 192.168.4.4 MASTER: True"
    
    # cp /nfs/shared_storage/EMagent_oraInventory.tar /u01/app
    # tar -xvf EMagent_oraInventory.tar
    
  5. Keep the same password you created in Installing the Management Agent on Oracle PCA for the oracle user on both management nodes:
    # passwd oracle
    
  6. Run the privileged agent scripts on the active management node:
    # /nfs/shared_storage/oemagent/agent_13.3.0.0.0/root.sh
    # /u01/app/oraInventory/orainstRoot.sh
    
  7. The Oracle Enterprise Manager agent needs to be under control of the Oracle Private Cloud Appliance software and not any local OS based startup scripts. Therefore, as the root user on the active management node, you should remove any OS based rc.* links to scripts.
    #  for x in `find /etc/rc.*/rc* | grep gcstart`; do  rm $x; done
    
  8. Copy the following agent installation files to the passive management node as the root user (ovcamn06r1 is passive in this example):
    # scp /etc/init.d/gcstartup root@ovcamn06r1:/etc/init.d/
    # rsync -og /etc/oragchomelist root@ovcamn06r1:/etc/oragchomelist
    # rsync -rog /u01/app/oraInventory/ oracle@ovcamn06r1:/u01/app/oraInventory
    
  9. Note:

    By default, the Enterprise Manager agent port 3872 is pre-populated by PCA software. If you used this default Enterprise Manager agent port 3872 for pushing the agent, then this step is not needed.

    Add the Enterprise Manager agent port to the number chosen during agent push (see Installing the Management Agent on Oracle PCA) (default 3872) to the firewall settings on both management nodes (active and passive):
    iptables -I INPUT <line_num> -m state --state NEW -m tcp -p tcp --dport <agent_port> -j ACCEPT
    where line_num is the any line_num before the iptables rule to block all traffic
    This line_num can be obtained using # service iptables status
    # service iptables save
    # service iptables reload
    
  10. Restart the Enterprise Manager agent on the active management node as oracle from the agent's emctl command::
    % /nfs/shared_storage/oemagent/agent_inst/bin/emctl stop agent
    % /nfs/shared_storage/oemagent/agent_inst/bin/emctl start agent
    
  11. Remove the blackout on Oracle PCA rack.

Note:

After the upgrade of Private Cloud Appliance is complete and the agent is restored, you must ensure that Prerequisites to Monitor the Fabric Interconnect in Oracle Private Cloud Appliance are met to enable the new Fabric Interconnect Target features in Oracle PCA.

2.7 Important Steps to Enable the Fabric Interconnect Target

The following steps are important to enable the Fabric Interconnect Target's new features:

  • Upgrade the OMS to 13.3.x.

  • From both the Fabric Interconnect home page menu, select Control, and then select Create Blackout option to enable blackout for both the Oracle Fabric Interconnect Targets (not a full Private Cloud Appliance blackout):

  • Upgrade the agent from 13.2.x to 13.3.x.

  • Execute the steps in the Prerequisites to Monitor the Fabric Interconnect in Oracle Private Cloud Appliance section to setup the Fabric Interconnect.

  • Rediscover the Fabric Interconnect Targets by following the steps in Private Cloud Appliance Rack Discovery section and at Step 7, explicitly enter the root/administrator credentials to access the Oracle Fabric Manager.

  • Promote the Target

  • Clear the Blackout state for both the Oracle Fabric Interconnect Targets. To clear the Blackout state, perform following steps:
    • From both the Fabric Interconnect home page menu, select Control.

    • Select End Blackout option.

2.8 Removing the Oracle PCA Target from Enterprise Manager

To remove the Oracle Private Cloud Appliance (PCA) target from Enterprise Manager monitoring:

Note:

Removing the Oracle PCA target from Enterprise Manager monitoring will also remove all PCA components from monitoring (for example, the Compute and Management Nodes, InfiniBand switches, Ethernet and Fabric Interconnect switches, Storage Servers, and so forth).
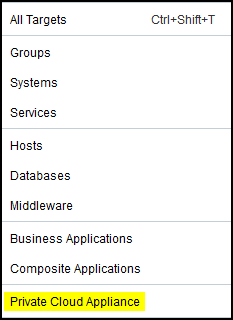
  1. From the Targets menu, select the Private Cloud Appliance item (Figure 2-17):

    Figure 2-17 Targets Menu


    Image Targets Menu

    Then, on the Targets page, select the Private Cloud Appliance item and click Remove.

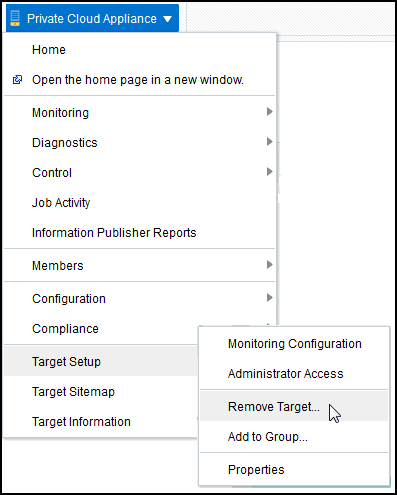
  2. Alternatively, you can remove the target from the PCA target home page. Click the Private Cloud Appliance menu, then select Target Setup, then select Remove Target (Figure 2-18):

    Figure 2-18 Remove Target


    Image Remove Target

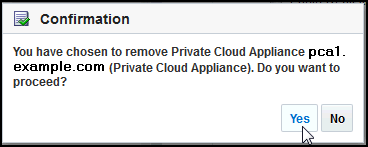
  3. A confirmation pop-up window appears (Figure 2-19):

    Figure 2-19 PCA Target Removal Confirmation


    Image PCA Target Removal Confirmation

    Click Yes to continue.

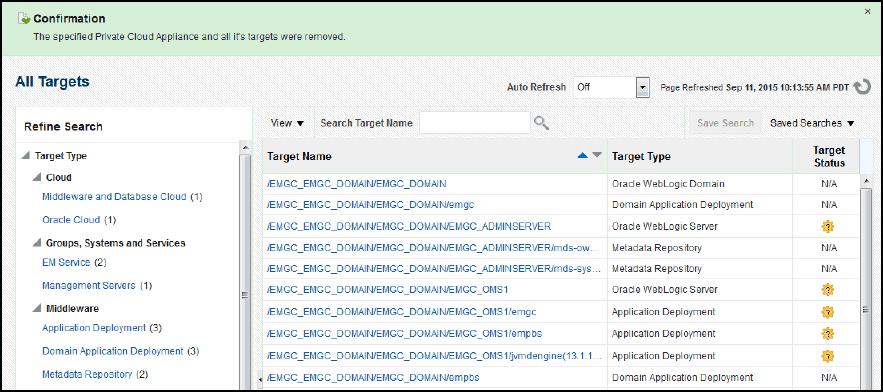
  4. After the PCA target is removed, the All Targets page will reload. A confirmation message will show that the PCA target and all of its components have been removed (Figure 2-20):

    Figure 2-20 Oracle PCA Target Removed - All Targets Page


    Image Oracle PCA Target Removed - All Targets Page