6 Customizing Support Ticketing Inbound Operations
When a ticket or incident Enterprise Manager creates is updated manually at the Service Manager console, the new ticket status is updated in Enterprise Manager. The update at the Service Manager console triggers a Java script that calls the EM CLI utility to send the new status to Enterprise Manager.
This chapter provides the following procedures to set up the ticketing inbound feature:
6.1 Adding a Custom Field to HP Service Manager
This section provides instructions to add a custom field to the HP Service Manager incident database to contain the Enterprise Manager connector identifier. The identifier must be stored with the incident, because it is a required value that must be supplied when status updates are sent to Enterprise Manager.
To add the custom field:
-
Log in to the HP Service Manager client using an account that has Administrative permissions.
-
Add the new custom field to the HP Service Manager database to contain the Enterprise Manager connector ID as follows:
-
Expand Menu Navigation, then Tailoring in the System Navigator pane.
-
Double-click on Database Dictionary.
The Database Dictionary panel appears.
-
Enter a File Name of probsummary and click Search.
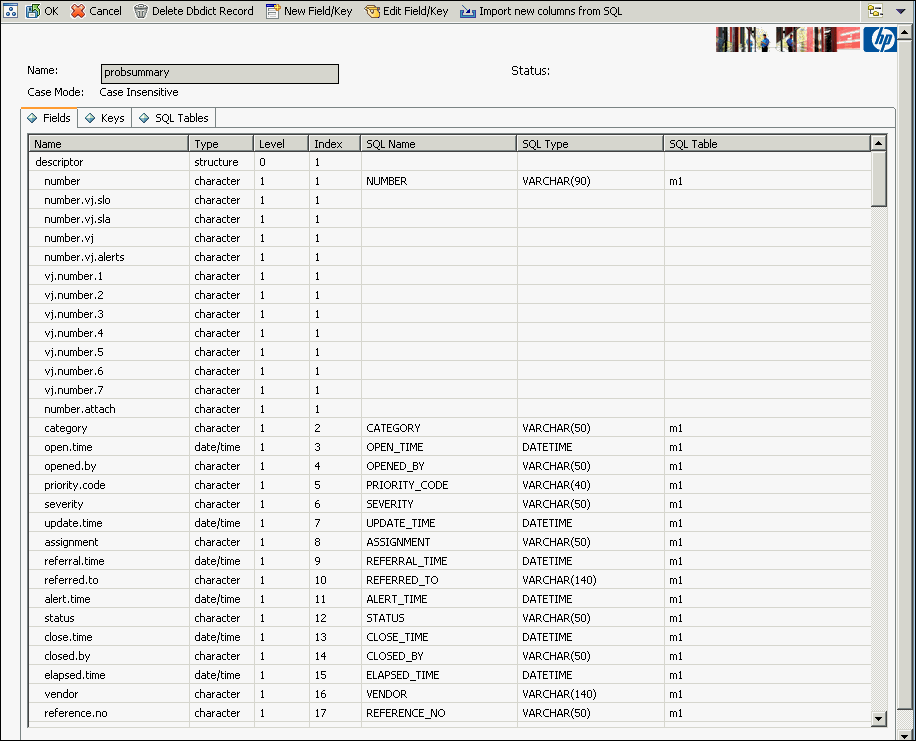
A form with the probsummary table information appears, as shown in Figure 6-1.
Figure 6-1 probsummary Information
-
Click on the line with a Name of descriptor and a Type of structure.
-
Click on New Field/Key.
The Add Field window appears.
-
Enter a Name of oracle.connector.id and a type of character, then click Add.
-
Scroll down to the bottom of the list of fields and click on the row with the name of oracle.connector.id.
-
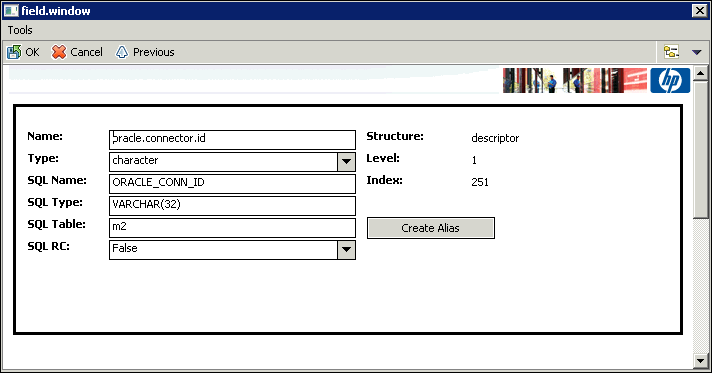
Click on Edit Field/Key. The field edit window appears, as shown in Figure 6-2.
Figure 6-2 Update Field Window
-
Enter ORACLE_CONN_ID in the SQL Name field, VARCHAR(32) in the SQL Type field, and m2 in the SQL Table field, then click OK.
-
Click OK on the main panel.
The ALTER TABLE database SQL statement appears, and you are asked whether Service Manager should automatically apply the change, or whether you want to apply it manually.
-
Click SM Alters.
After a period of time, a message states that the record has been updated in the dbdict file.
-
-
Modify the web service to include the new database field as follows:
-
Expand Menu Navigation, then Tailoring, then Web Services in the System Navigator pane.
-
Double-click on WSDL Configuration.
The External Access Definition panel appears.
-
Enter probsummary in the Name field and click Search.
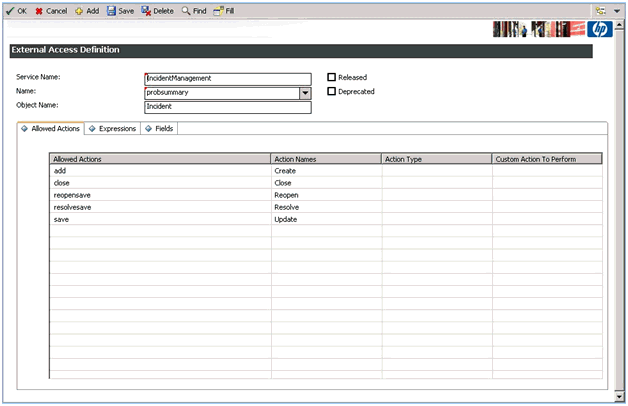
The record for probsummary will be loaded as shown in Figure 6-3.
Figure 6-3 External Access Definition Panel
-
Click on the Fields tab and scroll to the bottom of the list of fields.
-
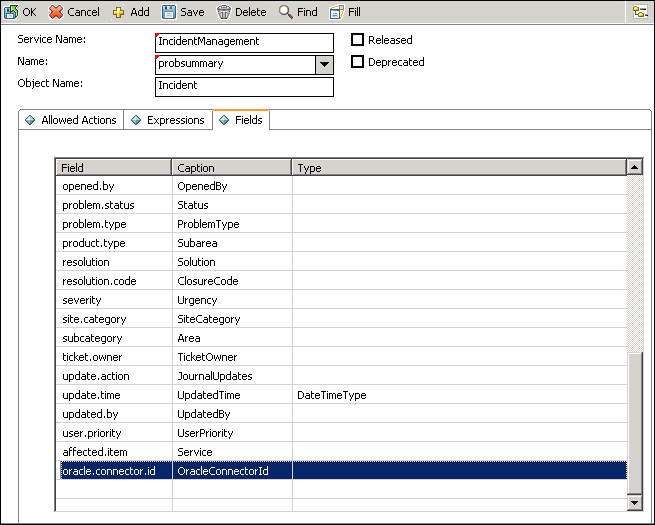
Click on the Field column of the first empty row and select oracle.connector.id from the list.
-
Click on the Caption column on the same row and enter OracleConnectorId, as shown in Figure 6-4, then click OK.
Figure 6-4 Oracle Connector ID
-
6.2 Setting Up EM CLI
Install the Enterprise Manager EM CLI Client on the Service Manager server system. The EM CLI Client needs to be able to communicate with your OMS.
To install the Enterprise Manager EM CLI Client:
Note:
EMCLI must be installed on the Service Manager server in order to communicate with your OMS.
6.3 Exporting the Notification Script Files
The notification script files are included in the Self Update archive that was installed in Installing the Connector.
To extract the script files:
-
Determine the command required to export the archive files. To do this, perform the following steps:
-
From the Setup menu of the Enterprise manager console, select Extensibility, then Self Update.
-
Click on the Management Connector link in the Type column.
The HP Service Manager connectors appear in the list with a status of Applied.
-
Click on the HP Service Manager connector, then select Export from the Actions list.
A pop-up window, like the example shown in Figure 6-5, appears with the command required to export the file.
Figure 6-5 Export Command Example

-
-
Open a command window on the Management Server host system and navigate to a temporary directory where you can copy and unzip the file.
-
Log into EM CLI using the following command. You will be asked to provide the password information for the sysman account.
emcli login -username=sysman
-
Run the EM CLI
export_updatecommand from your system, changing<dirname>to the full path of the temporary directory.This action creates a zip file with a name of
p15980954_112000_Generic.zip. -
Extract the adapter installation jar file from the zip file using the following command:
unzip *.zip archives/OracleOMSPost.js
6.4 Setting Up the Notification Script
This section provides the steps required to configure HP Service Manager to call the notification script.
To configure HP Service Manager to call the notification script:
-
Log into the HP Service Manager client with an account that has Administrative permissions.
-
Create a Script Library that generates the parameters for the EM CLI call by performing the following sub-steps:
-
Expand Menu Navigation, then Tailoring in the System Navigator pane.
-
Double-click on Script Library.
The Script Library panel appears.
-
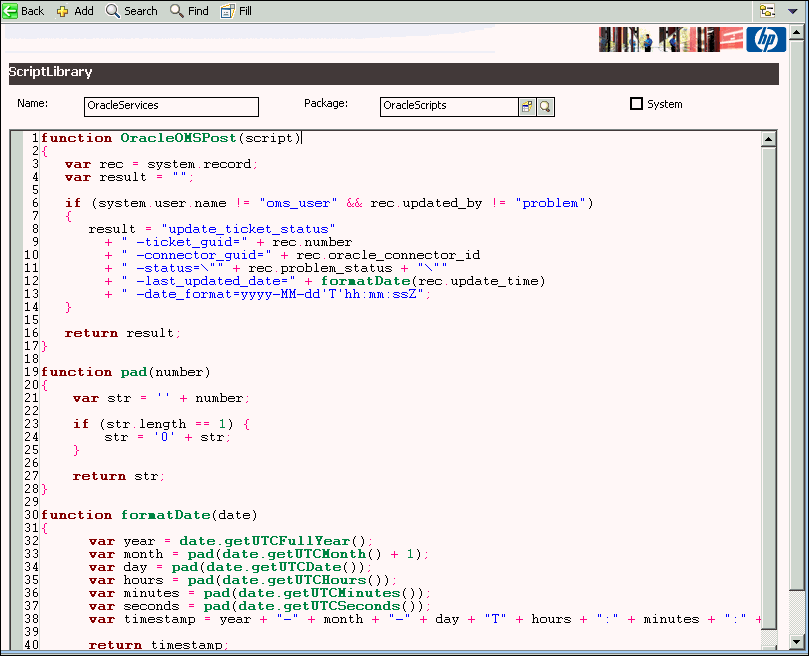
Enter a Name of OracleServices and a Package of OracleScripts.
-
Copy the contents of the OracleOMSPost.js file from Exporting the Notification Script Files into the script panel. Figure 6-6 shows the Script Library panel after the fields have been specified.
-
Change the value of the username on line 6 from oms_user to the username that Enterprise Manager will use to access the Service Manager web service. See Service Manager Username in Connection Settings for more information.
-
Click Add.
Figure 6-6 Script Library Panel
-
-
Create a Script Panel that calls the Script Library by performing the following sub-steps:
-
Double-click on Scripts in the System Navigator panel.
The Script Panel Definition panel appears.
-
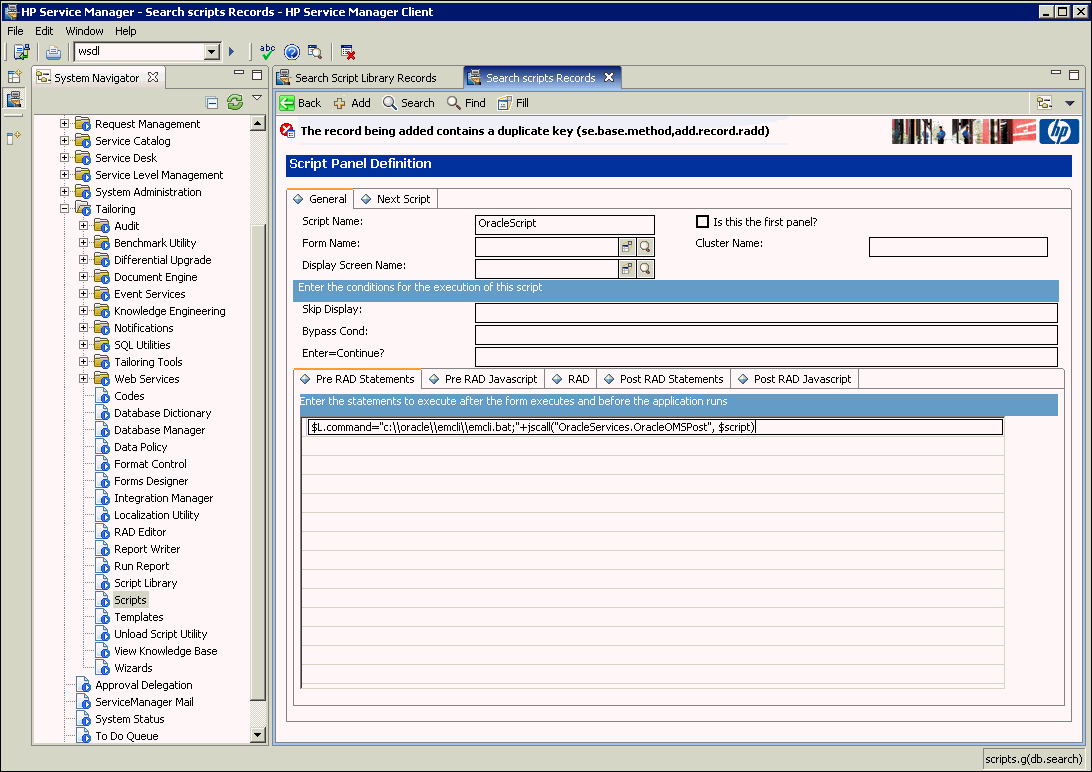
Enter a script name of OracleScript.
-
Click on the Pre RAD Statements tab.
-
Click on the first line and enter the following text, where <emcli_dir> is the path where the EM CLI tool was installed:
$L.command="<emcli_dir>\\emcli.bat;"+jscall("OracleServices.OracleOMSPost", $script)Note:
Backslashes in the path must be entered as double backslashes. For example, C:\tools\em\emcli.bat would be entered as C:\\tools\\em\\emcli.bat.
Figure 6-7 shows the Script Library panel after the fields have been specified.
-
Click on the RAD tab and set Application to us.launch.external.
-
Click on the first line in the Names column and enter name.
-
Click on the first line in the Values column and enter $L.command.
-
Click Add to create the Script Panel.
Figure 6-7 Script Panel Definition
-
-
Perform the following sub-steps to update the Format Control to invoke the script upon creating or updating a ticket:
-
Double-click on Format Control in the System Navigator panel.
The Search Format Control Records panel appears.
-
Enter probsummary in the Name field and click Search.
The Format Control: probsummary panel appears.
-
Click on the line where the Name is probsummary.
-
Click Subroutines to open the Subroutines tab.
One or more subroutines may already be defined.
-
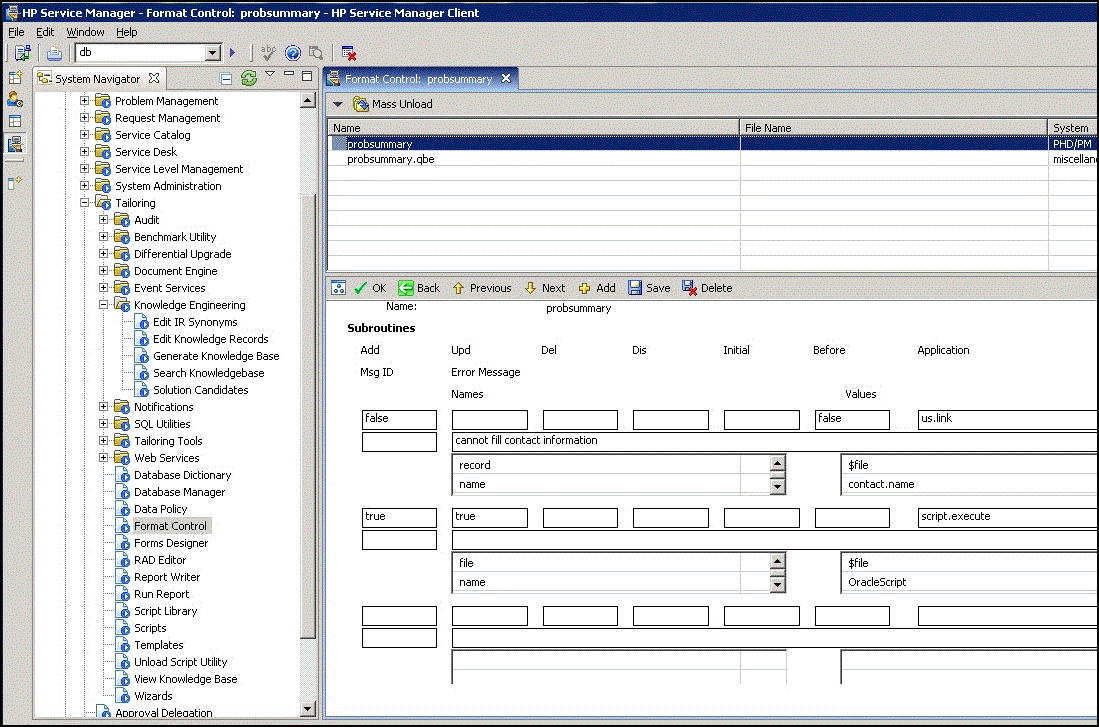
Scroll down the screen to the last empty entry and enter the following data:
-
Set Add to true.
-
Set Upd to true.
-
Set Names to file on line 1, and name on line 2.
-
Set Values to $file on line 1, and OracleScript on line 2.
Figure 6-8 shows the Format Control panel after you have specified the fields.
-
-
Click Save.
Figure 6-8 Format Control Panel
-
6.5 Uninstall Customization to HP Service Manager for Support Ticket Inbound Operations
This section provides the steps required to remove the changes made to HP Service Manager to allow for ticket inbound operations.
6.5.1 Remove Calls to the Notification Script
Follow the steps below to remove calls to the notification script:
- Log in to the HP Service Manager client with an account that has Administrative permissions.
- Expand Menu Navigation, then Tailoring in the System Navigator pane.
- Double-click on Script Library.
- Click Search to view all Scripts in the Script Library.
- Find and select OracleServices, then click Delete, and Yes to confirm.
- Double-click on Scripts in the System Navigator panel.
- Click Search to view all Scripts available.
- Find and select OracleScript, click Delete, then Yes to confirm.
- Double-click on Format Control in the System Navigator panel.
- Enter probsummary in the Name field and click Search.
- Click on the line where the Name is probsummary.
- Click Subroutines to open the Subroutines tab.
- Click Delete, then Yes to confirm.