Oracle® Enterprise Manager Ops Center
Add a Proxy Controller
12c Release 3 (12.3.2.0.0)
E59992-02
June 2016
This guide provides an end-to-end example for how to use Oracle Enterprise Manager Ops Center.
Introduction
As your environment grows and changes, you can add Proxy Controllers to better accommodate it.
This guide describes how to add and configure a new Proxy Controller.
Add a Proxy Controller in the following scenarios:
-
You are adding additional assets and your existing Proxy Controllers are under heavy load
-
You are adding assets on a network that your existing Proxy Controllers cannot access
You will complete the following tasks:
See Related Articles and Resources for links to related information and articles about Proxy Controllers, DHCP, and networks.
What You Will Need
You will need the following:
-
An installed Oracle Enterprise Manager Ops Center Enterprise Controller
-
A host system to run the Proxy Controller software
-
A user with the Ops Center Admin role
Identify a Host System
The host system for the Proxy Controller must be in a location where it can manage your assets and it must meet the Proxy Controller system requirements. If you are adding a new Proxy Controller to manage assets on a new network, the network must be accessible by the new Proxy Controller system.
The new Proxy Controller system must meet these requirements:
-
The system's operating system must be supported. See Oracle Enterprise Manager Ops Center Certified Systems Matrix for a list of supported systems.
-
To update operating systems, the Proxy Controller must not be installed on a system which uses a web proxy which requires authentication to reach the Enterprise Controller system.
-
To provision Oracle Solaris 11 using the Proxy Controller, it must be installed on an Oracle Solaris 11 system.
-
To provision an Oracle VM Server for SPARC using the Proxy Controller, it must be installed on an Oracle Solaris system.
-
To provision operating systems using the Proxy Controller, it must be in the same subnet as the OS provisioning targets.
-
No errors are reported by the OCDoctor utility when it is run using the procedure below.
About Installing and Configuring a Proxy Controller
You can use the Deploy Proxy Wizard to install and configure the new Proxy Controller on the host system through the user interface.
This installation installs, or upgrades to, Java Development Kit (JDK) 7 Update 101. If the system already has a later version of JDK installed, then the later version of JDK is used.
To install a Proxy Controller through the UI, the Enterprise Controller must be able to reach the Proxy Controller system with an SSH connection using port 22. If your site does not allow this type of connection, install the Proxy Controller from the command line using the procedures in the Installation for Oracle Solaris Operating System or the Installation for Linux Operating Systems.
About DHCP Configuration
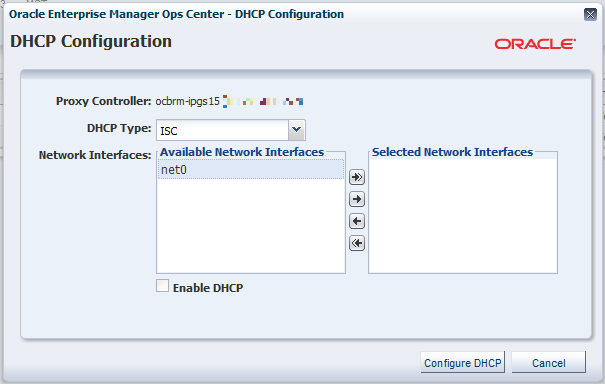
DHCP configuration configures and enables basic DHCP services on the Proxy Controller to support OS provisioning operations for Linux and Oracle Solaris 8-10. This action is only necessary if you plan to provision these operating systems using the Proxy Controller.
The DHCP Config action configures and enables either an Oracle Solaris DHCP server, or an Internet Standards Consortium (ISC) DHCP server, on the Proxy Controller.
Use the DHCP Config action to specify the Ethernet interfaces that the Proxy Controller uses to provide DHCP services. You can establish DHCP services on all the Ethernet interfaces in the Proxy Controller. The Proxy Controller's Ethernet interface that you specify must be connected to the network where the target systems for OS provisioning are connected.
You can configure DHCP server on the Proxy Controller to listen to multiple Ethernet interfaces. For example, consider the following network configuration for the Proxy Controller:
e1000g0  203.0.113.2
e1000g1  192.0.2.2
e1000g2  198.51.100.2
If you configure the DHCP server to listen to e1000g1 and e1000g2, then the target system must have the IP address in the range of 192.0.2.0/24 or 198.51.100.0/24.
The Provision OS Wizard supplies the specific identity information that the target system requests, using the basic DHCP services that you establish on the Proxy Controller.
Associating Networks
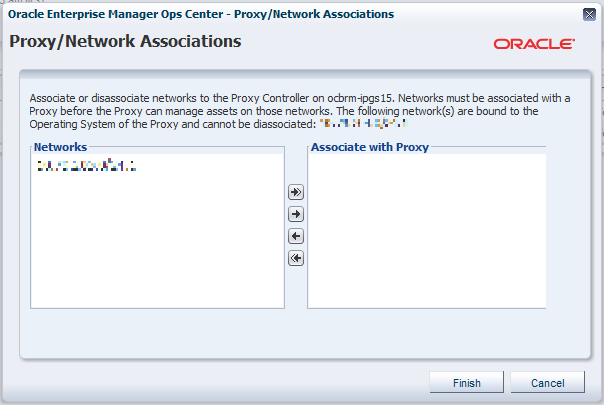
To manage assets, the Proxy Controller must have access to the networks that support the assets.
This procedure associates the Proxy Controller with one or more management networks. The list of networks includes only the management networks that are reachable by the system running the Proxy Controller.
Note:
If a Proxy Controller is connected to an asset using multiple networks, but management traffic between the Proxy Controller and agent must use a specific network, the Proxy Controller must have a NIC whitelisting file to identify the usable NICs.
Related Articles and Resources
See Oracle Enterprise Manager Ops Center Installation for Oracle Solaris Operating System or Oracle Enterprise Manager Ops Center Installation for Linux Operating Systems for more information about installation.
See Oracle Enterprise Manager Ops Center Administration and Oracle Enterprise Manager Ops Center Configure Reference for more information about DHCP and networks.
These documents are available in the Oracle Enterprise Manager Ops Center Documentation Library at http://docs.oracle.com/cd/E59957_01/index.htm.
For more information on Enterprise Manager Ops Center, see the Ops Center blog at https://blogs.oracle.com/opscenter/.
Oracle® Enterprise Manager Ops Center Add a Proxy Controller, 12c Release 3 (12.3.2.0.0)
E59992-02
Copyright © 2007, 2016, Oracle and/or its affiliates. All rights reserved.
This software and related documentation are provided under a license agreement containing restrictions on use and disclosure and are protected by intellectual property laws. Except as expressly permitted in your license agreement or allowed by law, you may not use, copy, reproduce, translate, broadcast, modify, license, transmit, distribute, exhibit, perform, publish, or display any part, in any form, or by any means. Reverse engineering, disassembly, or decompilation of this software, unless required by law for interoperability, is prohibited.
The information contained herein is subject to change without notice and is not warranted to be error-free. If you find any errors, please report them to us in writing.
If this is software or related documentation that is delivered to the U.S. Government or anyone licensing it on behalf of the U.S. Government, then the following notice is applicable:
U.S. GOVERNMENT END USERS: Oracle programs, including any operating system, integrated software, any programs installed on the hardware, and/or documentation, delivered to U.S. Government end users are "commercial computer software" pursuant to the applicable Federal Acquisition Regulation and agency-specific supplemental regulations. As such, use, duplication, disclosure, modification, and adaptation of the programs, including any operating system, integrated software, any programs installed on the hardware, and/or documentation, shall be subject to license terms and license restrictions applicable to the programs. No other rights are granted to the U.S. Government.
This software or hardware is developed for general use in a variety of information management applications. It is not developed or intended for use in any inherently dangerous applications, including applications that may create a risk of personal injury. If you use this software or hardware in dangerous applications, then you shall be responsible to take all appropriate fail-safe, backup, redundancy, and other measures to ensure its safe use. Oracle Corporation and its affiliates disclaim any liability for any damages caused by use of this software or hardware in dangerous applications.
Oracle and Java are registered trademarks of Oracle and/or its affiliates. Other names may be trademarks of their respective owners.
Intel and Intel Xeon are trademarks or registered trademarks of Intel Corporation. All SPARC trademarks are used under license and are trademarks or registered trademarks of SPARC International, Inc. AMD, Opteron, the AMD logo, and the AMD Opteron logo are trademarks or registered trademarks of Advanced Micro Devices. UNIX is a registered trademark of The Open Group.
This software or hardware and documentation may provide access to or information about content, products, and services from third parties. Oracle Corporation and its affiliates are not responsible for and expressly disclaim all warranties of any kind with respect to third-party content, products, and services unless otherwise set forth in an applicable agreement between you and Oracle. Oracle Corporation and its affiliates will not be responsible for any loss, costs, or damages incurred due to your access to or use of third-party content, products, or services, except as set forth in an applicable agreement between you and Oracle.

