Configure Top of Rack 93180YC-EX Switches
Introduction
This procedure provides the steps required to initialize and configure Cisco 93180YC-EX switches as per the topology defined in Physical Network Topology Design.Note:
All instructions in this procedure are executed from the Bootstrap Host.- Procedure OCCNE Installation of Oracle Linux 7.5 on Bootstrap Host has been completed.
- The switches are in factory default state.
- The switches are connected as per Installation PreFlight Checklist. Customer uplinks are not active before outside traffic is necessary.
- DHCP, XINETD, and TFTP are already installed on the Bootstrap host but are not configured.
- The Utility USB is available containing the necessary files as per: Installation PreFlight checklist: Create Utility USB.
All steps are executed from a Keyboard, Video, Mouse (KVM) connection.
Procedures
Table 3-3 Procedure to configure Top of Rack 93180YC-EX Switches
| Step # | Procedure | Description |
|---|---|---|
| 1.
|
Login to the Bootstrap host as root. | Using the KVM, login to the Bootstrap host as
root.
Note: All instructions in this procedure are executed from the Bootstrap Host. |
| 2.
|
Insert and mount the Utility USB | Insert and mount the Utility USB that
contains the configuration and script files. Verify the files are listed in the
USB using the ls /media/usb command.
Note: Instructions for mounting the USB can be found in: Installation of Oracle Linux 7.5 on Bootstrap Server : Install Additional Packages. Only steps 2 and 3 need to be followed in that procedure. |
| 3.
|
Create bridge interface | Create bridge interface to connect both
management ports and setup the management bridge to support switch
initialization.
Note: <CNE_Management_IP_With_Prefix> is from Installation PreFlight Checklist : Complete Site Survey Host IP Table. Row 1 CNE Management IP Addresess (VLAN 4) column. <ToRSwitch_CNEManagementNet_VIP> is from Installation PreFlight Checklist : Complete OA and Switch IP Table. $ nmcli con add con-name mgmtBridge type bridge ifname mgmtBridge $ nmcli con add type bridge-slave ifname eno2 master mgmtBridge $ nmcli con add type bridge-slave ifname eno3 master mgmtBridge $ nmcli con mod mgmtBridge ipv4.method manual ipv4.addresses 192.168.2.11/24 $ nmcli con up mgmtBridge $ nmcli con add type team con-name team0 ifname team0 team.runner lacp $ nmcli con add type team-slave con-name team0-slave-1 ifname eno5 master team0 $ nmcli con add type team-slave con-name team0-slave-2 ifname eno6 master team0 $ nmcli con mod team0 ipv4.method manual ipv4.addresses 172.16.3.4/24 $ nmcli con add con-name team0.4 type vlan id 4 dev team0 $ nmcli con mod team0.4 ipv4.method manual ipv4.addresses <CNE_Management_IP_Address_With_Prefix> ipv4.gateway <ToRswitch_CNEManagementNet_VIP> $ nmcli con up team0.4 |
| 4.
|
Edit the /etc/xinetd.d/tftp file |
Edit the /etc/xinetd.d/tftp file to enable TFTP service. Change the disable option to no, if it is set to yes. $ vi /etc/xinetd.d/tftp
# default: off
# description: The tftp server serves files using the trivial file transfer \
# protocol. The tftp protocol is often used to boot diskless \
# workstations, download configuration files to network-aware printers, \
# and to start the installation process for some operating systems.
service tftp
{
socket_type = dgram
protocol = udp
wait = yes
user = root
server = /usr/sbin/in.tftpd
server_args = -s /var/lib/tftpboot
disable = no
per_source = 11
cps = 100 2
flags = IPv4
}
|
| 5.
|
Enable tftp on the Bootstrap host. |
$ systemctl start tftp $ systemctl enable tftp Verify tftp is active and enabled: $ systemctl status tftp $ ps -elf | grep tftp |
| 6.
|
Copy the dhcpd.conf file |
Copy the dhcpd.conf file from the Utility USB in Installation PreFlight checklist : Create the dhcpd.conf File to the /etc/dhcp/ directory. $ cp /media/usb/dhcpd.conf /etc/dhcp/ |
| 7.
|
Restart and enable dhcpd service. |
# /bin/systemctl restart dhcpd.service # /bin/systemctl enable dhcpd.service Use the systemctl status dhcpd command to verify active and enabled. # systemctl status dhcpd |
| 8.
|
Copy the switch configuration and script files |
Copy the switch configuration and script files from the Utility USB to directory /var/lib/tftpboot/. $ cp /media/usb/93180_switchA.cfg /var/lib/tftpboot/. $ cp /media/usb/93180_switchB.cfg /var/lib/tftpboot/. $ cp /media/usb/poap_nexus_script.py /var/lib/tftpboot/. |
| 9.
|
Modify POAP script File. |
Modify POAP script File. Change Username and password credentials used to login to the Bootstrap host.
# vi /var/lib/tftpboot/poap_nexus_script.py
# Host name and user credentials
options = {
   "username": "<username>",
   "password": "<password>",
   "hostname": "192.168.2.11",
   "transfer_protocol": "scp",
   "mode": "serial_number",
   "target_system_image": "nxos.9.2.3.bin",
}

Note: The version nxos.9.2.3.bin is used by default. If different version is to be used, modify the "target_system_image" with new version.
|
| 10.
|
Modify POAP script file |
Modify POAP script file md5sum by executing the md5Poap.sh script from the Utility USB created from Installation PreFlight checklist : Create the md5Poap Bash Script. # cd /var/lib/tftpboot/ # /bin/bash md5Poap.sh |
| 11.
|
Create the files necessary to configure the ToR switches using the serial number from the switch. | The serial number is located on a pullout
card on the back of the switch in the left most power supply of the switch.
Note: The serial number is located on a pullout card on the
back of the switch in the left most power supply of the switch. Be careful in
interpreting the exact letters. If the switches are preconfigured then you can
even verify the serial numbers using ' |
| 12.
|
Copy the /var/lib/tftpboot/93180_switchA.cfg into a file called /var/lib/tftpboot/conf.<switchA serial number> | Modify the switch specific values in the
/var/lib/tftpboot/conf.<switchA serial number> file, including all the
values in the curly braces as following code block.
These values are contained at Installation PreFlight checklist : ToR and Enclosure Switches Variables Table (Switch Specific) and Installation PreFlight Checklist : Complete OA and Switch IP Table. Modify these values with the following sed commands, or use an editor such as vi etc. # sed -i 's/{switchname}/<switch_name>/' conf.<switchA serial number>
# sed -i 's/{admin_password}/<admin_password>/' conf.<switchA serial number>
# sed -i 's/{user_name}/<user_name>/' conf.<switchA serial number>
# sed -i 's/{user_password}/<user_password>/' conf.<switchA serial number>
# sed -i 's/{ospf_md5_key}/<ospf_md5_key>/' conf.<switchA serial number>
# sed -i 's/{OSPF_AREA_ID}/<ospf_area_id>/' conf.<switchA serial number>
# sed -i 's/{NTPSERVER1}/<NTP_server_1>/' conf.<switchA serial number>
# sed -i 's/{NTPSERVER2}/<NTP_server_2>/' conf.<switchA serial number>
# sed -i 's/{NTPSERVER3}/<NTP_server_3>/' conf.<switchA serial number>
# sed -i 's/{NTPSERVER4}/<NTP_server_4>/' conf.<switchA serial number>
# sed -i 's/{NTPSERVER5}/<NTP_server_5>/' conf.<switchA serial number>
# Note: If less than 5 ntp servers available, delete the extra ntp server lines such as command:
# sed -i 's/{NTPSERVER5}/d' conf.<switchA serial number>
Note: different delimiter is used in next two commands due to '/' sign in the variables
# sed -i 's#{ALLOW_5G_XSI_LIST_WITH_PREFIX_LEN}#<MetalLB_Signal_Subnet_With_Prefix>#g' conf.<switchA serial number>
# sed -i 's#{CNE_Management_SwA_Address}#<ToRswitchA_CNEManagementNet_IP>#g' conf.<switchA serial number>
# sed -i 's#{CNE_Management_SwB_Address}#<ToRswitchB_CNEManagementNet_IP>#g' conf.<switchA serial number>
# sed -i 's#{CNE_Management_Prefix}#<CNEManagementNet_Prefix>#g' conf.<switchA serial number>
# sed -i 's#{SQL_replication_SwA_Address}#<ToRswitchA_SQLreplicationNet_IP>#g' conf.<switchA serial number>
# sed -i 's#{SQL_replication_SwB_Address}#<ToRswitchB_SQLreplicationNet_IP>#g' conf.<switchA serial number>
# sed -i 's#{SQL_replication_Prefix}#<SQLreplicationNet_Prefix>#g' conf.<switchA serial number>
# ipcalc -n <ToRswitchA_SQLreplicationNet_IP/<SQLreplicationNet_Prefix> | awk -F'=' '{print $2}'
# sed -i 's/{SQL_replication_Subnet}/<output from ipcalc command as SQL_replication_Subnet>/' conf.<switchA serial number>
# sed -i 's/{CNE_Management_VIP}/<ToRswitch_CNEManagementNet_VIP>/g' conf.<switchA serial number>
# sed -i 's/{SQL_replication_VIP}/<ToRswitch_SQLreplicationNet_VIP>/g' conf.<switchA serial number>
# sed -i 's/{OAM_UPLINK_CUSTOMER_ADDRESS}/<ToRswitchA_oam_uplink_customer_IP>/' conf.<switchA serial number>
# sed -i 's/{OAM_UPLINK_SwA_ADDRESS}/<ToRswitchA_oam_uplink_IP>/g' conf.<switchA serial number>
# sed -i 's/{SIGNAL_UPLINK_SwA_ADDRESS}/<ToRswitchA_signaling_uplink_IP>/g' conf.<switchA serial number>
# sed -i 's/{OAM_UPLINK_SwB_ADDRESS}/<ToRswitchB_oam_uplink_IP>/g' conf.<switchA serial number>
# sed -i 's/{SIGNAL_UPLINK_SwB_ADDRESS}/<ToRswitchB_signaling_uplink_IP>/g' conf.<switchA serial number>
# ipcalc -n <ToRswitchA_signaling_uplink_IP>/30 | awk -F'=' '{print $2}'
# sed -i 's/{SIGNAL_UPLINK_SUBNET}/<output from ipcalc command as signal_uplink_subnet>/' conf.<switchA serial number>
# ipcalc -n <ToRswitchA_SQLreplicationNet_IP> | awk -F'=' '{print $2}'
# sed -i 's/{MySQL_Replication_SUBNET}/<output from the above ipcalc command appended with prefix >/' conf.<switchA serial number>
Note: The version nxos.9.2.3.bin is used by default and hard-coded in the conf files. If different version is to be used, run the following command:
# sed -i 's/nxos.9.2.3.bin/<nxos_version>/' conf.<switchA serial number>
Note: access-list Restrict_Access_ToR
# The following line allow one access server to access the switch management and SQL vlan addresses while other accesses are denied. If no need, delete this line. If need more servers, add similar line.
# sed -i 's/{Allow_Access_Server}/<Allow_Access_Server>/' conf.<switchA serial number>
|
| 13.
|
Copy the /var/lib/tftpboot/93180_switchB.cfg into a file called /var/lib/tftpboot/conf.<switchB serial number> |
Modify the switch specific values in the /var/lib/tftpboot/conf.<switchA serial number> file, including: hostname, username/password, oam_uplink IP address, signaling_uplink IP address, access-list ALLOW_5G_XSI_LIST permit address, prefix-list ALLOW_5G_XSI. These values are contained at Installation PreFlight checklist : ToR and Enclosure Switches Variables Table and Installation PreFlight Checklist : Complete OA and Switch IP Table. # sed -i 's/{switchname}/<switch_name>/' conf.<switchB serial number>
# sed -i 's/{admin_password}/<admin_password>/' conf.<switchB serial number>
# sed -i 's/{user_name}/<user_name>/' conf.<switchB serial number>
# sed -i 's/{user_password}/<user_password>/' conf.<switchB serial number>
# sed -i 's/{ospf_md5_key}/<ospf_md5_key>/' conf.<switchB serial number>
# sed -i 's/{OSPF_AREA_ID}/<ospf_area_id>/' conf.<switchB serial number>
# sed -i 's/{NTPSERVER1}/<NTP_server_1>/' conf.<switchB serial number>
# sed -i 's/{NTPSERVER2}/<NTP_server_2>/' conf.<switchB serial number>
# sed -i 's/{NTPSERVER3}/<NTP_server_3>/' conf.<switchB serial number>
# sed -i 's/{NTPSERVER4}/<NTP_server_4>/' conf.<switchB serial number>
# sed -i 's/{NTPSERVER5}/<NTP_server_5>/' conf.<switchB serial number>
# Note: If less than 5 ntp servers available, delete the extra ntp server lines such as command:
# sed -i 's/{NTPSERVER5}/d' conf.<switchB serial number>
Note: different delimiter is used in next two commands due to '/' sign in in the variables
# sed -i 's#{ALLOW_5G_XSI_LIST_WITH_PREFIX_LEN}#<MetalLB_Signal_Subnet_With_Prefix>#g' conf.<switchB serial number>
# sed -i 's#{CNE_Management_SwA_Address}#<ToRswitchA_CNEManagementNet_IP>#g' conf.<switchB serial number>
# sed -i 's#{CNE_Management_SwB_Address}#<ToRswitchB_CNEManagementNet_IP>#g' conf.<switchB serial number>
# sed -i 's#{CNE_Management_Prefix}#<CNEManagementNet_Prefix>#g' conf.<switchB serial number>
# sed -i 's#{SQL_replication_SwA_Address}#<ToRswitchA_SQLreplicationNet_IP>#g' conf.<switchB serial number>
# sed -i 's#{SQL_replication_SwB_Address}#<ToRswitchB_SQLreplicationNet_IP>#g' conf.<switchB serial number>
# sed -i 's#{SQL_replication_Prefix}#<SQLreplicationNet_Prefix>#g' conf.<switchB serial number>
# ipcalc -n <ToRswitchB_SQLreplicationNet_IP/<SQLreplicationNet_Prefix> | awk -F'=' '{print $2}'
# sed -i 's/{SQL_replication_Subnet}/<output from ipcalc command as SQL_replication_Subnet>/' conf.<switchB serial number>
# sed -i 's/{CNE_Management_VIP}/<ToRswitch_CNEManagementNet_VIP>/' conf.<switchB serial number>
# sed -i 's/{SQL_replication_VIP}/<ToRswitch_SQLreplicationNet_VIP>/' conf.<switchB serial number>
# sed -i 's/{OAM_UPLINK_CUSTOMER_ADDRESS}/<ToRswitchB_oam_uplink_customer_IP>/' conf.<switchB serial number>
# sed -i 's/{OAM_UPLINK_SwA_ADDRESS}/<ToRswitchA_oam_uplink_IP>/g' conf.<switchB serial number>
# sed -i 's/{SIGNAL_UPLINK_SwA_ADDRESS}/<ToRswitchA_signaling_uplink_IP>/g' conf.<switchB serial number>
# sed -i 's/{OAM_UPLINK_SwB_ADDRESS}/<ToRswitchB_oam_uplink_IP>/g' conf.<switchB serial number>
# sed -i 's/{SIGNAL_UPLINK_SwB_ADDRESS}/<ToRswitchB_signaling_uplink_IP>/g' conf.<switchB serial number>
# ipcalc -n <ToRswitchB_signaling_uplink_IP>/30 | awk -F'=' '{print $2}'
# sed -i 's/{SIGNAL_UPLINK_SUBNET}/<output from ipcalc command as signal_uplink_subnet>/' conf.<switchB serial number>
Note: The version nxos.9.2.3.bin is used by default and hard-coded in the conf files. If different version is to be used, run the following command:
# sed -i 's/nxos.9.2.3.bin/<nxos_version>/' conf.<switchB serial number>
Note: access-list Restrict_Access_ToR
# The following line allow one access server to access the switch management and SQL vlan addresses while other accesses are denied. If no need, delete this line. If need more servers, add similar line.
# sed -i 's/{Allow_Access_Server}/<Allow_Access_Server>/' conf.<switchB serial number>
|
| 14.
|
Generate the md5 checksum |
Generate the md5 checksum for each conf file in /var/lib/tftpboot and copy
that into a new file called
conf.<switchA/B serial
number>.md5.
$ md5sum conf.<switchA serial number> > conf.<switchA serial number>.md5 $ md5sum conf.<switchB serial number> > conf.<switchB serial number>.md5 |
| 15.
|
Verify the /var/lib/tftpboot directory has the correct files. |
Make sure the file permissions are set as given below. Note: The ToR switches are constantly attempting to find and execute the poap_nexus_script.py script which uses tftp to load and install the configuration files. # ls -l /var/lib/tftpboot/ total 1305096 -rw-r--r--. 1 root root 7161 Mar 25 15:31 conf.<switchA serial number> -rw-r--r--. 1 root root 51 Mar 25 15:31 conf.<switchA serial number>.md5 -rw-r--r--. 1 root root 7161 Mar 25 15:31 conf.<switchB serial number> -rw-r--r--. 1 root root 51 Mar 25 15:31 conf.<switchB serial number>.md5 -rwxr-xr-x. 1 root root 75856 Mar 25 15:32 poap_nexus_script.py |
| 16.
|
Disable firewalld. |
$ systemctl stop firewalld
$ systemctl disable firewalld

To verify:
$ systemctl status firewalld
Once this is complete, the ToR Switches will attempt to boot from the tftpboot files automatically. Eventually the verification steps can be executed below. It may take about 5 minutes for this to complete. |
| 17.
|
Un-mount the Utility USB | Un-mount the Utility USB and remove it:
umount
					 /media/usb
|

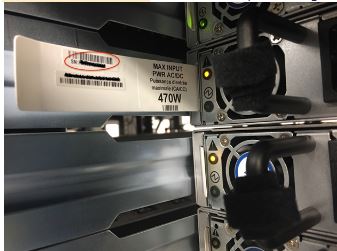
Table 3-4 Procedure to verify Top of Rack 93180YC-EX Switches
| Step # | Procedure | Description |
|---|---|---|
| 1.
|
After the ToR switches configured, ping the switches from bootstrap server. The switches mgmt0 interfaces are configured with the IP addresses which are in the conf files. | Note: Wait till the device
responds.
# ping 192.168.2.1 PING 192.168.2.1 (192.168.2.1) 56(84) bytes of data. 64 bytes from 192.168.2.1: icmp_seq=1 ttl=255 time=0.419 ms 64 bytes from 192.168.2.1: icmp_seq=2 ttl=255 time=0.496 ms 64 bytes from 192.168.2.1: icmp_seq=3 ttl=255 time=0.573 ms 64 bytes from 192.168.2.1: icmp_seq=4 ttl=255 time=0.535 ms ^C --- 192.168.2.1 ping statistics --- 4 packets transmitted, 4 received, 0% packet loss, time 3000ms rtt min/avg/max/mdev = 0.419/0.505/0.573/0.063 ms # ping 192.168.2.2 PING 192.168.2.2 (192.168.2.2) 56(84) bytes of data. 64 bytes from 192.168.2.2: icmp_seq=1 ttl=255 time=0.572 ms 64 bytes from 192.168.2.2: icmp_seq=2 ttl=255 time=0.582 ms 64 bytes from 192.168.2.2: icmp_seq=3 ttl=255 time=0.466 ms 64 bytes from 192.168.2.2: icmp_seq=4 ttl=255 time=0.554 ms ^C --- 192.168.2.2 ping statistics --- 4 packets transmitted, 4 received, 0% packet loss, time 3001ms rtt min/avg/max/mdev = 0.466/0.543/0.582/0.051 ms |
| 2.
|
Attempt to ssh to the switches with the username/password provided in the conf files. |
# ssh plat@192.168.2.1 The authenticity of host '192.168.2.1 (192.168.2.1)' can't be established. RSA key fingerprint is SHA256:jEPSMHRNg9vejiLcEvw5qprjgt+4ua9jucUBhktH520. RSA key fingerprint is MD5:02:66:3a:c6:81:65:20:2c:6e:cb:08:35:06:c6:72:ac. Are you sure you want to continue connecting (yes/no)? yes Warning: Permanently added '192.168.2.1' (RSA) to the list of known hosts. User Access Verification Password: Cisco Nexus Operating System (NX-OS) Software TAC support: http://www.cisco.com/tac Copyright (C) 2002-2019, Cisco and/or its affiliates. All rights reserved. The copyrights to certain works contained in this software are owned by other third parties and used and distributed under their own licenses, such as open source. This software is provided "as is," and unless otherwise stated, there is no warranty, express or implied, including but not limited to warranties of merchantability and fitness for a particular purpose. Certain components of this software are licensed under the GNU General Public License (GPL) version 2.0 or GNU General Public License (GPL) version 3.0 or the GNU Lesser General Public License (LGPL) Version 2.1 or Lesser General Public License (LGPL) Version 2.0. A copy of each such license is available at http://www.opensource.org/licenses/gpl-2.0.php and http://opensource.org/licenses/gpl-3.0.html and http://www.opensource.org/licenses/lgpl-2.1.php and http://www.gnu.org/licenses/old-licenses/library.txt. # |
| 3.
|
Verify the running-config has all expected configurations in the conf file using the show running-config command. |
# show running-config !Command: show running-config !Running configuration last done at: Mon Apr 8 17:39:38 2019 !Time: Mon Apr 8 18:30:17 2019 version 9.2(3) Bios:version 07.64 hostname 12006-93108A vdc 12006-93108A id 1 limit-resource vlan minimum 16 maximum 4094 limit-resource vrf minimum 2 maximum 4096 limit-resource port-channel minimum 0 maximum 511 limit-resource u4route-mem minimum 248 maximum 248 limit-resource u6route-mem minimum 96 maximum 96 limit-resource m4route-mem minimum 58 maximum 58 limit-resource m6route-mem minimum 8 maximum 8 feature scp-server feature sftp-server cfs eth distribute feature ospf feature bgp feature interface-vlan feature lacp feature vpc feature bfd feature vrrpv3 .... .... |
| 4.
|
Verify license on the switches | In case some of the above features are
missing, verify license on the switches and at least NXOS_ADVANTAGE level
license is "In use". If license not installed or too low level, contact vendor
for correct license key file, following Licensing document mentioned in
reference section to install license key. Then run "write erase" and "reload"
to set back to factory default. The switches will go to POAP configuration
again.
# show license

Example output:
# show license
MDS20190215085542979.lic:
SERVER this_host ANY
VENDOR cisco
INCREMENT NXOS_ADVANTAGE_XF cisco 1.0 permanent uncounted \
        VENDOR_STRING=<LIC_SOURCE>MDS_SWIFT</LIC_SOURCE><SKU>NXOS-AD-XF</SKU> \
        HOSTID=VDH=FDO22412J2F \
        NOTICE="<LicFileID>20190215085542979</LicFileID><LicLineID>1</LicLineID> \
        <PAK></PAK>" SIGN=8CC8807E6918

# show license usage

Example output:
# show license usage
Feature                      Ins  Lic   Status Expiry Date Comments
                                 Count
--------------------------------------------------------------------------------
...
NXOS_ADVANTAGE_M4             No    -   Unused             -
NXOS_ADVANTAGE_XF             Yes   -   In use never       -
NXOS_ESSENTIALS_GF            No    -   Unused             -
...
#
|
| 5.
|
Verify the RMS1 can ping the CNE_Management VIP |
# ping <ToRSwitch_CNEManagementNet_VIP> PING <ToRSwitch_CNEManagementNet_VIP> (<ToRSwitch_CNEManagementNet_VIP>) 56(84) bytes of data. 64 bytes from <ToRSwitch_CNEManagementNet_VIP>: icmp_seq=2 ttl=255 time=1.15 ms 64 bytes from <ToRSwitch_CNEManagementNet_VIP>: icmp_seq=3 ttl=255 time=1.11 ms 64 bytes from <ToRSwitch_CNEManagementNet_VIP>: icmp_seq=4 ttl=255 time=1.23 ms ^C --- 10.75.207.129 ping statistics --- 4 packets transmitted, 3 received, 25% packet loss, time 3019ms rtt min/avg/max/mdev = 1.115/1.168/1.237/0.051 ms |
| 6.
|
Enable customer uplink | Connect or enable customer uplink. |
| 7.
|
Verify the RMS1 can be accessed from laptop. Use application such as putty etc to ssh to RMS1. |
$ ssh root@<CNE_Management_IP_Address> Using username "root". root@<CNE_Management_IP_Address>'s password:<root password> Last login: Mon May 6 10:02:01 2019 from 10.75.9.171 [root@RMS1 ~]# |
SNMP Trap Configuration
Table 3-5 Procedure to configure SNMP Trap
| Step # | Procedure | Description |
|---|---|---|
| 1.
|
SNMPv2c Configuration |
When SNMPv2c configuration is needed, ssh to the two switches, run the following commands: These values <SNMP_Trap_Receiver_Address>and <SNMP_Community_String> are from Installation Preflight Checklist [root@RMS1 ~]# ssh <user_name>@<ToRswitchA_CNEManagementNet_IP> # configure terminal (config)# snmp-server host <SNMP_Trap_Receiver_Address> traps version 2c <SNMP_Community_String> (config)# snmp-server host <SNMP_Trap_Receiver_Address> use-vrf default (config)# snmp-server host <SNMP_Trap_Receiver_Address> source-interface Ethernet1/51 (config)# snmp-server enable traps (config)# snmp-server community <SNMP_Community_String> group network-admin |
| 2.
|
Restrict direct access to ToR switches | In order to restrict direct access to ToR
switches, IP access list is created and applied on the uplink interfaces, the
following commands are needed on ToR switches:
[root@RMS1 ~]# ssh <user_name>@<ToRswitchA_CNEManagementNet_IP>
# configure terminal
(config)#
ip access-list Restrict_Access_ToR
  permit ip {Allow_Access_Server}/32 any
  permit ip {NTPSERVER1}/32 {OAM_UPLINK_SwA_ADDRESS}/32
  permit ip {NTPSERVER2}/32 {OAM_UPLINK_SwA_ADDRESS}/32
  permit ip {NTPSERVER3}/32 {OAM_UPLINK_SwA_ADDRESS}/32
  permit ip {NTPSERVER4}/32 {OAM_UPLINK_SwA_ADDRESS}/32
  permit ip {NTPSERVER5}/32 {OAM_UPLINK_SwA_ADDRESS}/32
  deny ip any {CNE_Management_VIP}/32
  deny ip any {CNE_Management_SwA_Address}/32
  deny ip any {CNE_Management_SwB_Address}/32
  deny ip any {SQL_replication_VIP}/32
  deny ip any {SQL_replication_SwA_Address}/32
  deny ip any {SQL_replication_SwB_Address}/32
  deny ip any {OAM_UPLINK_SwA_ADDRESS}/32
  deny ip any {OAM_UPLINK_SwB_ADDRESS}/32
  deny ip any {SIGNAL_UPLINK_SwA_ADDRESS}/32
  deny ip any {SIGNAL_UPLINK_SwB_ADDRESS}/32
  permit ip any any

interface Ethernet1/51
  ip access-group Restrict_Access_ToR in

interface Ethernet1/52
  ip access-group Restrict_Access_ToR in
|
| 3.
|
Traffic egress | Traffic egress out of cluster, including
snmptrap traffic to SNMP trap receiver, and traffic goes to signal server:
[root@RMS1 ~]# ssh <user_name>@<ToRswitchA_CNEManagementNet_IP> # configure terminal (config)# feature nat ip access-list host-snmptrap 10 permit udp 172.16.3.0/24 <snmp trap receiver>/32 eq snmptrap log ip access-list host-sigserver 10 permit ip 172.16.3.0/24 <signal server>/32 ip nat pool sig-pool 10.75.207.211 10.75.207.222 prefix-length 27 ip nat inside source list host-sigserver pool sig-pool overload add-route ip nat inside source list host-snmptrap interface Ethernet1/51 overload interface Vlan3 ip nat inside interface Ethernet1/51 ip nat outside interface Ethernet1/52 ip nat outside Run the same commands on ToR switchB |


