4 Creating the Initial Application
About This Lesson
In this lesson, you use the Create Application Wizard to build the foundational pages of your application based on the imported tables and data.
After you build the foundation of your app, use Page Designer’s Create Page Wizard to add a new page to an existing app and run the app for the first time.
4.1 Creating a New Application Using the Create Application Wizard
With the tables populated, you are ready to create pages dedicated to each one with the Create Application Wizard.
You can create many different types of pages from the tables with Create Application Wizard, such as Reports, Forms, and a Master Detail.
You learn more about each page type later in the tutorial, but here are some basics:
-
Reports are pages that display the contents of a table.
-
Forms enable users to modify a table.
-
A master detail displays more than one table at a time, usually with a one-to-many relationship.
To create the initial application:
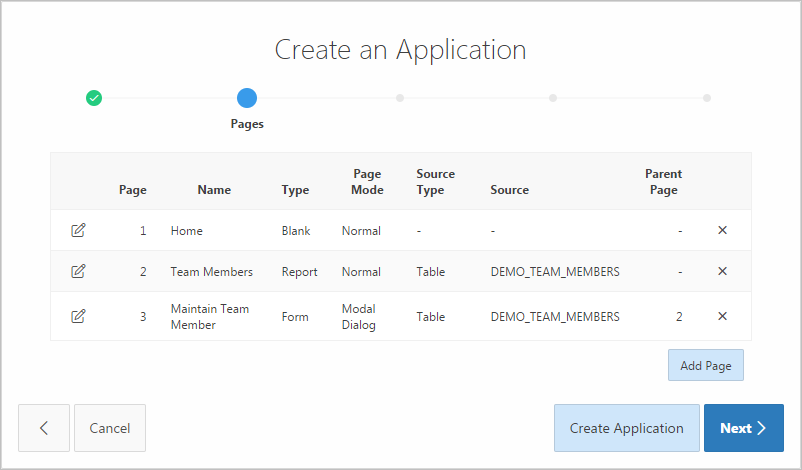
Often at the beginning of development, you only know some of the pages that your application requires. You can save time by clicking Add Page to generate a batch of application pages now instead of creating them one at a time later.
Each page appears in a list. You can also edit some attributes of each page by clicking the Edit icon (pencil) or delete pages in this list view by clicking the Remove icon (X).
Next, you create an interactive report to enable your users to view and maintain their contact information.
To add a report and form for the DEMO_TEAM_MEMBERS pages:
The Create Application Wizard automatically names new pages based on the name of the table. You should always ensure that the name of your pages makes sense to your users. In this case, remove the word "Demo" to avoid confusing your users.
To edit the name of the report in the Create Application Wizard:
To edit the name of the form:
4.2 Creating a Projects Page Using the Create Page Wizard
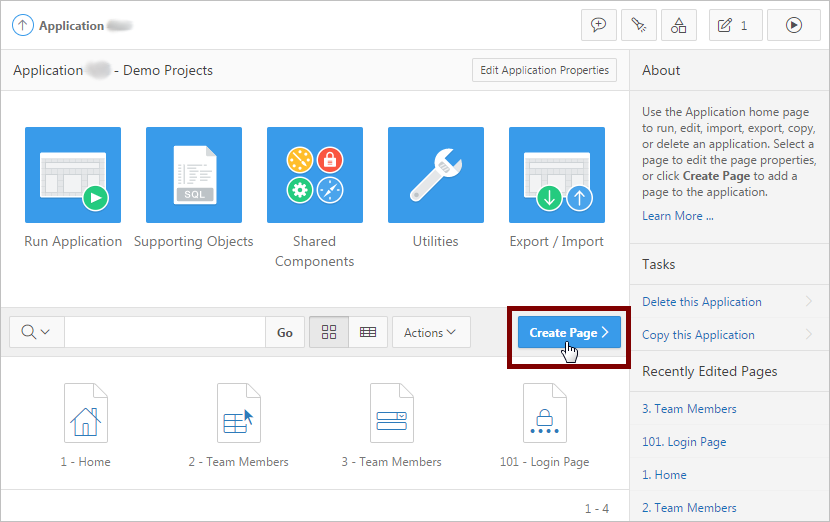
Use the Create Page Wizard to add new pages to an app. The Create Page Wizard has a more sophisticated interface to make adding and pre-configuring complicated page types easier (such as master detail or calendar).
Next, you want to add a project management page that your users can check for project progress. Progress on projects is measured in milestones, so you need to connect those two tables.
A master detail page reflects a one-to-many relationship between two tables. In this case, you want to show the relationship between the DEMO_PROJECTS and the DEMO_MILESTONES tables.
In addition to viewing progress on milestones and projects, you also want to give your users a way to edit the information themselves. A two page master detail is also pre-built like a report and form to give your users a way to edit the information.
To add a two page master detail page using the Create Page wizard:
Page Designer is the comprehensive integrated development environment (IDE) for Oracle Application Express. You explore Page Designer further in a future lesson. For now, you still have one more page to create.
4.3 Creating a Calendar Using the Create Page Wizard
Use the Create Page Wizard to add a calendar page so that your users can manage their deadlines.
To add a calendar page with the Create Page Wizard:
Page Designer appears displaying the new Calendar page.
4.4 About Page Designer
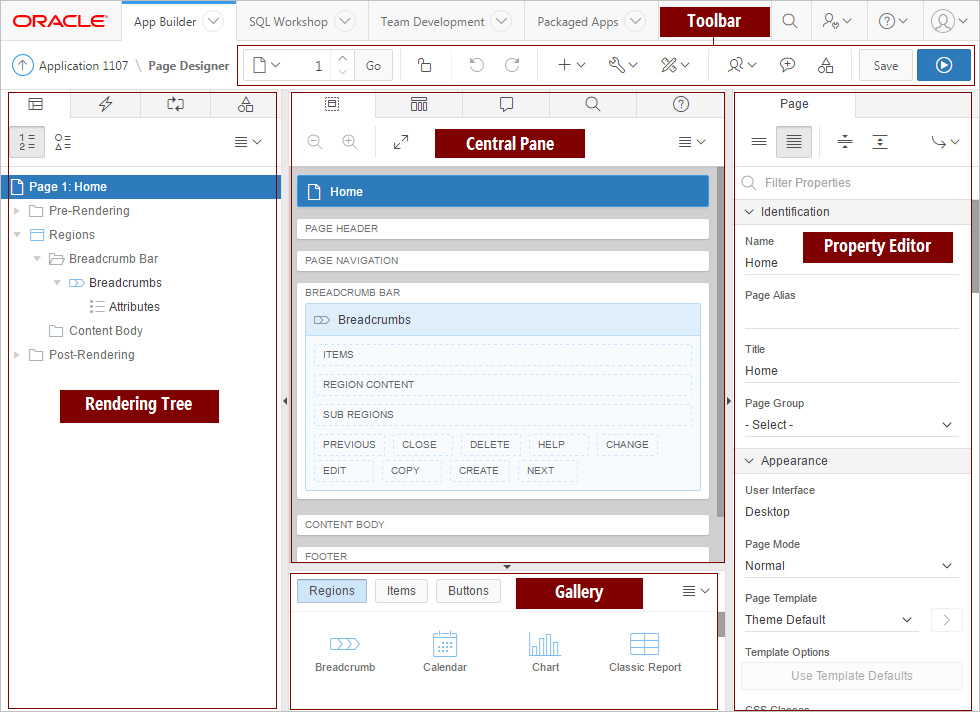
Use Page Designer to develop and maintain the individual pages of your application in Oracle Application Express. Page Designer is a powerful integrated development environment (IDE) designed to provide developers with everything they need at their fingertips with an array of panes and toolbars. Most of your time in this tutorial is spent in Page Designer.
Note:
This section is a condensed look at a very powerful tool. For more in-depth information about Page Designer’s capabilities, review the "Managing Pages in Page Designer" chapter in the official Oracle Application Express documentation Oracle Application Express App Builder User’s Guide.

Description of the illustration GUID-EC0670C6-5867-45FE-AA6C-9F990C65AE1A-default.png
Toolbar
At the top of Page Designer is the toolbar. The toolbar contains a number of buttons and menus. You use the Page Selector, Undo Changes, Shared Components, Save, and Save and Run Page most often. You can hover your mouse cursor over a button to display its name in a tooltip.
- Page Selector
-
Displays the current page. You can enter a page number directly, or click on the popup list of values to select a page.
- Page Lock
-
Indicates if the page is unlocked (clear), locked by you (green), or locked by another developer (red). You can click on this icon to lock or unlock the page, providing it is not locked by another developer.
- Undo Changes
-
Click to undo the previous update you made within Page Designer.
- Redo Changes
-
Click to reapply the last update that was undone using Undo Changes.
- Create
-
Create new pages, regions, shared components, developer comments and team development entries.
- Utilities
-
Perform a check, delete, export, or review the history for the current page. You can also access the attribute dictionary, application utilities or upgrade the application.
- Settings
-
Switch between two-pane and three-pane layouts or reset the page layout back to default.
- Team Development
-
Show the Features, To Do’s, Bugs and Feedback entries for this page. You can also drill into filtered reports for each entry type.
- Developer Comments
-
Drill into the developer comments entered for the current page, such as bugs or to-dos. You can also create new comments or delete comments from the modal window that is displayed.
- Shared Components
-
Navigate to the Shared Components page.
- Save
-
Save all changes you have made on the current page.
- Save and Run Page
-
Save all changes and then run the current page.
You cannot run modal and non-modal pages directly using Save and Run Page. Instead you need to navigate to a normal page and run the page from there, then navigate to the modal or non-modal page within the running application.
Panes
Page Designer is divided up into different panes. Each pane is dedicated to a specific purpose.
- Left Pane (Rendering Tree)
-
Includes tabs for Rendering, Dynamic Actions, Processing, and Page Shared Components. Each tab displays a list of the corresponding component types and components created on the current page.
Right-click to access context sensitive menus. You can also drag components up and down within the trees to change the position or sequence of the selected component.
- Central Pane
-
Includes tabs for Layout, Component View, Messages, Page Search, and Help.
-
Layout shows a visual representation of the page. You can add new components to a page by dragging them from the Gallery pane, at the bottom, and dropping them in Layout.
-
Component View groups user interface elements and application logic by component type.
-
Messages displays current errors and warnings. Clicking on a message changes the focus within Property Editor to the corresponding attribute associated with the error or warning.
-
Page Search enables you to search for any text within the current page.
-
Help displays attribute specific help. Click on the attribute name within Property Editor to see information and examples for that attribute.
-
- Right Pane (Property Editor)
-
Displays the Property Editor. Use the Property Editor to update attributes for the selected components.
When you select multiple components, the Property Editor only displays common attributes. Updating a common attribute will update that attribute for all of the selected components.
4.5 Running the Application for the First Time
Your app is functionally ready to run.
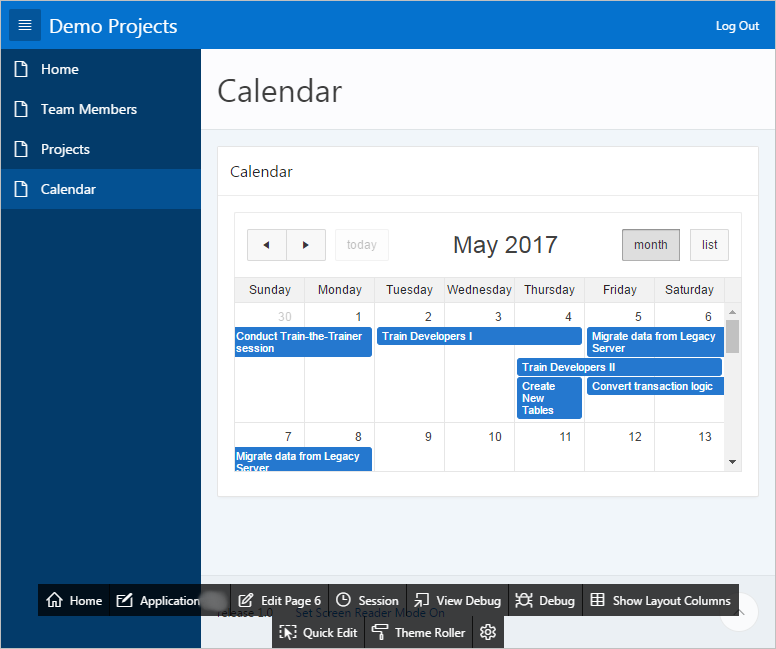
When you "run" an app, you are telling Oracle Application Express to open a new browser window and render the app. The rendered app is called the "application runtime" (or just "runtime"). As you create new pages, you can run them individually, or run an entire application.
Run the app for the first time from Page Designer and view the application runtime.
Explore the application by clicking on menu items and navigating to different pages in the navigation pane. The sample tables and data display on various pages in a raw format. The rest of this tutorial guides you through the development process to improve both the presentation and functionality of this data for your end users.
Tip:
From this point on, you can load a different script from the .zip file to start at the beginning of any of the following chapters. This is useful for skipping ahead or around, or double-checking your work like an answer key.
Proceed to the next lesson.


