3 Populating Your Workspace

To build an Oracle Application Express app, you need a complete set of tables and data. Oracle provides these in a .zip file that is designed to accompany this tutorial.

About This Lesson

In this lesson, you obtain and extract the .zip file to your local machine and use the tools in Oracle Application Express (SQL Workshop and SQL Scripts) to import some of its contents into your workspace.

Once imported, you also review the output of the scripts in Object Browser to confirm the presence of the tables and data.

The sample tables and data that you load in these steps resemble the kind of information that real Oracle Application Express HR apps use every day. They include information typical of data sets for employees, projects, calendars, and schedules.

3.1 Setting Up Your Workspace

To proceed with this tutorial, you must meet complete the following tasks:

  • Ensure you meet all the requirements that are described in "Before You Begin."

  • Download the .zip file containing the latest tables and data.

To download the .zip file:

  1. Navigate to the Tutorials page: http://docs.oracle.com/database/apex-5.1/nav/tutorials.htm
  2. Click Download sample tables and data zip file.
    The download begins.
  3. Extract the .zip file to an easily accessible location on your local machine.

3.2 Importing the Sample Tables

Oracle Application Express includes powerful wizards designed to quickly build an initial app based on an existing set of data. However, first you must get the data into your workspace. The .zip file that you downloaded earlier contains a script to generate a set of sample tables.

Prepare your workspace by uploading the Demo_Project_Basic_Tables.sql script to your workspace and run it in the SQL Workshop.

To import the sample tables into your workspace:

  1. Sign in to your Oracle Application Express workspace.
  2. Click SQL Workshop and select SQL Scripts.
  3. Click the Upload button.
    The Upload Script dialog displays.
  4. For Import file, click the appropriate button to browse your system for a file (for example, in Chrome the Choose File button).
  5. Navigate to the directory where you extracted the .zip file and open the files folder or subdirectory.
  6. Select Demo_Project_Basic_Tables.sql and click Open.
  7. Click Upload.
  8. In the SQL Scripts list, click the Edit icon (pencil) adjacent to the script.
    The Script Editor appears.
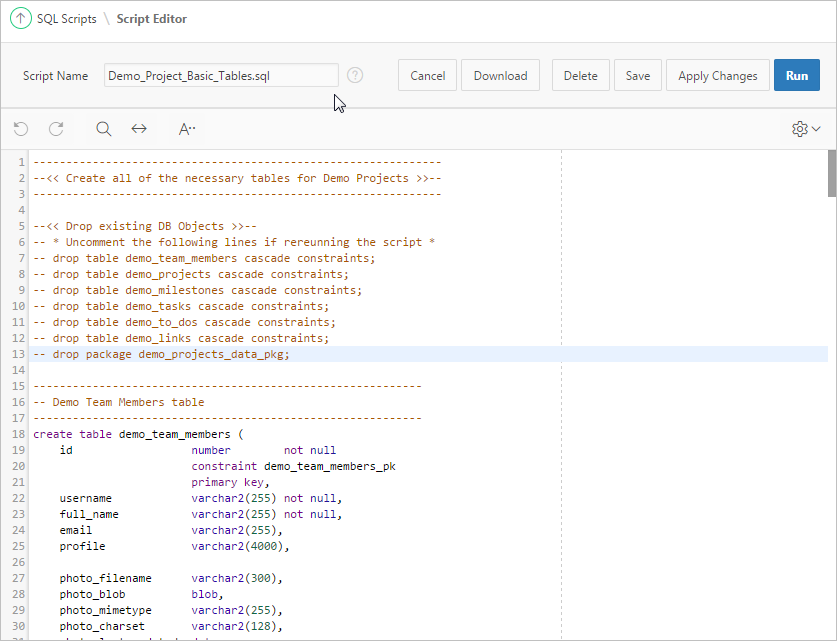
  9. In the Script Editor, review the raw code of the script.

    Description of GUID-1FB3BD07-B4BE-411C-9EFE-384332AC123C-default.png follows
    Description of the illustration GUID-1FB3BD07-B4BE-411C-9EFE-384332AC123C-default.png

    The script creates the following objects:

    • DEMO_TEAM_MEMBERS - Stores the details for the users of the application including a photo. Includes:

      • Primary Key - ID

      • Unique Key - USERNAME

      • Before Insert or Update Trigger - Populates ID with Globally Unique Identifier (GUID); Populates audit columns; Sets USERNAME to uppercase

    • DEMO_PROJECTS - Stores the details for the projects, including the lead, status and completed date. Includes:

      • Primary Key - ID

      • Unique Key - NAME

      • Foreign Key - PROJECT_LEAD must match an ID in DEMO_TEAM_MEMBERS

      • Index - PROJECT_LEAD to improve query performance on the foreign key column

      • Before Insert or Update Trigger - Populates ID with GUID; Populates audit columns

    • DEMO_MILESTONES - A child table under projects for milestones, including the due date. Includes:

      • Primary Key - ID

      • Foreign Key - PROJECT_ID must match an ID in DEMO_PROJECTS

      • Index - PROJECT_ID to improve query performance on the foreign key column

      • Before Insert or Update Trigger - Populates ID with GUID; Populates audit columns

    • DEMO_TASKS - A child table under projects for tasks, optionally for a given milestone, and including an assignee and dates. Includes:

      • Primary Key - ID

      • Foreign Key - ASSIGNEE must match an ID in DEMO_TEAM_MEMBERS

      • Foreign Key - PROJECT_ID must match an ID in DEMO_PROJECTS

      • Foreign Key - MILESTONE_ID must match an ID in DEMO_MILESTONES

      • Indexes - ASSIGNEE, PROJECT_ID, MILESTONE_ID to improve query performance on the foreign key columns

      • Before Insert or Update Trigger - Populates ID with GUID; Populates audit columns

    • DEMO_TO_DOS - A child table under tasks for to dos, and including an assignee and dates. Includes:

      • Primary Key - ID

      • Foreign Key - PROJECT_ID must match an ID in DEMO_PROJECTS

      • Foreign Key - TASK_ID must match an ID in DEMO_TASKS

      • Foreign Key - ASSIGNEE must match an ID in DEMO_TEAM_MEMBERS

      • Indexes - PROJECT_ID, TASK_ID, ASSIGNEE to improve query performance on the foreign key columns

      • Before Insert or Update Trigger - Populates ID with GUID; Populates audit columns

    • DEMO_LINKS - A child table under tasks for links. Includes:

      • Primary Key - ID

      • Foreign Key - PROJECT_ID must match an ID in DEMO_PROJECTS

      • Foreign Key - TASK_ID must match an ID in DEMO_TASKS

      • Indexes - PROJECT_ID, TASK_ID to improve query performance on the foreign key columns

      • Before Insert or Update Trigger - Populates ID with GUID; Populates audit columns

  10. Click the Run button.
    The Run Script dialog appears.
  11. Click Run Now to run the Demo_Project_Basic_Tables.sql script.
    The Manage Script Results page appears.
  12. Click the View Results icon (magnifying glass).
    Your results should indicate 37 Statements Processed, 37 Successful, and 0 With Errors.
You have populated the sample tables in your workspace.

3.3 Importing the Sample Data

Next, import the sample data.

Upload the Demo_Project_Basic_Data.sql script to your workspace and run it in the SQL Workshop.

To upload the sample data to your workspace:
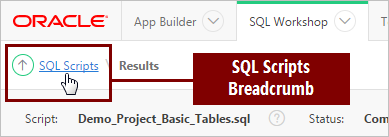
  1. In the SQL results summary page, click the SQL Scripts breadcrumb.
  2. Click Upload.
  3. For Import file, click the appropriate button to browse your system for a file (for example, in Chrome the Choose File button).
  4. Navigate to the directory where you extracted the .zip file and open the files folder or subdirectory.
  5. Select the SQL script file named Demo_Project_Basic_Data.sql and click Open.
  6. Click Upload.
  7. In the SQL Scripts list, click the Run icon (pencil) adjacent to the Demo_Project_Basic_Data.sql script.
    The Run Script dialog appears.
  8. Click Run Now.
    The Manage Script Results page appears.
  9. Click the View Results icon (magnifying glass).
    Your results should indicate 2 Statements Processed, 2 Successful, and 0 With Errors.
You have populated the sample data in your workspace. You must still populate the data in the sample tables.

3.4 Populating the Tables with the Data

The two scripts that you loaded and ran in SQL Workshop in the previous topic generated the sample tables and data as database objects in your workspace. Now you must add the data to the tables.

In addition to SQL Scripts, SQL Workshop also features the SQL Commands facility. SQL Commands enables you to run any valid SQL comfmand, such as loading a data package into a target table.

To run an Oracle Database package and populate the sample tables with the sample data:

  1. In the SQL Scripts Results page, click the SQL Workshop tab at the top of the page to return to the SQL Workshop home page.
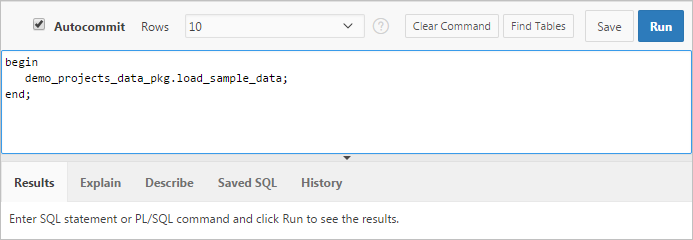
  2. Click SQL Commands.
  3. Enter the following code:
    begin
       demo_projects_data_pkg.load_sample_data;
    end;
    
  4. Click Run.
    When the package is finished, the Results tab displays Statement processed.
You have populated the sample tables with the sample data.

3.5 Reviewing Output with Object Browser

Object Browser displays all the raw objects present in the Oracle database schema associated with your workspace. The APEX$ tables are created by Application Express to store internal data that is specific to your workspace. Other tables such as DEMO_CUSTOMERS were created when you installed Sample Database Application.

To review the package that you created in the Object Browser:
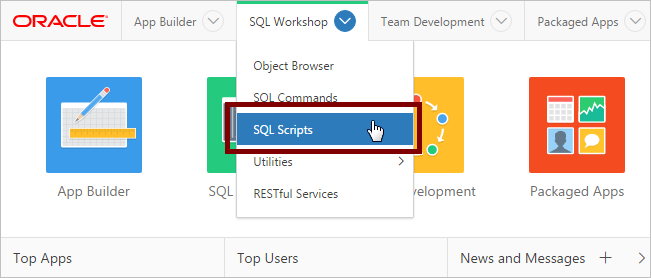
  1. Click SQL Workshop to return to the SQL Workshop home page.
  2. Click Object Browser.

    Tip:

    For quicker navigation, click the arrow next to SQL Workshop to display a drop-down menu.
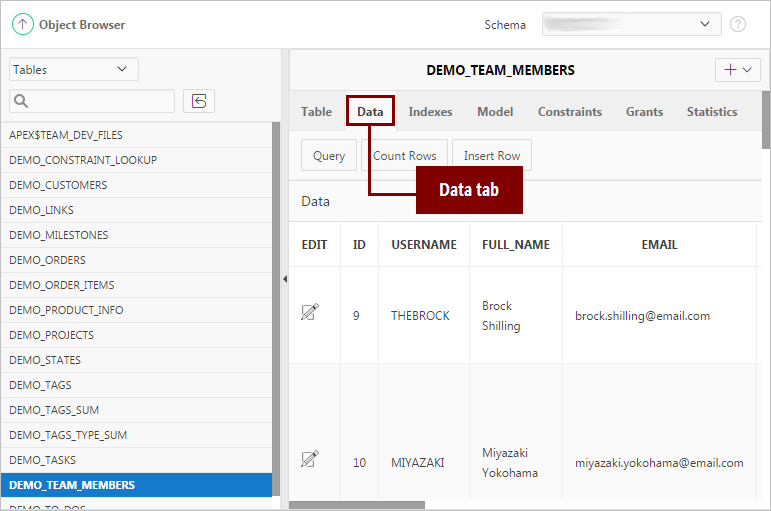
  3. In the list of tables, select DEMO_TEAM_MEMBERS.
  4. Click the Data tab. The Data tab displays the raw information of the DEMO_TEAM_MEMBERS table.

    Description of GUID-379665CD-823C-4561-B87D-CE33C1353478-default.png follows
    Description of the illustration GUID-379665CD-823C-4561-B87D-CE33C1353478-default.png

    Note:

    You can also click the Edit icon on the Data report to edit the current data directly. However, leave the data unchanged for now.
  5. In the left pane, click Tables to view a drop-down list and select Packages.
    A list of all packages present in your workspace schema displays.
  6. Select DEMO_PROJECTS_DATA_PKG.
  7. Select the Body tab to review the primary PL/SQL code that you executed to populate your data.

    This package includes complex PL/SQL code to insert images and replicate users entering in records. It is not important that you understand the PL/SQL code in this package, as you do not normally have to populate data in this matter. Normally, you would create the tables with no data and then use the application you build to insert the records.

  8. When you finish, click the Oracle logo in the top-left of the page to return to the Workspace home page.
You have fully populated your workspace and are ready to create a new application.
Proceed to the next lesson.