7 Generating and Deploying SQL Scripts
- Overview of the SQL Script Generation Feature
Oracle Data Miner provides the SQL script generation feature, using which you can generate SQL scripts for one or all nodes in a workflow. You can then integrate the SQL scripts into another application. - Overview of the SQL Script Generation Use Case
The SQL script generation feature is explained with the help of a use case, that uses a sample workflowcodegen_workflowand a demo database tableINSUR_CUST_LTV_SAMPLE. - Generating SQL Script Files from the Workflow
You must run the workflow before generating the SQL script from it. - Scheduling Workflow Script Files
All the generated SQL script files must be deployed to the target or production database where they are accessible by the database instance. The SQL script files must be stored together in the same directory. - Deploying SQL Scripts on the Target Database
Deploying the SQL scripts involves running the master script file from the base directory.
Overview of the SQL Script Generation Feature
Oracle Data Miner provides the SQL script generation feature, using which you can generate SQL scripts for one or all nodes in a workflow. You can then integrate the SQL scripts into another application.
In this way, Oracle Data Miner provides the scope to integrate data mining with another end user application. This feature is explained in details supported by a use case.
Related Topics
Overview of the SQL Script Generation Use Case
The SQL script generation feature is explained with the help of a use case, that uses a sample workflow codegen_workflow and a demo database table INSUR_CUST_LTV_SAMPLE.
The use case demonstrates how to:
-
Import, run, and deploy the workflow
codegen_workflow -
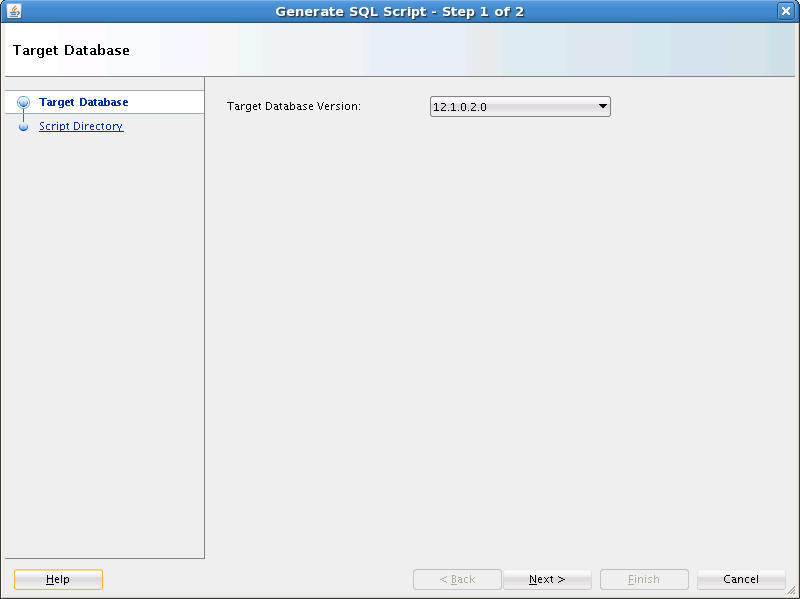
Generate SQL script from the workflow
codegen_workflow -
Schedule SQL scripts to run on the database using:
-
Oracle SQL Developer
-
Oracle Enterprise Manager
-
-
Deploy the generated SQL scripts on a Target or Production Database
- Premise of the SQL Script Generation Use Case
The SQL Script Generation use case described in this section is based on the following premises: - About the Sample Workflow
The sample workflowcodegen_workflow,demonstrates data modelling and data scoring. - Performing Prerequisite Tasks
Before deploying a workflow, there are certain tasks which must be performed. - Importing and Running a Workflow
You can import a predefined workflow into a project.
Related Topics
Premise of the SQL Script Generation Use Case
The SQL Script Generation use case described in this section is based on the following premises:
-
The Data Analysts define the workflow for model building and scoring.
-
The Data Analysts use the new script generation feature to hand over a set of SQL scripts to the Application Developer for deployment.
-
The Application Developers deploy the scripts to the target or production database, where they can schedule the scripts to run periodically. This allows the model to be built with fresh customer data every time the scripts are run.
-
Demo Database: The use case uses a demo database table
INSUR_CUST_LTV_SAMPLE,which can be installed to a users account. -
Predefined workflow: The use case explains the procedure with the help of the predefined workflow
codegen_workflow.
- Location of Demo Workflow Files
The workflow filecodegen_workflow.xmlwhich contains the predefined workflow is available in the SQL Developer installation location at:sqldeveloper_home\dataminer\demos\workflows.
About the Sample Workflow
The sample workflow codegen_workflow, demonstrates data modelling and data scoring.
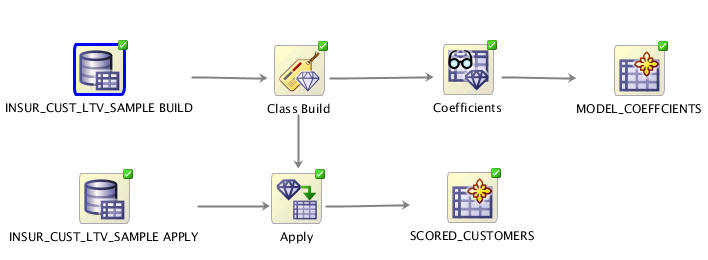
The sample workflow in this use case codegen_workflow, comprises two distinct processes contained within a single lineage: Modeling (top) and Scoring (bottom) as shown in Figure 7-1. Both the processes use the demo data INSUR_CUST_LTV_SAMPLE as the input data source.
Figure 7-1 The Sample Workflow - codegen_workflow
-
Modelling: The modeling process builds a Classification Support Vector Machine (SVM) model. It predicts whether the customer will buy insurance or not. The model coefficients are persisted to a database table for viewing. This table may provide a basis for application integration.
-
Scoring: The scoring process makes predictions for the customer data using the Support Vector Machine (SVM) model created by the modeling lineage. The prediction result is persisted to a database view for viewing. The view provides the following:
-
Predictions of the current input data. For example, if the input table is refreshed with new data, this view will automatically capture the predictions of the new data.
-
Basis for application integration.
-
Performing Prerequisite Tasks
Before deploying a workflow, there are certain tasks which must be performed.
The prerequisite tasks are:
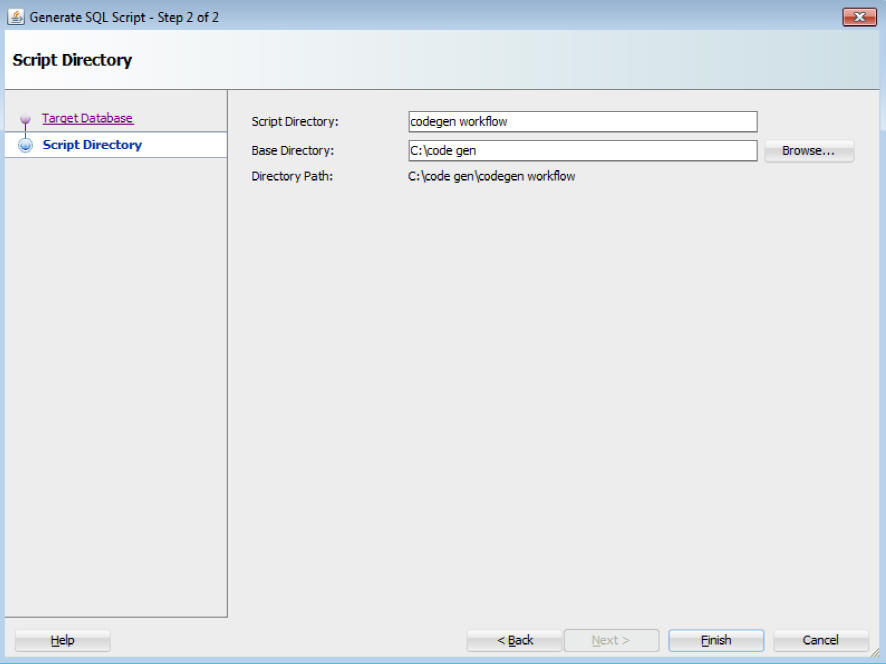
Generating SQL Script Files from the Workflow
You must run the workflow before generating the SQL script from it.
To generate the SQL script files from a workflow:
You can check the list of generated scripts in the script directory that you defined in step 5.
- List of Generated SQL Script Files
The Structured Query Language (SQL) script files that are generated from thecodegen_workflow,perform jobs that are related object cleanups, and other node specific operations. - Variable Definitions in Script Files
SQL scripts generated for the nodes have variable definitions that provide object names for the public objects created by the scripts. The master script invokes all the underlying node level scripts in proper order. Therefore, all variable definitions must be defined in the master script. - Control Tables
When the master scriptworkflow name_Run.sqlis run, the Control Table is created first by using the name specified in the control table name variable.
List of Generated SQL Script Files
The Structured Query Language (SQL) script files that are generated from the codegen_workflow, perform jobs that are related object cleanups, and other node specific operations.
Table 7-1 lists the SQL script files that are generated from the codegen_workflow, along with their descriptions:
Table 7-1 List of Generated Script Files and their Description
| Script File Type | Script File Name | Examples of Script Files Generated from the codegen_workflow | Description |
|---|---|---|---|
|
Master Script |
|
|
Invokes all the required node level scripts in the correct order. It performs the following tasks:
|
|
Cleanup Script |
|
|
Drops all objects created by the master script. It drops the following:
|
|
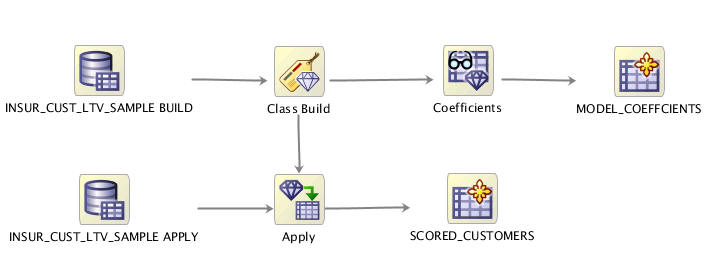
Workflow Image |
|
|
This is an image of the workflow at the time of script generation. |
|
Node Script |
|
|
Performs node specific operations, such as Model creation in Build nodes. One node script is generated for each node that participates in the script generation. |
Variable Definitions in Script Files
SQL scripts generated for the nodes have variable definitions that provide object names for the public objects created by the scripts. The master script invokes all the underlying node level scripts in proper order. Therefore, all variable definitions must be defined in the master script.
The following variables are supported:
-
Variables that allow you to change the name of the objects that are input to the node level scripts, such as tables or views, and models. By default, these names are the original table or view names, and model names.
-
Variables that allow you to change the name of the Control table. By default, the name of the Control table is the workflow name.
-
Variables that indicate if named objects should be deleted first before they are generated by the script.
Control Tables
When the master script workflow name_Run.sql is run, the Control Table is created first by using the name specified in the control table name variable.
The Control Table performs the following:
-
Registers generated objects, such as views, models, text specifications and so on
-
Allows input objects to be looked up by the logical nodes in the workflow, and registers their output objects
-
Determines the objects that need to be dropped by the cleanup script
-
Provides internal name of objects that are not readily accessible through the workflows. For example, users can find the model test result tables by viewing the Control Table.
-
By using different control file names along with different output variable names, you can use the generated script to concurrently generate and manage different results. This may be useful if the input data sources continue different sets of data that you want to mine independently. In this use case, the application would be responsible for saving the name of the Control Table so that it can be utilized when rerunning or dropping the generated results.
- Structure of the Control Table
The Control Table is created first by using the name specified in the control table name variable when the master script workflow name_Run.sql is run - Columns in the Control Table
The columns in the Control Table contains information related to nodes and models.
Related Topics
Structure of the Control Table
The Control Table is created first by using the name specified in the control table name variable when the master script workflow name_Run.sql is run
The structure of the Control Table is as follows:
CREATE TABLE "&WORKFLOW_OUTPUT"
(
NODE_ID VARCHAR2(30) NOT NULL,
NODE_NAME VARCHAR2(128) NOT NULL,
NODE_TYPE VARCHAR2(30) NOT NULL,
MODEL_ID VARCHAR2(30),
MODEL_NAME VARCHAR2(128),
MODEL_TYPE VARCHAR2(35),
OUTPUT_NAME VARCHAR2(30) NOT NULL,
OUTPUT_TYPE VARCHAR2(30) NOT NULL,
ADDITIONAL_INFO VARCHAR2(65),
CREATION_TIME TIMESTAMP(6) NOT NULL,
COMMENTS VARCHAR2(4000 CHAR)
)
Columns in the Control Table
The columns in the Control Table contains information related to nodes and models.
Table 7-2 lists the columns in the Control Table along with their description and examples.
Table 7-2 Columns in the Control Table and their Description
| Column Name | Description | Examples |
|---|---|---|
|
NODE_ID |
This is the ID of the node that constitutes a part of the workflow. It uniquely identifies the node. |
10001, 10002 |
|
NODE_NAME |
This is the name of the node that constitutes a part of the workflow. |
Class Build, MINING_DATA_BUILD_V |
|
NODE_TYPE |
This is the category of node. |
Data Source node, Class Build node and so on. |
|
MODEL_ID |
This is the ID of the workflow model. It uniquely identifies each model referenced within a workflow. |
10101, 10102 |
|
MODEL_NAME |
This is the name of the model. |
CLAS_GLM_1_6 |
|
MODEL_TYPE |
Model type is the algorithm type used by the model. |
Generalized Linear Model, Support Vector Machines and so on |
|
OUTPUT_NAME |
This is the name of the output. These are internally generated names unless the names are under the control of the user. |
Table/View Name, Model Name, Text object names such as: ODMR$15_37_21_839599RMAFRXI - table name "DMUSER"."CLAS_GLM_1_6" - fully qualified model name |
|
OUTPUT_TYPE |
It qualifies the type of output object. |
Table, view, model |
|
ADDITIONAL_INFO |
This is the information that qualifies the purpose of the object about the script execution. |
Target class for test lift result |
|
CREATION_TIME |
This is the time of object creation. |
11-DEC-12 03.37.25.935193000 PM (format determined by locale) |
|
COMMENTS |
Comment to qualify the role of the object about the script execution. |
Output Data (displayed for nodes like Data Source) Data Usage (displayed for the view passed into model build) Weights Setting (displayed for a weights table passed into model build) Build Setting (displayed for a build settings table passed into model build) Model (displayed for a Model object) |
Scheduling Workflow Script Files
All the generated SQL script files must be deployed to the target or production database where they are accessible by the database instance. The SQL script files must be stored together in the same directory.
This section shows how to use SQL Developer and Oracle Enterprise Manager to schedule the master script to run.
- Prerequisites for Scheduling Workflow Script Files
Before scheduling workflow script files, certain tasks related to Oracle Database, SQL script files, Oracle Data Miner repository and Oracle Data Miner user account must be performed. - Schedule SQL Scripts Using SQL Developer
Oracle SQL Developer provides the graphical user interface to define Scheduler Jobs. - Scheduling SQL Scripts using Oracle Enterprise Manager
Oracle Enterprise Manager allows Database Administrators to define jobs. The job definition defines the master script invocation as a script file using a full file path.
Prerequisites for Scheduling Workflow Script Files
Before scheduling workflow script files, certain tasks related to Oracle Database, SQL script files, Oracle Data Miner repository and Oracle Data Miner user account must be performed.
The prerequisites to schedule the SQL script files are:
-
Oracle Database: An instance of Oracle Database is required to schedule the generated SQL script files.
-
SQL script files: All the generated SQL script files should be deployed to the target or production database host, where they are accessible by the database instance. All the scripts files should be stored together in the same directory.
-
Oracle Data Miner Repository: The Data Miner Repository is required to run the scripts because some node scripts use the services provided by the Repository at runtime. Some examples of services provided by the Repository are statistic calculation for Explorer node, text processing for Build Text node and so on.
-
Oracle Data Miner user account: The user account is required to run the script files because it has the necessary grants to the services provided by the Repository.
-
Complete directory path in the master script file: Add the complete directory path to each node script invocation in the master script. This is required so that the individual node script files can be called by the master script during runtime.
- Adding Complete Directory Path in the Master Script
You can add the complete directory path in the master scriptcodegen_workflow_Run.sqlby editing the master script file. - Creating Credentials for Database Host and Database
A credential is an Oracle Scheduler object that has a user name and password pair stored in a dedicated database object.
Adding Complete Directory Path in the Master Script
You can add the complete directory path in the master script codegen_workflow_Run.sql by editing the master script file.
To add the complete directory path in the master script:
Creating Credentials for Database Host and Database
A credential is an Oracle Scheduler object that has a user name and password pair stored in a dedicated database object.
You must create two credentials for:
-
Host credential: A SQLPlus script job uses a host credential to authenticate itself with a database instance or the operating system so that the SQLPlus executable can run.
-
Connection credential: This credential contains a database credential, which connects SQLPlus to the database before running the script.
To create the credentials:
-
In the Connections tab, expand the connection in which your user account is created.
-
Expand Scheduler under that connection.
-
Under Scheduler, right-click Credentials and click New Credentials. The Create Credentials dialog box opens.
-
First, create the host credential to log in to the host on which the job is running. Provide the following information:
-
Name
-
Select Enabled.
-
Description
-
User Name
-
Password
-
-
Click Apply.
-
Next, create the connection credential for the Database connection. Repeat the same procedure as described in step 1 through step 5.
This completes the task of creating credentials for the database host and connection.
Schedule SQL Scripts Using SQL Developer
Oracle SQL Developer provides the graphical user interface to define Scheduler Jobs.
Scheduling Structured Query Language (SQL) scripts using SQL Developer involves the following:
- Creating Credentials for Database Host and Database
A credential is an Oracle Scheduler object that has a user name and password pair stored in a dedicated database object. - Defining Scheduler Job using Job Wizard
The Job wizard allows you to create a job schedule, using which you can define a workflow job
Creating Credentials for Database Host and Database
A credential is an Oracle Scheduler object that has a user name and password pair stored in a dedicated database object.
You must create two credentials for:
-
Host credential: A SQLPlus script job uses a host credential to authenticate itself with a database instance or the operating system so that the SQLPlus executable can run.
-
Connection credential: This credential contains a database credential, which connects SQLPlus to the database before running the script.
To create the credentials:
-
In the Connections tab, expand the connection in which your user account is created.
-
Expand Scheduler under that connection.
-
Under Scheduler, right-click Credentials and click New Credentials. The Create Credentials dialog box opens.
-
First, create the host credential to log in to the host on which the job is running. Provide the following information:
-
Name
-
Select Enabled.
-
Description
-
User Name
-
Password
-
-
Click Apply.
-
Next, create the connection credential for the Database connection. Repeat the same procedure as described in step 1 through step 5.
This completes the task of creating credentials for the database host and connection.
Defining Scheduler Job using Job Wizard
The Job wizard allows you to create a job schedule, using which you can define a workflow job
To define job schedules:
-
In the SQL Developer Connections tab, expand the connection in which your user account is created.
-
Expand Scheduler under that connection.
-
Under Scheduler, right-click Jobs and click New Jobs (wizard). The Create Jobs dialog box opens.
-
In the Create Job Wizard — Step 1 of 6 dialog box, define the Job Details with the following information:
-
Job Name
-
Select Enabled.
-
Description
-
Job Class
-
Type of Job. Select Script.
-
Script Type: Select SQLPlus.
-
When to Execute Job: Select Repeat Interval.
-
In the Repeat Interval dialog box, set the repeat interval, start date, time and click OK.
-
Click Next.
-
-
In the Create Job Wizard — Step 2 of 6 dialog box, define the following:
-
Select the option Local from the drop-down list.
-
Select Credential: Select the host credential that you createdfrom the drop-down list.
-
Connect Credential Name: Select the connection credential that you created from the drop-down list.
-
Click Next.
-
-
In the Create Job Wizard — Step 4 of 6 dialog box, you can set up email notification based on the job status.
-
In the Select Events section, select the job events for which you want to send email notifications.
-
In the Recipients field, enter the email address. For each message, you can specify recipient email addresses and the sender (optional).
-
Click Next.
-
-
In the Create job Wizard — Step 5 of 6 dialog box, click Next. For this use case, this step is skipped.
-
In the Create job Wizard — Step 6 of 6 dialog box, click Finish. This completes the creation of the job schedule.
After creating the job, you can monitor it in SQL Developer.
Related Topics
Scheduling SQL Scripts using Oracle Enterprise Manager
Oracle Enterprise Manager allows Database Administrators to define jobs. The job definition defines the master script invocation as a script file using a full file path.
You can decide whether the job should be run on a schedule or on demand. You can also monitor the running of the job in the application.
To schedule jobs in Oracle Enterprise Manager:
-
Log in to the Oracle Enterprise Manager using your Oracle Database account.
-
In the Job Activity section, click Jobs. The Job Creation page opens.
-
In the Create Job drop-down list, select SQL Script and click Go. This opens the Create Job page where you can define the new job.
-
In the General tab, enter the following details:
-
Name
-
Description
-
Target Database: Provide the target database where the job will run.
-
-
In the Parameters tab, provide the full path name of the cleanup script and master script in the SQL Script section.
-
In the Credentials tab, provide the credentials for the following:
-
Database Host Credential
-
Database Credentials
-
-
In the Schedule tab, define the schedule of the job.
-
In the Access tab, you can set up email notifications based on the job status.
-
Click Submit to create the job.
Related Topics
Deploying SQL Scripts on the Target Database
Deploying the SQL scripts involves running the master script file from the base directory.
To deploy SQL scripts, run the following master script file:
> @" C: base directory\workflow name_Run.sql"
> @" C: <base directory>\workflow name_Run.sql"
For example, run the following master script codegen_workflow_Run.sql in SQLPlus from the base directory:
>@" C:\code gen\codegen workflow\codegen_workflow_Run.sql"
If you must run the master script file subsequently, run the cleanup script codegen_workflow_Drop.sql first to delete previously generated objects, and then run the following master script:
>@" C:\code gen\codegen workflow\codegen_workflow_Drop.sql"
>@" C:\code gen\codegen workflow\codegen_workflow_Run.sql"
- Querying the Control Table
After running the SQL scripts, you can query the Control Table to examine the generated objects.
Querying the Control Table
After running the SQL scripts, you can query the Control Table to examine the generated objects.
To query the Control Table, run the following command in SQLPlus:
>select * from workflow_name
For example, query the Control Table for codegen_workflow to examine the generated objects, as follows:
>select * from "codegen_workflow"
Figure 7-7 An Output Table - Result of the Query
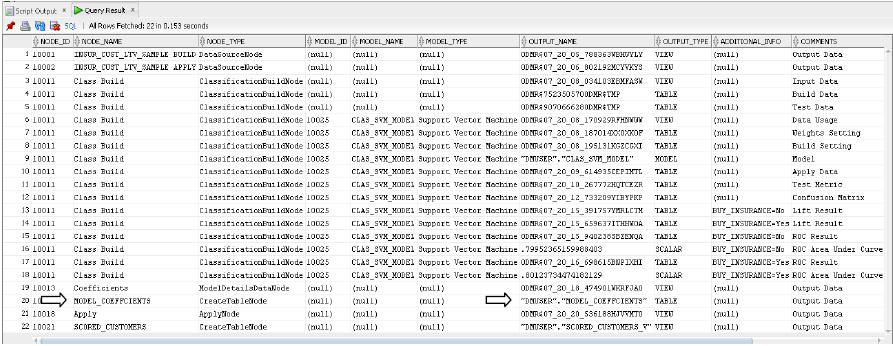
Description of "Figure 7-7 An Output Table - Result of the Query "
In this example, the Create Table node MODEL_COEFFICIENTS, produced an output table MODEL_COEFFCIENTS that persisted the coefficient data extracted from the generated SVM model.
Related Topics
