2 Working with TimesTen Scaleout
This chapter focuses on working with TimesTen Grid in SQL Developer.
Topics include:
Displaying the TimesTen Grid view
SQL Developer enables you to create, manage, and explore a TimesTen Scaleout grid and its components.
To enable the TimesTen Grid view, ensure that you are on the main SQL Developer page. Then, from the View menu, select TimesTen Grid.
Note:
If the TimesTen Grid view option is unavailable, ensure that you have set the environment variables that are described in "Setting environment variables for TimesTen and SQL Developer".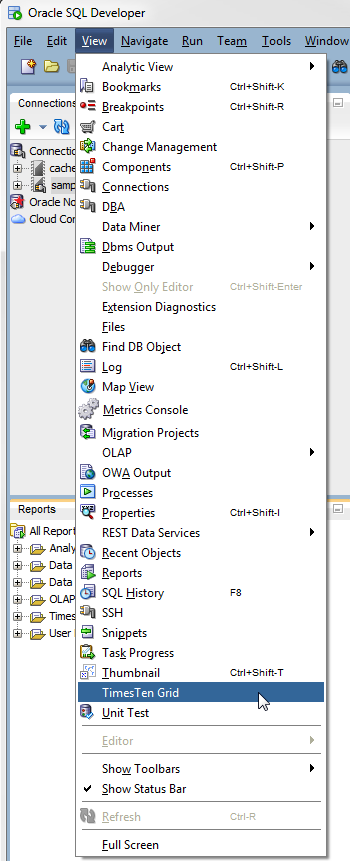
The TimesTen Grid view node displays in the bottom-left corner of the SQL Developer page.
Testing passwordless SSH configuration
Passwordless SSH (secure shell) is required between all intended hosts for a grid in TimesTen Scaleout, regardless of the type of instance (management instance or data instance) on each host. Passwordless SSH is also required for any host that is used as a scp repository. For more information on configuring passwordless SSH and repositories, see "Setting passwordless SSH" and "Working with repositories", respectively, in the Oracle TimesTen In-Memory Database Scaleout User's Guide.
SQL developer provides a tool to test that each host in the grid can access one another through passwordless SSH. To test the passwordless SSH configuration of your hosts, ensure that you are on the main SQL Developer page and that you have enabled the TimesTen Grid view.
-
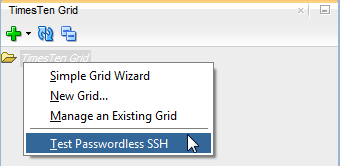
In the TimesTen Grid view node, right-click the TimesTen Grid folder and select Test Passwordless SSH.
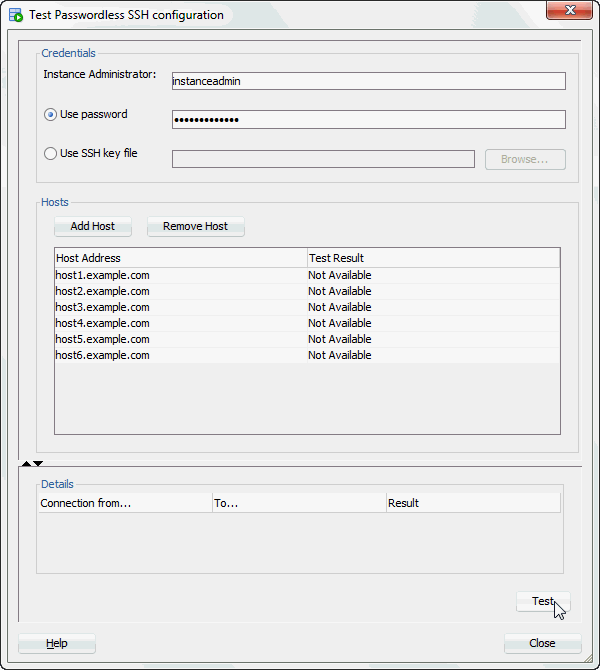
The Test Passwordless SSH configuration dialog displays. Locate the Instance Administrator Credentials region.
-
In the Instance Administrator text field, type the username of the instance administrator that will create and manage the grid.
-
By default, the Use Password option is selected. In the Use Password text field, type the password of the instance administrator.
Note:
Alternatively, you can select the Use SSH key file option and use the Browse button to specify an SSH key file. The Use SSH key file option enables you to avoid having to specify the password of the instance administrator. You can generate this SSH key file on any of the hosts of your grid as long as you have successfully setup passwordless SSH between these hosts.Locate the Add Hosts button in the Hosts region.
-
Click Add Hosts once for every host that you want to add to the grid topology.
-
In the Host Address column of the hosts table, type the host address for every host that will be part of the grid topology.
Note:
In case that you are using different internal and external addresses for a host, use the internal host address. -
Click Test.
The test can take several minutes depending on the number of hosts that you selected. In the Result column of the Details table and the Test Result column of the Hosts table, you should see the text "OK" for every host. If any host displays the text "Failed", ensure that the particular host is configured for passwordless SSH. For more information on configuring passwordless SSH, see "Setting passwordless SSH" in the Oracle TimesTen In-Memory Database Scaleout User's Guide. Locate the Close button at the bottom of the dialog.
-
Click Close.
The Test Passwordless SSH configuration dialog closes.
You have successfully tested the passwordless SSH configuration between all hosts for a grid in TimesTen Scaleout. You are now ready to create a grid.
Working with the grid
SQL Developer enables you to create a new grid, manage an existing grid, remove a grid from SQL Developer, and perform various grid operations.
Create a grid
SQL developer enables you to create a grid. You can create a TimesTen Scaleout grid with either the Simple Grid Wizard or the New Grid option. The New Grid option is recommended for advanced users.
Before you create a grid:
-
Ensure that you have configured passwordless SSH for all intended hosts for your grid. See "Testing passwordless SSH configuration" for more information.
-
Ensure that there is a common instance administrator user ID and numeric UID across all intended hosts for your grid. For more information, see "Understanding the TimesTen users group and the operating system user" in the Oracle TimesTen In-Memory Database Scaleout User's Guide.
-
Ensure that you have configured Apache ZooKeeper for TimesTen Scaleout membership services. For more information, see "Configuring Apache ZooKeeper as the membership service" in the Oracle TimesTen In-Memory Database Scaleout User's Guide.
Consider these things when you decide whether to use the Simple Grid Wizard or the new grid option:
-
The Simple Grid Wizard does not allow you to define physical groups, but you are able to assign a host to a specific data space group. If you want to define physical groups, use the new grid option.
-
The Simple Grid Wizard automatically applies the grid model changes at the end of the wizard. If you want to verify the model changes before applying the grid model, use the new grid option.
-
The Simple Grid Wizard and the new grid option both create a TimesTen installation on every specified host based in the installation location that you specify.
-
The Simple Grid Wizard and the new grid option both create data instance locations on every specified host that does not have a data instance.
-
The New Grid option only creates a management instance. For production deployments, it is highly recommended to create a second management instance. After TimesTen creates the management instance you need to add data instances to your grid.
There are several restrictions that you should consider when deciding on the object names for TimesTen Scaleout. For more information, see "Grid objects and object naming" in the Oracle TimesTen In-Memory Database Reference.
Follow one of these procedures to create a grid with SQL Developer:
Create a grid with the Simple Grid Wizard
To use the Simple Grid Wizard to create a grid, ensure that you are on the main SQL Developer page and that you have enabled the TimesTen Grid view. To start the Simple Grid Wizard:
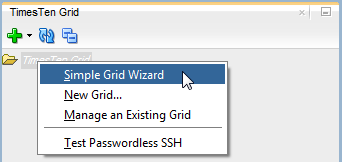
In the TimesTen Grid view node, right-click the TimesTen Grid Folder and select Simple Grid Wizard.
If you are using the Simple Grid Wizard for the first time, a Passwordless SSH dialog displays. Ensure that you have completed the prerequisites that the dialog specifies. If you do not want to see the Passwordless SSH dialog when you use the Simple Grid Wizard, select the Skip This Message Next Time check box. Then, click the Yes button. See "Create a grid" for more information on the prerequisites for creating a grid.
You are now ready to configure your initial management instance.
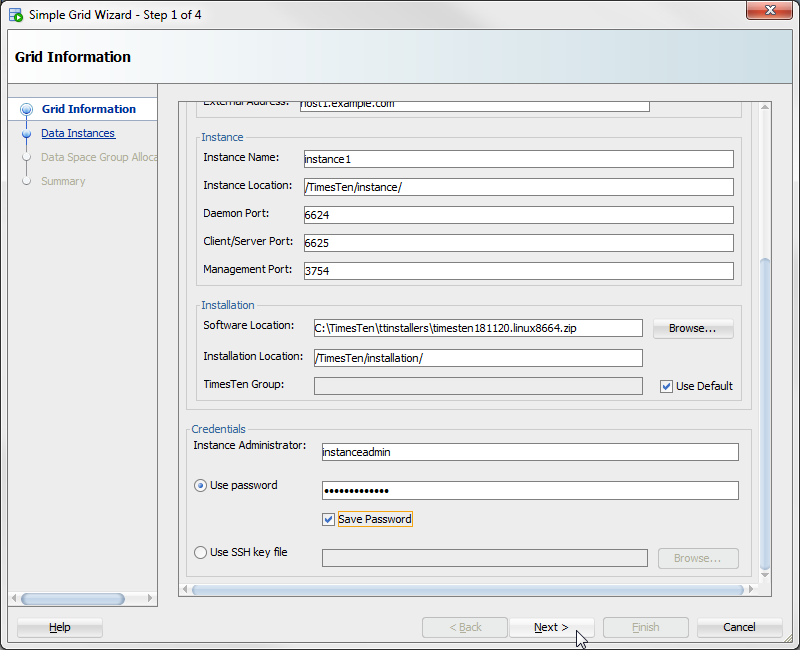
Configure your first management instance
To configure the first management instance for your grid:
Note:
The Simple Grid Wizard enables you to a create a single management instance. It is recommended that you create an additional management instance by creating a second management instance. See "Create a new management instance" for more information.-
In the Name text field, type a name for your grid. Select a name that is a meaningful identifier. The default value is
grid1. -
Select a K-safety level from the K-safety list. It is recommended that you select a K-safety level of
2. -
In the Membership Configuration field, specify a ZooKeeper membership configuration file. You can specify the path of the file in the text field or you can use the Browse button to locate a file.
For more information about the ZooKeeper membership configuration file, see "Configuring Apache ZooKeeper as the membership service" in the Oracle TimesTen In-Memory Database Scaleout User's Guide.
-
If you want to specify a host name for the management instance that is different from the host name that the operating system assigns, deselect the Use Default check box. In the Host Name field, type a name for your management instance host. Select a name that is a meaningful identifier.
-
In the Internal Address field, specify the internal address of the management instance.
-
In the External Address field, specify the external address of the management instance.
-
In the Instance Name field, type a name for your management instance. Select a name that is a meaningful identifier. The default value is
instance1. -
In the Instance Location field, specify the directory where you want TimesTen to create the instance. TimesTen creates a directory with the instance name inside of the directory you specify. For example, if you have an instance name of
instance1and an instance location of/TimesTen/instance/, TimesTen creates your instance in the/TimesTen/instance/instance1/directory. -
In the Daemon Port field, specify the port number for the TimesTen daemon. The default value is
6624. -
In the Client/Server Port field, specify the port number for the TimesTen client/server. The default value is
6625. -
In the Management Port field, specify the management port number. The default value is
3754.The management port is the value for the TCP/IP port number of the first management instance replication agent.
-
In the Software Location field, specify the location of the TimesTen installation file. You can specify the path in the text field or you can use the Browse button to locate the file.
-
In the Installation Location field, specify the directory where you want TimesTen to copy the install file. TimesTen copies the install file and then extracts the installation files. The installation files are extracted to a directory that is named based on the release number of TimesTen Scaleout. For example, if you are installing TimesTen Scaleout 18.1, the files are extracted to a
tt18.1.1.1.0directory inside of the installation location that you specified. -
If you want to specify a user group that will own the TimesTen installation that is different from the primary user group of the instance administrator, deselect the Use Default check box. In the TimesTen Group field, specify the user group that will own the TimesTen installation. All the installations and instances in the grid will be owned by this user group.
-
In the Instance Administrator field, type the instance administrator of the management instance. Ensure that the instance administrator exists on all intended hosts with a common user ID and numeric UID.
-
By default, the Use Password option is selected. In the Use Password text field, type the password for the instance administrator.
Note:
Alternatively, you can select the Use SSH key file option and use the Browse button to specify an SSH key file. The Use SSH key file option enables you to avoid having to specify the password of the instance administrator. You can generate this SSH key file with the ssh-keygen Linux tool on any of the hosts of your grid as long as you have successfully setup passwordless SSH between these hosts. -
To avoid SQL Developer prompts for the instance administrator password during future operations, select the Save Password check box.
You are now ready to have SQL Developer validate your input values. Locate the Next button.
-
Click Next.
SQL Developer validates your input values and displays a progress dialog. The validation can take a few minutes. If SQL Developer displays an error message, troubleshoot the error and click the Next button again to revalidate your input values.
The progress dialog closes and the Simple Grid Wizard dialog refreshes. You are now ready to add data instances.
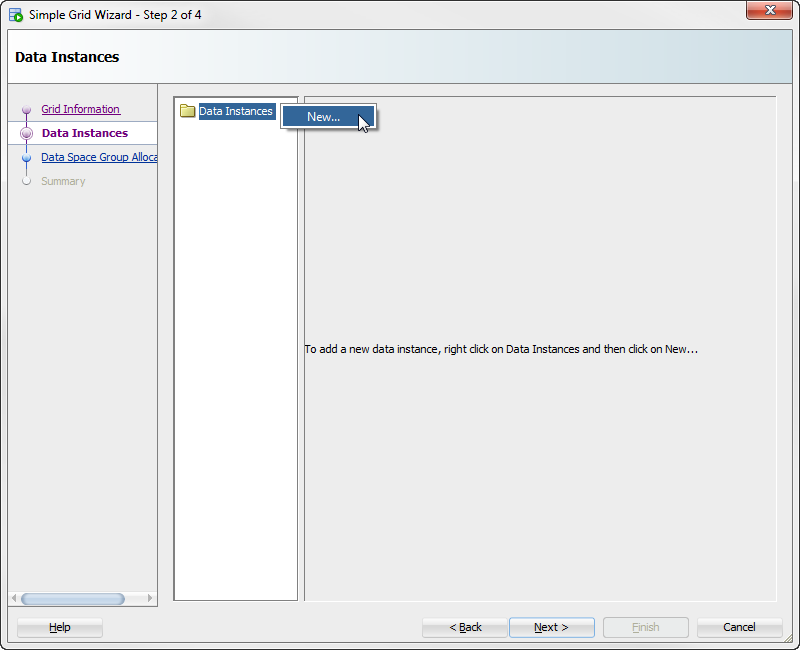
Add data instances
To add data instances to your grid:
Note:
When you add a data instance, SQL Developer actually adds a host, an installation, and then an instance.-
Right-click the Data Instances folder and select New.
You are now ready to add the information for your data instance. Locate the Host Name text field.
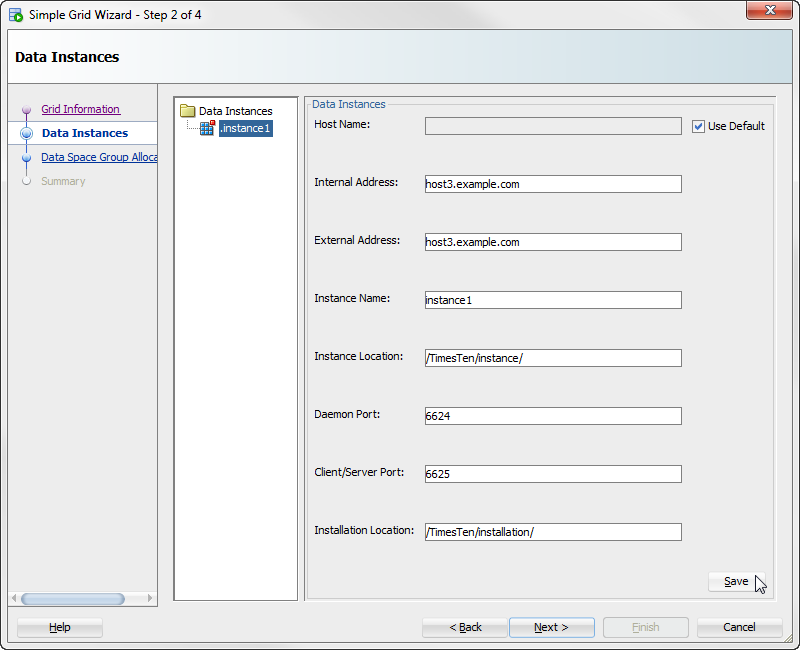
-
If you want to specify a host name for the data instance that is different from the host name that the operating system assigns, deselect the Use Default check box. In the Host Name field, type a name for your data instance host. Select a name that is a meaningful identifier.
-
In the Internal Address field, specify the internal address of the data instance.
-
In the External Address field, specify the external address of the data instance.
-
In the Instance Name field, type a name for your management instance. Select a name that is a meaningful identifier. The default value is
instance1. -
In the Instance Location field, specify the directory where you want TimesTen to create the instance.
-
In the Daemon Port field, specify the port number for the TimesTen daemon. The default value is
6624. -
In the Client/Server Port field, specify the port number for the TimesTen client/server. The default value is
6625. -
In the Installation Location field, specify the directory where you want TimesTen to copy the install file. TimesTen copies the install file and then extracts the installation files. The installation files are extracted to a directory that is named based on the release number of TimesTen Scaleout. For example, if you are installing TimesTen Scaleout 18.1, the files are extracted to a
tt18.1.1.1.0directory inside of the installation location that you specified.Locate the Save button.
-
Click Save to save the configuration of your data instance.
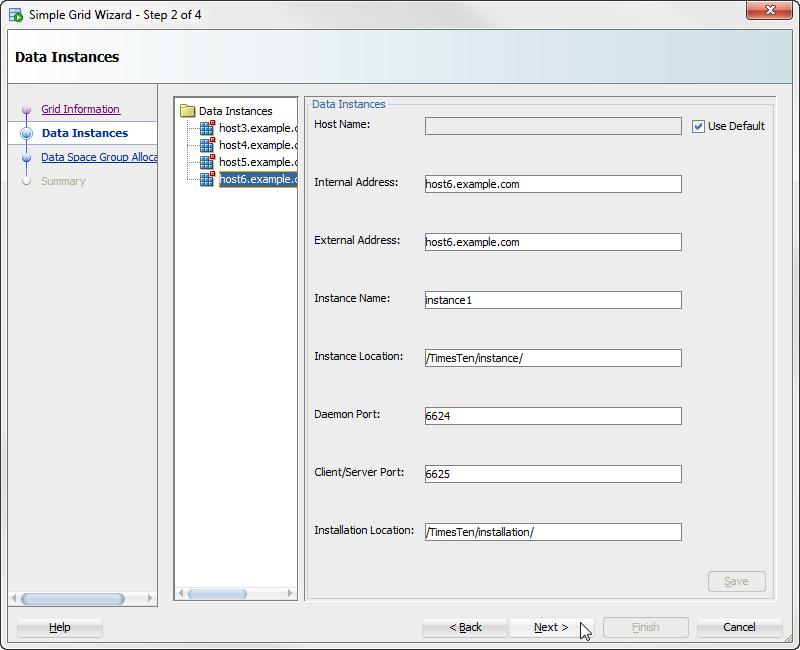
You have successfully added a data instance. When you add a data instance, SQL Developer actually adds a host, an installation, and then an instance.You are now ready to add additional data instances.
You can add additional hosts with installations and data instances by:
-
Adding a new data instance.
Right-click the Data Instances folder and select New. Then, follow the steps described in "Add data instances".
-
Duplicating the configuration of another data instance.
Right-click the data instance that you want to duplicate and select Duplicate. SQL Developer adds a new data instance with the same configuration values as the original data instance except for the host name, internal address, and external address. Ensure that you enter the values for the host name, internal address, and external address text fields.
You can remove a data instance by right-clicking the data instance that you want to remove and select Delete.
-
-
Once you have added all of your intended data instances to your grid, click Next.
SQL Developer validates your input values and displays a progress dialog. The validation can take a few minutes. If SQL Developer displays an error message, troubleshoot the error and click the Next button again to revalidate your input values.
The progress dialog closes and the Simple Grid Wizard dialog refreshes. You are now ready to assign your hosts to data space groups.
Assign hosts to data space groups
Organize the hosts that contain one full copy of the data into a single data space group. Since there are k copies of the data, there are an equal number of data space groups, which are numbered from 1 to k. k is the value that you set for the K-safety configuration of your grid. The hosts in one data space group should be physically separate from the group of hosts in another data space group. Thus, hosts in one data space group are more likely to fail together; hosts in separate data space groups are less likely to fail simultaneously. For more information on data space groups, see "Assigning hosts to data space groups" in the Oracle TimesTen In-Memory Database Scaleout User's Guide.
Once you have assigned a host to a data space group and you have applied that change to the grid model, you cannot change the data space group of that host.
To assign hosts to data space groups:
Right-click the host name that you want to assign to a data space group. Then, select the data space group where you want to assign the host.
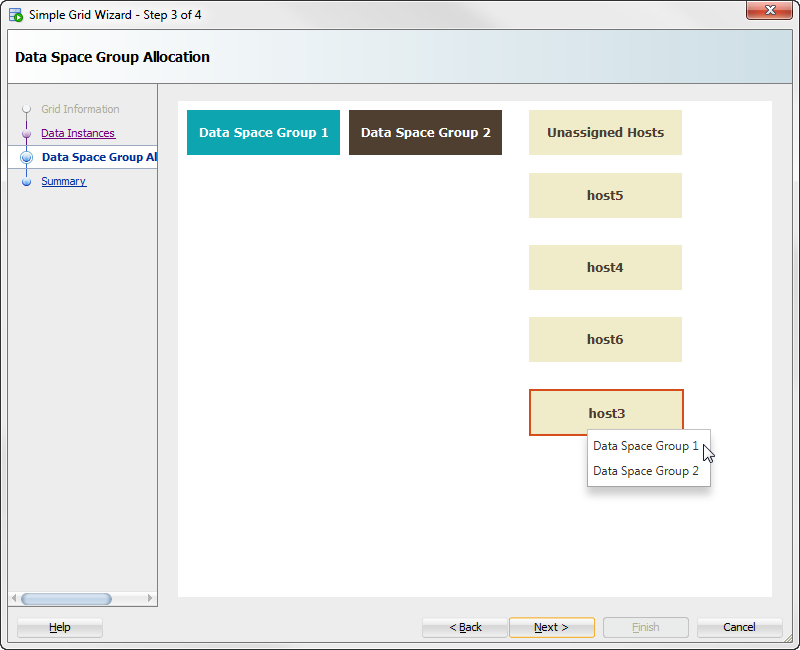
Your host gets assigned to the data space group that you selected. Repeat this procedure to assign all of your hosts to data space groups. Ensure that you have the same amount of hosts in each data space group.
Once you have assigned all of your hosts to data space groups, click Next.
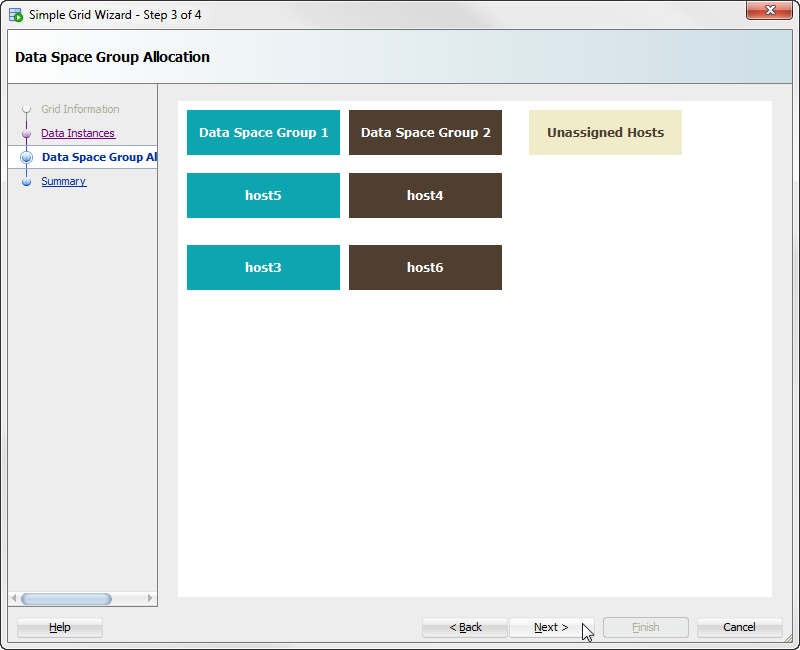
The Simple Grid Wizard refreshes and shows a summary table with the configuration for your grid.
Verify that the configuration settings for your grid are correct and click Finish.

The Simple Grid Wizard dialog closes and a Create Grid progress dialog displays. Creating a grid can take a few minutes depending on the number of hosts. If SQL Developer displays an error message, troubleshoot the error. In the case that an error file is generated, the Create Grid progress dialog displays the error file as a hyperlink. You can save the error file and troubleshoot any errors that are listed in the file.
Create a grid with the New Grid option
To use the new grid option to create a grid, ensure that you are on the main SQL Developer page and that you have enabled the TimesTen Grid view. To create a new grid with the new grid option:
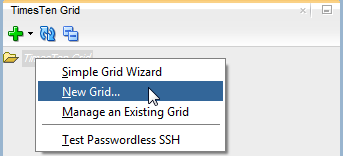
-
In the TimesTen Grid view node, right-click the TimesTen Grid Folder and select New Grid.
If you are using the new grid option for the first time, a Passwordless SSH dialog displays. Ensure that you have completed the prerequisites that the dialog specifies. If you do not want to see the Passwordless SSH dialog when you use the Simple Grid Wizard, select the Skip This Message Next Time check box. Then, click the Yes button. See "Create a grid" for more information on the prerequisites for creating a grid.
You are now ready to configure your initial management instance.
Note:
The new grid option enables you to a create a single management instance. See "Create a new management instance" for more information. -
In the Name text field, type a name for your grid. Select a name that is a meaningful identifier. The default value is
grid1. -
Select a K-safety level from the K-safety list. It is recommended that you select a K-safety level of
2. -
In the Membership Configuration field, specify a ZooKeeper membership configuration file. You can specify the path of the file in the text field or you can use the Browse button to locate a file.
For more information about the ZooKeeper membership configuration file, see "Configuring Apache ZooKeeper as the membership service" in the Oracle TimesTen In-Memory Database Scaleout User's Guide.
-
If you want to specify a host name for the management instance that is different from the host name that the operating system assigns, deselect the Use Default check box. In the Host Name field, type a name for your management instance host. Select a name that is a meaningful identifier.
-
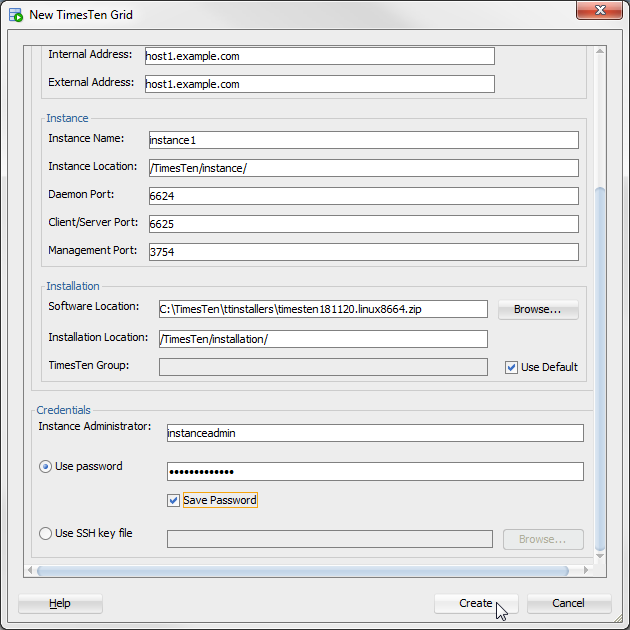
In the Internal Address field, specify the internal address of the management instance.
-
In the External Address field, specify the external address of the management instance.
-
In the Instance Name field, type a name for your management instance. Select a name that is a meaningful identifier. The default value is
instance1. -
In the Instance Location field, specify the directory where you want TimesTen to create the instance. TimesTen creates a directory with the instance name inside of the directory you specify. For example, if you have an instance name of
instance1and an instance location of/TimesTen/instance/, TimesTen creates your instance in the/TimesTen/instance/instance1/directory. -
In the Daemon Port field, specify the port number for the TimesTen daemon. The default value is
6624. -
In the Client/Server Port field, specify the port number for the TimesTen client/server. The default value is
6625. -
In the Management Port field, specify the management port number. The default value is
3754.The management port is the value for the TCP/IP port number of the first management instance replication agent.
-
In the Software Location field, specify the location of the TimesTen installation file. You can specify the path in the text field or you can use the Browse button to locate the file.
-
In the Installation Location field, specify the directory where you want TimesTen to copy the install file. TimesTen copies the install file and then extracts the installation files. The installation files are extracted to a directory that is named based on the release number of TimesTen Scaleout. For example, if you are installing TimesTen Scaleout 18.1, the files are extracted to a
tt18.1.1.1.0directory inside of the installation location that you specified. -
If you want to specify a user group that will own the TimesTen installation that is different from the primary user group of the instance administrator, deselect the Use Default check box. In the TimesTen Group field, specify the user group that will own the TimesTen installation. All the installations and instances in the grid will be owned by this user group.
-
In the Instance Administrator field, type the instance administrator of the management instance. Ensure that the instance administrator exists on all intended hosts with a common user ID and numeric UID.
-
By default, the Use Password option is selected. In the Use Password text field, type the password for the instance administrator.
Note:
Alternatively, you can select the Use SSH key file option and use the Browse button to specify an SSH key file. The Use SSH key file option enables you to avoid having to specify the password of the instance administrator. You can generate this SSH key file on any of the hosts of your grid as long as you have successfully setup passwordless SSH between these hosts. -
To avoid SQL Developer prompts for the instance administrator password during future operations, select the Save Password check box.
You are now ready to have SQL Developer validate your input values. Locate the Create button.
-
Click Create.
SQL Developer validates your input values and displays a progress dialog. The validation can take a few minutes. If SQL Developer displays an error message, troubleshoot the error and create your grid with the new grid option again.
The New TimesTen Grid dialog closes and the a progress dialog displays. Creating a grid can take a few minutes. If SQL Developer displays an error message, troubleshoot the error. In the case that an error file is generated, the Create Grid progress dialog displays the error file as a hyperlink. You can save the error file and troubleshoot any errors that are listed in the file.
You have successfully created a management instance for your grid. You are now ready to add an additional management host or data instances.
Manage an existing grid
If you created a grid with the ttGridAdmin utility, you can add the grid to the TimesTen Grid view. After you add your grid to the TimesTen Grid view you can manage and work with your grid in SQL Developer.
To add an existing grid to the TimesTen Grid view, ensure that you are on the main SQL Developer page and that you have enabled the TimesTen Grid view. To manage an existing grid:
-
In the TimesTen Grid view node, right-click the TimesTen Grid Folder and select Manage an Existing Grid.
Figure 2-14 Select Manage an Existing Grid
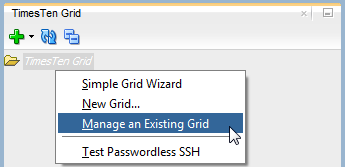
Description of ''Figure 2-14 Select Manage an Existing Grid''
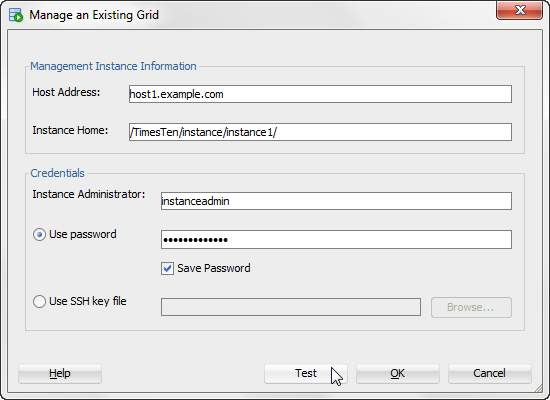
The Manage an Existing Grid dialog displays. Locate the Host Address text field.
-
In the Host Address field, specify the external address of the active management instance of your grid.
-
In the Instance Home field, specify the instance home directory of your active management instance.
-
In the Instance Administrator field, type the instance administrator of the active management instance.
-
By default, the Use Password option is selected. In the Use Password text field, type the password for the instance administrator.
Note:
Alternatively, you can select the Use SSH key file option and use the Browse button to specify an SSH key file. The Use SSH key file option enables you to avoid having to specify the password of the instance administrator. You can generate this SSH key file on any of the hosts of your grid as long as you have successfully setup passwordless SSH between these hosts. -
To avoid SQL Developer prompts for the instance administrator password during future operations, select the Save Password check box.
You are now ready to have SQL Developer validate your input values. Locate the Test button.
-
Click Test.
A progress dialog displays. The test process can take a few minutes. If SQL Developer displays an error message, troubleshoot the error.
Once the test process completes, a Test Grid Existence dialog displays. Locate the OK button.
-
Click OK.
The Test Grid Existence dialog closes. You are now ready to save the configuration of your existing grid.
Locate the OK button.
-
Click OK.
SQL Developer validates your input values and displays a progress dialog. The validation can take a few minutes. If SQL Developer displays an error message, troubleshoot the error and fix any invalid input values.
Once SQL Developer completes validation, a Manage an Existing Grid confirmation dialog displays. Locate the OK button.
-
Click OK.
The Manage an Existing Grid dialog closes.
You have successfully added an existing Grid to SQL Developer. You are now ready to manage and work with your grid in SQL Developer.
Shutdown a grid
SQL Developer enables you to shutdown the components of a grid, such as databases, data instances, and management instances.
To shutdown a grid, ensure that you are on the main SQL Developer page and that you have enabled the TimesTen Grid view.
Note:
If you unload a database, stop a data instance, or stop a management instance and the progress dialog does not progress, you can cancel out of the progress dialog. Then, click Next and SQL Developer displays a warning message that a database is loaded or an instance is started. Click Yes to proceed to the next shutdown step.-
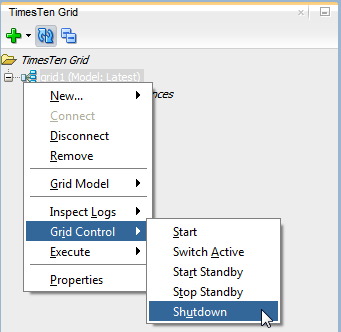
Right-click the name of your grid, select Grid Control, then select Shutdown.
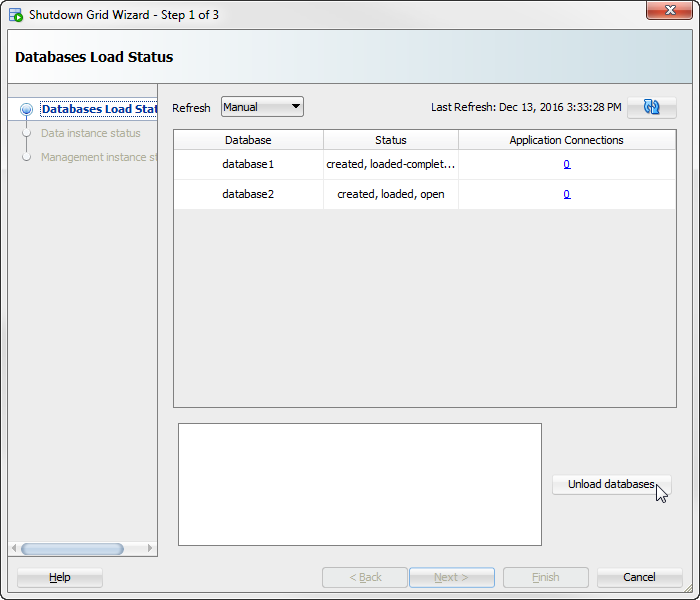
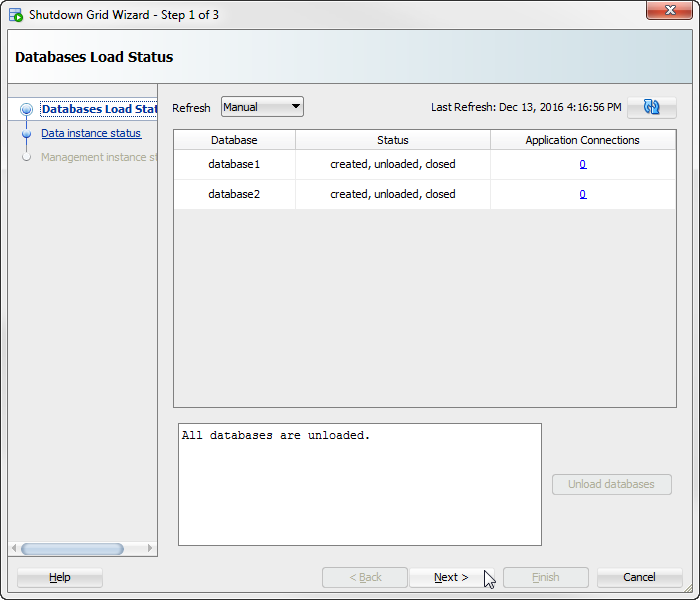
The Shutdown Grid Wizard dialog and Updating databases information progress dialog display.
The Updating databases information progress dialog closes. If a database has open connections, click the link in the Applications Connection column of the database table to view active connections to a specific database. Ensure that you close all applications that are connected to the database before shutting down a grid.
Locate the Unload databases button.
-
Click Unload databases.
The Updating databases information progress dialog displays. Unloading databases can take a few minutes depending on the number of databases. If SQL Developer displays an error message, troubleshoot the error.
Note:
If you are unable to disconnect an application from a database, SQL Developer may be unable to unload that database. If that is the case, you can cancel the unload databases process and go to step 3 to attempt to unload your data instances.The Updating databases information progress dialog closes. In the output text area, you should see the text "All databases are unloaded."
Locate the Next button.
-
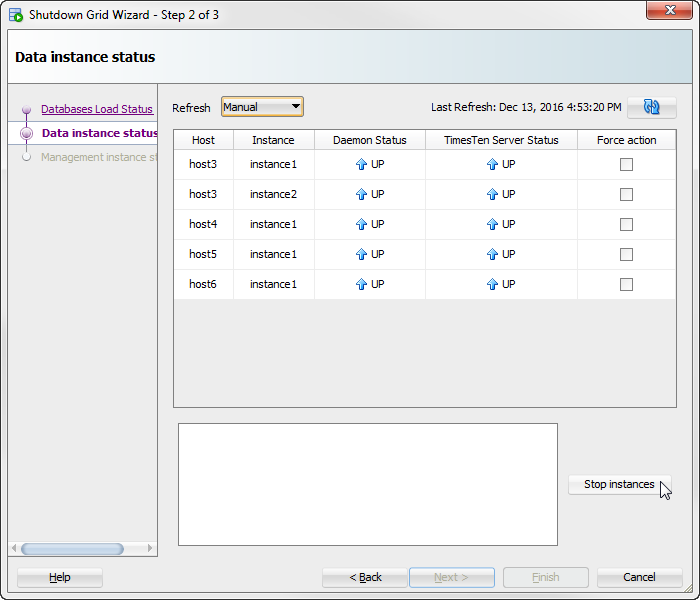
Click Next.
The Shutdown Grid wizard dialog refreshes and the Updating instances information progress dialog displays. The Updating instances information progress dialog closes.
Locate the Stop instances button.
-
Click Stop Instances.
Note:
Optionally, select the Force action check box of a specific instance to forcefully stop that instance. Forcefully stopping an instance may result in data loss. It is recommended to have a backup of your data before forcefully stopping an instance.The Updating instances information progress dialog displays. Stopping instances can take a few minutes depending on the number of instances. If SQL Developer displays an error message, troubleshoot the error.
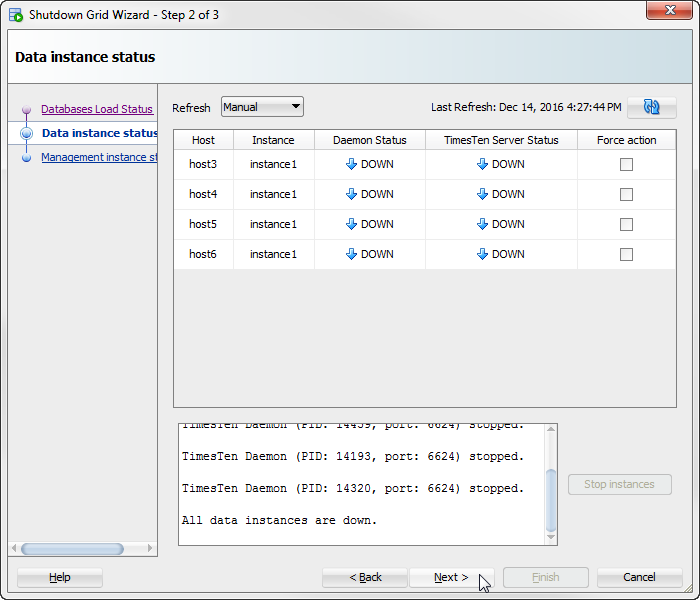
The Updating instances information progress dialog closes. In the output text area, you should see the text "All data instances are down."
Locate the Next button.
-
Click Next.
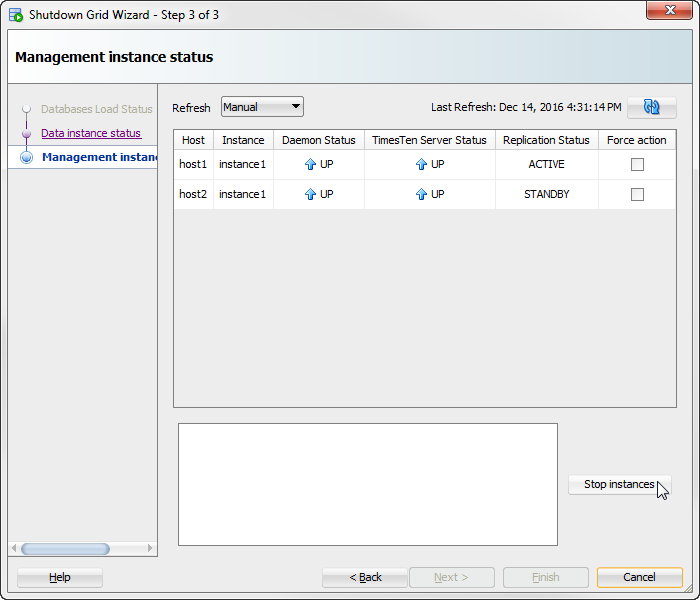
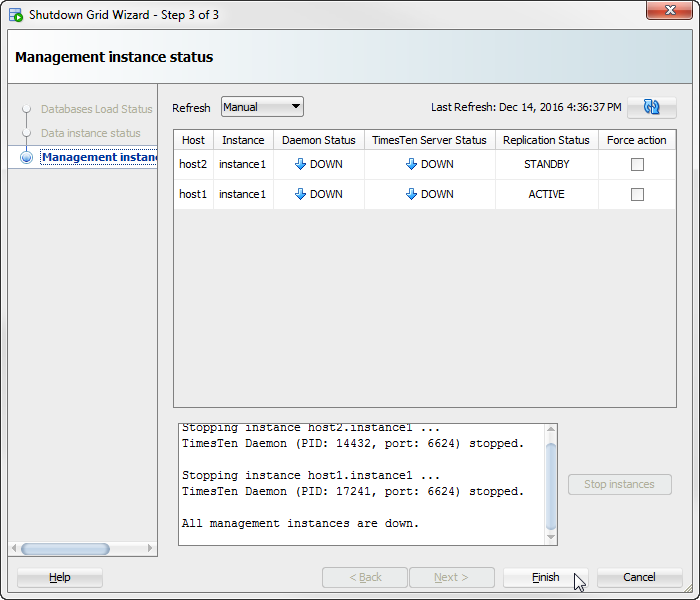
The Shutdown Grid wizard dialog refreshes and the Updating instances information progress dialog displays. The Updating instances information progress dialog closes.
Locate the Stop instances button.
-
Click Stop instances.
The Updating instances information progress dialog displays. If SQL Developer displays an error message, troubleshoot the error.
The Updating instances information progress dialog closes. In the output text area, you should see the text "All management instances are down."
Locate the Finish button.
-
Click Finish.
The Shutdown Grid Wizard dialog closes.
You have successfully shutdown the components of a grid, such as databases, data instances, and management instances.
Start a grid
SQL Developer enables you to start the components of a grid, such as management instances, data instances, and databases.
To start a grid, ensure that you are on the main SQL Developer page and that you have enabled the TimesTen Grid view.
Note:
If you load a database, start a data instance, or start a management instance and the progress dialog does not progress, you can cancel out of the progress dialog. Then, click Next and SQL Developer displays a warning message that a database is not loaded or an instance is stopped. Click Yes to proceed to the next startup step.-
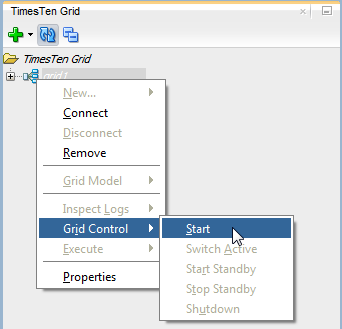
Right-click the name of your grid, select Grid Control, then select Start.
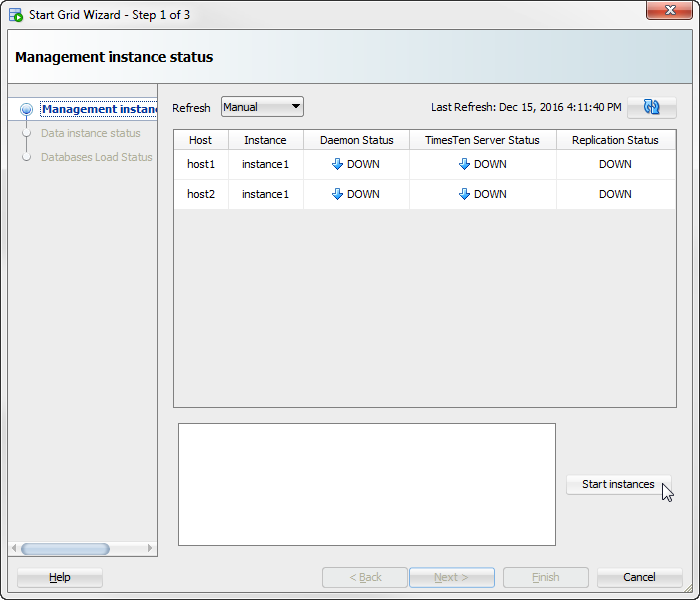
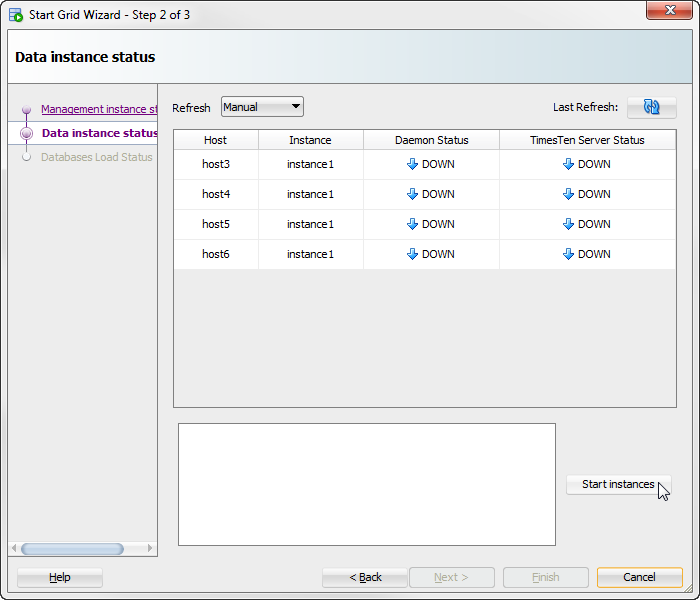
The Start Grid Wizard dialog and Updating instances information progress dialog display. The Updating instances information progress dialog closes.
Locate the Start instances button.
-
Click Start instances.
The Updating instances information progress dialog displays. Starting instances can take a few minutes depending on the number of instances. If SQL Developer displays an error message, troubleshoot the error.
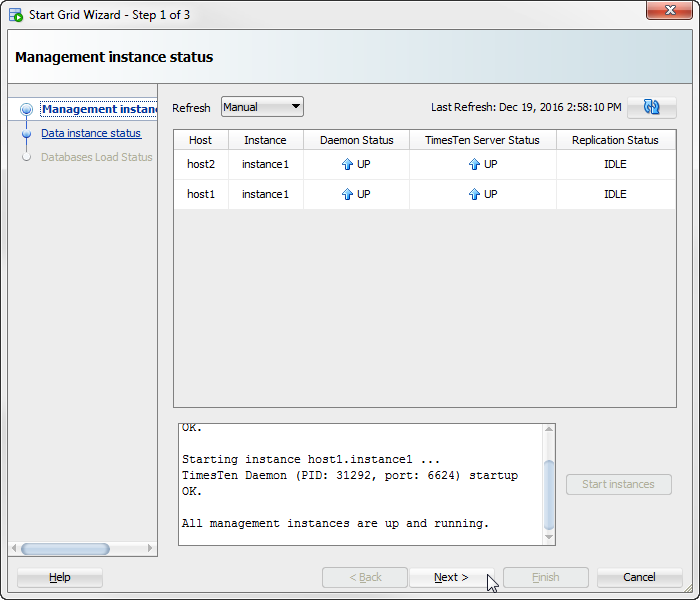
The Updating instances information progress dialog closes. In the output text area, you should see the text "All management instances are up and running."
Locate the Next button.
-
Click Next.
The Start Grid Wizard dialog refreshes and the Updating instances information progress dialog displays. The Updating instances information progress dialog closes.
Locate the Start instances button.
-
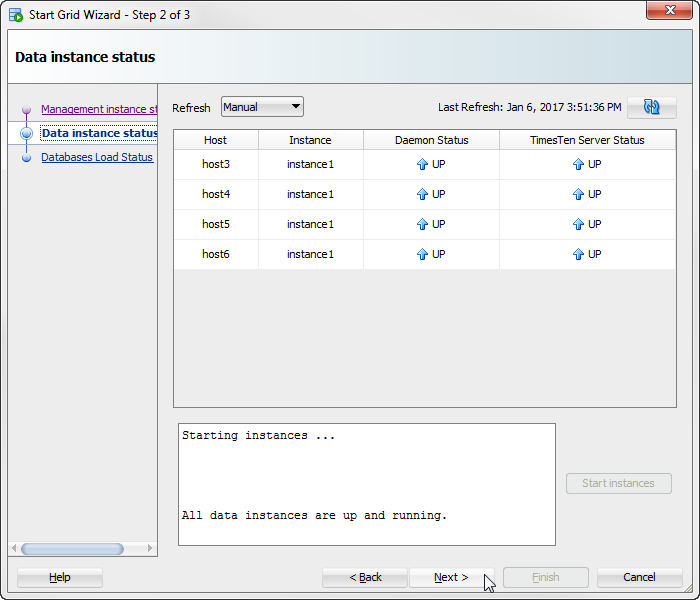
Click Start instances.
The Updating instances information progress dialog displays. Starting instances can take a few minutes depending on the number of instances. If SQL Developer displays an error message, troubleshoot the error.
The Updating instances information progress dialog closes. In the output text area, you should see the text "All data instances are up and running."
Locate the Next button.
-
Click Next.
The Updating databases information progress dialog displays. The Updating databases information progress dialog closes.
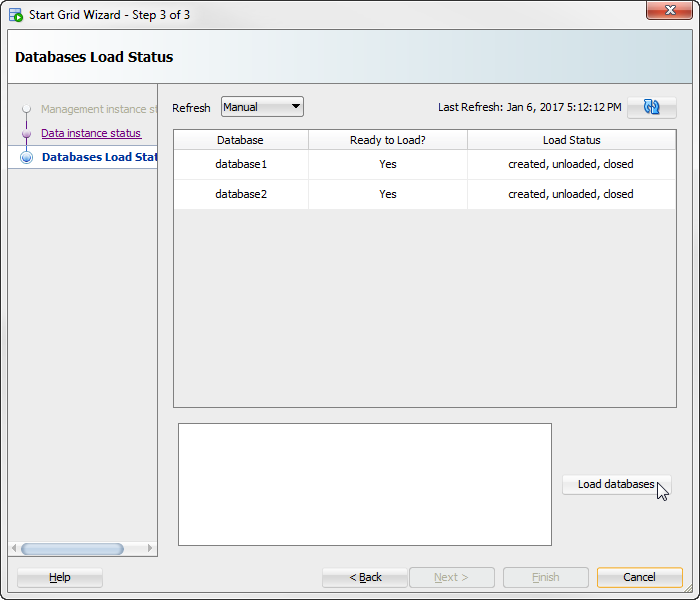
The Start Grid wizard dialog refreshes.
Locate the Load databases button.
-
Click Load databases.
The Updating databases information progress dialog displays. Loading databases can take a few minutes depending on the number of databases. If SQL Developer displays an error message, troubleshoot the error.
The Updating databases information progress dialog closes. In the output text area, you should see the text "All databases are loaded"
Locate the Finish button.
-
Click Finish.
The Start Grid Wizard dialog closes.
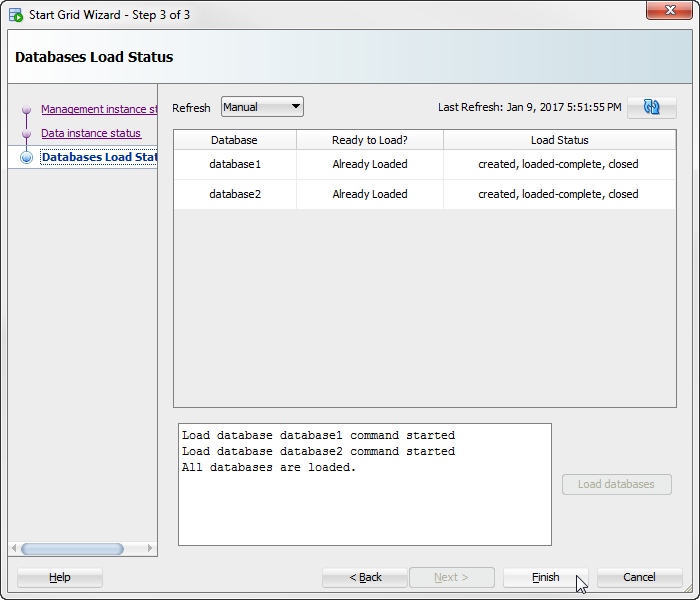
You have successfully started your grid. Ensure that you open your database before you attempt to connect applications to the database. See "Perform database operations" for more information.
Remove a grid from SQL Developer
SQL Developer enables you to remove a grid from SQL Developer. This does not delete a grid and its objects from the hosts on which you installed the grid, but only removes the grid entry from the TimesTen grid view.
To remove a grid, ensure that you are on the main SQL Developer page and that you have enabled the TimesTen Grid view.
Right-click the name of your grid, then select Remove.
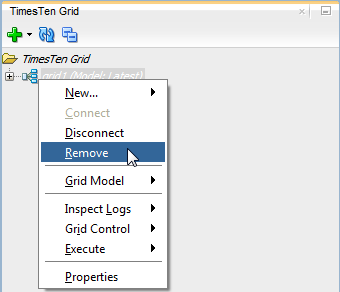
The Remove Grid dialog displays. Locate the Yes button.
Click Yes.
The Remove Grid dialog closes and SQL Developer removes the grid entry from the TimesTen grid view.
You have successfully removed a grid entry from the TimesTen grid view.
Working with the grid model
TimesTen Scaleout maintains a single central configuration of the grid within a model that describes the desired structure of a grid, not its current structure. The model represents the desired logical topology of a grid with model objects that is a complete list of all components of a grid, such as installations, hosts, databases, and instances.
SQL Developer enables you to work with a grid model. SQL Developer enables you to perform the following procedures with the grid model:
Apply grid model changes to the grid
After you add more objects to a grid model, you need to apply these components to the grid. Changes made to the model do not immediately impact a grid until you explicitly apply these changes. After you apply the changes, TimesTen Scaleout implements the changes made to the latest version of the model into the operational grid. For example, if you add a new installation and data instance to the latest version of the model, applying the changes to the model performs all of the necessary operations to create and initialize both the installation and the data instance in that host.
Applying grid model changes to the grid is a resource intensive operation. If you plan on making multiple changes to the grid model, make all the changes to your grid model before applying the changes to the grid.
To apply grid model changes to the grid, ensure that you are on the main SQL Developer page, that you have enabled the TimesTen Grid view, and that your grid node is expanded:
-
Right-click the name of your grid, select Grid Model, then select Apply Changes.
The Comparing current and latest grid dialog model dialog displays. Comparing grid models can take a few minutes.
If SQL Developer does not find any changes between the current and latest grid model, the Comparing current and latest grid dialog model dialog displays the text "Latest model is up to date with current model". Click Close to close the dialog.
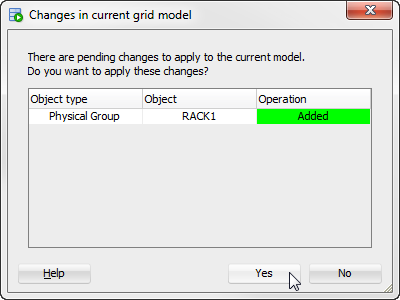
If SQL Developer finds any changes between the current and latest grid model, a Changes in current grid model dialog displays. Locate the changes table.
-
Review that the changes listed in the table are grid model changes that you want to apply to the grid.
-
Click Yes.
The Changes in current grid model dialog closes and a Apply Changes dialog displays. Applying changes to the grid model can take a few minutes depending on the number of grid model changes. If SQL Developer displays an error message, troubleshoot the error.
-
Click Close.
The Apply Changes dialog closes.

You have successfully applied the grid model changes to your grid.
Export the grid model
SQL Developer enables you to export the current model of your grid.
To export the current model of your grid, ensure that you are on the main SQL Developer page, that you have enabled the TimesTen Grid view, and that your grid node is expanded.
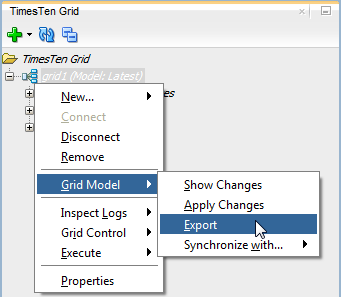
-
Right-click the name of your grid, select Grid Model, then select Export.
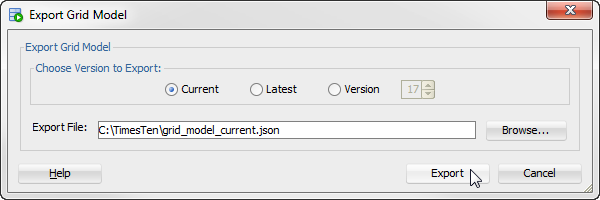
The Export Grid Model dialog displays. Locate the Choose Version to Export region.
-
From the Choose Version to Export region, select a version of the configuration to export. These are the options:
-
Current - This is the current grid model that is applied to the grid.
-
Latest - This is the latest grid model that is not yet applied to the grid.
-
Version - This is the version of the configuration file that you can select. If you select this option, use the text field to the right of the Version radio button to select the version to export.
Locate the Browse button.
-
-
Click Browse.
The Export file dialog displays. Specify the location of where you want to export the grid model file.
-
In the File Name text field, specify a meaningful name for the grid model file and click Save.
The Export file dialog closes. In the Export dialog, locate the Export button.
-
Click Export.
The Verifying File Location progress dialog displays. If SQL Developer displays an error message, troubleshoot the error.
The Verifying File Location progress dialog and the Export Grid Model dialog close. The Export grid model progress dialog displays. If SQL Developer displays an error message, troubleshoot the error.
Locate the Close button.
-
Click Close.
The Export grid model progress dialog closes.
You have successfully exported a grid model file.
Change the grid model that the grid view displays
SQL Developer enables you to select which grid model shows in the grid view of SQL Developer.
To change the grid model that your grid view displays, ensure that you are on the main SQL Developer page, that you have enabled the TimesTen Grid view, and that your grid node is expanded.
Right-click your grid node, select Grid Model, select Synchronize with, then select one of these options:
-
Latest - Shows all of the latest object changes that have not been applied to the grid model.
-
Current - Shows only the objects that have been applied to your grid model.

SQL Developer changes the grid model that your grid view displays.
You have successfully changed the grid model that your grid view displays.
View the changes to the grid model
SQL Developer enables you to view the changes between your current and latest grid model. These changes are not yet applied to your grid model.
To view the changes to your grid model, ensure that you are on the main SQL Developer page, that you have enabled the TimesTen Grid view, and that your grid node is expanded.
Right-click your grid node, select Grid Model, then select Show Changes.
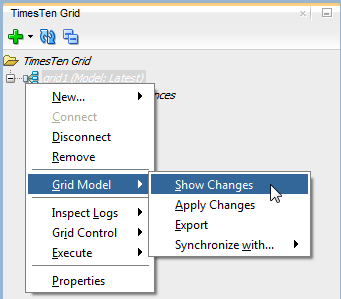
The Comparing current and latest grid model progress dialog displays.
If there are no changes between your current and latest grid model, you see the message "Latest model is up to date with current model". Click Close.
If there are changes between your current and latest grid model, the Comparing current and latest grid model progress dialog closes and the Changes in current grid model dialog displays. Review the changes to your grid mode and click Close.
You have successfully viewed the changes between your current and latest grid model.
Working with physical groups
SQL Developer enables you to add and remove physical groups from your grid model. You can also assign and remove hosts from physical groups. For more information about physical groups, see "Description of the physical topography of the grid" in the Oracle TimesTen In-Memory Database Scaleout User's Guide.
SQL Developer enables you to perform the following procedures with physical groups:
Define a new physical group
To add a physical group to the grid model, ensure that you are on the main SQL Developer page, that you have enabled the TimesTen Grid view, and that your grid node is expanded.
-
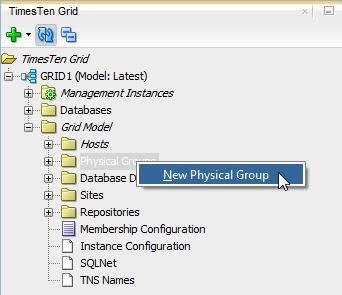
Expand the Grid Model option, right-click the Physical Groups option, then select New Physical Group.
The New Physical Group dialog displays. Locate the Physical Group Name text field. Select a name that is a meaningful identifier.
-
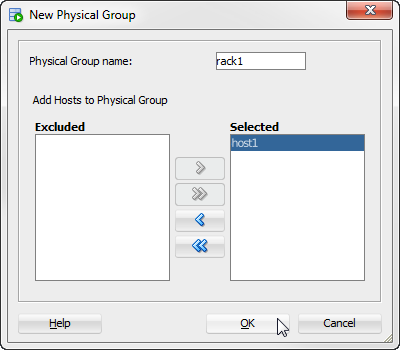
In the Physical Group name text field, specify the name of the physical group. Select a name that is a meaningful identifier.
Note:
Step 3 is only required if you want to assign an existing host to the physical group. If you do not want to assign an existing host to the physical group, skip to step 4. Once you add a new host to the grid model, you are able to assign that host to a specific physical group. -
In the Excluded list, locate the row that contains the host name that you want to assign to your new physical group. Double click the host name. If you want to assign multiple hosts, double click the corresponding host name of any additional host.
-
Click OK.
The New Physical Group dialog closes and a Creating Physical Group progress dialog displays. Creating a physical group can take a few minutes. If SQL Developer displays an error message, troubleshoot the error.
If you are adding or editing a grid model object for the first time, a Apply Changes dialog displays. This dialog shows you a reminder to apply your changes to the grid model. If you do not want to see this dialog when you add or edit a grid model object, select the Skip This Message Next Time check box. Then, click the OK button.
Locate the Close button in the Creating Physical Group progress dialog.
-
Click Close.
The Creating Physical Group progress dialog closes.
You have successfully added a physical group to the grid model. However, you need to apply your changes to the grid. Changes made to the grid model do not immediately impact a grid until you explicitly apply these changes. See "Apply grid model changes to the grid" for more information on applying model changes.
Assign or remove hosts from a physical group
To edit a physical group, ensure that you are on the main SQL Developer page, that you have enabled the TimesTen Grid view, and that your grid node is expanded.
-
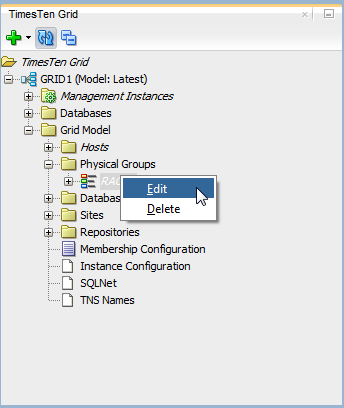
Expand the Grid Model option, expand the Physical Groups option, right-click the name of the physical group, then select Edit.
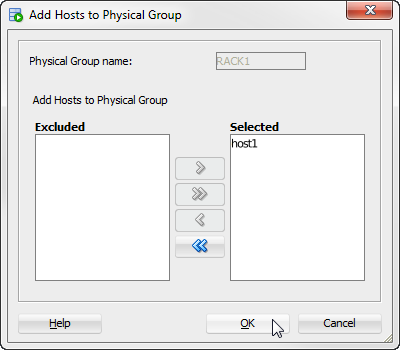
The Add Hosts to Physical Group dialog displays. Locate the Excluded and Selected lists. Identify the hosts that you want to assign or remove from the physical group.
-
In the Excluded list, locate the row that contains the host name that you want to assign to your physical group. Double click the host name. If you want to assign multiple hosts, double click the corresponding host name of any additional host.
-
In the Selected list, locate the row that contains the host name that you want to remove from your physical group. Double click the host name. If you want to remove multiple hosts, double click the corresponding host name of any additional host.
Review the Excluded list to ensure that the list contains the hosts that you want to remove from your physical group. Review the Selected list to ensure that the list contains the hosts that you want to assign to your physical group. Locate the OK button.
-
Click OK.
The Add Hosts to Physical Group dialog closes and a Assigning Physical Group progress dialog displays. Assigning hosts to physical groups can take a few minutes. If SQL Developer displays an error message, troubleshoot the error.
Locate the Close button in the Add Hosts to Physical Group progress dialog.
-
Click Close.
You have successfully edited a physical group in the grid model. However, you need to apply your changes to the grid. Changes made to the grid model do not immediately impact a grid until you explicitly apply these changes. See "Apply grid model changes to the grid" for more information on applying model changes to a grid.
Delete a physical group
To delete a physical group, ensure that you are on the main SQL Developer page, that you have enabled the TimesTen Grid view, and that your grid node is expanded.
-
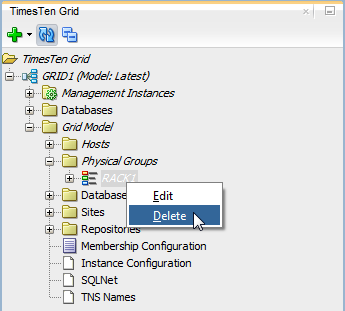
Expand the Grid Model option, expand the Physical Groups option, right-click the name of the physical group, then select Delete.
The Delete Physical Group dialog displays. Locate the Yes button.
-
Click Yes.
The Delete Physical Group dialog closes and a Delete Physical Group progress dialog displays. Removing a physical group can take a few minutes. If SQL Developer displays an error message, troubleshoot the error.
Locate the Close button in the Delete Physical Group progress dialog.
-
Click Close.
You have successfully removed a physical group from the grid model. However, you need to apply your changes to the grid. Changes made to the grid model do not immediately impact a grid until you explicitly apply these changes. See "Apply grid model changes to the grid" for more information on applying model changes to a grid.
Working with hosts
SQL Developer enables you to add and remove hosts that you can use for data and management instances. You can also assign hosts to data space and physical groups and execute commands on hosts. SQL Developer enables you to perform the following procedures with hosts:
Add a host
Before configuring a data or management on a new host you need to add that host to the grid model. It is recommended that you only configure one instance per host. You can either add a host where you define all configuration parameters or by cloning the configuration of an existing host.
Add a new host
To add a new host to the grid model, ensure that you are on the main SQL Developer page, that you have enabled the TimesTen Grid view, and that your grid node is expanded.
-
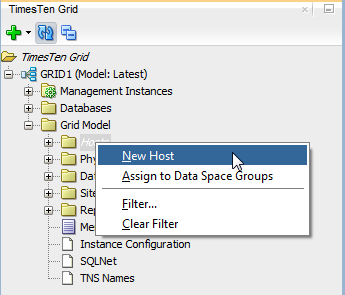
Expand the Grid Model option, right-click the Hosts option, then select New Host.
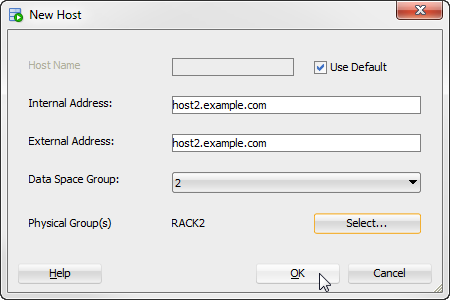
The New Host dialog displays. Locate the Host Name text field.
In some cases, a Passwordless SSH dialog displays. Ensure that you have completed the prerequisites that the dialog specifies. If you do not want to see the Passwordless SSH dialog again, select the Skip This Message Next Time check box. Then, click the Yes button. See "Create a grid" for more information on the prerequisites for creating a grid.
-
If you want to specify a host name for the host that is different from the host name that the operating system assigns, deselect the Use Default check box. In the Host Name field, type a name for your host. Select a name that is a meaningful identifier.
-
In the Internal Address field, specify the internal address of the host.
-
In the External Address field, specify the external address of the host.
-
From the Data Space Group drop-down list, select the data space group where you want to assign the host.
Note:
Steps 6-8 are only required if you are using physical groups. If you do not want to use physical groups, skip to step 9. See "Working with physical groups" for more information on physical groups. -
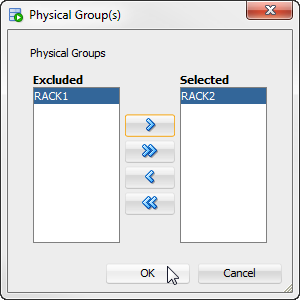
To select a physical group for this host, click the Select button to the right of the Physical Group(s) field.
The Physical Group(s) dialog displays. Locate the Excluded list.
-
In the Excluded list, locate the row that contains the physical group to which you want to assign to your host. Double click the physical group name. If you want to assign your host to multiple physical groups, double click the corresponding physical group name of any additional physical group.
Review the Selected list to ensure that the list contains the physical groups to which you want to assign your host. Locate the OK button.
-
Click OK.
The Physical Group(s) dialog closes and the New Host dialog refreshes. Locate the OK button in the New Host dialog.
-
Click OK.
The New Host dialog closes and a New Host progress dialog displays. Adding a new host can take a few minutes. If SQL Developer displays an error message, troubleshoot the error.
Locate the Close button in the New Host progress dialog.
-
Click Close.
You have successfully added a new host to the grid model. However, you need to apply your changes to the grid. Changes made to the grid model do not immediately impact a grid until you explicitly apply these changes. See "Apply grid model changes to the grid" for more information on applying model changes to a grid.
Clone a host
Cloning a host enables you to create a host for an instance (management or data) by duplicating the configuration of an existing host, including its associated installations and instances.
To clone a host, ensure that you are on the main SQL Developer page, that you have enabled the TimesTen Grid view, and that your grid node is expanded.
-
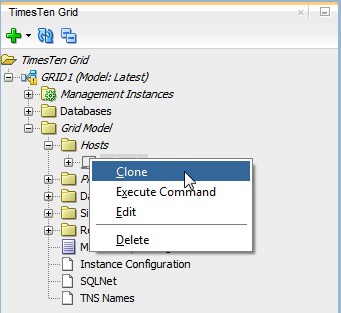
Expand the Grid Model option, expand the Hosts options, right-click the host that you want to clone, then select Clone.
In some cases, a Passwordless SSH dialog displays. Ensure that you have completed the prerequisites that the dialog specifies. If you do not want to see the Passwordless SSH dialog again, select the Skip This Message Next Time check box. Then, click the Yes button. See "Create a grid" for more information on the prerequisites for creating a grid.
If you are cloning a management instance for the first time, a Management Instance dialog displays. Ensure that you are sure that you want to clone a management instance. If you do not want to see the Management Instance dialog when you clone a management instance, select the Skip This Message Next Time check box. Then, click the Yes button.
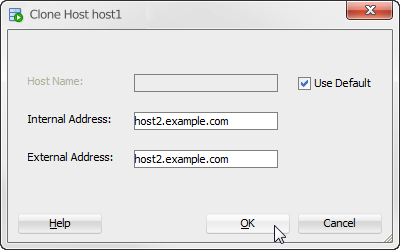
The Clone Host dialog displays.
-
If you want to specify a host name for the host that is different from the host name that the operating system assigns, deselect the Use Default check box. In the Host Name field, type a name for your host. Select a name that is a meaningful identifier.
-
In the Internal Address field, specify the internal address of the host.
-
In the External Address field, specify the external address of the host.
You are now ready to clone the host. Locate the OK button.
-
Click OK.
The Clone Host dialog closes and a Clone Host progress dialog displays. Cloning a host can take a few minutes. If SQL Developer displays an error message, troubleshoot the error.
Locate the Close button in the Clone Host progress dialog.
-
Click Close.
Edit the host to change the physical group or data space group of this host. You can only change the data space group of this new host before applying model changes to the grid. See "Edit a host" for more information.
You have successfully cloned a host. However, you need to apply your changes to the grid. Changes made to the grid model do not immediately impact a grid until you explicitly apply these changes. See "Apply grid model changes to the grid" for more information on applying model changes to a grid.
Edit a host
SQL Developer enables you to edit the data space group and physical group of a host.
To edit a host, ensure that you are on the main SQL Developer page, that you have enabled the TimesTen Grid view, and that your grid node is expanded.
-
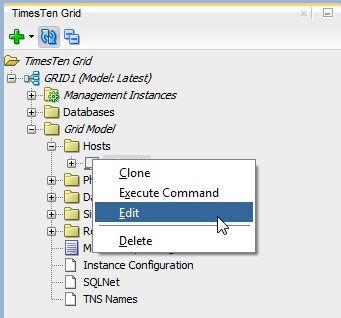
Expand the Grid Model option, expand the Hosts options, right-click the host that you want to edit, then select Edit.
The Edit Host dialog displays.
-
From the Data Space Group drop-down list, select the data space group where you want to assign the host.
Once you have assigned a host to a data space group and you have applied that change to the grid model, you cannot change the data space group of that host.
-
To select a physical group for this host, click the Select button to the right of the Physical Group(s) field.
The Physical Group(s) dialog displays. Locate the Excluded and Selected lists. Identify the physical group(s) to which you want to assign your host.
-
In the Excluded list, locate the row that contains the physical group to which you want to assign your host. Double click the host name. If you want to assign your host to multiple physical groups, double click the corresponding physical group name of any additional physical group.
-
In the Selected list, locate the row that contains the physical group from which you want to withdraw your host. Double click the host name. If you want to withdraw multiple physical groups, double click the corresponding physical group name of any additional physical group.
Review the Excluded list to ensure that the list contains the physical groups from which you want to withdraw your host. Review the Selected list to ensure that the list contains the physical groups to which you want to assign your host. Locate the OK button.
-
Click OK.
The Physical Group(s) dialog closes. Locate the OK button in the Edit Host dialog.
-
Click OK.
The Edit Host dialog closes and the Edit Host progress dialog displays. Editing a host can take a few minutes. If SQL Developer displays an error message, troubleshoot the error.
Locate the Close button in the Edit Host progress dialog.
-
Click Close.
You have successfully edited a host. However, you need to apply your changes to the grid. Changes made to the grid model do not immediately impact a grid until you explicitly apply these changes. See "Apply grid model changes to the grid" for more information on applying model changes to a grid.
Assign hosts to data space groups
SQL Developer enables you to assign hosts to data space groups as long as the host is not already associated with a data space group. Once a host is assigned to a data space group, you cannot reassign that host.
To assign hosts to data space groups, ensure that you are on the main SQL Developer page, that you have enabled the TimesTen grid view, and that your grid node is expanded.
-
Expand the Grid Model option, right-click the Hosts options, then select Assign to Data Space Groups.
Figure 2-48 Select Assign to Data Space Groups
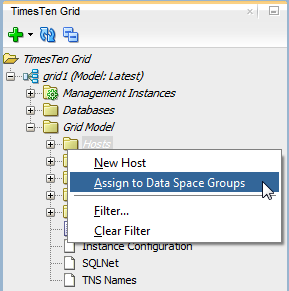
Description of ''Figure 2-48 Select Assign to Data Space Groups''
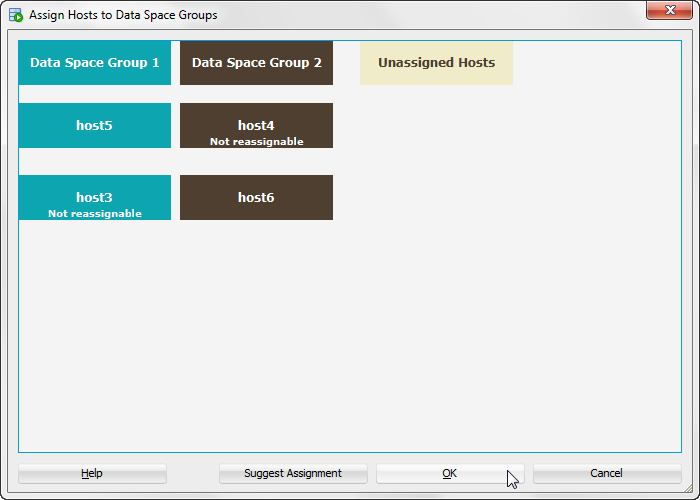
The Assign Hosts to Data Space Groups dialog displays. Locate the host that you want to assign to a data space group.
-
Right-click the host name that you want to assign to a data space group. Then, select the data space group where you want to assign the host.
Note:
If you have configured physical groups, you can click the Suggest Assignment button to have TimesTen Scaleout suggest data space groups for your hosts. Ensure that you have configured physical groups before using the Suggest Assignment button. See "Working with physical groups" for more information.Your host gets assigned to the data space group that you selected. Repeat this procedure to assign all of your hosts to data space groups. Ensure that you have the same amount of hosts in each data space group.
-
Once you have assigned all of your hosts to data space groups, click OK.
The Assign Hosts to Data Space Groups progress dialog displays. Assigning hosts to a data space group can take a few minutes. If SQL Developer displays an error message, troubleshoot the error.
The Assign Hosts to Data Space Groups progress dialog and the Assign Hosts to Data Space Groups dialog close.
You have successfully assigned hosts to data space groups. However, you need to apply your changes to the grid. Changes made to the grid model do not immediately impact a grid until you explicitly apply these changes. See "Apply grid model changes to the grid" for more information on applying model changes to a grid.
Delete a host
SQL Developer enables you to delete a host from your grid model. Before you delete a host, ensure that you have migrated all the data from the database of this host to other hosts in your grid.
To delete a host, ensure that you are on the main SQL Developer page, that you have enabled the TimesTen Grid view, and that your grid node is expanded.
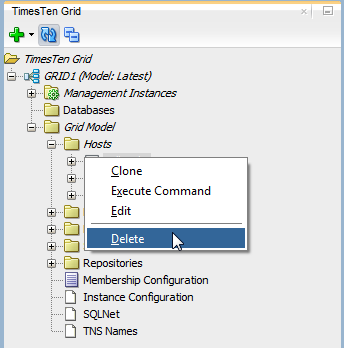
-
Expand the Grid Model option, expand the Hosts options, right-click the host that you want to delete, then select Delete.
The Delete Host warning dialog displays. You see a warning message that asks you to ensure that you have migrated all the data from the database of this host to other hosts in your grid. Locate the Yes button.
-
Click Yes.
The Delete Host warning dialog closes and the Delete Host progress dialog displays. Deleting a host can take a few minutes. If SQL Developer displays an error message, troubleshoot the error.
Locate the Close button in the Delete Host progress dialog.
-
Click Close.
You have successfully deleted a host. However, you need to apply your changes to the grid. Changes made to the grid model do not immediately impact a grid until you explicitly apply these changes. See "Apply grid model changes to the grid" for more information on applying model changes to a grid.
Execute a command on a host
SQL Developer enables you to execute commands on hosts that are part of your grid. To execute a command on a host, ensure that you are on the main SQL Developer page, that you have enabled the TimesTen Grid view, and that your grid node is expanded.
Note:
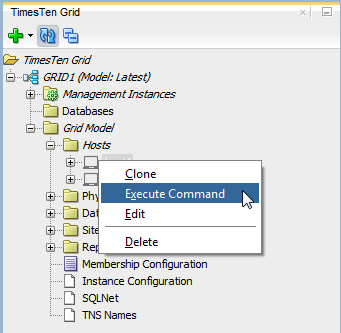
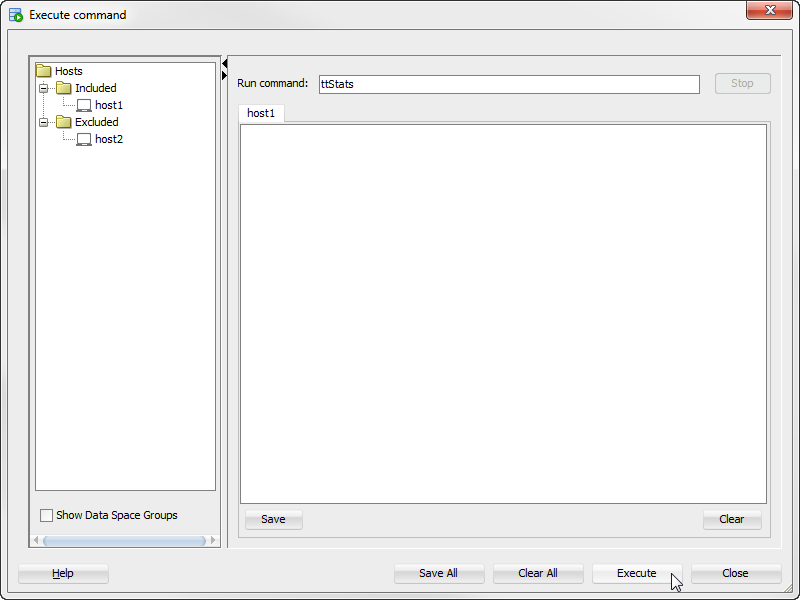
This procedure opens the Execute command dialog which enables you to select any host on which you want to execute commands. The Execute command dialog also enables you to execute a command on multiple hosts simultaneously.-
Expand the Grid Model option, expand the Hosts options, right-click the host on which you want to execute a command, then select Execute Command.
The Execute Command dialog displays. Locate the Excluded folder in the right part of the Execute Command dialog.
Note:
If you want to see the data space group of each host, check the Show Data Space Group check box that is located at the bottom of the Execute Command dialog. This option separates the hosts in the Included and Excluded folders based on the data space group of each host. -
In the Excluded folder, locate the host on which you want to execute a command. Right-click the host name and select Move. If you want to execute a command on additional hosts, right-click the corresponding host name and select Move for any additional hosts.
Review the Included folder to ensure that the list contains the hosts on which you want to execute a command. Review the Excluded folder to ensure that the list contains the hosts on which you do not want to execute a command. Locate the Run Command text field.
-
In the Run command text field, type the command that you want to execute on the hosts that you selected.
Locate the Execute button.
-
Click Execute.
TimesTen Scaleout executes the command on all of the hosts that you selected. SQL Developer displays a tab with the output of every host. You can click on a host tab to view the output of the command for that specific host. You can save the output of a host by clicking the Save button. You can also save the output of every host by clicking the Save All button.
You have successfully executed a command on a host from your grid. You can execute additional commands by typing the new command in the Execute command text field and then clicking the Execute button. Once you have finished executing commands on your hosts, locate the Close button.
-
Click Close.
The Execute command dialog closes.
Working with installations
SQL Developer enables you to create or delete an installation from a host that is part of your grid. SQL Developer enables you to perform the following procedures with installations:
Create a new installation
SQL Developer enables you to create a new installation on a host that is part of your grid.
To create a new installation on a host, ensure that you are on the main SQL Developer page, that you have enabled the TimesTen Grid view, and that your grid node is expanded.
-
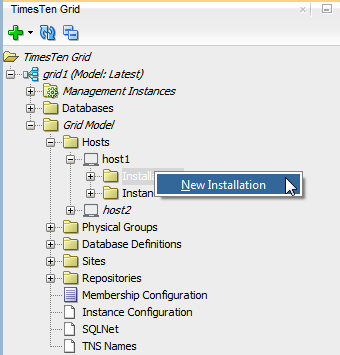
Expand the Grid Model option, expand the Hosts options, expand the host on which you want to create an installation, right-click the Installations option, then select New Installation.
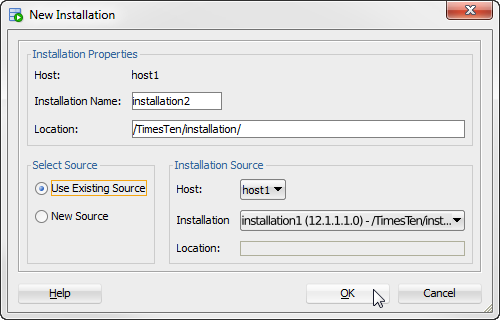
The New Installation dialog displays. Locate the Installation Name text field.
-
In the Installation Name field, type a name for your installation. Select a name that is a meaningful identifier. The default value is
installationn, wherenis the next sequential number based on your highest numbered installation name. For example, if you have an installation namedinstallation1, the default value isinstallation2.Locate the Select Source region of the New Installation dialog.
-
In the Location field, specify the directory on your selected host where the TimesTen installation file can be copied.
-
Select an installation source from the Select Source radio buttons. These installation sources are available:
Use existing source
The Use Existing Source option enables you to copy an existing TimesTen installation from a host that is part of your grid. Before selecting the Use Existing Source option, ensure that you have completed the steps up to step 3 from "Create a new installation".
-
From the Host drop-down list, select the host that contains the existing installation that you want to copy.
The Installation drop-down list refreshes with the available installations of the selected host. If the host that you selected does not contain any TimesTen installation, SQL Developer switches your source to New Source.
-
From the Installation drop-down list, select the installation that you want to copy.
-
Click OK.
The New Installation dialog closes and the Creating Installation in grid model progress dialog displays. Creating a new installation can take a few minutes. If SQL Developer displays an error message, troubleshoot the error.
Locate the Close button in the Creating Installation in grid model progress dialog.
-
Click Close.
You have successfully created a new TimesTen installation. However, you need to apply your changes to the grid. Changes made to the grid model do not immediately impact a grid until you explicitly apply these changes. See "Apply grid model changes to the grid" for more information on applying model changes to a grid.
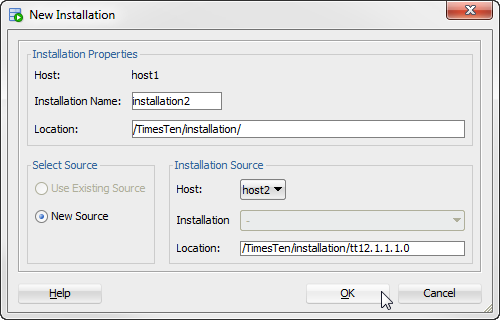
New source
The New Source option enables you to use new installation files from a host that is part of your grid. Before selecting the New Source option, ensure that you have completed the steps up to step 3 from "Create a new installation".
-
From the Host drop-down list, select the host that contains the new installation files that you want to copy.
-
In the Location field, specify the directory on your specified host where the TimesTen installation file are located.
-
Click OK.
The New Installation dialog closes and the Creating Installation in grid model progress dialog displays. Creating a new installation can take a few minutes. If SQL Developer displays an error message, troubleshoot the error.
Locate the Close button in the Creating Installation in grid model progress dialog.
-
Click Close.
You have successfully created a new TimesTen installation. However, you need to apply your changes to the grid. Changes made to the grid model do not immediately impact a grid until you explicitly apply these changes. See "Apply grid model changes to the grid" for more information on applying model changes to a grid.
Delete an installation
SQL Developer enables you to delete an existing installation from a host that is part of your grid.
To delete a TimesTen installation from a host, ensure that you are on the main SQL Developer page, that you have enabled the TimesTen Grid view, and that your grid node is expanded.
-
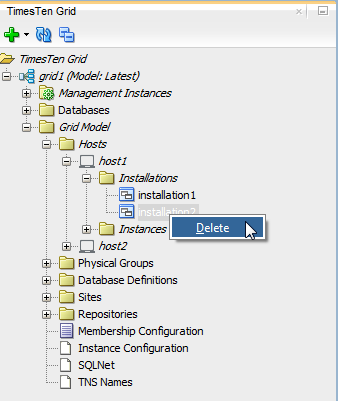
Expand the Grid Model option, expand the Hosts options, expand the host from which you want to delete an installation, expand the Installations option, then right-click the installation and select Delete.
The Delete Installation dialog displays. Locate the Yes button.
-
Click Yes.
The Delete Installation dialog closes and the Delete Installation progress dialog displays. Deleting an installation can take a few minutes. If SQL Developer displays an error message, troubleshoot the error.
Locate the Close button.
-
Click Close.
You have successfully deleted a TimesTen installation. However, you need to apply your changes to the grid. Changes made to the grid model do not immediately impact a grid until you explicitly apply these changes. See "Apply grid model changes to the grid" for more information on applying model changes to a grid.
Working with management instances
TimesTen uses one or two management instances to manage TimesTen Scaleout: an active management instance and a standby management instance. When managing TimesTen Scaleout, you perform all management operations through the active management instance to modify the grid model.
When you create a grid through the Simple Grid Wizard or the New Grid option in SQL Developer, TimesTen only creates an active management instance. It is recommended that you add a standby management instance to guard against failure and provide high availability for the management of your grid.
SQL Developer enables you to perform these management instance procedures:
Create a new management instance
To create a new management instance, ensure that you are on the main SQL Developer page and that you have enabled the TimesTen Grid view.
-
Right-click the name of your grid, select Grid Management, then select New Management Instance.
Figure 2-57 Create a new management instance
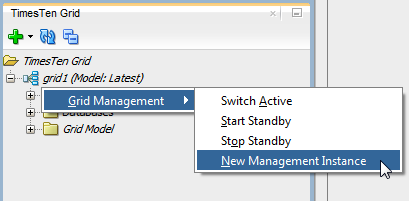
Description of ''Figure 2-57 Create a new management instance''
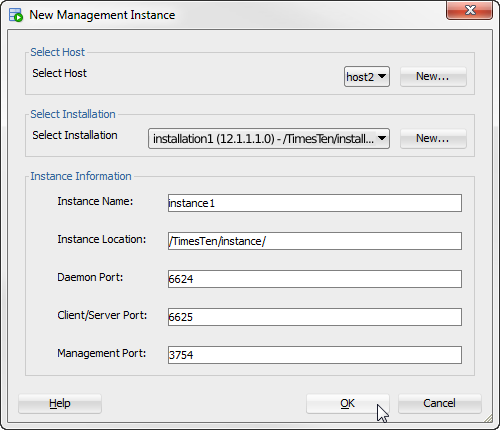
The New Management Instance dialog displays. Locate the Select Host region.
-
From the Select Host drop-down list, select the host where you want to create the management instance.
If you want to add a new host, click the New button next to the Select Host drop-down list. See "Add a host" for more information on the New Host dialog.
-
From the Select Installation drop-down list, select the installation that you want to use for the management instance. If you selected a host without an existing TimesTen installation, you need to create an installation on your selected host.
If you want to create a new installation, click the New button next to the Select Installation drop-down list. See "Create a new installation" for more information on the New Installation dialog.
-
In the Instance Name field, type a name for your management instance. Select a name that is a meaningful identifier. The default value is
instance1. -
In the Instance Location field, specify the directory where you want TimesTen to create the instance. TimesTen creates a directory with the instance name inside of the directory you specify. For example, if you have an instance name of
instance1and an instance location of/TimesTen/instance/, TimesTen creates your instance in the/TimesTen/instance/instance1/directory. -
In the Daemon Port field, specify the port number for the TimesTen daemon.
If you selected a host without a TimesTen instance, the default value for the TimesTen daemon port is
6624.If you selected a host with a TimesTen instance, the default value is the daemon port of your original instance plus 100. For example, if your original instance has a daemon port of
6624, the default value is6724. -
In the Client/Server Port field, specify the port number for the TimesTen client/server.
If you selected a host without a TimesTen instance, the default value for the TimesTen client/server port is
6625.If you selected a host with a TimesTen instance, the default value is the client/server port of your original instance plus 100. For example, if your original instance has a client/server port of
6625, the default value is6725. -
In the Management Port field, specify the management port number.
The management port is the value for the TCP/IP port number of the first management instance replication agent.
If you selected a host without a TimesTen instance, the default value for the management port is
3754.If you selected a host with a TimesTen instance, the default value is the management port of your original instance plus 100. For example, if your original instance has a management port of
3754, the default value is3854. -
Click OK.
The Creating grid object(s) progress dialog displays. If your selected instance directory does not exist, a confirmation dialog displays to ensure that you want to create the new directory. If this warning dialog displays, click Yes.
Creating a management instance can take a few minutes. If SQL Developer displays an error message, troubleshoot the error.
The Management Instance dialog closes.
Locate the Close button.
-
Click Close.
You have successfully created a TimesTen management instance. However, you need to apply your changes to the grid. Changes made to the grid model do not immediately impact a grid until you explicitly apply these changes. See "Apply grid model changes to the grid" for more information on applying model changes to a grid.
Replace a management instance
SQL Developer enables you to replace a management instance with a new instance. This is useful if you want to retire the host of an existing management instance and replace it with a new host.
You can only replace a management instance when your grid has an active and standby management instance.
If you replace the active management instance, TimesTen Scaleout promotes the standby management instance to the active management instance. Then, TimesTen Scaleout deletes your original active management instance and adds your new management instance as the standby management instance.
If you replace the standby management instance, TimesTen Scaleout deletes your current standby management instance and adds your new management instance as the standby management instance.
To replace an instance, ensure that you are on the main SQL Developer page, that you have enabled the TimesTen Grid view, and that your grid node is expanded.
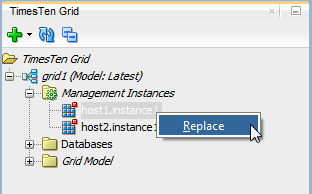
-
Expand the Management Instances option, right-click the management instance, then select Replace.
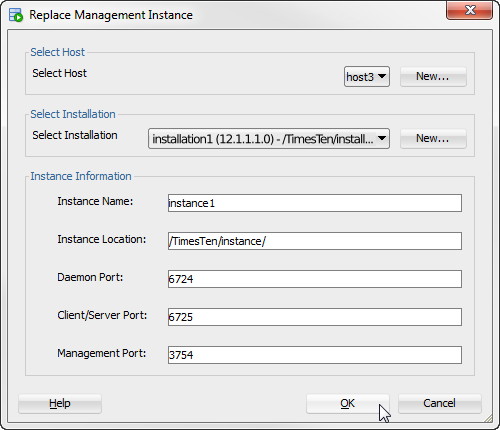
The Replace Management Instance dialog displays.
-
From the Select Installation drop-down list, select the installation that you want to use for the management instance. If you selected a host without an existing TimesTen installation, you need to create an installation on your selected host.
If you want to create a new installation, click the New button next to the Select Installation drop-down list. See "Create a new installation" for more information on the New Installation dialog.
-
In the Instance Name field, type a name for your management instance. Select a name that is a meaningful identifier. The default value is
instance1. -
In the Instance Location field, specify the directory where you want TimesTen to create the instance. TimesTen creates a directory with the instance name inside of the directory you specify. For example, if you have an instance name of
instance1and an instance location of/TimesTen/instance/, TimesTen creates your instance in the/TimesTen/instance/instance1/directory. -
In the Daemon Port field, specify the port number for the TimesTen daemon.
If you selected a host without a TimesTen instance, the default value for the TimesTen daemon port is
6624.If you selected a host with a TimesTen instance, the default value is the daemon port of your original instance plus 100. For example, if your original instance has a daemon port of
6624, the default value is6724. -
In the Client/Server Port field, specify the port number for the TimesTen client/server.
If you selected a host without a TimesTen instance, the default value for the TimesTen client/server port is
6625.If you selected a host with a TimesTen instance, the default value is the client/server port of your original instance plus 100. For example, if your original instance has a client/server port of
6625, the default value is6725. -
In the Management Port field, specify the management port number.
The management port is the value for the TCP/IP port number of the first management instance replication agent.
If you selected a host without a TimesTen instance, the default value for the management port is
3754.If you selected a host with a TimesTen instance, the default value is the management port of your original instance plus 100. For example, if your original instance has a management port of
3754, the default value is3854. -
Click OK.
The Replace Management Instance progress dialog displays. If your selected instance directory does not exist, a confirmation dialog displays to ensure that you want to create the new directory. If this warning dialog displays, click Yes.
Replacing a management instance can take a few minutes. If SQL Developer displays an error message, troubleshoot the error.
The Replace Management Instance dialog closes.
Locate the Close button.
-
Click Close.
You have successfully created a new management instance, deleted an old management instance, and set the new management instance as your standby management instance. However, you need to apply your changes to the grid. Changes made to the grid model do not immediately impact a grid until you explicitly apply these changes. See "Apply grid model changes to the grid" for more information on applying model changes to a grid.
Switch the active management instance
SQL Developer enables you to switch your current standby management instance to the active management instance of your grid.
Before you attempt to switch the active management instance, ensure that you have two management instances for your grid.
To switch the active management instance, ensure that you are on the main SQL Developer page, that you have enabled the TimesTen Grid view, and that your grid node is expanded.
-
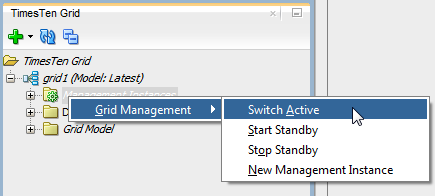
Right-click the name of your grid, select Grid Management, then select Switch Active.
The Switch Active Management Instance progress dialog displays. Checking for a standby management instance can take a few minutes. If SQL Developer displays an error message, troubleshoot the error.
The Switch Active Management Instance progress dialog closes and the Switch Active Management Instance confirmation dialog displays. Locate the Yes button.
-
Click Yes.
The Switch Active Management Instance confirmation dialog closes and the Switch Active Management Instance progress dialog displays.
Switching the active management instance can take a few minutes. If SQL Developer displays an error message, troubleshoot the error.
Locate the Close button.
-
Click Close.
You have successfully switched the active management instance. However, you need to apply your changes to the grid. Changes made to the grid model do not immediately impact a grid until you explicitly apply these changes. See "Apply grid model changes to the grid" for more information on applying model changes to a grid.
Ensure that you start your new standby management instance after you switch the active management instance. See "Control the standby management instance" for more information.
Control the standby management instance
SQL Developer enables you to start or stop the standby management instance.
To start or stop the standby management instance, ensure that you are on the main SQL Developer page, that you have enabled the TimesTen Grid view, and that your grid node is expanded.
-
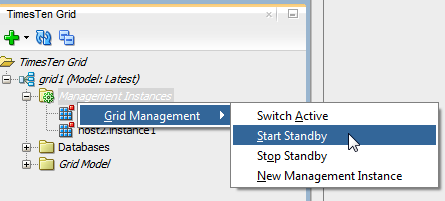
Right-click Management Instances, select Grid Management, then select one of these options:
-
Start Standby - This option starts the standby management instance.
-
Stop Standby - This option stops the standby management instance.
A confirmation dialog displays. Locate the Yes button.
If you attempt to start a standby management instance that is already started, a progress dialog displays with an error message. This also applies if you attempt to stop a standby management instance that is already stopped.
-
-
Click Yes.
The confirmation dialog closes and a progress dialog displays. Starting or stopping a standby management instance can take a few minutes. If SQL Developer displays an error message, troubleshoot the error.
Locate the Close button.
-
Click Close.
You have successfully started or stopped a standby management instance.
Use the shell on the host of the active management instance
SQL Developer enables you to open a shell terminal to execute commands on the host of your active management instance. This is useful to execute certain ttGridAdmin utility commands that might not be supported by SQL Developer. For more information on ttGridAdmin commands, see "ttGridAdmin" in the Oracle TimesTen In-Memory Database Reference.
To start the shell terminal on the host of your active management instance, ensure that you are on the main SQL Developer page and that you have enabled the TimesTen Grid view.
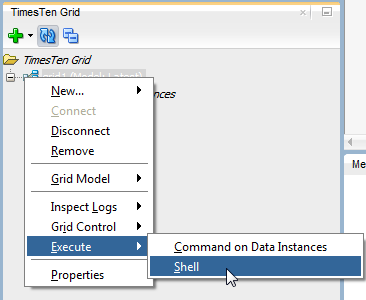
Right-click the name of your grid, select Execute, then select Shell.
SQL Developer displays a tab with a shell terminal. You can execute commands on the host of your active management instance through this shell terminal.
Working with data instances
SQL Developer enables you to create or delete a data instance from a host that is part of your grid. SQL Developer enables you to perform the following procedures with instances:
Create a new data instance
SQL Developer enables you to create a new data instance with a data instance wizard or directly on a specific host.
Consider the following before creating a new data instance:
-
Ensure that the hosts on which you create data instances for database distribution are assigned to a data space group. If you attempt to create a data instance on a host that is not assigned to a data space group, TimesTen Scaleout does not create that data instance. See "Assign hosts to data space groups" for more information on assigning a host to a data space group.
Use one of these options to create a data instance:
-
New data instance wizard - This option enables you to specify the host on which the instance is created.
-
New data instance on a specific host - This option enables you to select the host on which the instance is created before opening the dialog.
New data instance wizard
To create a new data instance, ensure that you are on the main SQL Developer page and that you have enabled the TimesTen Grid view.
Right-click the name of your grid, then select New Data Instance.
Then follow the steps, starting on step 2, as described in "Create a new management instance". You do need to specify a management port for a data instance.
New data instance on a specific host
SQL Developer enables you to create a new data instance on a host that is part of your grid.
To create a new data instance on a host, ensure that you are on the main SQL Developer page, that you have enabled the TimesTen Grid view, and that your grid node is expanded.
-
Expand the Grid Model option, expand the Hosts options, expand the host on which you want to create an instance, right-click the Instances option, then select New Instance.
The New Instance dialog displays. Locate the Instance Name text field.
-
In the Instance Name field, type a name for your instance. Select a name that is a meaningful identifier. The default value is
instancen, wherenis the next sequential number based on your highest numbered instance name. For example, if you have an instance namedinstance1, the default value isinstance2. -
In the Instance Location field, specify the directory where you want TimesTen to create the instance. TimesTen creates a directory with the instance name inside of the directory you specify. For example, if you have an instance name of
instance1and an instance location of/TimesTen/instance/, TimesTen creates your instance in the/TimesTen/instance/instance1/directory. -
In the Daemon Port field, specify the port number for the TimesTen daemon. By default, the default value is the daemon port of your original instance plus 100. For example, if your original instance has a daemon port of
6624, the default value is6724. -
In the Client/Server Port field, specify the port number for the TimesTen client/server. By default, the default value is the client/server port of your original instance plus 100. For example, if your original instance has a client/server port of
6625, the default value is6725. -
From the Installation drop-down list, select the installation that you want TimesTen to use to create the instance. This drop-down list only shows available installations on the host on which you are creating the new instance.
To use an installation that is located on a different host or use a new installation source, click the New button that is located next to the Installation drop-down list. See "Create a new installation" for more information about the New Installation dialog.
-
Click OK.
The New Instance dialog closes and the New Instance progress dialog displays. If your selected instance directory does not exist, a confirmation dialog displays to ensure that you want to create the new directory. If this warning dialog displays, click Yes.
Creating an instance can take a few minutes. If SQL Developer displays an error message, troubleshoot the error.
Locate the Close button.
-
Click Close.
You have successfully created a TimesTen instance. However, you need to apply your changes to the grid. Changes made to the grid model do not immediately impact a grid until you explicitly apply these changes. See "Apply grid model changes to the grid" for more information on applying model changes to a grid.
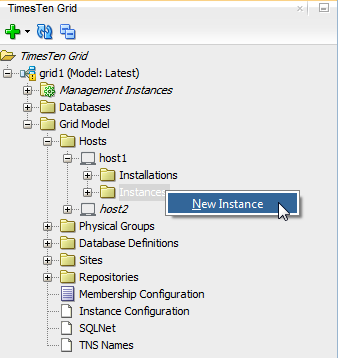
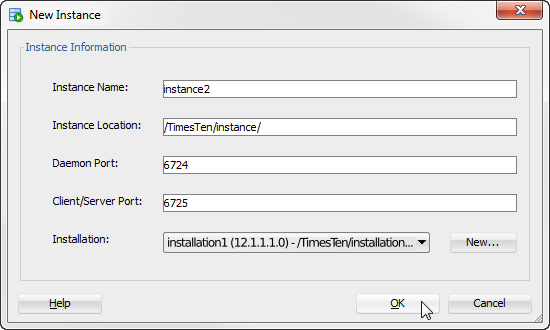
Edit a data instance
SQL Developer enables you to edit the installation of a data instance.
Note:
You can only edit a TimesTen data instance. You cannot edit a management instance.To edit a data instance, ensure that you are on the main SQL Developer page, that you have enabled the TimesTen Grid view, and that your grid node is expanded.
-
Expand the Grid Model option, expand the Hosts options, expand the host on which your instance is located, expand the Instances option, then right-click the instance and select Edit.
The Edit Instance dialog displays.
-
From the Installation drop-down list, select the new installation that you want to use for your instance.
-
Click OK.
The Edit Instance dialog closes and the Edit Instance progress dialog displays. Editing an instance can take a few minutes. If SQL Developer displays an error message, troubleshoot the error.
Locate the Close button in the Edit Instance progress dialog.
-
Click Close.
The Edit Instance progress dialog closes.
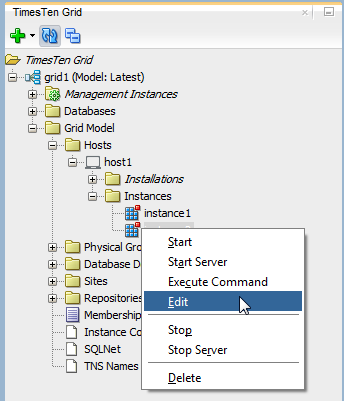
You have successfully edited an instance. However, you need to apply your changes to the grid and restart your instance. Changes made to the grid model do not immediately impact a grid until you explicitly apply these changes. See "Apply grid model changes to the grid" and "Start or stop the instance and server" for more information on applying model changes to a grid and restarting an instance, respectively.
Start or stop the instance and server
SQL Developer enables you to start or stop the TimesTen instance and the TimesTen server.
To start or stop the TimesTen instance or the TimesTen server, ensure that you are on the main SQL Developer page, that you have enabled the TimesTen Grid view, and that your grid node is expanded.
-
Expand the Grid Model option, expand the Hosts options, expand the host on which your instance is located, expand the Instances option, then right-click the instance and select one of these options:
-
Start - This option starts the TimesTen instance.
-
Start Server - This option starts the TimesTen server.
-
Stop - This option stops the TimesTen instance.
-
Stop Server - This option stops the TimesTen server.
A confirmation dialog displays. Locate the OK button.
Note:
If you want to immediately start or stop a service and ignore warnings, select the Force Action check box. -
-
Click OK.
The confirmation dialog closes. Starting or stopping a TimesTen instance or TimesTen server can take a few minutes. If SQL Developer displays an error message, troubleshoot the error.
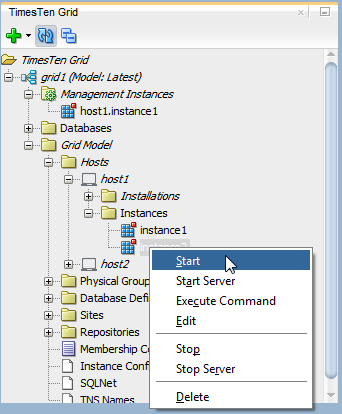
Execute a command on the host of a data instance
SQL Developer enables you to execute commands on a particular data instance is located. To execute a command on a data instance, ensure that you are on the main SQL Developer page, that you have enabled the TimesTen Grid view, and that your grid node is expanded.
Right-click the name of your grid, select Execute, then select Command on Data Instances.
Figure 2-68 Select Execute Command on Data Instances
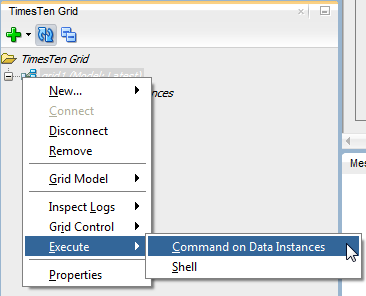
Description of ''Figure 2-68 Select Execute Command on Data Instances''
Alternatively, expand the Grid Model option, expand the Hosts options, expand the host on which your instance is located, expand the Instances option, then right-click the instance and select Execute Command.
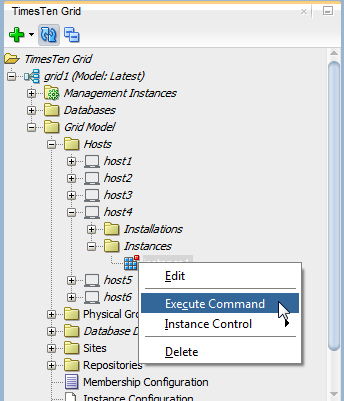
Then follow the steps, starting on step 2, as described in "Execute a command on a host".
Delete a data instance
SQL Developer enables you to delete an existing data instance from a host that is part of your grid.
Note:
You can only delete a stopped data instance. See "Start or stop the instance and server" for more information on stopping a data instance.Before you delete a TimesTen, ensure that you have migrated all data from databases of this instance to other TimesTen instances. For more information, see "Migrating, Backing Up and Restoring Data" in the Oracle TimesTen In-Memory Database Scaleout User's Guide.
To delete a TimesTen instance from a host, ensure that you are on the main SQL Developer page, that you have enabled the TimesTen Grid view, and that your grid node is expanded.
-
Expand the Grid Model option, expand the Hosts options, expand the host from which you want to delete an instance, expand the Instances option, then right-click the instance and select Delete.
The Delete Instance dialog displays. Ensure that you have migrated all data from databases of this instance to other TimesTen instances.
Locate the Yes button.
-
Click Yes.
The Delete Instance dialog closes and the Delete Instance progress dialog displays. Deleting an instance can take a few minutes. If SQL Developer displays an error message, troubleshoot the error.
Locate the Close button.
-
Click Close.
The Delete Instance progress dialog closes.
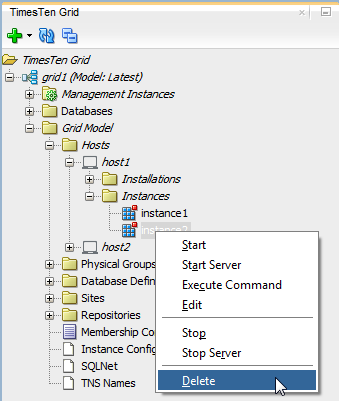
You have successfully deleted a TimesTen instance. However, you need to apply your changes to the grid. Changes made to the grid model do not immediately impact a grid until you explicitly apply these changes. See "Apply grid model changes to the grid" for more information on applying model changes to a grid.
Working with configuration files
SQL Developer enables you to import and export multiple configuration files for your grid. You can import and export these configuration files:
Note:
If you have not imported a file for a specific configuration, you cannot export a file for that configuration.-
Membership Configuration - This file contains configuration parameters for the membership service configuration for your grid. For more information on membership services, see "Overview of the TimesTen Scaleout membership service" in the Oracle TimesTen In-Memory Database Scaleout User's Guide.
-
Instance Configuration - This file contains configuration parameters that are used by each instance in the grid. For more information on this file, see "Import instance configuration attributes (instanceConfigImport)" in the Oracle TimesTen In-Memory Database Scaleout User's Guide.
-
SQLNet - This file contains configuration parameters for the grid to interact with an Oracle database through the
ttLoadFromOracleutility. For more information on this file, see "Import a sqlnet file (SQLNetImport)" in the Oracle TimesTen In-Memory Database Reference. -
TNS Names - This file contains configuration parameters for the grid to interact with an Oracle database through the
ttLoadFromOracleutility. For more information on this file, see "Import TNS names (TNSNamesImport)" in the Oracle TimesTen In-Memory Database Reference.
SQL Developer enables you to perform these operations with configuration files:
Import a configuration file
SQL Developer enables you to import multiple types of configuration files.
To import a configuration file, ensure that you are on the main SQL Developer page, that you have enabled the TimesTen Grid view, and that your grid node is expanded.
-
Expand the Grid Model option, then right-click the configuration file name and select Import.
The Import dialog displays. Locate the Browse button.
-
Click Browse.
The Import file dialog displays. Browse for your configuration file.
-
Select your configuration file and click Open.
The Import file dialog closes. In the Import dialog, locate the Import button.
-
Click Import.
The Verifying File Location progress dialog displays. SQL Developer verifies that the configuration file that you specified is a valid file. If SQL Developer displays an error message, troubleshoot the error.
The Verifying File Location progress dialog and the Import Configuration dialog close. The Importing Configuration progress dialog displays. If SQL Developer displays an error message, troubleshoot the error.
Locate the Close button.
-
Click Close.
The Import Configuration progress dialog closes.
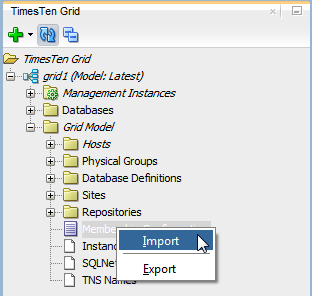
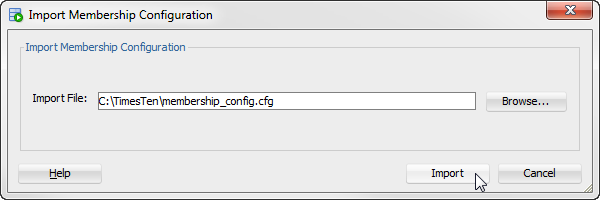
You have successfully imported a configuration file in the grid model. However, you need to apply your changes to the grid. Changes made to the grid model do not immediately impact a grid until you explicitly apply these changes. See "Apply grid model changes to the grid" for more information on applying model changes to a grid.
Export a configuration file
SQL Developer enables you to export multiple types of configuration files.
To export a configuration file, ensure that you are on the main SQL Developer page, that you have enabled the TimesTen Grid view, and that your grid node is expanded.
-
Expand the Grid Model option, then right-click the configuration file name and select Export.
The Export dialog displays. Locate the Choose Version to Export region.
-
From the Choose Version to Export region, select a version of the configuration to export. These are the options:
-
Current - This is the current configuration file that is applied to the grid.
-
Latest - This is the latest configuration file that is not yet applied to the grid.
-
Version - This is the version of the configuration file that you can select. If you select this option, use the text field to the right of the Version radio button to select the version to export.
Locate the Browse button.
-
-
Click Browse.
The Export file dialog displays. Specify the location of where you want to export the configuration file.
-
In the File Name text field, specify a meaningful name for the configuration file and click Save.
The Export file dialog closes. In the Export dialog, locate the Export button.
-
Click Export.
The Verifying File Location progress dialog displays. If SQL Developer displays an error message, troubleshoot the error.
The Verifying File Location progress dialog and the Export Configuration dialog close. The Export Configuration progress dialog displays. If SQL Developer displays an error message, troubleshoot the error.
Locate the Close button.
-
Click Close.
The Export Configuration progress dialog closes.
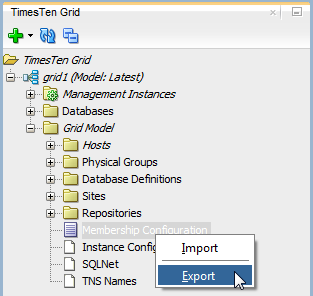
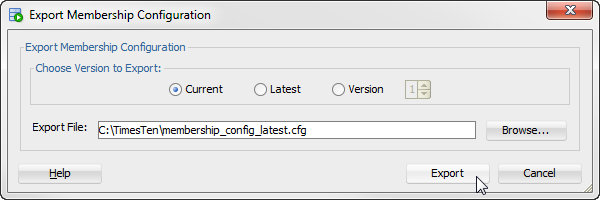
You have successfully exported a configuration file from the grid model.
Working with databases
SQL Developer enables you to create or delete a database from your grid.
Consider these things when you decide whether to use the database wizard or not:
-
The database wizard automatically applies the grid model changes at the end of the wizard. If you want to verify the model changes before applying the grid model, create a database definition and then create your database from that definition.
SQL Developer enables you to perform the following procedures with databases:
Create a database with the database wizard
SQL Developer enables you to create a database in your grid with the database wizard. You can also create a database from a database definition. See "Working with database definitions" for more information.
Before you create a database:
-
Ensure that you have a functional grid. See "Create a grid" and "Manage an existing grid" for more information.
-
Ensure that your grid has at least an equal amount of data instances to the K-safety level of your grid. For example if you have a K-safety level of
2, you need to have at least two data instances. See "Working with data instances" for more information on adding data instances. -
Ensure that each of your data space groups are associated with an equal amount of data instances. Hosts, not data instances, are assigned to data space groups. It is recommended that you have a single data instance on each host. See "Assign hosts to data space groups" for more information on assigning a host to a data space group.
To create a database, ensure that you are on the main SQL Developer page, that you have enabled the TimesTen Grid view, and that your grid node is expanded.
-
Right-click the Databases option and then select New Database.
The TimesTen Grid Database Wizard dialog and Comparing current and latest grid model progress dialog displays.
If you have made changes to your grid model and have not applied the model changes, the Comparing current and latest grid model progress dialog closes and a Changes in current grid model dialog displays. This dialog displays objects that have been added, changed, or removed from the grid model. Creating a database involves applying the grid model changes, so ensure that you want these grid model changes to be applied. Locate the OK button of the Changes in current grid model dialog.
See "Apply grid model changes to the grid" for more information on applying model changes to a grid.
If you have not made changed to your grid model, locate the Close button of the Comparing current and latest grid model progress dialog.
-
Depending on the dialog that displays, either click OK or Close.
Depending on the dialog that displayed, the Changes in current grid model dialog or the Comparing current and latest grid model progress dialog closes. The TimesTen Grid Database Wizard displays.
Locate the Database Name field.
-
In the Database Name text field, type a name for your database. Select a name that is a meaningful identifier. The default value is
database1.Note:
Optionally, you can import a database definition file to load attribute values for your database definition. The database definition file must use.dbdefas the file name extension.To import a database definition file, click the Import Definition button. Then, select your database definition file and click Open. If an attribute value was set in the wizard before you imported the database definition file, the attribute value changes to the value that is defined in the database definition file.
Once you have imported the database definition file, you can still edit the database definition within the wizard. If you do not want to keep editing the database definition, skip to step 5.
For more information on the database definition file, see "Creating a database definition file" in the Oracle TimesTen In-Memory Database Scaleout User's Guide.
If your grid already contains a database, the default value of the database name of your original database plus 1. For example, if your original database name is
database1, the default value isdatabase2. -
Set the connection attributes for your database. You can set these connection attributes:
-
Data Store Attribute - Attributes that are set at database creation time.
Note:
Ensure that you set a valid path for theDataStoreattribute. This path must be valid on every host for every data instance.It is best practice to specify
LogDirand have it be a different location fromDataStore. For additional considerations for database and user file locations, see "Planning installation and deployment" in the Oracle TimesTen In-Memory Database Installation, Migration, and Upgrade Guide. -
First Connection Attribute - Attributes that are set when a database is loaded into memory.
-
General Connection Attribute - Attributes that are set by each connection and persist for the duration of the connection. These attributes are added to a connectable and not are part of a database definition.
To set any attribute that is part of the type of connection attributes listed above, select the relevant tab. Each tab of connection attributes contains a list of attributes with default values. You can edit the value of an attribute by double clicking the value from the value column of an attribute. Depending on the connection attribute, you can edit the value with a text field or a drop-down list of valid values.
You can add additional connection attributes by selecting a connection attribute from the drop-down list located below the connection attribute tabs and then clicking Add. If a connection attribute is not listed in the drop-down list, you can select the New Attribute option and enter the connection attribute name in the Attribute column of the connection attribute table.
You can remove a connection attribute by selecting a connection attribute from the connection attribute table and then clicking Delete.
For more information on valid connection attributes and values, see "List of Attributes" in the Oracle TimesTen In-Memory Database Reference.
-
-
Once you have set your connection attributes, click Next.
SQL Developer validates your connection attribute values. If SQL Developer displays an error message, troubleshoot the error and click the Next button again to revalidate your input values.
The Checking Directory Attributes dialog displays. Checking for a directory can take a few minutes. If your selected database directory does not exist on the host of a data instance, a confirmation dialog displays to ensure that you want to create the new directory on that host. If this warning dialog displays, click Yes.
Note:
SQL Developer creates the selected database directory on all hosts of available data instances.The Checking Directory Attributes dialog closes and the TimesTen Grid Database Wizard dialog refreshes. Locate the Database Distribution map.
-
By default, the default value is the maximum number of data instances based on their data space group without leaving a replica set incomplete. Review the SQL Developer suggestion for data instances and perform any necessary modifications.
Note:
If you do not want to configure the distribution map in this wizard, check the Skip database distribution check box and click Next. See "Define the distribution map of a database" for more information on defining a distribution map for a database.Note:
Ensure that each data space group contains the same number of data instances to create complete replica sets. If your data space groups do not contain the same number of data instances, an error dialog displays after you click the Apply button.If you want to remove a suggested data instance, right-click the instance name and select Remove.
If you want to add a data instance from the Available column, right-click the instance name and select Add.
-
Once you have selected all of your data instances for data distribution, click Next.
The TimesTen Grid Database Wizard refreshes and shows a summary table with the configuration for your database.
-
Verify that the configuration settings for your database are correct and click Finish.
Note:
Optionally, click the Export Definition button to save the database definition as a.dbdeffile.The TimesTen Grid Database Wizard dialog closes and a Creating Database progress dialog displays. Creating a database can take a few minutes depending on the number of data instances included in the distribution map. If SQL Developer displays an error message, troubleshoot the error. In the case that an error file is generated, the Creating Database progress dialog displays the error file as a hyperlink. You can save the error file and troubleshoot any errors that are listed in the file.
Note:
If SQL Developer displays an error or if you cancel the database creation process, review the grid navigator to see if the database and definition file were created. In case that a database or database definition was created, delete the database and database definition. Then, create a new database. See "Destroy a database" for more information on deleting a database. -
Click Close.
The Creating Database progress dialog closes.
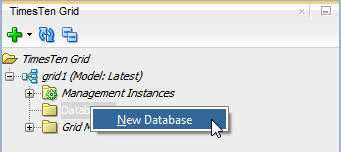
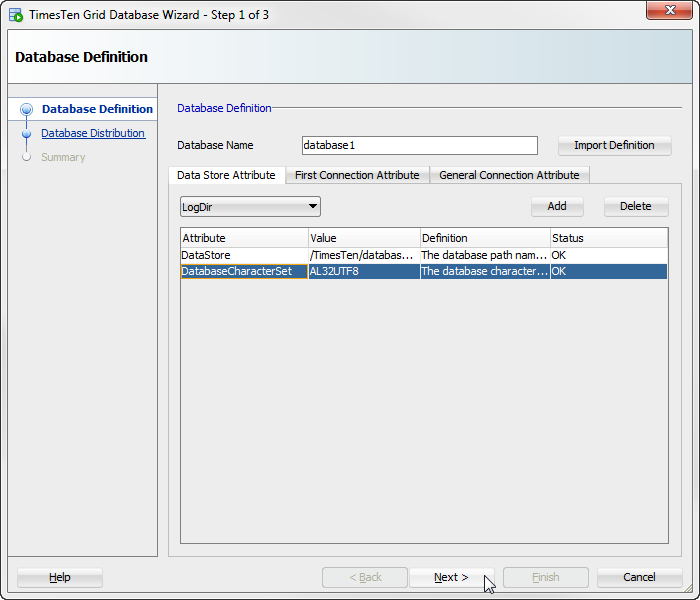
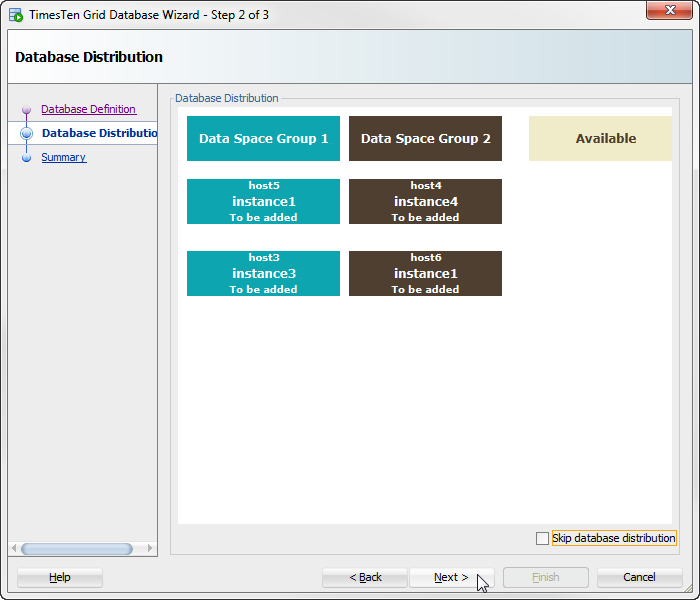
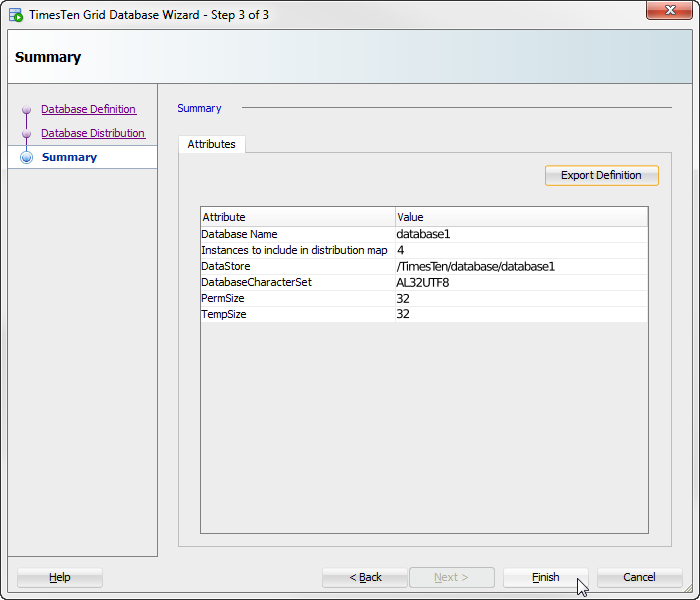
You have successfully created a database in your grid.
Before you attempt to connect an application to the database, ensure that you open the database and create a user with the appropriate privileges to connect to the database. To create a user for your database with SQL Developer, use the ttIsql utility through the Execute command on a host dialog. You can execute this utility on any of the data instances of your database.
This command creates a user, terry, with a password of terry for the database, database1. Then, terry is granted admin privileges.
ttisql -e 'CREATE USER terry IDENTIFIED BY terry;
GRANT ADMIN TO terry; ' DSN=database1
See "Perform database operations" and "Execute a command on a host", for more information on opening a database and executing a command on a host, respectively.
See "Managing Access Control" in the Oracle TimesTen In-Memory Database Security Guide for more information on creating users.
Working with database definitions
A database definition contains the description of a TimesTen Scaleout database. It defines the database name, as well as the attributes associated with the database. Once a database definition is added to the current version of the model, it can be used to create a database.
SQL Developer enables you to perform the following procedures with database definitions:
Create a database definition
SQL Developer enables you to create a database definition. To create a database definition, ensure that you are on the main SQL Developer page, that you have enabled the TimesTen Grid view, and that your grid node is expanded.
Note:
When you create a new database definition, TimesTen also creates a direct connectable for this new database definition.-
Expand the Grid Model option, right-click the Database Definitions option, then select New Database Definition.
Figure 2-79 Select New Database Definition
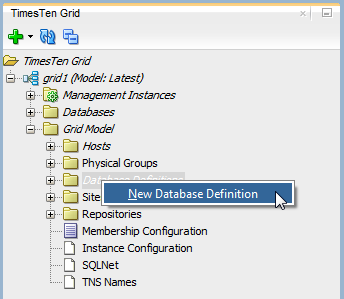
Description of ''Figure 2-79 Select New Database Definition''
The New Database Definition dialog displays. Locate the Database Name field.
-
In the Database Name text field, type a name for your database. Select a name that is a meaningful identifier. The default value is
database1.Note:
Optionally, you can import a database definition file to load attribute values for your database definition. The database definition file must use.dbdefas the file name extension.To import a database definition file, click the Import Definition button. Then, select your database definition file and click Open. If an attribute value was set in the wizard before you imported the database definition file, the attribute value changes to the value that is defined in the database definition file.
Once you have imported the database definition file, you can still edit the database definition within the wizard. If you do not want to keep editing the database definition, skip to step 4.
For more information on the database definition file, see "Creating a database definition file" in the Oracle TimesTen In-Memory Database Scaleout User's Guide.
If your grid already contains a database, the default value is the database name of your original database plus 1. For example, if your original database name is
database1, the default value isdatabase2. -
Set the connection attributes for your database definition. You can set these connection attributes:
-
Data Store Attribute - Attributes that are set at database creation time.
Note:
Ensure that you set a valid path for theDataStoreattribute. This path must be valid on every host for every data instance.It is best practice to specify
LogDirand have it be a different location fromDataStore. For additional considerations for database and user file locations, see "Planning installation and deployment" in the Oracle TimesTen In-Memory Database Installation, Migration, and Upgrade Guide. -
First Connection Attribute - Attributes that are set when a database is loaded into memory.
-
General Connection Attribute - Attributes that are set by each connection and persist for the duration of the connection.
To set any attribute that is part of the type of connection attributes listed above, select the relevant tab. Each tab of connection attributes contains a list of attributes with default values. You can edit the value of an attribute by double clicking the value from the value column of an attribute. Depending on the connection attribute, you can edit the value with a text field or a drop-down list of valid values.
You can add additional connection attributes by selecting a connection attribute from the drop-down list located below the connection attribute tabs and then clicking Add. If a connection attribute is not listed in the drop-down list, you can select the New Attribute option and enter the connection attribute name in the Attribute column of the connection attribute table.
You can remove a connection attribute by selecting a connection attribute from the connection attribute table and then clicking Delete.
For more information on valid connection attributes and values, see "List of Attributes" in the Oracle TimesTen In-Memory Database Reference.
-
-
Once you have set your connection attributes, click OK.
SQL Developer validates your connection attribute values. If SQL Developer displays an error message, troubleshoot the error and click the OK button again to revalidate your input values.
The Checking Directory Attributes dialog displays. Checking for a directory can take a few minutes. If your selected database directory does not exist on the host of a data instance, a confirmation dialog displays to ensure that you want to create the new directory on that host. If this warning dialog displays, click Yes.
Note:
SQL Developer creates the selected database directory on all hosts of available data instances.The Checking Directory Attributes dialog closes and the Creating Database Definition progress dialog displays. Creating a database definition can take a few minutes. If SQL Developer displays an error message, troubleshoot the error.
Locate the Close button.
-
Click Close.
The Creating Database Definition progress dialog closes.
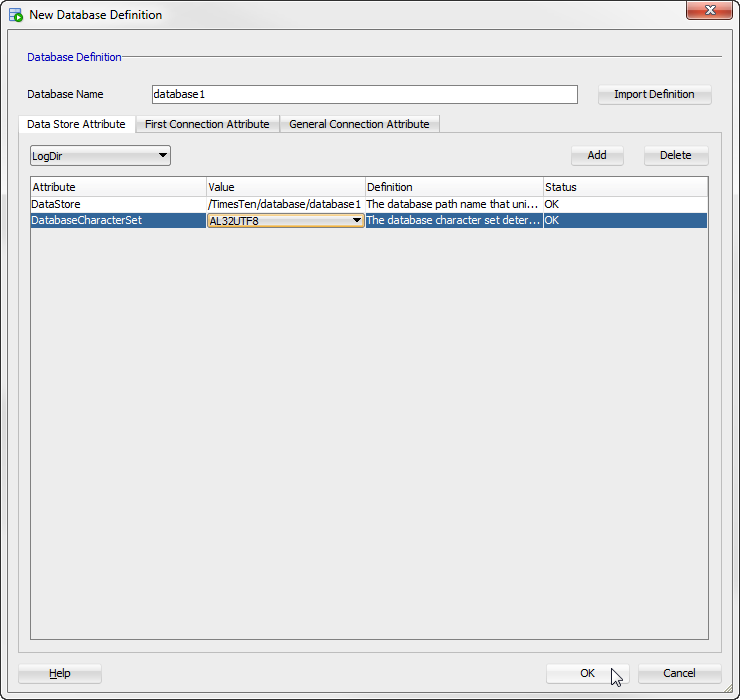
You have successfully created a database definition and a direct connectable. However, you need to apply your changes to the grid. Changes made to the grid model do not immediately impact a grid until you explicitly apply these changes. See "Apply grid model changes to the grid" for more information on applying model changes to a grid.
Note:
After creating a database definition, a database icon from your database definition displays under the Databases node of your grid node in SQL Developer. However, you are unable to perform database operation with this database until you create the database from your database definition. See "Create a database from a database definition" for more information.Create a database from a database definition
SQL Developers enables you to create a database from a database definition. To create a database from a database definition, ensure that you are on the main SQL Developer page, that you have enabled the TimesTen Grid view, and that your grid node is expanded.
If the database definition is already used for another database, SQL Developer displays an error message. You can only create a database from a database definition that has not been used to create another database.
-
Expand the Grid Model option, expand the Database Definitions option, right-click the name of your database definition, then select Create Database.
The Command issued dialog displays and a Creating Database progress dialog displays in the lower right corner of the main SQL Developer page. Locate the OK button of the Command issue dialog.
-
Click OK.
The Command issued dialog closes. Creating a database can take a few minutes. If SQL Developer displays an error message, troubleshoot the error.
Note:
If SQL Developer displays an error or if you cancel the database creation process, review the grid navigator to see if the database and definition file were created. In case that a database or database definition was created, delete the database and database definition. Then, create a new database. See "Destroy a database" for more information on deleting a database.
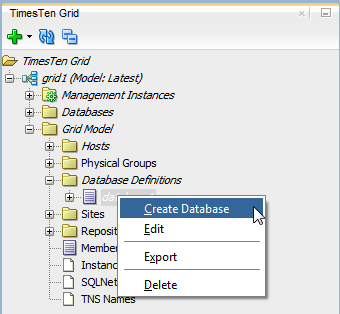
You have successfully created a database from a database definition. You are now ready to specify the distribution map of the database.
Before you attempt to connect an application to the database, ensure that you open the database and create a user with the appropriate privileges to connect to the database. To create a user for your database with SQL Developer, use the ttIsql utility through the Execute command on a host dialog. You can execute this utility on any of the data instances of your database.
This command creates a user, terry, with a password of terry for the database, database1. Then, terry is granted CREATE SESSION privileges.
ttisql -e 'CREATE USER terry IDENTIFIED BY terry;
GRANT CREATE SESSION TO terry; ' DSN=database1
See "Perform database operations" and "Execute a command on a host", for more information on opening a database and executing a command on a host, respectively.
See "Managing Access Control" in the Oracle TimesTen In-Memory Database Security Guide for more information on creating users.
Edit a database definition
SQL Developer enables you to edit an existing database definition.
Before you edit an existing database definition:
-
If you want to edit a database attribute and there is a database that was created from the database definition you are editing, you must stop the database, destroy it, and recreate it with the new database attributes. Since you are destroying the database, this causes you to lose all data in that database.
-
If you want to edit a general connection attribute, edit the respective connectable because general connection attributes are associated with a connectable. See "Edit a connectable" for more information.
-
If you edit a first connection attribute of a database definition of an open database, these changes are not applied until you unload and reload the database. SQL Developer displays a warning message if your database is currently open when you edit the database definition. See "Perform database operations" for more information on closing and opening a database.
To edit a database definition, ensure that you are on the main SQL Developer page, that you have enabled the TimesTen Grid view, and that your grid node is expanded.
Expand the Grid Model option, expand the Database Definitions option, right-click the name of your database definition, then select Edit.
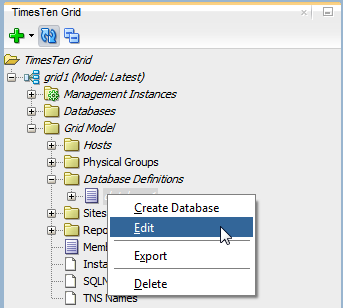
The Edit Database Definition dialog and the Checking if database exists progress dialog display.
If there is an open database that was created from the database definition you are editing, the Checking if database exists progress dialog closes and a Editing open database warning dialog displays. If you do not want to see the Editing open database warning for future operations, select the Skip This Message Next Time check box. Then, click the OK button.
If there is no open database that was created from the database definition you are editing, the Checking if database exists progress dialog closes.
Follow the steps, starting on step 3, as described in "Create a database definition".
Export a database definition
SQL Developer enables you to export an existing database definition. You can use this exported database definition file to import the definition of a new database definition.
To export a database definition, ensure that you are on the main SQL Developer page, that you have enabled the TimesTen Grid view, and that your grid node is expanded.
Expand the Grid Model option, expand the Database Definitions option, right-click the name of your database definition, then select Export.
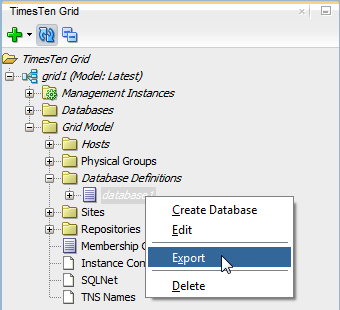
The Export Definition dialog displays.
Specify the location of where you want to export the connectable file.
In the File Name text field, specify a meaningful name for the database definition file and click Save.
The Export Definition dialog closes.
You have successfully exported a database definition file.
Delete a database definition
SQL Developer enables you to delete a database definition from your grid model.
You cannot delete a database definition if it references an existing database. You must destroy the database first. See "Destroy a database" for more information.
To delete a database definition, ensure that you are on the main SQL Developer page, that you have enabled the TimesTen Grid view, and that your grid node is expanded.
Expand the Grid Model option, expand the Database Definitions option, right-click the name of your database definition, then select Delete.
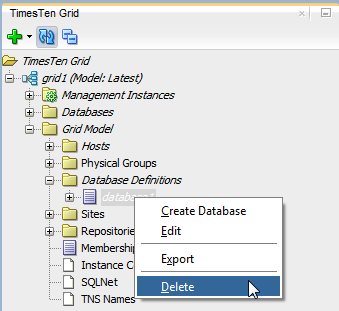
The Delete database definition dialog displays. Locate the Yes button.
Click Yes.
The Delete database definition dialog closes and the Delete database definition progress dialog displays. Locate the Close button.
Click Close.
You have successfully deleted a database definition. However, you need to apply your changes to the grid. Changes made to the grid model do not immediately impact a grid until you explicitly apply these changes. See "Apply grid model changes to the grid" for more information on applying model changes to a grid.
Define the distribution map of a database
SQL Developers enables you to define the distribution map of a new database from a database definition. You can also redefine the distribution map of an existing database. You cannot access a database that is in the process of defining or redefining its distribution map. To define the distribution map of a database, ensure that you are on the main SQL Developer page, that you have enabled the TimesTen Grid view, and that your grid node is expanded.
Note:
Redefining the distribution map of an existing database can take up to a few hours. Ensure that you do not need to access this database before redefining the distribution map.-
Expand the Databases option, right-click the name of your database, then select Redistribute.
The Distribution for database dialog displays. Locate the Database Distribution map.
-
If you want to add a data instance from the Available column, right-click the instance name and select Add.
If you want to remove a suggested data instance, right-click the instance name and select Remove. If you want to replace the data instance that you are removing, select Remove and replace with and select the new data instance.
If you want to evict a data instance, right-click the instance name and select Evict. Only evict a data instance if you are unable to fix that data instance and you have a backup of the data from that data instance. Evicting a data instance can result in data loss. If you want to replace the data instance that you are evicting, Select Evict and replace with and select the new data instance.
Note:
Ensure that each data space group contains the same number of data instances to create complete replica sets. If your data space groups do not contain the same number of data instances, an error dialog displays after you click the Apply button. -
Once you have selected all of your data instances for data distribution, click Apply.
The Performing operations progress dialog displays. Defining the distribution map of a new database can take a few minutes. If you are redistributing the data of an existing database, the redistribution can take up to a few hours. If SQL Developer displays an error message, troubleshoot the error.
Once the distribution map of your database is applied, the Performing operations progress dialog closes and the Distribution for database dialog refreshes. The distribution map shows how your data instances are distributed in replica sets and data space group.
Locate the Close button.
-
Click Close.
The Distribution for database dialog closes.
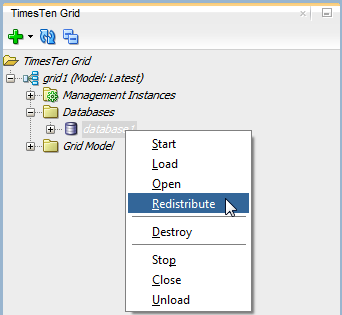
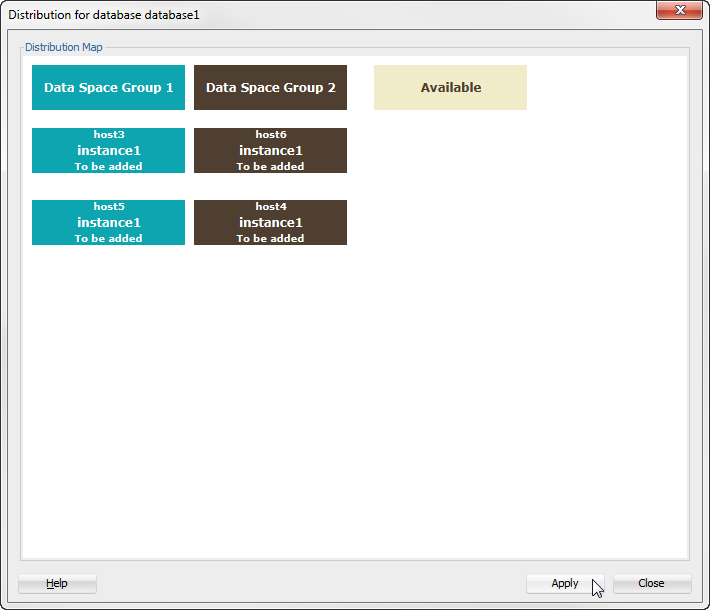
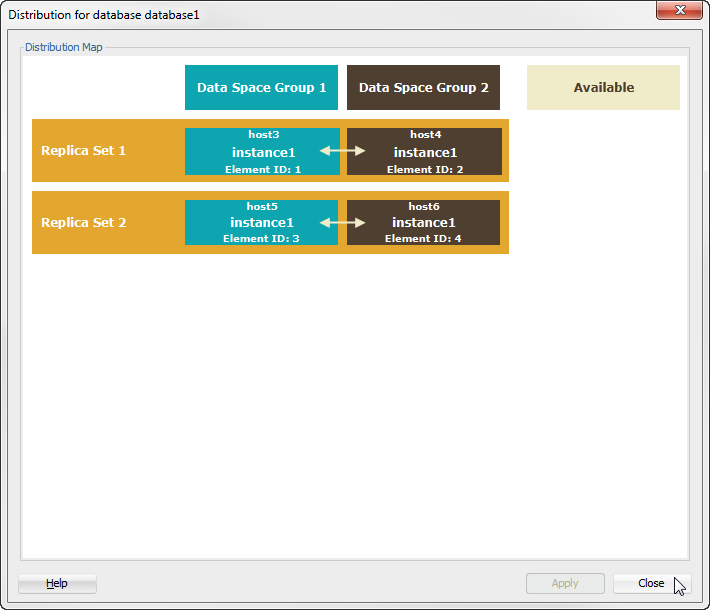
You have successfully defined the distribution map of a database.
Perform database operations
SQL Developer enables you to start, load, open, stop, close, and unload the TimesTen database.
To start, load, open, stop, close, or unload the TimesTen database, ensure that you are on the main SQL Developer page, that you have enabled the TimesTen Grid view, and that your grid node is expanded.
Expand the Databases option, then right-click the name of your database and select one of these options:
Note:
Depending on the current state of your database, you may be unable to perform a certain operation. If SQL Developer is unable to perform a specific operation, an error or warning message displays. For example, you cannot open a database that is already open.-
Start - Loads every element of the database into memory of their respective hosts and enables the database for user connections. This option does the same thing as if you perform a load and open operation of the database.
-
Load - Loads every element of the database into memory of their respective hosts.
-
Open - Enables the database for user connections.
-
Stop - Disables new user connections to a database and unloads every element of the database from the memory of their respective hosts. This option does the same thing as if you perform a close and unload operation of the database.
-
Close - Disables new user connections to a database.
-
Unload - Unloads every element of the database from the memory of their respective hosts.
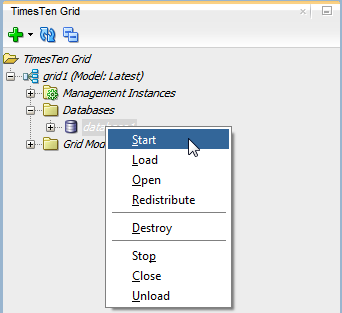
SQL Developer performs the operation that you selected. The operation can take a few minutes.
Note:
If you select the stop, close, or unload option, a warning dialog displays asking you to confirm that you want to continue with the operation. The dialog contains a number hyperlink that you can click to view the current connections to your database. If you are sure that you want to proceed with the operation, click Yes.A progress dialog displays in the lower right corner of the main SQL Developer window. If SQL Developer displays an error message, troubleshoot the error.
You can review the status of your database by double clicking the name of your database from the TimesTen Grid view region. If your database status is already open, you can click the refresh button that is located in the top left corner of the database status window to refresh your database status.
You have successfully performed an operation on the database.
Working with connectables
SQL Developer enables you to perform various operations with direct and client/server connectables. A connectable creates a DSN in the configuration files of every data instance. Applications may use this DSN to connect to the database. The connection attributes found in the DSN depend on the type of connectable. For more information about connection attributes, see "Connection Attributes" in the Oracle TimesTen In-Memory Database Reference.
There are two types of available connectables:
-
Direct connectable: Creates a system DSN with the connection attributes both defined in the database definition and the connectable.
-
Client/server connectable: Creates a client DSN with the
TTC_SERVERattribute of one or all the data instances available plus the connection attributes defined in the connectable.
You can perform these operations with connectables:
Create a connectable
SQL Developer enables you to create client/server and direct connectables.
To create a client/server or direct connectable, ensure that you are on the main SQL Developer page, that you have enabled the TimesTen Grid view, and that your grid node is expanded.
-
Expand the Databases option, expand the name of your database, then either right-click the Client/Server Connectables or Direct Connectables option and select New Connectable.
The New Connectable dialog displays. Locate the Connectable Name text field.
-
In the Connectable Name text field, type a name for your connectable. Select a name that is a meaningful identifier.
-
From the Connect to instance drop-down list, select a specific instance that applications connect to through the client/server DSN. The default value is Any Instance which lets your application connect to your database through any available data instance.
Note:
Optionally, you can import a connectable file to load connection attribute values for your connectable. The connectable file must use.connectas the file name extension.To import a connectable file, click the Import Definition button. Then, select your connectable file and click Open. If a connection attribute value was set in the wizard before you imported the connectable file, the connection attribute value changes to the value that is defined in the connectable file.
Once you have imported the connectable file, you can still edit the connectable definition within the wizard. If you do not want to keep editing the connectable definition, skip to step 5.
For more information on the connectable file, see "Creating a connectable file" in the Oracle TimesTen In-Memory Database Scaleout User's Guide.
-
Set the connection attributes for your connectable.
You can add additional connection attributes by selecting a connection attribute from the drop-down list located below the Connect to instance drop-down list and then clicking Add. If a connection attribute is not listed in the drop-down list, you can select the New Attribute option and enter the connection attribute name in the Attribute column of the connection attribute table. Depending on the connection attribute, you can edit the value with a text field or a drop-down list of valid values.
You can remove a connection attribute by selecting a connection attribute from the connection attribute table and then clicking Delete.
For more information on valid connection attributes and values, see "Connection Attributes" in the Oracle TimesTen In-Memory Database Reference.
-
Once you have set your connection attributes, click OK.
The New Connectable dialog closes and the Creating connectable progress dialog displays. Creating a connectable can take a few minutes. If SQL Developer displays an error message, troubleshoot the error.
Locate the Close button.
-
Click Close.
The Creating connectable progress dialog closes.
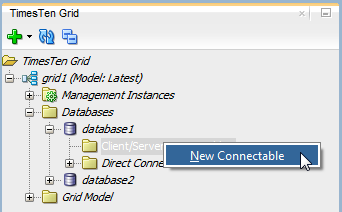
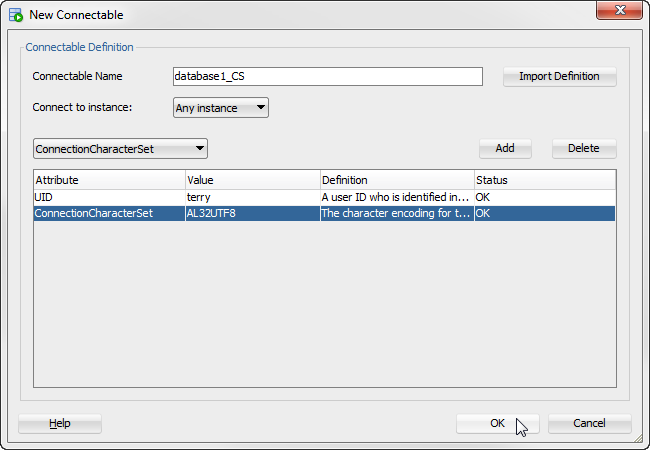
You have successfully created a connectable for your database. However, you need to apply your changes to the grid. Changes made to the grid model do not immediately impact a grid until you explicitly apply these changes. See "Apply grid model changes to the grid" for more information on applying model changes to a grid.
Edit a connectable
SQL Developer enables you to edit an existing connectable.
To edit a connectable, ensure that you are on the main SQL Developer page, that you have enabled the TimesTen Grid view, and that your grid node is expanded.
Expand the Grid Model option, expand the Database Definitions option, expand the name of your database, then either expand the Client/Server Connectables or Direct Connectables option, right-click the name of the connectable and select Edit.
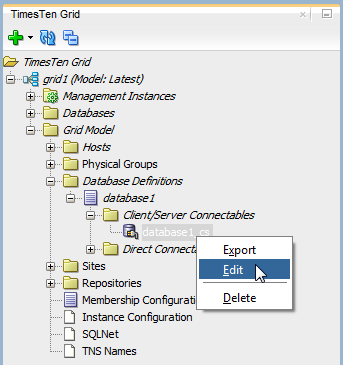
The Edit Connectable dialog displays.
Follow the steps, starting on step 3, as described in "Create a connectable".
Export a connectable
SQL Developer enables you to export an existing connectable. You can use this exported connectable file to import the definition of a new connectable.
To export a connectable, ensure that you are on the main SQL Developer page, that you have enabled the TimesTen Grid view, and that your grid node is expanded.
Expand the Grid Model option, expand the Database Definitions option, expand the name of your database, then either expand the Client/Server Connectables or Direct Connectables option, right-click the name of the connectable and select Export.
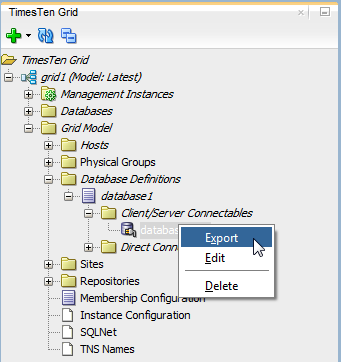
The Save Connectable definition dialog displays.
Specify the location of where you want to export the connectable file.
In the File Name text field, specify a meaningful name for the connectable file and click Save.
The Save Connectable Definition dialog closes.
You have successfully exported a connectable file.
Delete a connectable
SQL Developer enables you to delete a connectable from your grid model.
To delete a connectable, ensure that you are on the main SQL Developer page, that you have enabled the TimesTen Grid view, and that your grid node is expanded.
Expand the Grid Model option, expand the Database Definitions option, expand the name of your database, then either expand the Client/Server Connectables or Direct Connectables option, right-click the name of the connectable and select Delete.
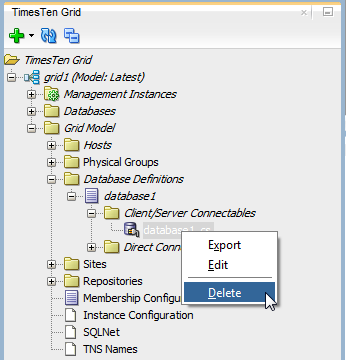
The Delete Connectable dialog displays. Locate the Yes button.
Click Yes.
The Delete Connectable dialog closes and the Delete Connectable progress dialog displays. Locate the Close button.
Click Close.
You have successfully deleted a connectable. However, you need to apply your changes to the grid. Changes made to the grid model do not immediately impact a grid until you explicitly apply these changes. See "Apply grid model changes to the grid" for more information on applying model changes to a grid.
View active connections to the database
SQL Developer enables you to view all active connections to a database. This is useful to determine if it is safe to perform certain database operations like destroying a database or closing a database.
To view active connections to a database, ensure that you are on the main SQL Developer page, that you have enabled the TimesTen Grid view, and that your grid node is expanded.
Expand the Databases option and select the name of your database.
Figure 2-94 Select the name of your database
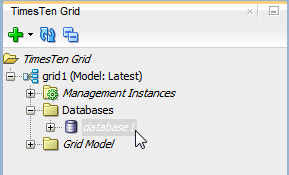
Description of ''Figure 2-94 Select the name of your database''
The database status displays or refreshes if it is already displayed. Locate the connections link that is next to the Number of applications connected to the database_name label.
Click the connections link that is next to the Number of applications connected to the database_name label.
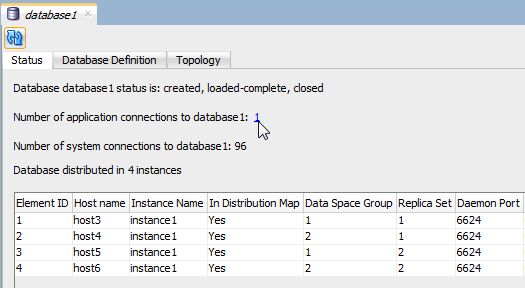
The Updating information for database progress dialog displays. Once the database information has been loaded, the Updating information for database progress dialog closes and the Connection Details dialog displays.
Figure 2-96 The Connections Details dialog
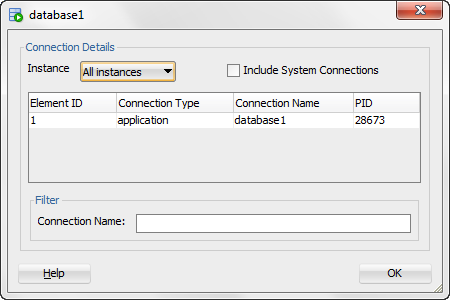
Description of ''Figure 2-96 The Connections Details dialog''
The Connection Details dialog enables you to view all connections to your database data instances or specific data instances. Use the Instance drop-down list to select an instance for which you want to see its connection. In case that you want to see system connections, select the Include System Connections check box. You can also use the Connection Name text field to create a filter for all available connections to your selected instance.
Click the OK button to close the Connection Details dialog.
Destroy a database
SQL Developer enables you to destroy a database.
Before you create a grid:
-
Ensure that you have migrated or backed up all data from the database. For more information, see "Migrating, Backing Up and Restoring Data" in the Oracle TimesTen In-Memory Database Scaleout User's Guide.
-
Ensure that the database is unloaded from memory. See "Perform database operations" for more information.
To destroy a database, ensure that you are on the main SQL Developer page, that you have enabled the TimesTen Grid view, and that your grid node is expanded.
-
Expand the Databases option, then right-click the name of your database and select Destroy.
The Destroy database dialog displays.
Ensure that there are no active connections to your database before proceeding. Click the number hyperlink near the top of the dialog to view the connection details of your database. Ensure that there are no critical connections to your database or properly close any active connections.
If there are 0 active connections to the database, you are ready to proceed.
-
In the text field, enter the instance administrator name.
-
If you want to delete the database definition of your database, click in the check box to the left of the text Delete database definition.
-
Click OK.
The Destroying database dialog displays. Deleting a database can take a few minutes. If SQL Developer displays an error message, troubleshoot the error.
The Locate the Close button.
-
Click Close.
The Destroying database progress and Destroy database dialogs close.
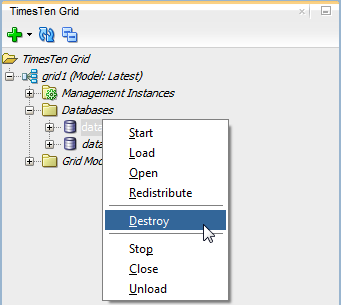
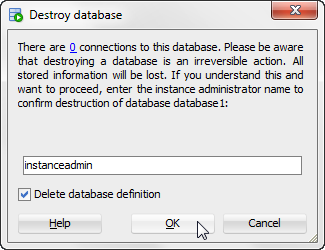
You have successfully deleted a database. However, you need to apply your changes to the grid. Changes made to the grid model do not immediately impact a grid until you explicitly apply these changes. See "Apply grid model changes to the grid" for more information on applying model changes to a grid.
Working with repositories
In a grid, a repository is used to store backups of databases, database exports, and collections of log files. TimesTen Scaleout enables you to define a repository as a directory path mounted using NFS on each host or as a directory path that is not directly mounted on each host. Multiple grids can use a single repository as long as each grid is associated with that repository.
SQL Developer enables you to create and detach repositories from your grid. For more information about repositories, see "Working with repositories" in the Oracle TimesTen In-Memory Database Scaleout User's Guide.
SQL Developer enables you to perform the following procedures with repositories:
Create a repository
To create a new grid repository, ensure that you are on the main SQL Developer page, that you have enabled the TimesTen Grid view, and that your grid node is expanded.
-
Expand the Grid Model option, right-click Repositories and select Create Repository.
The Create Repository dialog displays. Locate the Repository Name field.
-
In the Repository Name field, specify the name for the repository.
-
In the Location field, specify a location that is mounted using NFS on each host or as a directory path that is accessible on each host with SSH or SCP.
-
From the Method drop-down list, select a mounting option:
-
Mount - Creates a repository as a directory path mounted using NFS on each host of your grid.
-
SCP - Creates a repository as a directory path that is not directly mounted on each host of your grid.
-
-
If you selected the SCP method, specify the fully qualified domain name of the host on which the repository exists in the Address field.
-
Click OK.
The Create Repository dialog closes and the Create Repository progress dialog displays. Creating the repository can take a few minutes. If SQL Developer displays an error message, troubleshoot the error.
Locate the Close button in the Create Repository progress dialog.
-
Click Close.
The Create Repository progress dialog closes.
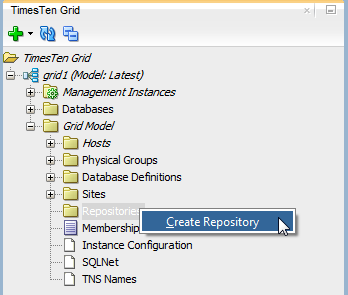
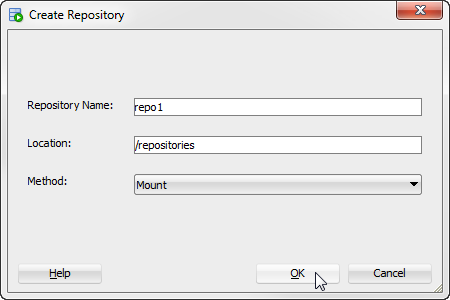
You have successfully created a repository. This repository is now available in the repositories folder of your grid model.
Detach a repository
To detach a grid repository, ensure that you are on the main SQL Developer page, that you have enabled the TimesTen Grid view, and that your grid node is expanded.
-
Expand the Grid Model option, expand Repositories, then right-click the name of your repository and select Detach.
The Detach Repository warning dialog displays. Locate the Yes button.
-
Click Yes.
The Detach Repository warning dialog closes and the Detach Repository progress dialog displays.Detaching the repository can take a few minutes. If SQL Developer displays an error message, troubleshoot the error.
Locate the Close button in the Detach Repository progress dialog.
-
Click Close.
The Detach Repository progress dialog closes.
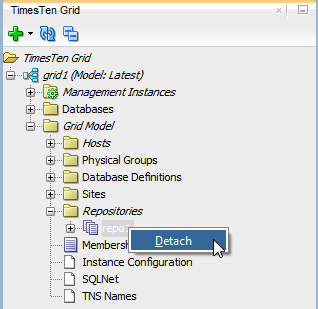
You have successfully detached a repository.
Inspecting logs
SQL Developer enables you to review the support and user log of TimesTen Scaleout. These logs may be useful in troubleshooting errors with your grid. For each instance that is part of your grid, you can view these logs:
-
Support Log
-
User Error Log
To view logs, ensure that you are on the main SQL Developer page and that you have enabled the TimesTen Grid view.
-
Right-click your grid node, select Inspect Logs, then select Support Log or User Error Log.
Depending on the option that you select, the Inspect Support Log or Inspect User Error log dialog displays.
-
In the Available instance folder, locate the instance for which you want to view a log. Right-click the instance name and select Load/Unload. If you want to view a log of additional instances, right-click the corresponding instance name and select Load/Unload for any additional instances.
Note:
In case the log panel expands and hides the instance panel of the dialog, place your cursor at the left edge of the log panel and use the resize arrow to resize the log panel.If you want to close a log of an instance, locate the instance in the Showing Logs folder for which you want to close a log. Then, right-click the instance name and select Load/Unload.
If you want to create filters, save the filtered logs, refresh logs, or perform various other operations with the logs, click the Logs menu button. The Logs menu button is located in the top left corner of the Inspect Support Log or Inspect User Error log dialog.
-
After you finish reviewing the log, click Cancel.
Depending on the option that you select, the Inspect Support Log or Inspect User Error log dialog closes.
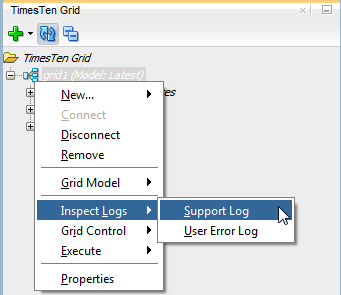
You have successfully reviewed the support log or user error log of the instances of your grid.