Beispiele für die Verwendung des Select AI Agent Framework
Sehen Sie sich Beispiele an, die zeigen, wie Sie das Select AI Agent Framework für allgemeine Aufgaben wie Filmanalyse, Protokollanalyse und Kundensupport erstellen, konfigurieren und damit interagieren.
Beispiel: Agent erstellen
Erstellen Sie einen Agenten, um eine definierte Aufgabe auszuführen.
Bevor Sie beginnen
Beurteilung:
Beispiel: Agent erstellen
In diesem Beispiel wird ein Agent namens Customer_Return_Agent erstellt, der für die Verarbeitung von Unterhaltungen im Zusammenhang mit Produktrückgaben verantwortlich ist.
Dieses Beispiel veranschaulicht die Verwendung von Google als AI-Provider, wie im AI-Profil GOOGLE angegeben. Das AI-Profil identifiziert das LLM, das der Agent für Argumentation und Antworten verwendet. Das Attribut role enthält Anweisungen, die den Agent leiten.
BEGIN
  DBMS_CLOUD_AI_AGENT.CREATE_AGENT(
    agent_name => 'CustomerAgent',
    attributes =>'{
       "profile_name": "GOOGLE",
                       "role": "You are an experienced customer agent who deals with customers return request."
     }'
  );
END;
/
Hinweis
Hinweis: Jeder Agent in einem Team mit mehreren Agents kann ein eindeutiges KI-Profil aufweisen, und jedes Profil kann einen anderen KI-Provider und/oder LLM verwenden.
Beispiel: Integrierte Tools erstellen
Erstellen Sie integrierte Tools wie SQL, RAG, Websearch, Email und Slack. Mit diesen Tools können Agents und Aufgaben Daten abfragen, Wissen abrufen, im Web suchen und Benachrichtigungen senden.
Bevor Sie beginnen
Beurteilung:
-
Voraussetzungen für die Verwendung des Select AI Agent Framework
-
Slack-Benachrichtigungen von einer autonomen KI-Datenbank senden
Select AI Agent akzeptiert die folgenden Tools:
-
SQL -
RAG -
WEBSEARCH -
NOTIFICATION-
EMAIL -
SLACK
-
Hinweis
Hinweis: Integrierte Tools (z.B. SQL und RAG) enthalten interne Anweisungen. Optional können Sie vom Benutzer bereitgestellte Anweisungen anhängen, um das Verhalten für Ihren Anwendungsfall anzupassen. Durch das Anhängen einer Anweisung kann aufgabenspezifischer Kontext hinzugefügt werden (Beispiel: Geltungsbereichsabfragen zu einem bestimmten Schema oder Hilfe beim Durchsetzen eines Antwortformats). Dies kann die Relevanz für spezielle Szenarien verbessern. Schlecht geschriebene oder übermäßig präskriptive Anweisungen können die Werkzeugleistung beeinträchtigen. Halten Sie Anweisungen kurz, spezifisch und konsistent mit dem Zweck des Tools.
Beispiel: SQL-Tool
In diesem Beispiel wird ein SQL-Tool erstellt, das Abfragen in natürlicher Sprache in SQL-Anweisungen übersetzt. Mit dem SQL-Tool können Agents datenbezogene Fragen beantworten, indem Prompts SQL-Abfragen zugeordnet werden.
Dieses Beispiel zeigt, wie OCI als KI-Provider verwendet wird, wie im KI-Profil nl2sql_profile angegeben. Das AI-Profil identifiziert das LLM, das der Agent für Argumentation und Antworten verwendet. In diesem Beispiel definiert das KI-Profil nl2sql_profile das Set der SH-Schematabellen, die der Agent abfragen kann. Dadurch wird der Zugriff in natürlicher Sprache auf häufig verwendete Umsatzhistoriendaten wie Kunden, Produkte, Werbeaktionen und Länder ermöglicht. Das SQL-Tool verwendet die Datenbankobjekte, die im AI-Profil angegeben sind, um sicherzustellen, dass generierte SQL-Anweisungen korrekt und relevant für das SH-Dataset bleiben.
BEGIN
  DBMS_CLOUD_AI.CREATE_PROFILE(
      profile_name => 'nl2sql_profile',
      attributes   => '{"provider": "oci",
        "credential_name": "GEN1_CRED",
        "oci_compartment_id": "ocid
1.compartment.oc1..aaaa...",
	object_list": [{"owner": "SH", "name": "customers"},
                      {"owner": "SH", "name": "countries"},
                      {"owner": "SH", "name": "supplementary_demographics"},
                      {"owner": "SH", "name": "profits"},
                      {"owner": "SH", "name": "promotions"},
                      {"owner": "SH", "name": "products"}]

       }');
end;
/

EXEC DBMS_CLOUD_AI_AGENT.DROP_TOOL('SQL');
BEGIN
  DBMS_CLOUD_AI_AGENT.CREATE_TOOL(
    tool_name  => 'SQL',
    attributes => '{"tool_type": "SQL",
                    "tool_params": {"profile_name": "nl2sql_profile"}}'
  );
END;
/
Beispiel: RAG-Tool
In diesem Beispiel wird ein RAG-Tool (Retrieval Augmented Generation) erstellt. Mit dem RAG-Tool können Agents Antworten in Unternehmensdokumenten abrufen und auf diese Weise die Genauigkeit für wissensbasierte Antworten verbessern.
Dieses Beispiel veranschaulicht die Definition einer RAG_PROFILE mit Zugangsdaten, einem Vektorindex und die Angabe von Profilparametern. Erstellen Sie dann einen Vektorindex RAG_INDEX in Object Storage für Dokumenteinbettungen, und erstellen Sie die RAG_TOOL, die mit Ihrem Profil verknüpft ist.
BEGIN
  DBMS_CLOUD_AI.CREATE_PROFILE(
          profile_name =>'RAG_PROFILE',
          attributes   =>'{"provider": "oci",
            "credential_name": "GENAI_CRED",
            "vector_index_name": "RAG_INDEX",
            "oci_compartment_id": "ocid1.compartment.oc1..aaaa..",
            "temperature": 0.2,
            "max_tokens": 3000
          }');
END;
/

BEGIN
   DBMS_CLOUD_AI.CREATE_VECTOR_INDEX(
           index_name  => 'RAG_INDEX',
           attributes  => '{"vector_db_provider": "oracle",
                            "location": "https://swiftobjectstorage.us-phoenix-1.oraclecloud.com/v1/my_namespace/my_bucket/my_data_folder",
                            "object_storage_credential_name": "OCI_CRED",
                            "profile_name": "RAG_PROFILE",
                            "chunk_overlap":128,
                            "chunk_size":1024
   }');
END;
/

EXEC DBMS_CLOUD_AI_AGENT.DROP_TOOL('RAG_TOOL');
BEGIN
  DBMS_CLOUD_AI_AGENT.CREATE_TOOL(
    tool_name  => 'RAG_TOOL',
    attributes => '{"tool_type": "RAG",
                      "tool_params": {"profile_name": "RAG_PROFILE"}}'
  );
END;
/
Beispiel: Websearch-Tool
In diesem Beispiel wird ein Websearch-Tool zum Abrufen von Details aus dem Internet erstellt. Mit dem Websearch-Tool können Agents Informationen aus dem Web suchen, z.B. Produktpreise oder Beschreibungen.
Dieses Beispiel veranschaulicht das Hinzufügen eines ACL-Eintrags für den OpenAI-Provider. Zugangsdaten OPENAI_CRED mit Ihrem API-Schlüssel erstellen und das Websearch-Tool erstellen, dessen Zweck beschreiben und mit den Zugangsdaten verknüpfen.
Hinweis
Hinweis: OpenAI ist der einzige unterstützte Websearch AI-Provider.
BEGIN
  DBMS_NETWORK_ACL_ADMIN.APPEND_HOST_ACE(
    host => 'api.openai.com',
    ace  => xs$ace_type(privilege_list => xs$name_list('http'),
                        principal_name => 'ADB_USER',
                        principal_type => xs_acl.ptype_db)
   );
END;
/

BEGIN
  DBMS_CLOUD.CREATE_CREDENTIAL(
    credential_name => 'OPENAI_CRED',
    username        => 'OPENAI',
    password        => '<`OPENAI_API_KEY`>'
  );
END;
/

EXEC DBMS_CLOUD_AI_AGENT.DROP_TOOL('Websearch');
BEGIN
  DBMS_CLOUD_AI_AGENT.create_tool(
    tool_name  => 'Websearch',
    attributes => '{"instruction": "This tool can be used for searching the details about topics mentioned in notes and prepare a summary about prices, details on web",
                      "tool_type": "WEBSEARCH",
                      "tool_params": {"credential_name": "OPENAI_CRED"}}'
  );
END;
/
Beispiel: Benachrichtigungstool mit E-Mail-Typ
In diesem Beispiel wird ein Tool für E-Mail-Benachrichtigungen erstellt. Mit dem Tool "E-Mail" können Agents Benachrichtigungs-E-Mails als Teil ihres Workflows senden.
In diesem Beispiel wird veranschaulicht, wie Sie Zugangsdaten EMAIL_CRED mit Ihrem Kennwort erstellen, SMTP-Zugriff für den Datenbankbenutzer zulassen und ein Benachrichtigungstool mit dem Typ EMAIL erstellen, einschließlich SMTP-Details, Absender- und Empfängeradressen.
Hinweis
Hinweis: Sie müssen SMTP-Zugangsdaten in Oracle Cloud Infrastructure generieren, bevor Sie Zugangsdaten in der autonomen KI-Datenbank erstellen. Weitere Informationen finden Sie unter SMTP-Zugangsdaten für einen Benutzer generieren.
BEGIN
  DBMS_CLOUD.CREATE_CREDENTIAL(
    credential_name => 'EMAIL_CRED',
    username => '<SMTP username>',
    password => '<SMTP password>');
END;
/
-- Allow SMTP access for user
BEGIN
   DBMS_NETWORK_ACL_ADMIN.APPEND_HOST_ACE(
     host => 'smtp.email.us-ashburn-
1.oci.oraclecloud.com',
     lower_port => 587,
     upper_port => 587,
     ace => xs$ace_type(privilege_list => xs$name_list('SMTP'),
                        principal_name => 'ADB_USER',
                        principal_type => xs_acl.ptype_db));
END;
/

EXEC DBMS_CLOUD_AI_AGENT.DROP_TOOL('Email');
BEGIN
  DBMS_CLOUD_AI_AGENT.CREATE_TOOL(
    tool_name  => 'EMAIL',
    attributes => '{"tool_type": "NOTIFICATION",
                    "tool_params": {"notification_type" : "EMAIL",
                                    "credential_name": "EMAIL_CRED",
                                    "recipient": "example_recipient@oracle.com",
                                    "smtp_host": "smtp.email.us-ashburn-1.oci.oraclecloud.com",
                                    "sender": "example_sender@oracle.com"}}'
  );
END;
/
Beispiel: Benachrichtigungstool mit Slack-Typ
In diesem Beispiel wird ein Slack-Benachrichtigungstool erstellt. Mit dem Slack-Tool können Agents Benachrichtigungen direkt an einen Slack-Workspace-Kanal senden.
Dieses Beispiel zeigt, wie Sie einen ACL-Eintrag für Slack hinzufügen und ein Benachrichtigungstool mit dem Typ SLACK erstellen, das ihn mit SLACK_CRED und dem Zielkanal verknüpft.
BEGIN
 DBMS_NETWORK_ACL_ADMIN.APPEND_HOST_ACE (
  host         => 'slack.com',
  lower_port   => 443,
  upper_port   => 443,
  ace          => xs$ace_type(
      privilege_list => xs$name_list('http'),
      principal_name => 'ADB_USER',
      principal_type => xs_acl.ptype_db));
END;
/

BEGIN
  DBMS_CLOUD_AI_AGENT.create_tool(
    tool_name  => 'slack',
    attributes => '{"tool_type": "SLACK",
                    "tool_params": {"credential_name": "SLACK_CRED",
                                    "channel": "<channel_number>"}}'
  );
END;
/
Beispiel: Beschreiben und Ausführen des Select AI Agent Framework Framework-Tools
Verwenden Sie Tool-APIs, um ein Tool zu beschreiben und ein Tool nach Namen auszuführen. DESCRIBE_TOOL gibt die Toolbeschreibung, Attribute und das Argumentschema zurück. RUN_TOOL ruft das Tool mit einer JSON-Eingabe-Payload auf und gibt das Toolergebnis als JSON zurück.
Bevor Sie beginnen
Beurteilung:
- Voraussetzungen für KI-Auswahl ausführen
- Voraussetzungen für die Verwendung des Select AI Agent Framework
- Funktion DESCRIBE_TOOL
- RUN_TOOL-Funktion
- Prozedur CREATE_TOOL
Dieses Beispiel erstellt Beispiellogdaten, registriert eine PL/SQL-Funktion als Select AI Agent Framework-Tool, zeigt, wie Sie das Toolschema prüfen, bevor Sie es verwenden, und ruft das Tool direkt aus SQL oder PL/SQL mit JSON-Eingabe auf. Dieselben APIs können von MCP-kompatiblen Integrationen verwendet werden, um Tool-Discovery- und Toolaufruffunktionen bereitzustellen.
Wenn keine Agent-Tools erstellt wurden, geben die Tool-Discovery- und Toolaufruf-APIs ein leeres Ergebnis zurück. Erstellen Sie ein oder mehrere Tools, indem Sie DBMS_CLOUD_AI_AGENT.CREATE_TOOL verwenden, um Tools für Discovery und Aufruf verfügbar zu machen.
DECLARE
  l_result CLOB;
BEGIN
  l_result := DBMS_CLOUD_AI_AGENT.DESCRIBE_TOOL(
    tool_name => 'FETCH_LOG_TOOL'
  );

  DBMS_OUTPUT.PUT_LINE(l_result);
END;
/

SELECT DBMS_CLOUD_AI_AGENT.RUN_TOOL(
  tool_name => 'FETCH_LOG_TOOL',
  input => '{"P_SINCE":"2026-01-01"}'
) AS tool_result
FROM dual;
Das folgende Beispiel zeigt, wie Sie ein Tool erstellen und DESCRIBE_TOOL und RUN_TOOL verwenden.
BEGIN
  EXECUTE IMMEDIATE 'DROP TABLE app_log_messages PURGE';
EXCEPTION
  WHEN OTHERS THEN
    IF SQLCODE != -942 THEN
      RAISE;
    END IF;
END;
/

CREATE TABLE app_log_messages (
  log_timestamp DATE,
  severity VARCHAR2(10),
  message VARCHAR2(4000)
);

INSERT INTO app_log_messages VALUES (DATE '2026-01-01', 'INFO', 'Routine performance check completed.');
INSERT INTO app_log_messages VALUES (DATE '2026-01-03', 'WARN', 'Query response time exceeded the review threshold.');
COMMIT;

CREATE OR REPLACE FUNCTION fetch_logs (
  p_since IN DATE
) RETURN CLOB IS
  l_logs CLOB;
BEGIN
  DBMS_LOB.CREATETEMPORARY(l_logs, TRUE);

  FOR rec IN (
    SELECT TO_CHAR(log_timestamp, 'YYYY-MM-DD') || ' ' ||
           severity || ': ' || message AS line
    FROM app_log_messages
    WHERE log_timestamp >= p_since
    ORDER BY log_timestamp
  ) LOOP
    DBMS_LOB.WRITEAPPEND(l_logs, LENGTH(rec.line) + 1, rec.line || CHR(10));
  END LOOP;

  RETURN l_logs;
END;
/

BEGIN
  DBMS_CLOUD_AI_AGENT.CREATE_TOOL(
    tool_name => 'FETCH_LOG_TOOL',
    attributes => '{"instruction":"Returns log messages on or after the requested date.","function":"FETCH_LOGS"}',
    description => 'Fetch application log messages by date.'
  );
END;
/

DECLARE
  l_result CLOB;
BEGIN
  l_result := DBMS_CLOUD_AI_AGENT.DESCRIBE_TOOL(
    tool_name => 'FETCH_LOG_TOOL'
  );

  DBMS_OUTPUT.PUT_LINE(l_result);
END;
/

SELECT DBMS_CLOUD_AI_AGENT.RUN_TOOL(
  tool_name => 'FETCH_LOG_TOOL',
  input => '{"P_SINCE":"2026-01-01"}'
) AS tool_result
FROM dual;
Beispiel: Aufgabe erstellen
Erstellen Sie eine Aufgabe, die ein Agent ausführen kann.
Bevor Sie beginnen
Beurteilung:
Hinweis
Hinweis: Nur ein DBA kann EXECUTE-Berechtigungen und eine Netzwerk-ACL-Prozedur erteilen.
Beispiel: E-Mail-Aufgabe erstellen
In diesem Beispiel wird Generate_Email_Task erstellt, das das LLM anweist, eine Standardbestätigungs-E-Mail mit strukturierten Daten zu erstellen.
Das folgende Beispiel veranschaulicht die Verwendung des Attributs instruction und gibt Anweisungen dazu, was die E-Mail enthalten soll.
BEGIN DBMS_CLOUD_AI_AGENT.DROP_TASK('Generate_Email_Task');
EXCEPTION WHEN OTHERS THEN NULL; END;
/
BEGIN
    DBMS_CLOUD_AI_AGENT.CREATE_TASK(
    task_name => 'Generate_Email_Task',
    attributes => '{"instruction": "Use the customer information and product details to generate an email in a professional format. The email should:' \|\|
                    '
1. Include a greeting to the customer by name' \|\|
                    '2. Specify the item being returned, the order number, and the reason for the return' \|\|
                    '3. If it is a refund, state the refund will be issued to the credit card on record.' \|\|
                    '4. If it is a replacement, state that the replacement will be shipped in 3-5 business days."}'
    );
END;
Beispiel: Fetch-Logaufgabe erstellen
In diesem Beispiel wird eine FETCH_LOGS_TASK erstellt, die Logs basierend auf der Anforderung abruft.
Dieses Beispiel veranschaulicht das Erstellen einer Aufgabe, die das Tool log_fetcher zum Abrufen von Logs verwendet. Dieses benutzerdefinierte Tool gibt die PL/SQL-Prozedur fetch_logs an. Die Aufgabenanweisung gibt an, was für eine Aufgabe erforderlich ist. Das Attribut enable_human_tool ist auf "true" gesetzt, sodass eine Person den Taskflow bei Bedarf leiten oder genehmigen kann. Ein vollständiges Beispiel finden Sie unter Beispiel: Logberichte abrufen und analysieren.
BEGIN
  DBMS_CLOUD_AI_AGENT.CREATE_TASK(
    task_name  =>'FETCH_LOGS_TASK',
    attributes =>'{
       "instruction": "Fetch the log entries from the database based on user request: {query}",
       "tools": ["log_fetcher"],
       "enable_human_tool" : "true"
     }'
  );
END;
/
Beispiel: Loganalyseaufgabe erstellen
In diesem Beispiel wird eine ANALYZE_LOG_TASK erstellt, mit der die abgerufenen Logs analysiert werden.
Das folgende Beispiel veranschaulicht, wie Sie FETCH_LOGS_TASK als Attribut input verwenden. Die Aufgabe ANALYZE_LOG_TASK wird gestartet, nachdem Logs erfasst wurden, damit FETCH_LOGS_TASK als Eingabe ausgegeben wird. Die Aufgabenanweisung gibt an, was für eine Aufgabe erforderlich ist. Das Attribut enable_human_tool ist auf "false" gesetzt, das angibt, dass keine Human-in-the-Loop-Prüfung vorhanden ist.
BEGIN
    DBMS_CLOUD_AI_AGENT.CREATE_TASK(
      task_name  =>'ANALYZE_LOG_TASK',
      attributes =>'{"instruction": "Analyze the fetched log entries retrieved based on user request: {query} ' ||
                      'Generate a detailed report include issue analysis and possible solution.",
         "input" : "FETCH_LOGS_TASK",
         "enable_human_tool" : "false"
       }'
    );
END;
/
Beispiel: Agent-Team erstellen
Erstellen Sie Agent-Teams, um Ihre Aufgaben zu erfüllen.
Bevor Sie beginnen
Beurteilung:
Beispiel: Agent-Team erstellen
In diesem Beispiel wird das Team ReturnAgency erstellt und ein einzelner Agent Customer_Return_Agent enthalten. Die Aufgabe Return_And_Price_Match ist dem Agent zugewiesen. Mit dieser Aufgabe werden Retourenanforderungen verwaltet, indem der Grund angegeben und der Bestellstatus in Ihrer Datenbank aktualisiert wird. Die process ist auf sequential gesetzt, um die Aufgaben in einer definierten Reihenfolge auszuführen.
BEGIN
  DBMS_CLOUD_AI_AGENT.CREATE_TEAM(
    team_name  => 'ReturnAgency',
    attributes => '{"agents": [{"name":"Customer_Return_Agent","task" : "Return_And_Price_Match"}],
                    "process": "sequential"}');
END;
/
Ein vollständiges Beispiel finden Sie unter Beispiel: Product Return Agent erstellen.
Beispiel: Multi-Agent-Team erstellen
In diesem Beispiel wird das Team Ops_Issues_Solution_Team erstellt. Es enthält zwei Agents zur Verarbeitung der Loganalyse und Fehlerbehebung: Data_Engineer und Ops_Manager. Der Agent Data_Engineer führt die Aufgabe fetch_logs_task aus, und der Agent Ops_Manager führt die Aufgabe analyze_log_task aus. Die process ist auf sequential gesetzt, um die Aufgaben in einer definierten Reihenfolge auszuführen.
BEGIN
      DBMS_CLOUD_AI_AGENT.create_team(
        team_name  => 'Ops_Issues_Solution_Team',
        attributes => '{"agents": [{"name":"Data_Engineer","task" : "fetch_logs_task"},
                                   {"name":"Ops_Manager","task" : "analyze_log_task"}],
                "process": "sequential"
                }');
END;
/
Ein vollständiges Beispiel finden Sie unter Beispiel: Logberichte abrufen und analysieren.
Beispiel: Agent-Team ermitteln und Teamstatus prüfen
Mit Team-Discovery-APIs können Sie verfügbare Teams auflisten, ein ausgewähltes Team beschreiben und den neuesten Ausführungsstatus für eine Teamunterhaltung abrufen. Teambeschreibungen enthalten die Skills, die von den Teams bereitgestellt werden. Diese Skills stellen die zugrunde liegenden Tools des Select AI Agent Framework dar und sind keine separaten Datenbankobjekte.
Bevor Sie beginnen
Beurteilung:
- Voraussetzungen für KI-Auswahl ausführen
- Voraussetzungen für die Verwendung des Select AI Agent Framework
- Prozedur CREATE_TEAM
- LIST_TEAMS-Funktion
- Funktion GET_TEAM_STATE
In diesem Beispiel werden verfügbare Agent-Teams aufgelistet, die von einem ausgewählten Team bereitgestellten Funktionen beschrieben und der letzte Ausführungsstatus für eine Unterhaltung abgerufen. Diese APIs können auch Agent2Agent-kompatible Integrationen unterstützen, die veröffentlichte Agent-Teams ermitteln und die von ihnen bereitgestellten Skills prüfen.
Wenn keine Agent-Teams erstellt wurden, geben die Agent-Team-Discovery und die Ausführungsstatus-APIs ein leeres Ergebnis zurück. Erstellen Sie ein oder mehrere Agent-Teams, indem Sie DBMS_CLOUD_AI_AGENT.CREATE_TEAM verwenden, um Team-Discovery und -ausführung zu ermöglichen.
Verwenden Sie für die Agent2Agent-Delegierung LIST_TEAMS, um Teams zurückzugeben, deren Eigentümer der aufrufende Benutzer ist und die genau einen Agent enthalten. Bevor Sie ein Team auswählen, verwenden Sie DESCRIBE_TEAM, um seine Funktionen zu prüfen.
Verwenden Sie dieselbe Unterhaltungs-ID, die an RUN_TEAM übergeben wurde, wenn Sie den Ausführungsstatus für eine bestimmte Unterhaltung benötigen. Verwenden Sie für die Agent2Agent-Integration eine Konversations-ID für die Teamausführung und den nachfolgenden Status-Lookup. Die Anwendung kann ein Team ermitteln, seine Fähigkeiten prüfen, Arbeit delegieren und dann den Ausführungsstatus abfragen.
SELECT DBMS_CLOUD_AI_AGENT.LIST_TEAMS() AS teams
FROM dual;

SELECT DBMS_CLOUD_AI_AGENT.DESCRIBE_TEAM(
  team_name => 'CUSTOMER_AGENT_ONLY_TEAM'
) AS team_description
FROM dual;

SELECT DBMS_CLOUD_AI_AGENT.GET_TEAM_STATE(
  team_name => 'CUSTOMER_AGENT_ONLY_TEAM',
  params => '{"conversation_id":"<CONVERSATION_ID>"}'
) AS team_state
FROM dual;
Verwenden Sie für die Agent2Agent-Integration eine Konversations-ID für die Teamausführung und den nachfolgenden Status-Lookup. Die Anwendung kann ein Team ermitteln, seine Fähigkeiten prüfen, Arbeit delegieren und dann den Ausführungsstatus abfragen.
DECLARE
  l_conversation_id VARCHAR2(36);
  l_response        CLOB;
  l_state           VARCHAR2(30);
BEGIN
  l_conversation_id := DBMS_CLOUD_AI.CREATE_CONVERSATION();

  l_response := DBMS_CLOUD_AI_AGENT.RUN_TEAM(
    team_name   => 'CUSTOMER_AGENT_ONLY_TEAM',
    user_prompt => 'I need help returning a damaged item.',
    params      => '{"conversation_id":"' || l_conversation_id || '"}'
  );

  l_state := DBMS_CLOUD_AI_AGENT.GET_TEAM_STATE(
    team_name => 'CUSTOMER_AGENT_ONLY_TEAM',
    params    => '{"conversation_id":"' || l_conversation_id || '"}'
  );

  DBMS_OUTPUT.PUT_LINE(l_response);
  DBMS_OUTPUT.PUT_LINE('Current state: ' || l_state);
END;
/
Das Statusergebnis meldet den letzten Ausführungsstatus für die Unterhaltung, wie RUNNING, WAITING_FOR_HUMAN, SUCCEEDED oder FAILED.
Beispiel: Agent erstellen, der Tools direkt aufruft
Aufrufe von Agent-direkten Tools unterstützen interaktive Sessions mit offenem Ende. In diesem Modus enthält der Teameintrag den Agent-Namen und weist dem Agent keine Agent-Aufgabe zu. Die Anwendung oder der Benutzer kontrolliert den Sessionabschluss durch Aufruf von SET_EXECUTION_STATE.
Bevor Sie beginnen
Beurteilung:
- Voraussetzungen für KI-Auswahl ausführen
- Voraussetzungen für die Verwendung des Select AI Agent Framework
- CREATE_AGENT - Prozedur
In diesem Beispiel wird ein Agent erstellt, der konfigurierte Tools direkt aufruft, ohne die aufgabenbasierte Ausführung zu verwenden. Es zeigt eine Agent-direkte Session, in der die Anwendung feststellt, wann die Interaktion abgeschlossen ist. Verwenden Sie aufgabenbasierte Workflows, wenn der Workflow vordefinierten Aufgabenanweisungen und Abschlusskriterien folgen soll. Verwenden Sie die Agent-Direktausführung, wenn die Anwendung die Unterhaltung offen halten und bestimmen muss, wann die Session beendet wird.
Agent-Direct-Tool-Aufruf-APIs geben ein leeres Ergebnis zurück, wenn keine Agents mit zugehörigen Tools erstellt wurden. Erstellen Sie einen Agent, und ordnen Sie ihm ein oder mehrere Tools zu, bevor Sie Agent-Direkttoolaufrufe aufrufen.
BEGIN
  DBMS_CLOUD_AI_AGENT.CREATE_AGENT(
    agent_name => 'CUSTOMER_AGENT_ONLY',
    attributes => '{
      "profile_name": "<AI_PROFILE_NAME>",
      "role": "You help customers with return requests. Ask for the return reason, collect the order number, confirm the requested action, and call EMAIL_TOOL only after the customer confirms the action.",
      "enable_human_tool": "true",
      "short_term_memory_length": 4,
      "tools": ["EMAIL_TOOL"]
    }'
  );
END;
/

BEGIN
  DBMS_CLOUD_AI_AGENT.CREATE_TEAM(
    team_name => 'CUSTOMER_AGENT_ONLY_TEAM',
    attributes => '{"agents":[{"name":"CUSTOMER_AGENT_ONLY"}],
      "process":"sequential"}'
  );
END;
/

DECLARE
  l_response CLOB;
  l_conversation_id VARCHAR2(128);
BEGIN
  l_conversation_id := DBMS_CLOUD_AI.CREATE_CONVERSATION();

  l_response := DBMS_CLOUD_AI_AGENT.RUN_TEAM(
    team_name => 'CUSTOMER_AGENT_ONLY_TEAM',
    user_prompt => 'I need help returning order 7820.',
    params => '{"conversation_id":"' || l_conversation_id || '"}'
  );

  DBMS_OUTPUT.PUT_LINE(l_response);
END;
/

BEGIN
  DBMS_CLOUD_AI_AGENT.SET_EXECUTION_STATE(
    team_name => 'CUSTOMER_AGENT_ONLY_TEAM',
    state => 'SUCCEEDED',
    params => '{"conversation_id":"<CONVERSATION_ID>"}'
  );
END;
/
Beispiel: Kurzzeit- und Langzeitspeicherlänge konfigurieren
Die Speicherlänge steuert, wie viel vorheriger Kontext verfügbar ist, wenn ein Agent das LLM aufruft. short_term_memory_length steuert die letzten Konversationsumgebungen, die in jedem LLM-Aufruf für die aktuelle Ausführung enthalten sind. long_term_memory_length steuert frühere Zusammenfassungen auf Aufgabenebene, die beim Start einer neuen Ausführung enthalten sind.
| Speichertyp | Attribut | Geltungsbereich | Standard |
|---|---|---|---|
| Kurzzeitgedächtnis | short_term_memory_length |
Auf einem Agent konfiguriert. | 30 |
| Langzeitgedächtnis | long_term_memory_length |
In einem Team konfiguriert. | 30 |
Unterhaltungsspeicher verwendet eine Standardspeichertiefe von 30 Unterhaltungsumdrehungen. Verwenden Sie den Standardwert für die meisten Workloads. Erhöhen Sie die Speichertiefe, wenn der Agent über längere Interaktionen zusätzlichen Konversationskontext benötigt, oder verringern Sie ihn, um die Kontextverarbeitung für kürzere, aufgabenorientierte Unterhaltungen zu reduzieren.
Bevor Sie beginnen
Beurteilung:
- Voraussetzungen für KI-Auswahl ausführen
- Voraussetzungen für die Verwendung des Select AI Agent Framework
- CREATE_AGENT - Prozedur
- Prozedur CREATE_TEAM
Dieses Beispiel konfiguriert den Kurzzeitgedächtnis für einen Agent und den Langzeitgedächtnis für ein Team und zeigt, wie die Menge des Konversationskontextes gesteuert wird, der für das LLM für verschiedene Workload-Anforderungen verfügbar ist.
BEGIN
  DBMS_CLOUD_AI_AGENT.CREATE_AGENT(
    agent_name => 'MEMORY_AWARE_RETURN_AGENT',
    attributes => '{
      "profile_name": "<AI_PROFILE_NAME>",
      "short_term_memory_length": 5,
      "role": "You help customers with product return requests and keep the current conversation context concise."
    }'
  );
END;
/

BEGIN
  DBMS_CLOUD_AI_AGENT.CREATE_TEAM(
    team_name => 'MEMORY_AWARE_RETURN_TEAM',
    attributes => '{"agents":[{"name":"MEMORY_AWARE_RETURN_AGENT","task":"RETURN_REQUEST_TASK"}],
      "long_term_memory_length": 5,
      "process":"sequential"}'
  );
END;
/
Beispiel: Erstellen eines Filmanalyse-Agents mit integrierten Tools
In diesem Beispiel wird gezeigt, wie Sie mit dem Select AI Agent Framework einen Filmanalyse-Agent erstellen können. In diesem Beispiel richten Sie einen Filmanalyse-Agent ein, der Daten abruft, Fragen beantwortet, im Web sucht und die Analyse per E-Mail versendet oder Slack-Benachrichtigungen sendet.
Bevor Sie beginnen
Beurteilung:
-
Voraussetzungen für die Verwendung des Select AI Agent Framework
-
Slack-Benachrichtigungen von einer autonomen KI-Datenbank senden
Im folgenden Beispiel wird davon ausgegangen, dass die Daten für Sie verfügbar sind.
In diesem Beispiel wird ein MOVIE_ANALYST-Agent erstellt und mehrere integrierte Tools wie SQL, RAG, WEBSEARCH und NOTIFICATION vom Typ EMAIL und SLACK verwendet. Der Agent beantwortet filmbezogene Fragen mit Eingabeaufforderungen in natürlicher Sprache.
In diesem Beispiel erstellen Sie zunächst den MOVIE_ANALYST-Agent, nachdem Ihr DBA EXECUTE-Berechtigungen erteilt hat für: die Packages DBMS_CLOUD_AI_AGENT, DBMS_CLOUD_AI, DBMS_CLOUD_PIPELINE, ACL-Zugriff für Ihren AI-Provider, SMTP-Zugriff und Slack-Zugriff.
Agent erstellen
Sie erstellen einen Agent mit dem Namen MOVIE_ANALYST mit einem Profil (GROK) und der Rolle, Fragen zu Filmen, Schauspielern und Genres zu beantworten.
Aufgabe erstellen
Sie erstellen eine Aufgabe mit dem Namen ANALYZE_MOVIE_TASK mit Anweisungen zur Beantwortung filmbezogener Abfragen.
Team einrichten
Sie erstellen ein MOVIE_AGENT_TEAM-Team mit MOVIE_ANALYST als Agent und der Aufgabe ANALYZE_MOVIE_TASK und legen es als aktives Team fest.
Sie können später Tools wie SQL, RAG, Websearch oder Notification anhängen, um ihre Funktionen zu erweitern.
Select AI Agent-Team ausführen
Sie führen das Agent-Team jetzt aus, indem Sie select ai agent als Präfix für Ihre Prompts verwenden.
Tools erstellen
Anschließend hängen Sie verschiedene integrierte Agent-Tools an:
-
SQL: Verwendet ein NL2SQL-Profil, um Fragen in SQL-Abfragen und andere unterstützte Select AI-Aktionen zu übersetzen. -
RAG: Ruft wissensbasierten Kontext aus gespeicherten Dokumenten ab. -
WEBSEARCH: Sammeln Sie Filmdetails oder Preise online. -
NOTIFICATION:-
EMAIL: Senden Sie Antworten auf Benutzereingabeaufforderungen, Filmberichte oder Bewertungen an einen Empfänger. -
SLACK: Antworten auf Benutzereingabeaufforderungen, Zusammenfassungen oder Aktualisierungen direkt an Slack senden.
-
Das vollständige Beispiel lautet wie folgt:
--Grants EXECUTE privilege to ADB_USER
--
GRANT EXECUTE on DBMS_CLOUD_AI_AGENT to ADB_USER;
GRANT EXECUTE on DBMS_CLOUD_AI to ADB_USER;
GRANT EXECUTE on DBMS_CLOUD_PIPELINE to ADB_USER;

-- Websearch tool accesses OPENAI endpoint, allow ACL access
BEGIN
  DBMS_NETWORK_ACL_ADMIN.APPEND_HOST_ACE(
    host => 'api.openai.com',
    ace  => xs$ace_type(privilege_list => xs$name_list('http'),
                        principal_name => 'ADB_USER',
                        principal_type => xs_acl.ptype_db)
   );
END;
/

-- To allow Email tool in Autonomous AI Database, allow SMTP access

BEGIN
   DBMS_NETWORK_ACL_ADMIN.APPEND_HOST_ACE(
     host => 'smtp.email.us-ashburn-1.oci.oraclecloud.com',
     lower_port => 587,
     upper_port => 587,
     ace => xs$ace_type(privilege_list => xs$name_list('SMTP'),
                        principal_name => 'ADB_USER,
                        principal_type => xs_acl.ptype_db));
END;
/

-- Allow ACL access to Slack

BEGIN
 DBMS_NETWORK_ACL_ADMIN.APPEND_HOST_ACE (
  host         => 'slack.com',
  lower_port   => 443,
  upper_port   => 443,
  ace          => xs$ace_type(
      privilege_list => xs$name_list('http'),
      principal_name => 'ADB_USER',
      principal_type => xs_acl.ptype_db));
END;
/

PL/SQL procedure successfully completed.

--Create an agent
BEGIN
   DBMS_CLOUD_AI_AGENT.CREATE_AGENT(
     agent_name => 'MOVIE_ANALYST',
     attributes => '{"profile_name": "GROK",
                     "role": "You are an AI Movie Analyst. Your can help answer a variety of questions related to movies. "
             }'
   );
END;
/

PL/SQL procedure successfully completed.

BEGIN
    DBMS_CLOUD_AI_AGENT.CREATE_TASK(
      task_name  => 'ANALYZE_MOVIE_TASK',
      attributes => '{"instruction": "Help the user with their request about movies. User question: {query}",
         "enable_human_tool" : "true"
       }'
    );
END;
/

PL/SQL procedure successfully completed.

BEGIN
  DBMS_CLOUD_AI_AGENT.CREATE_TEAM(
    team_name  => 'MOVIE_AGENT_TEAM',
    attributes => '{"agents": [{"name":"MOVIE_ANALYST","task" : "ANALYZE_MOVIE_TASK"}],
                    "process": "sequential"
                    }');
END;
/

PL/SQL procedure successfully completed.

EXEC DBMS_CLOUD_AI_AGENT.SET_TEAM('MOVIE_AGENT_TEAM');

PL/SQL procedure successfully completed.

select ai agent who are you?;

RESPONSE
--------------------------------------------------------------------------------
I'm MOVIE_ANALYST, an AI Movie Analyst here to assist with any questions or topi
cs related to movies. Whether you need information on films, actors, directors,
genres, or recommendations, I'm ready to help. What can I assist you with regard
ing movies?

-- SQL TOOL
BEGIN
  DBMS_CLOUD_AI.CREATE_PROFILE(
    profile_name =>'nl2sql_profile',
    attributes => '{"provider": "oci",
      "credential_name": "GENAI_CRED",
      "oci_compartment_id" : "ocid1.compartment.oc1..aaaaa...",
      "object_list": [{"owner": "ADB_USER", "name": "GENRE"},
                      {"owner": "ADB_USER", "name": "CUSTOMER"},
                      {"owner": "ADB_USER", "name": "WATCH_HISTORY"},
                      {"owner": "ADB_USER", "name": "STREAMS"},
                      {"owner": "ADB_USER", "name": "MOVIES"},
                      {"owner": "ADB_USER", "name": "ACTORS"}]
      }');
END;
/

PL/SQL procedure successfully completed.

BEGIN
  DBMS_CLOUD_AI_AGENT.CREATE_TOOL(
    tool_name  => 'SQL',
    attributes => '{"tool_type": "SQL",
                    "tool_params": {"profile_name": "nl2sql_profile"}}'
  );
END;
/

PL/SQL procedure successfully completed.

EXEC DBMS_CLOUD_AI_AGENT.drop_task('ANALYZE_MOVIE_TASK');

PL/SQL procedure successfully completed.

BEGIN
    DBMS_CLOUD_AI_AGENT.CREATE_TASK(
      task_name => 'ANALYZE_MOVIE_TASK',
      attributes =>'{"instruction": "Help the user with their request about movies. User question: {query}. ' ||
                       'You can use SQL tool to search the data from database",
        "tools": ["SQL"],
         "enable_human_tool" : "true"
       }'
    );
END;
/

PL/SQL procedure successfully completed.

EXEC DBMS_CLOUD_AI_AGENT.CLEAR_TEAM;

PL/SQL procedure successfully completed.

EXEC DBMS_CLOUD_AI_AGENT.SET_TEAM('MOVIE_AGENT_TEAM');

PL/SQL procedure successfully completed.

-- SQL tool retrieves the movie with the highest popularity view count from the watch_history table
select ai agent what is the most popular movie?;

RESPONSE
----------------------------------------------------------------
The most popular movie is "Laugh Out Loud" released in 2008.

-- RAG TOOL
BEGIN
  DBMS_CLOUD_AI.CREATE_PROFILE(
         profile_name => 'RAG_PROFILE',
         attributes =>'{"provider": "oci",
            "credential_name": "GENAI_CRED",
            "vector_index_name": "RAG_INDEX",
            "oci_compartment_id": "ocid1.compartment.oc1..aaaaa...",
            "temperature": 0.2,
            "max_tokens": 3000
          }');
END;
/

PL/SQL procedure successfully completed.

BEGIN
   DBMS_CLOUD_AI.CREATE_VECTOR_INDEX(
           index_name  => 'RAG_INDEX',
           attributes  => '{"vector_db_provider": "oracle",
                            "location": "https://swiftobjectstorage.us-phoenix-1.oraclecloud.com/v1/my_namespace/my_bucket/my_data_folder",
                            "object_storage_credential_name": "MY_OCI_CRED",
                            "profile_name": "RAG_PROFILE",
                            "vector_dimension": 1024,
                            "vector_distance_metric": "cosine",
                            "chunk_overlap":128,
                            "chunk_size":1024
   }');
END;
/
PL/SQL procedure successfully completed.

BEGIN
  DBMS_CLOUD_AI_AGENT.CREATE_TOOL(
    tool_name  => 'RAG_TOOL',
    attributes => '{"tool_type": "RAG",
                      "tool_params": {"profile_name": "RAG_PROFILE"}}'
  );
END;
/

PL/SQL procedure successfully completed.

BEGIN
    DBMS_CLOUD_AI_AGENT.CREATE_TASK(
      task_name =>'ANALYZE_MOVIE_TASK',
      attributes => '{"instruction": "Help the user with their request about movies. User question: {query}. ' ||
                       'You can use RAG tool to search the information from the knowledge base user give.",
        "tools": ["RAG_TOOL"],
         "enable_human_tool" : "true"
       }'
    );
END;
/

PL/SQL procedure successfully completed.

EXEC DBMS_CLOUD_AI_AGENT.CLEAR_TEAM;

PL/SQL procedure successfully completed.

EXEC DBMS_CLOUD_AI_AGENT.SET_TEAM('MOVIE_AGENT_TEAM');

PL/SQL procedure successfully completed.

-- Rag seach the object store to find review or comments of Movie Laugh out Loud
select ai agent Please find the comments of Movie Laugh out Loud;

RESPONSE
---------------------------------------------------------------------------------------------------------------------------------------------------------------------------------------------------------------------------------------------------------------------------------------------------------------------------------------------------------------------------------------------------------------------------------------------------------------------------------------------------------------------------------------
The comments for the movie "Laugh Out Loud" (2008) are as follows:
1. A lighthearted comedy that delivers plenty of laughs, though the plot is fairly predictable.
2. The performances are fun, especially from the lead actor who keeps the energy high.
3. Some jokes feel a bit outdated, but overall it is an enjoyable watch for a casual movie night.
4. Good chemistry between the cast members, which makes the humor more natural.
5. Not a groundbreaking comedy, but it does what it promises makes you laugh out loud.

-- WEBSEARCH TOOL
BEGIN
  DBMS_CLOUD.CREATE_CREDENTIAL(
    credential_name => 'OPENAI_CRED',
    username        => 'OPENAI',
    password        => '<API_KEY>'
  );
END;
/

PL/SQL procedure successfully completed.

BEGIN
  DBMS_CLOUD_AI_AGENT.CREATE_TOOL(
    tool_name  => 'WEBSEARCH_TOOL',
    attributes => '{"instruction": "This tool can be used for searching the details about topics mentioned in notes and prepare a summary about prices, details on web",
                      "tool_type": "WEBSEARCH",
                      "tool_params": {"credential_name": "OPENAI_CRED"}}'
  );
END;
/

PL/SQL procedure successfully completed.

BEGIN
    DBMS_CLOUD_AI_AGENT.CREATE_TASK(
      task_name => 'ANALYZE_MOVIE_TASK',
      attributes => '{"instruction": "Help the user with their request about movies. User question: {query}. ' ||
                       'You can use WEBSEARCH_TOOL tool to search the information from internet.",
        "tools": ["WEBSEARCH_TOOL"],
         "enable_human_tool" : "true"
       }'
    );
END;
/

PL/SQL procedure successfully completed.

EXEC DBMS_CLOUD_AI_AGENT.CLEAR_TEAM;

PL/SQL procedure successfully completed.

EXEC DBMS_CLOUD_AI_AGENT.SET_TEAM('MOVIE_AGENT_TEAM');

PL/SQL procedure successfully completed.

select ai agent What is the most popular movie of 2023?;

RESPONSE
------------------------------------------------------------------------------------------------------------------------------------------------------------------------------------------------------------------------------------------------------------------------------------------------------------------------------------------------------------------------------------------------------------------------------------------------------------------------------------------------------------------------------------------------------------------------------------------------------------------------------------------------------------------------------------------------------------------------------------------------------------------------------------------------------------------------------------------------------------------
Determining the most popular movie of 2023 can depend on various metrics such as box office earnings, streaming viewership, critical acclaim, or audience reception. Based on global box office data, which is often a strong indicator of popularity, the most successful movie of 2023 is "Barbie," directed by Greta Gerwig. Released in July 2023, it grossed over $1.4 billion worldwide, making it the highest-grossing film of the year and one of the biggest cultural phenomena, often discussed alongside "Oppenheimer" due to the "Barbenheimer" trend. Its widespread appeal, marketing, and social media buzz further solidify its status as the most popular movie of 2023. However, if you are looking for popularity based on a different metric (like streaming numbers or awards), please let me know, and I can adjust the analysis accordingly.

-- NOTIFICATION TOOL WITH EMAIL TYPE

BEGIN
  DBMS_CLOUD_AI_AGENT.CREATE_TOOL(
    tool_name  => 'EMAIL',
    attributes => q'[{"tool_type": "Notification",
                      "tool_params": {"notification_type" : "EMAIL",
                                      "credential_name": "EMAIL_CRED",
                                      "recipient": "example@oracle.com",
                                      "smtp_host": "smtp.email.us-ashburn-1.oci.oraclecloud.com",
                                      "sender": "example@oracle.com"}}]'
  );
END;
/

PL/SQL procedure successfully completed.

BEGIN
    DBMS_CLOUD_AI_AGENT.CREATE_TASK(
      task_name => 'ANALYZE_MOVIE_TASK',
      attributes =>'{"instruction": "Help the user with their request about movies. User question: {query}. ' ||
                       'You can use EMAIL TOOL tool to send email to the user.",
        "tools": ["EMAIL"],
         "enable_human_tool" : "true"
       }'
    );
END;
/

PL/SQL procedure successfully completed.

EXEC DBMS_CLOUD_AI_AGENT.CLEAR_TEAM;

PL/SQL procedure successfully completed.

EXEC DBMS_CLOUD_AI_AGENT.SET_TEAM('MOVIE_AGENT_TEAM');

PL/SQL procedure successfully completed.

select ai agent Please help me write a review of Movie "Barbie" and send the review to my email;

RESPONSE
-------------------------------------------------------------------------------------------------------------------------------------------------------------------------------------------------------------------------
I have written a review for the movie "Barbie" (2023) and sent it to your email. Please check your inbox for the detailed review. If you have any additional feedback or would like me to revise the review, let me know!

-- NOTIFICATION TOOL WITH SLACK TYPE

DBMS_CLOUD_AI_AGENT.CREATE_TOOL(
    tool_name  => 'SLACK_TOOL',
    attributes => '{"tool_type": "SLACK",
                    "tool_params": {"credential_name": "SLACK_CRED",
                                    "channel": "<channel_number>"}}'
  );
END;
/

PL/SQL procedure successfully completed.

BEGIN
    DBMS_CLOUD_AI_AGENT.CREATE_TASK(
      task_name  => 'ANALYZE_MOVIE_TASK',
      attributes => '{"instruction": "Help the user with their request about movies. User question: {query}. ' ||
                       'You can use SLACK TOOL to send the notification to the user.",
        "tools": ["SLACK_TOOL"],
         "enable_human_tool" : "true"
       }'
    );
END;
/

PL/SQL procedure successfully completed.

select ai agent Please help me find the top 3 most-watched movies of 2023 and send them to me on slack;

RESPONSE
------------------------------------------------------------------------------------------------------------------------------------
I have sent the list of the top 3 most-watched movies of 2023 to you via Slack. Please check your Slack notifications for the details.
Beispiel: Produktretouren-Agent erstellen
In diesem Beispiel wird gezeigt, wie Sie mit dem Select AI Agent Framework einen Conversational Agent mit mehreren Turns erstellen können. In diesem Beispiel richten Sie einen Kundenservice-Agent ein, der Produktretouren verarbeitet und den Retourenstatus in Ihrer Datenbank aktualisiert.
Bevor Sie beginnen
Beurteilung:
In diesem Beispiel werden ein Agent namens Customer_Return_Agent und ein Tool namens Update_Order_Status_Tool erstellt. Anschließend werden eine Aufgabe und ein Team für die Verarbeitung der Produktrückgabe definiert.
In diesem Beispiel erstellen Sie zunächst Beispieldaten zu Kunden, Kundenauftragsstatus und einer Funktion zur Aktualisierung des Kundenauftragsstatus, nachdem Ihr DBA EXECUTE-Berechtigungen erteilt hat für: DBMS_CLOUD_AI_AGENT und DBMS_CLOUD_AI. Erstellen Sie dann einen Agent namens Customer_Return_Agent.
Agent erstellen
Sie erstellen einen Agent namens Customer_Return_Agent mit einem Profil (OCI_GENAI_GROK) und einer Rolle zur Verwaltung von Retourenanforderungen.
Tools erstellen
Anschließend erstellen Sie ein Agent-Tool namens Update_Order_Status_Tool, um den Status der Bestellung in Ihrer Datenbank zu aktualisieren.
Aufgabe erstellen
Sie erstellen eine Aufgabe mit dem Namen Handle_Product_Return_Task, um den Ablauf zu leiten: fragen Sie nach dem Grund (nicht mehr benötigt, zu spät angekommen, Box defekt oder defekt). Fahren Sie mit einem fehlerhaften Rückfluss fort.
Team einrichten
Sie erstellen ein Agent-Team mit dem Namen Return_Agency_Team mit Customer_Return_Agent als Agent und legen es als aktives Team fest.
Agent-Team ausführen
Sie führen das Agent-Team jetzt aus, indem Sie select ai agent als Präfix für Ihre Prompts verwenden.
Das vollständige Beispiel lautet wie folgt:
--Grants EXECUTE privilege to ADB_USER
--
GRANT EXECUTE on DBMS_CLOUD_AI_AGENT to ADB_USER;
GRANT EXECUTE on DBMS_CLOUD_AI to ADB_USER;

BEGIN
  DBMS_CLOUD_AI_AGENT.CREATE_AGENT(
    agent_name => 'Customer_Return_Agent',
    attributes => '{"profile_name": "OCI_GENAI_GROK",
                    "role": "You are an experienced customer return agent who deals with customers return requests."}');
END;
/

PL/SQL procedure successfully completed.


--Sample customer data
CREATE TABLE CUSTOMERS (
    customer_id  NUMBER(10) PRIMARY KEY,
    name         VARCHAR2(100),
    email        VARCHAR2(100),
    phone        VARCHAR2(20),
    state        VARCHAR2(2),
    zip          VARCHAR2(10)
);

INSERT INTO CUSTOMERS (customer_id, name, email, phone, state, zip) VALUES
(1, 'Alice Thompson', 'alice.thompson@example.com', '555-1234', 'NY', '10001'),
(2, 'Bob Martinez', 'bob.martinez@example.com', '555-2345', 'CA', '94105'),
(3, 'Carol Chen', 'carol.chen@example.com', '555-3456', 'TX', '73301'),
(4, 'David Johnson', 'david.johnson@example.com', '555-4567', 'IL', '60601'),
(5, 'Eva Green', 'eva.green@example.com', '555-5678', 'FL', '33101');

--create customer order status
CREATE TABLE CUSTOMER_ORDER_STATUS (
    customer_id     NUMBER(10),
    order_number    VARCHAR2(20),
    status          VARCHAR2(30),
    product_name    VARCHAR2(100)

);

INSERT INTO CUSTOMER_ORDER_STATUS (customer_id, order_number, status, product_name) VALUES
(2, '7734', 'delivered', 'smartphone charging cord'),
(1, '4381', 'pending_delivery', 'smartphone protective case'),
(2, '7820', 'delivered', 'smartphone charging cord'),
(3, '1293', 'pending_return', 'smartphone stand (metal)'),
(4, '9842', 'returned', 'smartphone backup storage'),
(5, '5019', 'delivered', 'smartphone protective case'),
(2, '6674', 'pending_delivery', 'smartphone charging cord'),
(1, '3087', 'returned', 'smartphone stand (metal)'),
(3, '7635', 'pending_return', 'smartphone backup storage'),
(4, '3928', 'delivered', 'smartphone protective case'),
(5, '8421', 'pending_delivery', 'smartphone charging cord'),
(1, '2204', 'returned', 'smartphone stand (metal)'),
(2, '7031', 'pending_delivery', 'smartphone backup storage'),
(3, '1649', 'delivered', 'smartphone protective case'),
(4, '9732', 'pending_return', 'smartphone charging cord'),
(5, '4550', 'delivered', 'smartphone stand (metal)'),
(1, '6468', 'pending_delivery', 'smartphone backup storage'),
(2, '3910', 'returned', 'smartphone protective case'),
(3, '2187', 'delivered', 'smartphone charging cord'),
(4, '8023', 'pending_return', 'smartphone stand (metal)'),
(5, '5176', 'delivered', 'smartphone backup storage');

--Create a update customer order status function
CREATE OR REPLACE FUNCTION UPDATE_CUSTOMER_ORDER_STATUS (
    p_customer_name IN VARCHAR2,
    p_order_number  IN VARCHAR2,
    p_status        IN VARCHAR2
) RETURN CLOB IS
    v_customer_id  customers.customer_id%TYPE;
    v_row_count    NUMBER;
BEGIN
    -- Find customer_id from customer_name
    SELECT customer_id
    INTO v_customer_id
    FROM customers
    WHERE name = p_customer_name;

    UPDATE customer_order_status
    SET status = p_status
    WHERE customer_id = v_customer_id
      AND order_number = p_order_number;

    v_row_count := SQL%ROWCOUNT;

    IF v_row_count = 0 THEN
        RETURN 'No matching record found to update.';
    ELSE
        RETURN 'Update successful.';
    END IF;
EXCEPTION
    WHEN OTHERS THEN
        RETURN 'Error: ' || SQLERRM;
END;

--Create Tool
BEGIN
    DBMS_CLOUD_AI_AGENT.CREATE_TOOL(
        tool_name => 'Update_Order_Status_Tool',
        attributes => '{"instruction": "This tool updates the database to reflect return status change. Always confirm user name and order number with user before update status",
                        "function" : "update_customer_order_status"}',
        description => 'Tool for updating customer order status in database table.'
    );
END;
/
--Create Task
BEGIN
  DBMS_CLOUD_AI_AGENT.CREATE_TASK(
    task_name => 'Handle_Product_Return_Task',
    attributes => '{"instruction": "Process a product return request from a customer:{query}' ||
                    '1. Ask customer the order reason for return (no longer needed, arrived too late, box broken, or defective)' ||
                    '2. If no longer needed:' ||
                    '   a. Inform customer to ship the product at their expense back to us.' ||
                    '   b. Update the order status to return_shipment_pending using Update_Order_Status_Tool.' ||
                     '3. If it arrived too late:' ||
                    '   a. Ask customer if they want a refund.' ||
                    '   b. If the customer wants a refund, then confirm refund processed and update the order status to refund_completed' ||
                    '4. If the product was defective or the box broken:' ||
                    '   a. Ask customer if they want a replacement or a refund' ||
                    '   b. If a replacement, inform customer replacement is on its way and they will receive a return shipping label for the defective product, then update the order status to replaced' ||
                    '   c. If a refund, inform customer to print out the return shipping label for the defective product, return the product, and update the order status to refund' ||
                    '5. After the completion of a return or refund, ask if you can help with anything else.' ||
                    '   End the task if user does not need help on anything else",
                    "tools": ["Update_Order_Status_Tool"]}'
  );
END;
/
SQL> BEGIN
  DBMS_CLOUD_AI_AGENT.CREATE_TEAM(
    team_name  => 'Return_Agency_Team',
    attributes => '{"agents": [{"name":"Customer_Return_Agent","task" : "Handle_Product_Return_Task"}],
                    "process": "sequential"}');
END;
/

PL/SQL procedure successfully completed.

SQL> EXEC DBMS_CLOUD_AI_AGENT.SET_TEAM('Return_Agency_Team');

PL/SQL procedure successfully completed.

--Validate that the agent team is set in the current session with get_team
SQL> SELECT DBMS_CLOUD_AI_AGENT.GET_TEAM from DUAL;

--Interact with the agent
SQL> select ai agent I want to return a smartphone case;

RESPONSE
Could you please tell me the reason for returning the smartphone case? Is it no longer needed, arrived too late, box broken, or defective?

SQL> select ai agent the item is defective

RESPONSE
I'm sorry to hear that the smartphone case is defective. Would you like a replacement or a refund?

SQL> select ai agent I will need a replacement

RESPONSE
Can you please confirm your name and order number so I can update the status and process the replacement?

SQL> select ai agent I''m Bob Martinez and my order number is 7820

RESPONSE
Is there anything else I can help you with?

SQL> select ai agent No, I''m all set. Thanks

RESPONSE
Thank you for reaching out, Bob. I'm glad I could assist with the return of your smartphone case and stand. If you have any further questions or need assistance in the future, feel free to contact us. Have a great day!
Beispiel: AI-Agent-Framework mit Database Actions und APEX auswählen
Wenn Sie Web-SQL-Clients wie Database Actions verwenden, führen Sie das Agent-Team mit der Funktion DBMS_CLOUD_AI_AGENT.RUN_TEAM aus, und geben Sie den Prompt in der Funktion an.
Hinweis
Hinweis: Verwenden Sie DBMS_CLOUD_AI_AGENT.SET_TEAM nicht in Database Actions oder APEX-Service. Geben Sie stattdessen das Agent-Team mit dem Argument team_name von DBMS_CLOUD_AI_AGENT.RUN_TEAM an.
Im folgenden Beispiel wird eine Unterhaltungs-ID erstellt, um die Unterhaltungshistorie des Kunden zu verfolgen. Anschließend wird die Funktion DBMS_CLOUD_AI_AGENT.RUN_TEAM verwendet, um mit dem Product Return Agent zu interagieren.
Weitere Informationen finden Sie unter Funktion RUN_TEAM.
CREATE OR REPLACE PACKAGE my_globals IS
  l_team_cov_id varchar2(4000);
END my_globals;
/
-- Create conversation
DECLARE
  l_team_cov_id varchar2(4000);
BEGIN
  l_team_cov_id := DBMS_CLOUD_AI.create_conversation();
  my_globals.l_team_cov_id := l_team_cov_id;
  DBMS_OUTPUT.PUT_LINE('Created conversation with ID: ' || my_globals.l_team_cov_id);
END;

--Interact with the agent
DECLARE
  v_response VARCHAR2(4000);
BEGIN
  v_response :=  DBMS_CLOUD_AI_AGENT.RUN_TEAM(
    team_name   => 'Return_Agency_Team',
    user_prompt => 'I want to return a smartphone case',
    params      => '{"conversation_id": "' \|\| my_globals.l_team_cov_id \|\| '"}'
  );
  DBMS_OUTPUT.PUT_LINE(v_response);
END;
Beispiel: Logberichte abrufen und analysieren
In diesem Beispiel wird gezeigt, wie Sie ein Agent-Team mit zwei Agenten-Aufgabenpaaren erstellen können, um Logs abzurufen und zu analysieren.
Bevor Sie beginnen
Beurteilung:
-
Voraussetzungen für Select AI erfüllen
-
Erstellen Sie ein AI-Profil mit Google als Anbieter. Siehe Beispiel: AI mit Google auswählen.
-
Erstellen Sie ein KI-Profil mit OpenAI als Provider. Siehe Beispiel: AI mit OpenAI auswählen.
-
-
Voraussetzungen für die Verwendung des Select AI Agent Framework
In diesem Beispiel wird Folgendes erstellt:
-
Zwei-Agent-Workflows zur Fehlerbehebung: Data_Engineer und Ops_Manager
-
ein Tool:
log-fetcherund definiert dann Aufgaben und Team, um Logs abzurufen und zu analysieren.
Hinweis
Hinweis: Nur ein DBA kann EXECUTE-Berechtigungen und eine Netzwerk-ACL-Prozedur ausführen.
In diesem Beispiel erstellen Sie zunächst die Agents Data_Engineer und Ops_Manager, nachdem Ihr DBA EXECUTE-Berechtigungen erteilt hat für: das Package DBMS_CLOUD_AI_AGENT, das Package DBMS_CLOUD_AI und den ACL-Zugriff für Ihre AI-Provider.
Agent erstellen
Sie erstellen den Agent namens Data_Engineer mit einem Profil (GOOGLE), das Google als KI-Provider und -Rolle verwendet, um komplexe Daten abzurufen und zu verarbeiten.
Erstellen Sie den Agent Ops_Manager mit einem Profil (OPENAI), der OpenAI als KI-Provider und -Rolle zur Analyse der Daten verwendet.
Tool erstellen
Anschließend erstellen Sie ein Agent-Tool:log_fetcher: gibt Logeinträge nach einem bestimmten Datum zurück. Dabei wird die benutzerdefinierte Prozedur fetch_logs verwendet.
Aufgaben erstellen
Sie definieren zwei Aufgaben fetch_logs_task und analyze_log_task, um den Ablauf zu steuern. Die fetch_logs_task ruft log_fetcher auf, um Logs basierend auf der Anforderung abzurufen. Die analyze_log_task analysiert die abgerufenen Logs.
Team einrichten
Sie erstellen ein Ops_Issues_Solution_Team-Team mit Data_Engineer und Ops_Manager, um nacheinander auszuführen.
Agent ausführen
Sie legen jetzt das aktive Team fest und führen das Agent-Team mit select ai agent als Präfix für Ihre Prompts aus.
Das vollständige Beispiel lautet wie folgt:
--Grants EXECUTE privilege to ADB_USER
--
GRANT EXECUTE on DBMS_CLOUD_AI_AGENT to ADB_USER;
GRANT EXECUTE on DBMS_CLOUD_AI to ADB_USER;

-- Grant Network ACL for OpenAI endpoint
BEGIN
     DBMS_NETWORK_ACL_ADMIN.APPEND_HOST_ACE(
         host => 'api.openai.com',
         ace  => xs$ace_type(privilege_list => xs$name_list('http'),
                             principal_name => 'ADB_USER',
                             principal_type => xs_acl.ptype_db)
     );
END;
/
--Grant Network ACL for Google endpoint
BEGIN
      DBMS_NETWORK_ACL_ADB_USER.APPEND_HOST_ACE(
        host => 'generativelanguage.googleapis.com',
        ace  => xs$ace_type(privilege_list => xs$name_list('http'),
                    principal_name => 'ADB_USER',
                    principal_type => xs_acl.ptype_db)
       );
END;
/
PL/SQL procedure successfully completed.

--Create a table with Database logs and insert sample data

SQL> CREATE TABLE app_logs (
  log_id         NUMBER GENERATED BY DEFAULT AS IDENTITY,
  log_timestamp  DATE,
  log_message    VARCHAR2(4000)
);

Table created.

SQL> INSERT INTO app_logs (log_timestamp, log_message) VALUES (
  TO_DATE('2025-03-22 03:15:45', 'YYYY-MM-DD HH24:MI:SS'),
  'INFO: Database Cluster: Failover completed successfully. Standby promoted to primary. Downtime duration: 33 seconds. Correlation ID: dbfailover102.'
);

1 row created.

SQL> INSERT INTO app_logs (log_timestamp, log_message) VALUES (
  TO_DATE('2025-03-23 08:44:10', 'YYYY-MM-DD HH24:MI:SS'),
  'INFO: Switchover Process: Synchronization restored. Performing scheduled switchover. Correlation ID: dbswitchover215.'
);

1 row created.

SQL> INSERT INTO app_logs (log_timestamp, log_message) VALUES (
  TO_DATE('2025-03-24 03:15:12', 'YYYY-MM-DD HH24:MI:SS'),
  'ERROR: Database Cluster: Primary database unreachable, initiating failover to standby. Correlation ID: dbfailover102.'
);

1 row created.

SQL> COMMIT;

Commit complete.

-- create data engineer agent
SQL> BEGIN
      DBMS_CLOUD_AI_AGENT.CREATE_AGENT(
        agent_name => 'Data_Engineer',
        attributes => '{"profile_name": "GOOGLE",
                        "role": "You are a specialized data ingestion engineer with expertise in   ' \|\|
                         'retrieving and processing data from complex database systems."
               }'
      );
    END;
    /
PL/SQL procedure successfully completed.

-- create ops manager agent
SQL> BEGIN
      DBMS_CLOUD_AI_AGENT.CREATE_AGENT(
        agent_name => 'Ops_Manager',
        attributes => '{"profile_name": "OPENAI",
                        "role": "You are an experienced Ops manager who excels at analyzing ' \|\|
                'complex log data, diagnosing the issues."
         }'
      );
    END;
    /


PL/SQL procedure successfully completed.

-- create log_fetcher tool
-- fetch_logs is a customized procedure.
-- Please make sure you have created your own procedure before use it in the tool

--Create a customized fetch_logs procedure
SQL> CREATE OR REPLACE FUNCTION fetch_logs(since_date IN DATE) RETURN CLOB IS
  l_logs CLOB;
BEGIN
  SELECT JSON_ARRAYAGG(log_message RETURNING CLOB)
    INTO l_logs
    FROM app_logs
   WHERE log_timestamp >= since_date
   ORDER BY log_timestamp;

  RETURN l_logs;
EXCEPTION
  WHEN OTHERS THEN
    RETURN 'Error fetching logs: ' || SQLERRM;
END fetch_logs;
/

Function created.

SQL> BEGIN
      DBMS_CLOUD_AI_AGENT.CREATE_TOOL(
        tool_name => 'log_fetcher',
        attributes => '{"instruction": "retrieves and returns all log messages with a LOG_TIMESTAMP greater than or equal to the input date.",
                        "function": "fetch_logs"}'
      );
    END;
    /

PL/SQL procedure successfully completed.

-- create task with log fetcher tool

SQL> BEGIN
      DBMS_CLOUD_AI_AGENT.CREATE_TASK(
        task_name  => 'fetch_logs_task',
        attributes => '{"instruction": "Fetch the log entries from the database based on user request: {query}}.",
                        "tools": ["log_fetcher"]}'
      );
    END;
    /

PL/SQL procedure successfully completed.

-- create task with predefined rag and slack tool

SQL> BEGIN
      DBMS_CLOUD_AI_AGENT.create_task(
        task_name => 'analyze_log_task',
        attributes => '{"instruction": "Analyze the fetched log entries retrieved based on user request: {query} ' ||
                      'Generate a detailed report include issue analysis and possible solution.",
           "input" : "fetch_logs_task"
        }'
     );
    END;
    /

PL/SQL procedure successfully completed.

-- create team and set agent team
SQL> BEGIN
      DBMS_CLOUD_AI_AGENT.create_team(
        team_name  => 'Ops_Issues_Solution_Team',
        attributes => '{"agents": [{"name":"Data_Engineer","task" : "fetch_logs_task"},
                                    {"name":"Ops_Manager","task" : "analyze_log_task"}],
                "process": "sequential"
                }');
    END;
    /

PL/SQL procedure successfully completed.

SQL> EXEC DBMS_CLOUD_AI_AGENT.SET_TEAM('Ops_Issues_Solution_Team');


PL/SQL procedure successfully completed.


SQL> select ai agent fetch and analyze the logs after 03/15 2025;

RESPONSE
-----------------------------------------------------------------------------------------------------------------------------------------------
1. Issue: High volume of 500 Internal Server Errors between 03/22 and 03/24.
   Solution: Review server application logs to identify failing components; add better exception handling and fallback mechanisms to prevent service crashes.

2. Issue: Increased response time on /api/v1/user and /checkout, peaking on 03/25.
   Solution: Profile back-end queries and services, apply caching where applicable, and offload static content to a CDN.

3. Issue: Detected brute-force login attack with over 500 failed POST attempts from a single IP.
   Solution: Add rate-limiting, temporary IP bans, and CAPTCHA on the /login endpoint to prevent credential stuffing.

4. Issue: Suspicious User-Agent headers such as curl/7.58.0 or empty headers mimicking mobile devices.
   Solution: Block malformed or uncommon User-Agent strings and log them for threat intelligence analysis.

5. Issue: DDoS-like traffic spike from distributed IPs observed on 03/20.
   Solution: Enable DDoS protection at the CDN or cloud provider level, and configure autoscaling to absorb burst traffic.
Beispiel: Benutzerdefiniertes HTTP-Tool erstellen
In diesem Beispiel wird eine PL/SQL-Funktion definiert, die eine HTTP GET-Anforderung sendet und den Antworttext zurückgibt. Die Funktion wird dann im Tool "Select AI Agent Framework" hinzugefügt.
Bevor Sie beginnen
Beurteilung:
Sie können ein benutzerdefiniertes Tool erstellen, das eine REST-Anforderung mit der Prozedur DBMS_CLOUD.SEND_REQUEST sendet und die Antwort als Text zurückgibt. In diesem Beispiel wird gezeigt, wie Sie die PL/SQL-Funktion schreiben und als Tool zur Verwendung in Agent-Aufgaben hinzufügen.
Die Funktion get_url_content sendet eine GET-Anforderung an die Ziel-URL und gibt die Antwort als CLOB zurück. DBMS_CLOUD_AI_AGENT.CREATE_TOOL verwendet die Funktion get_url_content und erstellt ein Tool namens HTTP_TOOL, das der Agent aufrufen kann, wenn eine Aufgabe Inhalt aus einer URL abrufen muss.
CREATE OR REPLACE FUNCTION get_url_content (
    url IN CLOB
) RETURN CLOB
AS
    l_resp   DBMS_CLOUD_TYPES.RESP;
    l_result CLOB;
BEGIN
    l_resp := DBMS_CLOUD.SEND_REQUEST(
                credential_name => NULL,
                method          => 'GET',
                uri             => url
             );
    l_result := DBMS_VECTOR_CHAIN.UTL_TO_TEXT(DBMS_CLOUD.GET_RESPONSE_RAW(l_resp);
    RETURN l_result;
END get_url_content;
/

BEGIN
  DBMS_CLOUD_AI_AGENT.create_tool(
    tool_name  => 'HTTP_TOOL',
    attributes => '{
      "instruction": "This tool fetches and returns the plain text content from the specified URL. ",
      "function": "get_url_content"
    }'
  );
END;
/
Beispiel: Agent-Prompts und -Antworten aus der letzten Teamausführung anzeigen
Dieses Beispiel hilft beim Debuggen der letzten Agent-Aktivität, indem es Prompts, Antworten und Agent-Gedanken aus der letzten Agent-Teamausführung mit historischen Ansichten und Unterhaltungsdaten anzeigt.
Bevor Sie beginnen
Beurteilung:
In diesem Beispiel werden detaillierte Logs aus der letzten Ausführung des Agent-Teams abgerufen und angezeigt. Im Beispiel werden die Ansichten USER_AI_AGENT_TEAM_HISTORY, USER_AI_AGENT_TASK_HISTORY und USER_CLOUD_AI_CONVERSATION_PROMPTS verwendet, um den Teamnamen, die Aufgabe, die zugehörigen Prompts und Antworten jedes Agents anzuzeigen. Mit dieser Abfrage können Sie Probleme beheben, indem Sie sowohl die Eingabeaufforderung als auch die generierten Antworten der letzten Teamausführung prüfen.
WITH latest_team AS (
  SELECT team_exec_id, team_name, start_date
  FROM user_ai_agent_team_history
  ORDER BY start_date DESC
  FETCH FIRST 1 ROW ONLY
),
latest_task AS (
    SELECT team_exec_id, task_name, agent_name, conversation_params, start_date,
           ROW_NUMBER() OVER (PARTITION BY team_exec_id, task_name, agent_name
                             ORDER BY start_date DESC) as rn
  FROM user_ai_agent_task_history
)
SELECT
  team.team_name,
  task.task_name,
  task.agent_name,
  p.prompt,
  p.prompt_response
FROM latest_team team
JOIN latest_task task
  ON team.team_exec_id = task.team_exec_id
 AND task.rn = 1
LEFT JOIN user_cloud_ai_conversation_prompts p
  ON p.conversation_id = JSON_VALUE(task.conversation_params, '$.conversation_id')
ORDER BY task.start_date DESC NULLS LAST,
         p.created     DESC NULLS LAST;
In diesem Beispiel werden detaillierte Protokolle aus den Ansichten "Tool", "Task" und "Team History" abgerufen. Verwenden Sie die folgenden Abfragen, um die Verwendung von Audittools, Aufgaben und Teams zu prüfen und Probleme und Loganalysen zu beheben. Die Abfragen verwenden die Views USER_AI_AGENT_TOOL_HISTORY, USER_AI_AGENT_TASK_HISTORY und USER_AI_AGENT_TASK_HISTORY.
--View the tool history

select * from USER_AI_AGENT_TOOL_HISTORY
order by START_DATE desc

--View the task history

select * from USER_AI_AGENT_TASK_HISTORY
order by START_DATE desc

--View the team history
select * from USER_AI_AGENT_TEAM_HISTORY
order by START_DATE desc
Beispiel: Agent-Teamausführung mit dem Status WAITING_FOR_HUMAN fortsetzen
In diesem Beispiel wird gezeigt, wie Sie die Ausführung eines Agent-Teams fortsetzen können, wenn der Status der Aufgabenhistorie WAITING_FOR_HUMAN lautet. Wenn ein Agent-Team den Status WAITING_FOR_HUMAN eingibt, wird es angehalten, bis ein Benutzer die nächste Eingabe oder Bestätigung angibt. Sie können die Ausführung je nach Verwendung des Agent-Teams fortsetzen: in der SQL-Befehlszeile oder über DBMS_CLOUD_AI_AGENT.RUN_TEAM.
Bevor Sie beginnen
Beurteilung:
Beispiel: Agent-Teamausführung mit SQL-Befehlszeile fortsetzen
Wenn Sie SELECT AI AGENT <prompt> in der SQL-Befehlszeile verwenden, setzt der Agent die angehaltene Teamausführung automatisch fort. Der Konversationskontext, einschließlich vorheriger Eingabeaufforderungen und Argumentation, wird beibehalten, ohne dass zusätzliche Parameter erforderlich sind.
Beispiel: Agent-Teamausführung mit DBMS_CLOUD_AI_AGENT.RUN_TEAM fortsetzen
Wenn Sie die Prozedur DBMS_CLOUD_AI_AGENT.RUN_TEAM verwenden, können Sie ein unterbrochenes Agent-Team wiederaufnehmen, indem Sie dieselbe conversation_id übergeben, die bei der Erstausführung verwendet wurde. Der Ausführungsstatus des Agent-Teams, einschließlich ausstehender Aktionen und Kontext, wird beibehalten, und das Agent-Team fährt genau dort fort, wo es gestoppt wurde.
Ein Beispiel mit der Funktion DBMS_CLOUD_AI_AGENT.RUN_TEAM finden Sie unter Beispiel: Product Return Agent erstellen.
--Interact with the agent
DECLARE
  v_response VARCHAR2(4000);
BEGIN
  v_response :=  DBMS_CLOUD_AI_AGENT.RUN_TEAM(
    team_name   => '<same initial team name>',
    user_prompt => 'response to request',
    params      => '{"conversation_id": "<same initial conversation_id>"}'
  );
  DBMS_OUTPUT.PUT_LINE(v_response);
END;
Beispiel: Erstellen und Ausführen eines Kundendienstvorgesetztenteams
Dieses End-to-End-Beispiel basiert auf dem Multi-Turn-Kundensupportszenario. Es erstellt Beispielkonten- und Zahlungsdaten, definiert PL/SQL-Funktionen, ordnet diese Funktionen Tools zu, erstellt Worker-Agents und -Aufgaben, erstellt den Supervisor-Agent und das Team und führt eine Multi-Turn Select AI Agent Framework-Unterhaltung aus.
Bevor Sie beginnen
Beurteilung:
- Voraussetzungen für Select AI erfüllen
- Voraussetzungen für die Verwendung des Select AI Agent Framework
- Prozedur CREATE_TEAM
- CREATE_AGENT - Prozedur
Der Accountmitarbeiter kann Kundenaccountdetails suchen oder aktualisieren. Der Zahlungsmitarbeiter kann Zahlungstransaktionen abrufen und ein E-Mail-Benachrichtigungstool verwenden, wenn der Benutzer bestätigt, dass ein Kontoauszug gesendet werden muss. Der Vorgesetzte erhält die Benutzeranforderung, delegiert an das Konto oder den Zahlungsmitarbeiter und gibt die endgültige Antwort zurück.
Die folgende Abbildung zeigt den Ablauf der Kundenserviceorchestrierung mit einem Supervisor-Agent:
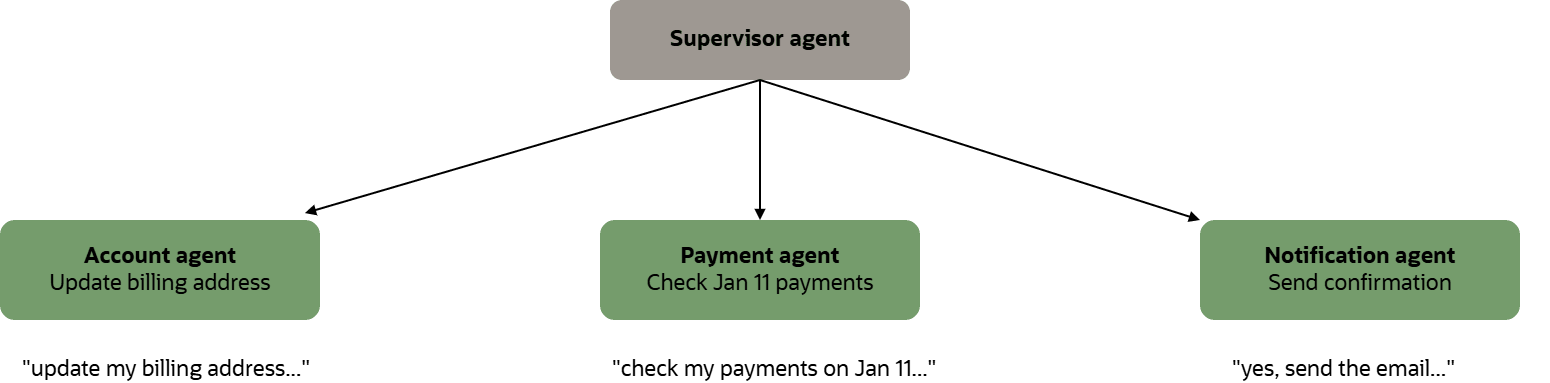
Beschreibung der Abbildung select-ai-agent-customer-service-supervisor.png
Das folgende Beispiel zeigt, wie ein Supervisor-Agent Mitarbeiter-Agents koordiniert, um eine Kundenanforderung abzuschließen.
Ein Kunde fragt:
"Bitte überprüfen Sie meine Zahlungen am 11. Januar 2026 und senden Sie mir eine Erklärung."
Der Vorgesetzte analysiert die Anforderung und wählt nur die erforderlichen Mitarbeiter-Agents aus.
| Schritt | Entscheidung Vorgesetzter | Agents | Ergebnis |
|---|---|---|---|
| 1 | Identifizieren Sie die Anforderung als Zahlungsanfrage, die auch eine Auszugszustellung erfordern kann | ZAHLUNGSAGENT/ZAHLUNGSMANAGEMENTAUFGABE | Der Zahlungsmitarbeiter ruft die Transaktionen für den 11. Januar 2026 ab und gibt die Zahlungsdetails an den Vorgesetzten zurück. |
| 2 | Stellen Sie fest, dass der Benutzer auch eine Anweisung angefordert hat, die vor dem Senden eine Bestätigung erfordert. | Supervisor-Agent | Der Supervisor fordert den Benutzer auf, zu bestätigen, dass die Anweisung gesendet werden soll. |
| 3 | Nach Erhalt der Bestätigung delegieren Sie die Auszugszustellung an den Benachrichtigungsmitarbeiter. | NOTIFICATION_AGENT/SEND_STATEMENT_TASK | Der Benachrichtigungs-Worker sendet oder bereitet den Auszug vor und gibt den Auslieferungsstatus zurück. |
| 4 | Kombinieren Sie die Zahlungsdetails und den Auszugszustellungsstatus. | Supervisor-Agent | Der Vorgesetzte gibt eine einzelne Antwort zurück, die die Zahlungsübersicht und die Bestätigung der Auszugszustellung enthält. |
-- Payment System Demo

-- ============================================================================
-- STEP 1: Create user_accounts Sample Table
-- ============================================================================

-- Optional cleanup for a repeatable demo
BEGIN
  EXECUTE IMMEDIATE 'DROP TABLE user_accounts';
EXCEPTION
  WHEN OTHERS THEN
    IF SQLCODE != -942 THEN
      RAISE;
    END IF;
END;
/

-- Create user_accounts table
CREATE TABLE user_accounts (
  user_id NUMBER GENERATED ALWAYS AS IDENTITY PRIMARY KEY,
  user_name VARCHAR2(100) NOT NULL UNIQUE,
  email VARCHAR2(100),
  billing_address VARCHAR2(200),
  phone VARCHAR2(20),
  account_status VARCHAR2(20),
  created_date DATE DEFAULT SYSDATE,
  updated_date DATE DEFAULT SYSDATE
);

-- Insert three example rows
INSERT INTO user_accounts (user_name, email, billing_address, phone, account_status)
VALUES ('john_smith', '<USER1_EMAIL>', '123 Main St, San Francisco, CA 94102', '415-555-0100', 'ACTIVE');

INSERT INTO user_accounts (user_name, email, billing_address, phone, account_status)
VALUES ('mary_jones', '<USER2_EMAIL>', '456 Oak Ave, Austin, TX 78701', '512-555-0200', 'ACTIVE');

INSERT INTO user_accounts (user_name, email, billing_address, phone, account_status)
VALUES ('david_wilson', '<USER3_EMAIL>', '789 Pine Rd, Seattle, WA 98101', '206-555-0300', 'ACTIVE');

COMMIT;


-- ============================================================================
-- STEP 2: Create PL/SQL Functions
-- ============================================================================

-- Function 1: check_account - retrieves user account information
CREATE OR REPLACE FUNCTION check_account(
  user_name IN VARCHAR2
) RETURN VARCHAR2
IS
  l_account_info VARCHAR2(4000);
  l_user_name VARCHAR2(100) := user_name;
  l_email VARCHAR2(100);
  l_billing_address VARCHAR2(200);
  l_phone VARCHAR2(20);
  l_account_status VARCHAR2(20);
BEGIN
  -- Query user account
  SELECT
    user_name,
    email,
    billing_address,
    phone,
    account_status
  INTO
    l_user_name,
    l_email,
    l_billing_address,
    l_phone,
    l_account_status
  FROM user_accounts
  WHERE UPPER(user_name) = UPPER(l_user_name);
  --Format account information as readable text
  l_account_info := 'Account Information for ' || l_user_name || CHR(10) ||
                    '--------------------------------' || CHR(10) ||
                    'Email: ' || NVL(l_email, 'Not set') || CHR(10) ||
                    'Billing Address: ' || NVL(l_billing_address, 'Not set') || CHR(10) ||
                    'Phone: ' || NVL(l_phone, 'Not set') || CHR(10) ||
                    'Account Status: ' || NVL(l_account_status, 'Unknown');

  RETURN l_account_info;

EXCEPTION
  WHEN NO_DATA_FOUND THEN
    RETURN 'Error: User "' || user_name || '" not found in the system.';
  WHEN OTHERS THEN
    RETURN 'Error retrieving account: ' || SQLERRM;
END check_account;
/

-- Function 2: update_account - updates user account information
CREATE OR REPLACE FUNCTION update_account(
  user_name IN VARCHAR2,
  column_name IN VARCHAR2,
  new_value IN VARCHAR2
) RETURN VARCHAR2
IS
  -- Uses an autonomous transaction so the tool can commit the account update
  -- independently of the surrounding Agent call.
  PRAGMA AUTONOMOUS_TRANSACTION;
  l_sql VARCHAR2(500);
  l_rows_updated NUMBER;
  l_result VARCHAR2(500);
  l_valid_column BOOLEAN := FALSE;
BEGIN
  -- Validate column name (security: only allow specific columns)
  IF UPPER(column_name) IN ('EMAIL', 'BILLING_ADDRESS', 'PHONE', 'ACCOUNT_STATUS') THEN
    l_valid_column := TRUE;
  ELSE
    RETURN 'Error: Column "' || column_name || '" is not allowed to be updated. ' ||
           'Valid columns are: email, billing_address, phone, account_status';
  END IF;

  -- Build dynamic SQL for update
  l_sql := 'UPDATE user_accounts SET ' ||
           DBMS_ASSERT.SIMPLE_SQL_NAME(column_name) || ' = :new_value, ' ||
           'updated_date = SYSDATE ' ||
           'WHERE user_name = :user_name';

  -- Execute update
  EXECUTE IMMEDIATE l_sql
    USING new_value, user_name;

  l_rows_updated := SQL%ROWCOUNT;
  COMMIT;

  -- Return result message
  IF l_rows_updated > 0 THEN
    l_result := 'Successfully updated ' || column_name || ' to "' || new_value ||
                '" for user "' || user_name || '".';
  ELSE
    l_result := 'Error: User "' || user_name || '" not found. No updates made.';
  END IF;

  RETURN l_result;

EXCEPTION
  WHEN OTHERS THEN
    ROLLBACK;
    RETURN 'Error updating account: ' || SQLERRM;
END update_account;
/

-- ============================================================================
-- STEP 3: Create Tools Based on PL/SQL Functions
-- ============================================================================

-- Tool 1: check_account_tool
BEGIN
  DBMS_CLOUD_AI_AGENT.CREATE_TOOL(
    tool_name  => 'CHECK_ACCOUNT_TOOL',
    attributes => '{
      "instruction": "This tool retrieves user account information including email, billing address, phone, and account status. Provide the user_name to get the account details.",
      "function": "check_account"
    }'
  );
END;
/

-- Tool 2: update_account_tool
BEGIN
  DBMS_CLOUD_AI_AGENT.CREATE_TOOL(
    tool_name  => 'UPDATE_ACCOUNT_TOOL',
    attributes => '{
      "instruction": "This tool updates user account information. Provide user_name, column_name (email, billing_address, phone, or account_status), and new_value to update the account.",
      "function": "update_account"
    }'
  );
END;
/

-- ============================================================================
-- STEP 4: Create Account Management Agent
-- ============================================================================

BEGIN
  DBMS_CLOUD_AI_AGENT.CREATE_AGENT(
    agent_name  => 'ACCOUNT_AGENT',
    description => 'Manages user account information including billing addresses and contact details',
    attributes  => '{
      "profile_name": "<AI_PROFILE_NAME>",
      "role": "You are a Account Management Specialist. Your role is to help users view and update their account information."

    }'
  );
END;
/

-- ============================================================================
-- STEP 5: Create Task for Account Management Agent
-- ============================================================================

BEGIN
  DBMS_CLOUD_AI_AGENT.CREATE_TASK(
    task_name  => 'ACCOUNT_MANAGEMENT_TASK',
    attributes => '{
      "instruction": "Handle user account management requests. For account queries, use the check_account_tool with the user_name. For account updates, use the update_account_tool with user_name, the column to update (email, billing_address, phone, or account_status), and the new value. Always provide clear confirmation of any changes made.",
      "tools": ["CHECK_ACCOUNT_TOOL", "UPDATE_ACCOUNT_TOOL"]
    }'
  );
END;
/

-- ============================================================================
-- STEP 6: Create Payment Transactions Sample Table
-- ============================================================================

-- Optional cleanup for a repeatable demo
BEGIN
  EXECUTE IMMEDIATE 'DROP TABLE payment_transactions';
EXCEPTION
  WHEN OTHERS THEN
    IF SQLCODE != -942 THEN
      RAISE;
    END IF;
END;
/

-- Create payment_transactions table
CREATE TABLE payment_transactions (
  transaction_id NUMBER GENERATED ALWAYS AS IDENTITY PRIMARY KEY,
  user_name VARCHAR2(100) NOT NULL,
  transaction_date DATE NOT NULL,
  amount NUMBER(10,2) NOT NULL,
  payment_method VARCHAR2(50),
  status VARCHAR2(20),
  description VARCHAR2(200),
  created_date DATE DEFAULT SYSDATE
);

-- Create index for better query performance
CREATE INDEX idx_transactions_user_date ON payment_transactions(user_name, transaction_date);

-- Insert sample transaction data
-- Transactions for john_smith
INSERT INTO payment_transactions (user_name, transaction_date, amount, payment_method, status, description)
VALUES ('john_smith', TO_DATE('2026-01-11', 'YYYY-MM-DD'), 150.00, 'Credit Card', 'COMPLETED', 'Monthly subscription');

INSERT INTO payment_transactions (user_name, transaction_date, amount, payment_method, status, description)
VALUES ('john_smith', TO_DATE('2026-01-11', 'YYYY-MM-DD'), 75.50, 'PayPal', 'COMPLETED', 'Add-on service');

INSERT INTO payment_transactions (user_name, transaction_date, amount, payment_method, status, description)
VALUES ('john_smith', TO_DATE('2026-01-15', 'YYYY-MM-DD'), 200.00, 'Credit Card', 'COMPLETED', 'Annual renewal');

INSERT INTO payment_transactions (user_name, transaction_date, amount, payment_method, status, description)
VALUES ('john_smith', TO_DATE('2024-12-01', 'YYYY-MM-DD'), 150.00, 'Credit Card', 'COMPLETED', 'Monthly subscription');

-- Transactions for mary_jones
INSERT INTO payment_transactions (user_name, transaction_date, amount, payment_method, status, description)
VALUES ('mary_jones', TO_DATE('2024-11-11', 'YYYY-MM-DD'), 99.99, 'Debit Card', 'COMPLETED', 'Premium upgrade');

INSERT INTO payment_transactions (user_name, transaction_date, amount, payment_method, status, description)
VALUES ('mary_jones', TO_DATE('2024-11-20', 'YYYY-MM-DD'), 49.99, 'Credit Card', 'COMPLETED', 'Monthly subscription');

-- Transactions for david_wilson
INSERT INTO payment_transactions (user_name, transaction_date, amount, payment_method, status, description)
VALUES ('david_wilson', TO_DATE('2024-11-11', 'YYYY-MM-DD'), 299.00, 'Wire Transfer', 'COMPLETED', 'Annual plan');

INSERT INTO payment_transactions (user_name, transaction_date, amount, payment_method, status, description)
VALUES ('david_wilson', TO_DATE('2024-11-25', 'YYYY-MM-DD'), 25.00, 'PayPal', 'PENDING', 'Additional storage');

COMMIT;


-- ============================================================================
-- STEP 7: Create PL/SQL Function for get_payment
-- ============================================================================
CREATE OR REPLACE FUNCTION get_payment(
  user_name IN VARCHAR2,
transaction_date IN VARCHAR2  -- Expected format: 'YYYY-MM-DD' or 'Nov 11' or 'November 11'
) RETURN VARCHAR2
IS
  l_payment_info CLOB;
  l_transaction_date DATE;
  l_total_amount NUMBER := 0;
  l_transaction_count NUMBER := 0;
  l_date_parsed DATE;
  l_user_name VARCHAR2(100) := user_name;
  -- Cursor to fetch transactions
  CURSOR c_transactions IS
    SELECT
      transaction_id,
      TO_CHAR(transaction_date, 'YYYY-MM-DD HH24:MI:SS') AS txn_datetime,
      amount,
      payment_method,
      status,
      description
    FROM payment_transactions
    WHERE user_name = l_user_name
      AND TRUNC(transaction_date) = TRUNC(l_date_parsed)
    ORDER BY transaction_date;

BEGIN
  -- Parse the date input (handle different formats)
  BEGIN
    -- Try standard format first: YYYY-MM-DD
    l_date_parsed := TO_DATE(transaction_date, 'YYYY-MM-DD');
  EXCEPTION
    WHEN OTHERS THEN
      BEGIN
        -- Try format: Mon DD (e.g., 'Nov 11')
        l_date_parsed := TO_DATE(transaction_date || ' ' || TO_CHAR(SYSDATE, 'YYYY'), 'Mon DD YYYY');
      EXCEPTION
        WHEN OTHERS THEN
          BEGIN
            -- Try format: Month DD (e.g., 'November 11')
            l_date_parsed := TO_DATE(transaction_date || ' ' || TO_CHAR(SYSDATE, 'YYYY'), 'Month DD YYYY');
          EXCEPTION
            WHEN OTHERS THEN
              RETURN 'Error: Unable to parse date "' || transaction_date || '". Please use format YYYY-MM-DD (e.g., 2024-11-11) or Mon DD (e.g., Nov 11).';
          END;
      END;
  END;

  -- Build header
  l_payment_info := 'Payment Transactions for ' || l_user_name || ' on ' ||
                    TO_CHAR(l_date_parsed, 'YYYY-MM-DD') || CHR(10) ||
                    '================================================================' || CHR(10);

  -- Fetch and format transactions
  FOR rec IN c_transactions LOOP
    l_transaction_count := l_transaction_count + 1;
    l_total_amount := l_total_amount + rec.amount;

    l_payment_info := l_payment_info || CHR(10) ||
                      'Transaction #' || l_transaction_count || ':' || CHR(10) ||
                      '  Transaction ID: ' || rec.transaction_id || CHR(10) ||
                      '  Date/Time: ' || rec.txn_datetime || CHR(10) ||
                      '  Amount: $' || TO_CHAR(rec.amount, 'FM999,999,990.00') || CHR(10) ||
                      '  Payment Method: ' || NVL(rec.payment_method, 'N/A') || CHR(10) ||
                      '  Status: ' || NVL(rec.status, 'N/A') || CHR(10) ||
                      '  Description: ' || NVL(rec.description, 'N/A') || CHR(10);
  END LOOP;

  -- Add summary
  IF l_transaction_count = 0 THEN
    l_payment_info := l_payment_info || CHR(10) ||
                      'No transactions found for this date.' || CHR(10);
  ELSE
    l_payment_info := l_payment_info || CHR(10) ||
                      '================================================================' || CHR(10) ||
                      'Summary:' || CHR(10) ||
                      '  Total Transactions: ' || l_transaction_count || CHR(10) ||
                      '  Total Amount: $' || TO_CHAR(l_total_amount, 'FM999,999,990.00') || CHR(10);
  END IF;

  RETURN l_payment_info;

EXCEPTION
  WHEN OTHERS THEN
    RETURN 'Error retrieving payment information: ' || SQLERRM;
END get_payment;
/

-- ============================================================================
-- STEP 8: Create Tool for get_payment
-- ============================================================================

BEGIN
  DBMS_CLOUD_AI_AGENT.CREATE_TOOL(
    tool_name  => 'GET_PAYMENT_TOOL',
    attributes => '{
      "instruction": "This tool retrieves payment transaction information for a specific user on a specific date. Provide the user_name and date (format: YYYY-MM-DD). It returns all transactions for that user on that date including transaction IDs, amounts, payment methods, status, and descriptions.",
      "function": "get_payment"
    }'
  );
END;
/

BEGIN
   DBMS_CLOUD.DROP_CREDENTIAL(
     credential_name => 'EMAIL_CRED' );
END;
/

BEGIN
  DBMS_CLOUD.CREATE_CREDENTIAL(
    credential_name => 'EMAIL_CRED',
    username => '<OCI_SMTP_USERNAME>',
    password => '<SMTP_PASSWORD>');
END;
/

BEGIN
   -- Allow SMTP access for user ADMIN
   DBMS_NETWORK_ACL_ADMIN.APPEND_HOST_ACE(
     host => 'smtp.email.us-ashburn-1.oci.oraclecloud.com',
     lower_port => 587,
     upper_port => 587,
     ace => xs$ace_type(privilege_list => xs$name_list('SMTP'),
                        principal_name => '<DATABASE_USERNAME>',
                        principal_type => xs_acl.ptype_db));
END;
/

-- ============================================================================
-- STEP 9: Configure Email Notification Tool
-- ============================================================================

EXEC DBMS_CLOUD_AI_AGENT.drop_tool('Email');
BEGIN
  -- This EMAIL tool sends statements to the fixed recipient configured in the recipient parameter.
  -- To send to a customer's stored email address, replace this fixed-recipient configuration
  -- with logic that looks up and passes the customer's email address.
  DBMS_CLOUD_AI_AGENT.create_tool(
    tool_name  => 'EMAIL',
    attributes => q'[{"tool_type": "Notification",
                      "tool_params": {"notification_type" : "EMAIL",
                                      "credential_name": "EMAIL_CRED",
                                      "recipient": "<RECIPIENT_EMAIL>",
                                      "subject": "Payment statement",
                                      "smtp_host": "smtp.email.us-ashburn-1.oci.oraclecloud.com",
                                      "sender": "<SENDER_EMAIL>"}}]'
  );
END;
/

-- ============================================================================
-- STEP 10: Create Payment Management Agent
-- ============================================================================

BEGIN
  DBMS_CLOUD_AI_AGENT.CREATE_AGENT(
    agent_name  => 'PAYMENT_AGENT',
    description => 'Manages payment transactions, generates statements, and handles payment-related queries',
    attributes  => '{
      "profile_name": "<AI_PROFILE_NAME>",
      "role": "You are a Payment Management Specialist. "
    }'
  );
END;
/

-- ============================================================================
-- STEP 11: Create Task for Payment Management Agent
-- ============================================================================

BEGIN
  DBMS_CLOUD_AI_AGENT.CREATE_TASK(
    task_name  => 'PAYMENT_MANAGEMENT_TASK',
    attributes => '{
      "instruction": "Handle payment-related requests. For payment queries, use GET_PAYMENT_TOOL with the user_name and date. Show the payment details, then ask the user whether they want to receive the statement by email. If they do, send it using EMAIL.",
      "tools": ["GET_PAYMENT_TOOL", "EMAIL"]
    }'
  );
END;
/


-- STEP 12: Create the Supervisor Agent and Team
exec DBMS_CLOUD_AI_AGENT.clear_team;
exec DBMS_CLOUD_AI_AGENT.drop_team('CUSTOMER_SUPPORT');
EXEC DBMS_CLOUD_AI_AGENT.drop_agent('ORCHESTRATOR_AGENT');
BEGIN
  DBMS_CLOUD_AI_AGENT.create_agent(
    'ORCHESTRATOR_AGENT',
    '{
       "profile_name": "<AI_PROFILE_NAME>",
       "supervisor" : true
     }'
  );
END;
/
BEGIN
    DBMS_CLOUD_AI_AGENT.create_team(
        team_name   => 'CUSTOMER_SUPPORT',
        attributes  => '{
            "process": "sequential",
            "supervisor_agent": "ORCHESTRATOR_AGENT",
            "agents": [
                {"name":"ACCOUNT_AGENT","task" : "ACCOUNT_MANAGEMENT_TASK"},
                {"name":"PAYMENT_AGENT","task" : "PAYMENT_MANAGEMENT_TASK"}
            ]
        }',
        description => 'A supervised team with orchestrator delegating to specialists'
    );
END;
/

-- STEP 13: Run the Conversation
exec DBMS_CLOUD_AI_AGENT.set_team('CUSTOMER_SUPPORT');

SQL> select ai agent my user name is john_smith, I want to update my billing address to 11th Ave, Austin, TX 78701;

RESPONSE
--------------------------------------------------------------------------------
The billing address for user 'john_smith' has been successfully updated to '11th Ave, Austin, TX 78701'.

SQL> select ai agent please check my payments on Jan 11 2026;

RESPONSE
--------------------------------------------------------------------------------
Here are your payment details for January 11, 2026, john_smith:

================================================================
Payment Transactions for john_smith on 2026-01-11

Transaction #1:
  Transaction ID: 1
  Date/Time: 2026-01-11 00:00:00
  Amount: $150.00
  Payment Method: Credit Card
  Status: COMPLETED

RESPONSE
--------------------------------------------------------------------------------
  Description: Monthly subscription

Transaction #2:
  Transaction ID: 2
  Date/Time: 2026-01-11 00:00:00
  Amount: $75.50
  Payment Method: PayPal
  Status: COMPLETED
  Description: Add-on service

================================================================

RESPONSE
--------------------------------------------------------------------------------
Summary:
  Total Transactions: 2
  Total Amount: $225.50

Would you like to receive a statement of these transactions via email? Please confirm.

SQL> select ai agent yes send the email;

RESPONSE
--------------------------------------------------------------------------------
The payment statement for January 11, 2026, has been successfully sent to the configured recipient. If you have any further questions or need assistance, feel free to ask.
Beispiel: Agent-Teams importieren und exportieren
Importieren und exportieren Sie die Select AI Agent Framework-Teams über Datenbanken, Schemas und kompatible Agent-Services hinweg und zwischen autonomen KI-Datenbankumgebungen.
Bevor Sie beginnen
Beurteilung:
Dieses Beispiel zeigt, wie Sie eine Agent-Teamdefinition exportieren und in eine andere Umgebung importieren können. Sie können ein Team als Zeichenfolge exportieren oder in Object Storage speichern und dann diese Teamdefinition aus einer Zeichenfolge, einem Object Storage oder einer lokalen Datei importieren. Zu den Teamdefinitionen für "AI Agent Framework auswählen" gehören Agents, Aufgaben und Tooldefinitionen. EXPORT_TEAM gibt eine CLOB zurück oder schreibt die exportierte Teamdefinition in Object Storage, und IMPORT_TEAM importiert eine Teamdefinition aus einer CLOB- oder Object Storage-Datei in die Datenbank.
Hinweis
Hinweis: Der Export und Import umfassen Teamdefinitionen und zugehörige Metadaten wie Agents, Aufgaben und Tooldefinitionen. Export und Import umfassen keine unterstützenden Ressourcen außerhalb der Teamdefinition, wie Zugangsdaten, vom Benutzer erstellte PL/SQL-Funktionen, externe REST-Services, OCI Functions, AWS Lambda-Funktionen, Profile, Indizes oder andere abhängige Ressourcen. Erstellen Sie diese Ressourcen erneut in der Zielumgebung, bevor Sie das importierte oder exportierte Team verwenden.
Beispiele für den Export eines Agent-Teams
Die folgenden Beispiele zeigen, wie ein Team exportiert wird.
Beispiel: Team in Object Storage exportieren
In diesem Beispiel wird das Team ReturnAgency exportiert und die exportierte Teamdefinition in einen Object Storage-Speicherort geschrieben. Verwenden Sie diese Methode, wenn Sie die exportierte Teamdefinition in PL/SQL verarbeiten und die Teamdefinition außerhalb der Datenbank zur Migration oder Wiederverwendung speichern möchten.
DECLARE
  output          clob;
  params_clob     clob;
BEGIN
BEGIN
  DBMS_CLOUD_AI_AGENT.EXPORT_TEAM(
    team_name                      => 'ReturnAgency',
    object_storage_credential_name => 'cred1',
    location                       => 'https://swiftobjectstorage.us-ashburn-
1.oraclecloud.com/v1/my_namespace/my_bucket/my_data_folder'
  );
END;
/
Export in Objektspeicher mit 'overwrite'-Parameter auf TRUE gesetzt
Agent-Teamdefinition in eine JSON-Datei in Object Storage exportieren. Das Argument params legt "overwrite": true fest, sodass der Vorgang eine vorhandene Datei am angegebenen Speicherort mit demselben Namen ersetzen kann.
DECLARE
  output          clob;
  params_clob     clob;
BEGIN
  DBMS_CLOUD_AI_AGENT.export_team(
              team_name => ‘ReturnAgency’,
              object_storage_credential_name  => ‘OBJ_STORAGE_CRED’,
              location => ‘https://swiftobjectstorage.us-ashburn-1.oraclecloud.com/v1/my_namespace/my_bucket/my_data_folder/return_agency.json’,
              params => ‘{“overwrite”: true}’

  );
END;
/
Beispiel: Team in eine lokale Datei exportieren
In diesem Beispiel wird das Team Return Agency in eine CLOB exportiert und die Ausgabe mit UTL_FILE in eine Datei geschrieben. Verwenden Sie diese Methode, wenn Sie die exportierte Teamdefinition in einem Datenbankverzeichnisobjekt beibehalten möchten.
Hinweis
Hinweis: Wenn die exportierte Teamdefinition groß ist, schreiben Sie die Ausgabe CLOB in eine Datei in Blöcken anstelle eines einzelnen UTL_FILE.PUT_LINE-Aufrufs.
DECLARE
	output clob;
	params_clob clob;
	file_handler UTL_FILE.FILE_TYPE;
BEGIN
	output := DBMS_CLOUD_AI_AGENT.export_team(
	team_name => 'Return Agency'
	);

	file_handler := UTL_FILE.FOPEN(
		location => 'MY_DIR',
		filename => 'return_agency.json',
		open_mode => 'W',
		max_linesize => 32767
		);
	UTL_FILE.PUT_LINE(file_handler, output);
	UTL_FILE.FCLOSE(file_handler);
END;
/
Beispiel: Team in eine Zeichenfolge exportieren
Exportieren Sie eine Agent-Teamdefinition als CLOB. Die Funktion gibt die Teamspezifikation zurück, die Sie in einer Variablen speichern, prüfen, ändern oder in der nachfolgenden Verarbeitung verwenden können, bevor Sie sie speichern oder an anderer Stelle importieren.
DECLARE
  output          clob;
  params_clob     clob;
  file_handler    UTL_FILE.FILE_TYPE;
BEGIN
  output := DBMS_CLOUD_AI_AGENT.export_team(
              team_name => ‘Return Agency’
  );
END;
/
Beispiele für das Importieren eines Agententeams
Die folgenden Beispiele zeigen den Import eines Teams.
Beispiel: Team aus Object Storage importieren
In diesem Beispiel wird eine Teamdefinition aus einer JSON-Datei importiert, die in Object Storage gespeichert ist. Verwenden Sie diese Methode, wenn die exportierte Teamdefinition bereits in einem Remotespeicherort vorhanden ist.
BEGIN
  DBMS_CLOUD_AI_AGENT.import_team(
              profile_name => 'PROFILE_NAME',
              team_name    => 'ReturnAgency',
              object_storage_credential_name => 'cred1',
              object_uri      => 'https://swiftobjectstorage.us-ashburn-1.oraclecloud.com/v1/my_namespace/my_bucket/my_data_folder/import_agent.json'
  );

END;
/
Beispiel: Ein Team aus einer übergebenen Spezifikation importieren
In diesem Beispiel werden zuerst die erforderlichen vom Benutzer erstellten Funktionen erstellt. Anschließend wird die Teamdefinition aus einer JSON-Spezifikation importiert, die in einer CLOB gespeichert ist. Verwenden Sie diese Methode, wenn Sie die Spezifikation in PL/SQL vor dem Import generieren oder ändern.
CREATE OR REPLACE
FUNCTION run_sql(nl_query IN CLOB)
RETURN CLOB
IS
  v_query CLOB;
BEGIN
  v_query := '(Name,Description,Category,Date Created,Price,Discounted Price,Offer Expiration Date)
("AquaPure Water Pitcher", "2-liter BPA-free water pitcher with filter", "Kitchen", "2024-04-12", 34.95, 27.95, "2024-07-01")
("CozyLuxe Throw Blanket", "Ultra-soft microfiber throw blanket (50"x60")", "Living Room", "2024-03-22", 19.99, None, None)
("SafeStep Bath Mat", "Non-slip bath mat, mildew resistant, gray", "Bathroom", "2024-05-05", 12.50, 9.99, "2024-06-15")
("PowerPlug Extension", "6-outlet surge protector power strip", "Electrical", "2024-01-10", 21.75, None, None)
("FreshGuard Storage Bags", "Set of 20 reusable silicone food storage bags", "Kitchen", "2024-03-17", 15.60, 12.48, "2024-06-10") ';

  RETURN v_query;
END run_sql;
/

CREATE OR REPLACE
FUNCTION email(contents IN CLOB)
RETURN CLOB
IS
BEGIN
  dbms_output.put_line('>>>>>>>> Agent generated:\n' ||
                            contents || '\n<<<<<<<<<');
  RETURN 'Email sent successfully';
END email;
/

-- import with specification
DECLARE
  l_input_json CLOB;
BEGIN
  l_input_json :=
  q'[
{
    "agents": [],
    "component_type": "Agent",
    "description": "You are an marketing agent who helps plan campaigns.",
    "flows": [],
    "id": "1d02daf2-57...",
    "inputs": [],
    "llm_config": {
        "component_type": "OCI_CONFIG",
        "default_generation_parameters": {
            "max_tokens": null,
            "temperature": null,
            "top_p": null
        },
        "description": null,
        "id": "9e2a18a2...ae",
        "metadata": {},
        "model_id": "openai.gpt-oss-120b",
        "name": "openai/gpt-oss-120b"
    },
    "metadata": {},
    "name": "Marketing assistant",
    "outputs": [],
    "system_prompt": "Help the user with their tasks around marketing products for their business.",
    "tools": [
        {
            "component_type": "ServerTool",
            "description": "Send an email to the current user.",
            "id": "9fcc6...",
            "inputs": [
                {
                    "title": "content",
                    "type": "string"
                }
            ],
            "metadata": {},
            "name": "Email",
            "outputs": [
                {
                    "type": "string"
                }
            ]
        },
        {
            "component_type": "ServerTool",
            "description": "Generates a SQL query for the given NL Question, runs it, and returns the results.",
            "id": "ae1e6c17...",
            "inputs": [
                {
                    "title": "nl_query",
                    "type": "string"
                }
            ],
            "metadata": {},
            "name": "run_sql",
            "outputs": [
                {
                    "type": "string"
                }
            ]
        }
    ]
}
  ]';

  DBMS_CLOUD_AI_AGENT.import_team(
              profile_name => 'PROFILE_NAME',
              team_name    => 'MARKETING',
              specification    => l_input_json
  );

END;
/
Beispiel: Team aus einer Verzeichnisdatei importieren
Agent-Teamdefinition aus einer JSON-Datei importieren, die in einem Verzeichnisobjekt gespeichert ist. Der Parameter location gibt das Verzeichnisobjekt und den Dateinamen an.
DECLARE
    file_handle 	UTL_FILE.FILE_TYPE;
    line_buffer 	VARCHAR2(32767);
    file_content 	CLOB;
    temp_line 		VARCHAR2(32767);
BEGIN
    DBMS_LOB.CREATETEMPORARY(file_content, TRUE);

    file_handle := UTL_FILE.FOPEN('MY_DIRECTORY', 'marketing_team.txt', 'r');

    LOOP
        BEGIN
            UTL_FILE.GET_LINE(file_handle, line_buffer);

            temp_line := line_buffer || CHR(10);
            DBMS_LOB.WRITEAPPEND(file_content, LENGTH(temp_line), temp_line);
        EXCEPTION
            WHEN NO_DATA_FOUND THEN
               EXIT;
        END;
    END LOOP;

    UTL_FILE.FCLOSE(file_handle);

	DBMS_CLOUD_AI_AGENT.import_team(
              profile_name     => 'PROFILE_NAME',
              team_name        => 'MARKETING',
              specification    => file_content
    );


EXCEPTION
    WHEN OTHERS THEN
        IF UTL_FILE.IS_OPEN(file_handle) THEN
            UTL_FILE.FCLOSE(file_handle);
        END IF;
        RAISE;
END;
Beispiel für Export und Import
Das folgende Beispiel zeigt einen Export- und Importablauf für ein Agent-Team.
—————————————————————–
– Export a Team
—————————————————————–
– Create an Agent, Task, and Team

BEGIN
  DBMS_CLOUD_AI_AGENT.CREATE_TOOL(
    tool_name  => ‘GET_PAYMENT_TOOL’,
    attributes => ‘{
      “instruction”: “This tool retrieves payment transaction information for a specific user on a specific date. Provide the user_name and date (format: YYYY-MM-DD). It returns all transactions for that user on that date including transaction IDs, amounts, payment methods, status, and descriptions.”,
      “function”: “get_payment”
    }’
  );
END;
/

– Websearch tool is accessing OPENAI endpoint, so we need allow ACL access
BEGIN
  DBMS_NETWORK_ACL_ADMIN.APPEND_HOST_ACE(
    host => ‘api.openai.com’,
    ace  => xs$ace_type(privilege_list => xs$name_list(‘http’),
                        principal_name => ‘ADB_USER’,
                        principal_type => xs_acl.ptype_db)
   );
END;
/

BEGIN
  DBMS_CLOUD_AI_AGENT.create_tool(
    tool_name  => ‘Websearch’,
    attributes => q’[{“instruction”: “This tool can be used for searching the price given a specific link. The input of the tool should be a query like what is the price of the product on this website”,
                      “tool_type”: “WEBSEARCH”,
                      “tool_params”: {“credential_name”: “GENAI_CRED”}}]’
  );
END;
/

BEGIN
  DBMS_CLOUD.CREATE_CREDENTIAL(
    credential_name => ‘EMAIL_CRED’,
    username => '',
    password => '');
END;
/

-- To allow Email tool in ADBS, we need to allow SMTP access
BEGIN
   -- Allow SMTP access for user ADMIN
   DBMS_NETWORK_ACL_ADMIN.APPEND_HOST_ACE(
     host => 'smtp.email.us-ashburn-1.oci.oraclecloud.com',
     lower_port => 587,
     upper_port => 587,
     ace => xs$ace_type(privilege_list => xs$name_list('SMTP'),
                        principal_name => 'ADB_USER',
                        principal_type => xs_acl.ptype_db));
END;
/

BEGIN
  -- This EMAIL tool sends statements to the fixed recipient configured in the recipient parameter.
  -- To send to a customer's stored email address, replace this fixed-recipient configuration
  -- with logic that looks up and passes the customer's email address.
  DBMS_CLOUD_AI_AGENT.create_tool(
    tool_name  => 'EMAIL',
    attributes => q'[{"tool_type": "Notification",
                      "tool_params": {"notification_type" : "EMAIL",
                                      "credential_name": "EMAIL_CRED",
                                      "recipient": "",
                                      "subject": "Payment statement",
                                      "smtp_host": "smtp.email.us-ashburn-1.oci.oraclecloud.com",
                                      "sender": ""}}]'
  );
END;
/

BEGIN
  DBMS_CLOUD_AI_AGENT.CREATE_AGENT(
    agent_name  => 'PAYMENT_AGENT',
    description => 'Manages payment transactions, generates statements, and handles payment-related queries',
    attributes  => '{
      "profile_name": "",
      "role": "You are a Payment Management Specialist. "
    }'
  );
END;
/

BEGIN
  DBMS_CLOUD_AI_AGENT.create_team(
    team_name  => 'ReturnAgency',
    attributes => '{"agents": [{"name":"CustomerAgent","task" : "Return_And_Price_Match"}],
                    "process": "sequential"}');
END;
/

-- Export Team Option 1: Export to Object Store
DECLARE
  output          clob;
  params_clob     clob;
BEGIN
  DBMS_CLOUD_AI_AGENT.export_team(
              team_name => 'ReturnAgency',
              object_storage_credential_name  => 'cred1',
              location => 'https://swiftobjectstorage.us-ashburn-1.oraclecloud.com/v1/my_namespace/my_bucket/my_data_folder/'
  );

END;
/

– Export Team Option 2: Export to a File
DECLARE
  output          clob;
  params_clob     clob;
  l_attr_obj      JSON_OBJECT_T := new JSON_OBJECT_T;
  file_handler    UTL_FILE.FILE_TYPE;
BEGIN
  output := DBMS_CLOUD_AI_AGENT.export_team(
              team_name => ‘Return Agency’
  );

  file_handler := UTL_FILE.FOPEN(
                    location      => ‘MY_DIR’,
                    filename      => ‘return_agency.json’,
                    open_mode     => ‘W’,
                    max_linesize  => 32767
                    );
  UTL_FILE.PUT_LINE(file_handler, output);
  UTL_FILE.FCLOSE(file_handler);

END;
/

—————————————————————–
– Import a Team
—————————————————————–

– Import Team Option 1: Import from a file in Object Store
BEGIN
  DBMS_CLOUD_AI_AGENT.import_team(
              profile_name => ‘PROFILE_NAME’,
              team_name    => ‘TEAM_NAME’,
              object_storage_credential_name => ‘cred1’,
              object_uri      => ‘https://swiftobjectstorage.us-ashburn-1.oraclecloud.com/v1/my_namespace/my_bucket/my_data_folder/import_agent.json’
  );
END;
/

– Import Team Option 2: Import from a passed specification
– Create any relevant functions first
CREATE OR REPLACE
FUNCTION run_sql(nl_query IN CLOB)
RETURN CLOB
IS
  v_query CLOB;
BEGIN
  v_query := ‘(Name,Description,Category,Date Created,Price,Discounted Price,Offer Expiration Date)
(“AquaPure Water Pitcher”, “2-liter BPA-free water pitcher with filter”, “Kitchen”, “2024-04-12”, 34.95, 27.95, “2024-07-01”)
(“CozyLuxe Throw Blanket”, “Ultra-soft microfiber throw blanket (50”x60”)”, “Living Room”, “2024-03-22”, 19.99, None, None)
(“SafeStep Bath Mat”, “Non-slip bath mat, mildew resistant, gray”, “Bathroom”, “2024-05-05”, 12.50, 9.99, “2024-06-15”)
(“PowerPlug Extension”, “6-outlet surge protector power strip”, “Electrical”, “2024-01-10”, 21.75, None, None)
(“FreshGuard Storage Bags”, “Set of 20 reusable silicone food storage bags”, “Kitchen”, “2024-03-17”, 15.60, 12.48, “2024-06-10”) ‘;

RETURN v_query;
END run_sql;
/

CREATE OR REPLACE
FUNCTION email(contents IN CLOB)
RETURN CLOB
IS
BEGIN
  dbms_output.put_line(‘»»»» Agent generated:\n’ ||
                            contents || ‘\n««««<’);
  RETURN ‘Email sent successfully’;
END email;
/

– import with specification
DECLARE
  l_input_json CLOB;
BEGIN
  l_input_json :=
  q’[
{
    “agents”: [],
    “component_type”: “Agent”,
    “description”: “You are an marketing agent who helps plan campaigns.”,
    “flows”: [],
    “id”: “1d02da…”,
    “inputs”: [],
    “llm_config”: {
        “component_type”: “OCI_CONFIG”,
        “default_generation_parameters”: {
            “max_tokens”: null,
            “temperature”: null,
            “top_p”: null
        },
        “description”: null,
        “id”: “9e2a1…”,
        “metadata”: {},
        “model_id”: “openai.gpt-oss-120b”,
        “name”: “openai/gpt-oss-120b”
    },
    “metadata”: {},
    “name”: “Marketing assistant”,
    “outputs”: [],
    “system_prompt”: “Help the user with their tasks around marketing products for their business.”,
    “tools”: [
        {
            “component_type”: “ServerTool”,
            “description”: “Send an email to the current user.”,
            “id”: “9fcc66…”,
            “inputs”: [
                {
                    “title”: “content”,
                    “type”: “string”
                }
            ],
            “metadata”: {},
            “name”: “Email”,
            “outputs”: [
                {
                    “type”: “string”
                }
            ]
        },
        {
            “component_type”: “ServerTool”,
            “description”: “Generates a SQL query for the given NL Question, runs it, and returns the results.”,
            “id”: “ae1e…”,
            “inputs”: [
                {
                    “title”: “nl_query”,
                    “type”: “string”
                }
            ],
            “metadata”: {},
            “name”: “run_sql”,
            “outputs”: [
                {
                    “type”: “string”
                }
            ]
        }
    ]
}
  ]’;
  DBMS_CLOUD_AI_AGENT.import_team(
              profile_name => ‘PROFILE_NAME’,
              team_name    => ‘TEAM_NAME’,
              specification    => l_input_json
  );

end;
/

– Import Team Option 3: Import from a passed specification
DECLARE
    file_handle 	UTL_FILE.FILE_TYPE;
    line_buffer 	VARCHAR2(32767);
    file_content 	CLOB;
    temp_line 		VARCHAR2(32767);
BEGIN
    DBMS_LOB.CREATETEMPORARY(file_content, TRUE);

    file_handle := UTL_FILE.FOPEN('MY_DIRECTORY', 'marketing_team.txt', 'r');

    LOOP
        BEGIN
            UTL_FILE.GET_LINE(file_handle, line_buffer);

            temp_line := line_buffer || CHR(10);
            DBMS_LOB.WRITEAPPEND(file_content, LENGTH(temp_line), temp_line);
        EXCEPTION
            WHEN NO_DATA_FOUND THEN
               EXIT;
        END;
    END LOOP;

    UTL_FILE.FCLOSE(file_handle);

    DBMS_CLOUD_AI_AGENT.import_team(
              profile_name     => 'PROFILE_NAME',
              team_name        => 'TEAM_NAME',
              specification    => file_content
    );
EXCEPTION
    WHEN OTHERS THEN
        IF UTL_FILE.IS_OPEN(file_handle) THEN
            UTL_FILE.FCLOSE(file_handle);
        END IF;
        RAISE;
END;
/

– STEP 13: Run the Conversation
exec DBMS_CLOUD_AI_AGENT.set_team(‘CUSTOMER_SUPPORT’);

SQL> select ai agent my user name is john_smith, I want to update my billing address to 11th Ave, Austin, TX 78701;

RESPONSE

The billing address for user ‘john_smith’ has been successfully updated to ‘11th Ave, Austin, TX 78701’.

SQL> select ai agent please check my payments on Jan 11 2026;

RESPONSE

Here are your payment details for January 11, 2026, john_smith:

================================================================
Payment Transactions for john_smith on 2026-01-11

Transaction #1:
  Transaction ID: 1
  Date/Time: 2026-01-11 00:00:00
  Amount: $150.00
  Payment Method: Credit Card
  Status: COMPLETED

RESPONSE

Description: Monthly subscription

Transaction #2:
  Transaction ID: 2
  Date/Time: 2026-01-11 00:00:00
  Amount: $75.50
  Payment Method: PayPal
  Status: COMPLETED
  Description: Add-on service

================================================================

RESPONSE

Summary:
  Total Transactions: 2
  Total Amount: $225.50

Would you like to receive a statement of these transactions via email? Please confirm.

SQL> select ai agent yes send the email;

RESPONSE

The payment statement for January 11, 2026, has been successfully  sent to the configured recipient. If you have any further questions or  need assistance, feel free to ask.
Beispiel: Definition eines AI-Agent-Objekts abrufen
In diesem Beispiel werden ein Tool, ein Agent, eine Aufgabe und ein Team erstellt. Anschließend wird DBMS_CLOUD_AI_AGENT.GET_DEFINITION verwendet, um die Teamdefinition zurückzugeben. Es zeigt den Unterschied zwischen der Rückgabe nur des angeforderten Teams und der Rückgabe des Teams mit seinen abhängigen Objekten.
Bevor Sie beginnen
Beurteilung:
- Voraussetzungen für Select AI erfüllen
- Voraussetzungen für die Verwendung des Select AI Agent Framework
- Erstellen Sie ein AI-Profil, und ersetzen Sie
AI_PROFILE_NAMEdurch den Profilnamen in Ihrer Umgebung. - GET_DEFINITION (Funktion)
- Verwenden Sie Objektnamen, die für den aktuellen Datenbankbenutzer verfügbar sind.
Agent-Objekte erstellen
Erstellen Sie ein einfaches Tool, einen Agent, eine Aufgabe und ein Team. Das Tool gibt eine statische Antwort zurück, sodass für das Beispiel keine Kundendaten oder ein externer Service erforderlich ist.
CREATE OR REPLACE FUNCTION GETDEF_TOOL_FUNCTION(query IN CLOB, offset IN NUMBER, limit IN NUMBER) RETURN CLOB AS
BEGIN
  RETURN '{"status":"success","message":"Example response"}';
END;
/

BEGIN
  DBMS_CLOUD_AI_AGENT.CREATE_TOOL(tool_name => 'GETDEF_TOOL', attributes => '{"instruction":"Return a static response for the example.","function":"GETDEF_TOOL_FUNCTION"}');
  DBMS_CLOUD_AI_AGENT.CREATE_AGENT(agent_name => 'GETDEF_AGENT', attributes => '{"profile_name":"AI_PROFILE_NAME","role":"Return the response from GETDEF_TOOL.","tools":["GETDEF_TOOL"],"enable_human_tool":false}');
  DBMS_CLOUD_AI_AGENT.CREATE_TASK(task_name => 'GETDEF_TASK', attributes => '{"instruction":"Use GETDEF_TOOL for the request.","tools":["GETDEF_TOOL"]}');
  DBMS_CLOUD_AI_AGENT.CREATE_TEAM(team_name => 'GETDEF_TEAM', attributes => '{"agents":[{"name":"GETDEF_AGENT","task":"GETDEF_TASK"}],"process":"sequential"}');
END;
/
Definition eines Agents abrufen
Verwenden Sie object_type, das auf AGENT gesetzt ist, um den kanonischen DBMS_CLOUD_AI_AGENT.CREATE_AGENT-Block für einen vorhandenen Agent zurückzugeben.
SELECT DBMS_CLOUD_AI_AGENT.GET_DEFINITION(object_type => 'AGENT', object_name => 'GETDEF_AGENT') AS definition FROM dual;Definition eines Tools abrufen
Verwenden Sie object_type, das auf TOOL gesetzt ist, um den kanonischen DBMS_CLOUD_AI_AGENT.CREATE_TOOL-Block für ein vorhandenes Tool zurückzugeben.
SELECT DBMS_CLOUD_AI_AGENT.GET_DEFINITION(object_type => 'TOOL', object_name => 'GETDEF_TOOL') AS definition FROM dual;Definition einer Aufgabe abrufen
Verwenden Sie object_type, das auf TASK gesetzt ist, um den kanonischen DBMS_CLOUD_AI_AGENT.CREATE_TASK-Block für eine vorhandene Aufgabe zurückzugeben.
SELECT DBMS_CLOUD_AI_AGENT.GET_DEFINITION(object_type => 'TASK', object_name => 'GETDEF_TASK') AS definition FROM dual;Jeder Aufruf gibt nur die angeforderte Objektdefinition zurück. Verwenden Sie den Aufruf TEAM mit dependent_objects, wenn Sie die zugehörigen Agent-, Aufgaben- und Tooldefinitionen in derselben Ausgabe benötigen.
Teamdefinition mit abhängigen Objekten abrufen
Setzen Sie dependent_objects auf true, um die abhängigen Agent-, Aufgaben- und Tooldefinitionen in die zurückgegebene Ausgabe aufzunehmen.
SELECT DBMS_CLOUD_AI_AGENT.GET_DEFINITION(object_type => 'TEAM', object_name => 'GETDEF_TEAM', params => '{"dependent_objects": true}') AS definition FROM dual;Das Ergebnis enthält den kanonischen CREATE_TEAM-Block und die abhängigen Blöcke CREATE_TOOL, CREATE_AGENT und CREATE_TASK. Prüfen Sie Objektnamen und umgebungsspezifische Werte, bevor Sie die Objekte in einer anderen Datenbank neu erstellen.
Teamdefinition ohne abhängige Objekte abrufen
Rufen Sie GET_DEFINITION ohne params auf, um nur die angeforderte Teamdefinition zurückzugeben.
SELECT DBMS_CLOUD_AI_AGENT.GET_DEFINITION(object_type => 'TEAM', object_name => 'GETDEF_TEAM') AS definition FROM dual;Das Ergebnis enthält einen kanonischen DBMS_CLOUD_AI_AGENT.CREATE_TEAM-Block und referenziert abhängige Objekte nach ihren öffentlichen Namen, ohne ihre Erstellungsblöcke einzuschließen.
Beispiel: Zugriff auf ein freigegebenes Agent-Team erteilen und entziehen
Dieses Beispiel zeigt, wie ein Agent-Teameigentümer ein Agent-Team für einen anderen Datenbankbenutzer freigeben und den Zugriff auf das Team steuern kann. Im Beispiel wird ein Profilmanagement-Agent-Team erstellt, das Benutzerprofilinformationen aus einer Tabelle im Schema des Verbrauchers abruft.
Bevor Sie beginnen
Prüfen und vergewissern Sie sich, dass die Voraussetzungen erfüllt sind:
- Voraussetzungen für die gemeinsame Nutzung der Select AI Agent Framework Teams
- CREATE_AGENT - Prozedur
- Prozedur CREATE_TASK
- Prozedur CREATE_TOOL
- Prozedur CREATE_TEAM
- Prozedur GRANT_TEAM_ACCESS
- RUN_TEAM (Funktion)
Der Teamverantwortliche erstellt den Agent, die Aufgabe und das benutzerdefinierte Tool und erstellt dann das Agent-Team. Der Agent verwendet ein AI-Profil, das vom Platzhalter für die Laufzeitvariable {llm_profile} angegeben wird. Dadurch kann ein Verbraucher mit Zugriff auf das gemeinsame Team ein KI-Profil bereitstellen, das für seine Sitzung geeignet ist.
Das Beispiel erteilt dem Team Zugriff auf ADB_USER2, der sich mit seinem eigenen Schema bei der Datenbank anmeldet und ein KI-Profil mit dem Namen GROK_ADB_USER2 erstellt. Der Consumer ruft dann das Team mit dem qualifizierten Teamnamen auf, z.B. ADB_USER.Shared_ACCOUNT_TEAM, und stellt das AI-Profil über attribute_variables im Parameterargument bereit.
Die benutzerdefinierte CHECK_PROFILE_TOOL löst auch die Tabelle USER_PROFILES im Schema des authentifizierten Consumers auf. Infolgedessen kann das freigegebene Team dieselbe Tooldefinition verwenden, während Daten aus dem Schema des Benutzers abgerufen werden, der das Team aufruft.
Das Beispiel entzieht dem Verbraucher dann den Zugriff und zeigt an, dass der Benutzer das freigegebene Team nicht mehr verwenden kann.
Hinweis
Hinweis: Im Beispiel werden Platzhalterwerte für das angezeigte Szenario verwendet. Ersetzen Sie diese Werte durch Werte, die für Ihre eigene Anwendung und Ihren Anwendungsfall geeignet sind.
Toolfunktionen erstellen
Sie erstellen Toolfunktionen im Eigentümerschema. Das Tool "AI Agent Framework auswählen" referenziert die entsprechende Funktion und verwendet sie, wenn das Tool während einer Teamausführung ausgewählt wird. Das erste Tool sucht nach Produktinformationen für die Anfrage. Das zweite Tool formatiert die Produktinformationen als Supportantwort.
Tools erstellen
Sie geben die Eigentümerschema-Toolfunktionen als Agent-Tools an. Diese Tools bleiben Teil des inhabergeführten Teams.
Aufgaben erstellen
Sie erstellen LOOKUP_PRODUCT_TASK, um sie zuerst auszuführen, und WRITE_SUPPORT_RESPONSE_TASK, um sie auszuführen, nachdem Produktdetails verfügbar sind.
Agents erstellen
Sie erstellen PRODUCT_LOOKUP_AGENT, um Produktinformationen zu suchen, und SUPPORT_RESPONSE_AGENT, um die endgültige Antwort zu schreiben.
Team einrichten
Sie erstellen SHARED_SUPPORT_TEAM mit einem sequenziellen Prozess, sodass die Lookup-Aufgabe vor dem Start der Antwortaufgabe abgeschlossen wird.
Teamzugriff erteilen
Bevor Sie dem Team Zugriff erteilen, lesen Sie Voraussetzungen für die Freigabe der Select AI Agent Framework-Teams. Erteilen Sie einem anderen Datenbankbenutzer oder einer anderen Rolle die Berechtigung zum Ausführen des freigegebenen Teams. GRANT_TEAM_ACCESS erteilt Zugriff auf die Ausführung des Teams als Einheit. Die Teamberechtigung gewährt keinen unabhängigen Zugriff zum Bearbeiten der Teamdefinition.
Geteiltes Team ausführen
Der Konsument führt das gemeinsame Team unter Verwendung des vom Verantwortlichen qualifizierten Teamnamens aus. Laufzeitparameter können eine Konversations-ID und Namespace-Variablenwerte übergeben, ohne die gespeicherte Teamdefinition zu ändern.
ADB_USER2 führt das gemeinsame Team mit dem vom Verantwortlichen qualifizierten Teamnamen ADB_USER.Shared_ACCOUNT_TEAM aus. Der Consumer gibt GROK_ADB_USER2 für den Platzhalter {llm_profile} bis attribute_variables im Argument params an. Der Consumer gibt auch eine Unterhaltungs-ID an, um den Unterhaltungskontext beizubehalten.
Consumer-Ressourcen erstellen
Melden Sie sich als ADB_USER2 an. Erstellen Sie das AI-Profil GROK_ADB_USER2 und die Tabelle USER_PROFILES im Consumer-Schema. Das Beispiel füllt USER_PROFILES mit Beispielprofilinformationen auf, die von der CHECK_PROFILE_TOOL des freigegebenen Teams abgerufen werden.
Beispiel: Wenn ADB_USER2 nach der Rechnungsadresse john_smith fragt, verwendet CHECK_PROFILE_TOOL die Funktion CHECK_PROFILE, um die entsprechenden Informationen aus der Tabelle USER_PROFILES im Schema ADB_USER2 abzurufen.
Teamzugriff entziehen
Der Teameigentümer verwendet REVOKE_TEAM_ACCESS, um den Zugriff von ADB_USER2 auf Shared_ACCOUNT_TEAM zu entfernen. Nachdem der Zugriff entzogen wurde, kann ADB_USER2 das vom Eigentümer qualifizierte ADB_USER.Shared_ACCOUNT_TEAM nicht mehr ausführen.
Durch das Entziehen des Teamzugriffs werden die gespeicherten Team-, Agent-, Aufgaben- oder Tooldefinitionen nicht geändert oder entfernt. Dadurch wird die Berechtigung des Verbrauchers zum Ausführen des freigegebenen Teams entfernt.
Das vollständige Beispiel lautet:
-- create an agent team with admin owner
conn ADB_USER/<password>@<connection_name>

DROP TABLE user_profiles;

CREATE OR REPLACE FUNCTION check_profile(
  user_name IN VARCHAR2
) RETURN VARCHAR2
AUTHID CURRENT_USER
IS
  l_profile_info     VARCHAR2(4000);
  l_user_name        VARCHAR2(100) := user_name;
  l_email            VARCHAR2(100);
  l_billing_address  VARCHAR2(200);
  l_phone            VARCHAR2(20);
  l_account_status   VARCHAR2(20);
  l_schema_name      VARCHAR2(128);
BEGIN
  -- Resolve the table in the authenticated
  -- consumer's schema.
  l_schema_name := SYS_CONTEXT('USERENV',
                               'CURRENT_USER');

  EXECUTE IMMEDIATE '
    SELECT user_name, email, billing_address, phone,
           account_status
    FROM ' || DBMS_ASSERT.enquote_name(l_schema_name,
                                       FALSE) ||
    '.user_profiles
    WHERE UPPER(user_name) = UPPER(:1)'
  INTO
    l_user_name,
    l_email,
    l_billing_address,
    l_phone,
    l_account_status
  USING l_user_name;

  l_profile_info := 'Profile Information for ' ||
                    l_user_name || CHR(10) ||
                    '--------------------------------' || CHR(10) ||
                    'Email: ' || NVL(l_email, 'Not set') || CHR(10) ||
                    'Billing Address: ' ||
                    NVL(l_billing_address, 'Not set') || CHR(10) ||
                    'Phone: ' || NVL(l_phone, 'Not set') || CHR(10) ||
                    'Account Status: ' ||
                    NVL(l_account_status, 'Unknown');

  RETURN l_profile_info;

EXCEPTION
  WHEN NO_DATA_FOUND THEN
    RETURN 'Error: User "' || user_name ||
           '" not found in the system.';
  WHEN OTHERS THEN
    RETURN 'Error retrieving profile.';
END check_profile;
/

BEGIN
  DBMS_CLOUD_AI_AGENT.CREATE_TOOL(
    tool_name  => 'CHECK_PROFILE_TOOL',
    attributes => '{
      "instruction": "This tool retrieves user profile information including email, billing address, phone, and account status. Provide the user_name to get the profile details.",
      "function": "check_profile"
    }'
  );
END;
/

exec DBMS_CLOUD_AI_AGENT.DROP_AGENT('ACCOUNT_AGENT');

BEGIN
  DBMS_CLOUD_AI_AGENT.CREATE_AGENT(
    agent_name  => 'ACCOUNT_AGENT',
    description => 'Manages user profile and account information including billing addresses and contact details',
    attributes  => '{
      "profile_name": "{llm_profile}",
      "role": "You are a Profile Management Specialist. Your role is to help users view and update their account information."
    }'
  );
END;
/

exec DBMS_CLOUD_AI_AGENT.DROP_TASK('ACCOUNT_MANAGEMENT_TASK');

BEGIN
  DBMS_CLOUD_AI_AGENT.CREATE_TASK(
    task_name  => 'ACCOUNT_MANAGEMENT_TASK',
    attributes => '{
      "instruction": "Handle user profile management requests. For profile queries, use the check_profile_tool with the user_name. ",
      "tools": ["CHECK_PROFILE_TOOL"]
    }'
  );
END;
/

BEGIN
  DBMS_CLOUD_AI_AGENT.CREATE_TEAM(
    team_name  => 'Shared_ACCOUNT_TEAM',
    attributes => '{
      "agents": [
        {
          "name": "ACCOUNT_AGENT",
          "task": "ACCOUNT_MANAGEMENT_TASK"
        }
      ],
      "process": "sequential"
    }'
  );
END;
/

-- grant tool function to ADB_USER2
GRANT EXECUTE ON check_profile TO ADB_USER2;

-- grant_team_access to ADB_USER2
exec DBMS_CLOUD_AI_AGENT.GRANT_TEAM_ACCESS(
  'Shared_ACCOUNT_TEAM',
  'ADB_USER2'
);

conn ADB_USER2/<password>@<connection_name>;

BEGIN
  DBMS_CLOUD_AI.CREATE_PROFILE(
    'GROK_ADB_USER2',
    '{
      "provider": "oci",
      "credential_name": "<GENAI_CRED>",
      "oci_compartment_id": "<ocid1.compartment.oc1..placeholder>",
      "model": "xai.grok-3",
      "conversation": "TRUE"
    }'
  );
END;
/

-- Create user_profiles table
CREATE TABLE user_profiles (
  user_id NUMBER GENERATED ALWAYS AS IDENTITY PRIMARY KEY,
  user_name VARCHAR2(100) NOT NULL UNIQUE,
  email VARCHAR2(100),
  billing_address VARCHAR2(200),
  phone VARCHAR2(20),
  account_status VARCHAR2(20),
  created_date DATE DEFAULT SYSDATE,
  updated_date DATE DEFAULT SYSDATE
);

-- Insert three example rows
INSERT INTO user_profiles (
  user_name,
  email,
  billing_address,
  phone,
  account_status
)
VALUES (
  'john_smith',
  'john.smith@example.com',
  '123 Main St, San Francisco, CA 94102',
  '415-555-0100',
  'ACTIVE'
);

INSERT INTO user_profiles (
  user_name,
  email,
  billing_address,
  phone,
  account_status
)
VALUES (
  'mary_jones',
  'mary.jones@example.com',
  '456 Oak Ave, Austin, TX 78701',
  '512-555-0200',
  'ACTIVE'
);

INSERT INTO user_profiles (
  user_name,
  email,
  billing_address,
  phone,
  account_status
)
VALUES (
  'david_wilson',
  'david.wilson@example.com',
  '789 Pine Rd, Seattle, WA 98101',
  '206-555-0300',
  'ACTIVE'
);

COMMIT;

SQL> DECLARE
  2    l_final_answer    CLOB;
  3    l_conversation_id VARCHAR2(36);
  4  BEGIN
  5    l_conversation_id := DBMS_CLOUD_AI.CREATE_CONVERSATION();
  6
  7    l_final_answer := DBMS_CLOUD_AI_AGENT.RUN_TEAM(
  8      team_name   => 'ADB_USER.Shared_ACCOUNT_TEAM',
  9      user_prompt => 'What is the billing address for john_smith',
 10      params      => '{"attribute_variables":{"llm_profile":"GROK_ADB_USER2"},"conversation_id":"'
 11                     || l_conversation_id || '"}'
 12    );
 13
 14    DBMS_OUTPUT.PUT_LINE(l_final_answer);
 15  END;
 16  /

The billing address for john_smith is 123 Main St, San Francisco, CA 94102.


conn ADB_USER/<password>@<connection_name>

exec DBMS_CLOUD_AI_AGENT.REVOKE_TEAM_ACCESS(
  'Shared_ACCOUNT_TEAM',
  'ADB_USER2'
);

conn ADB_USER2/<password>@<connection_name>;

DECLARE
  l_final_answer    CLOB;
  l_conversation_id VARCHAR2(36);
BEGIN
  l_conversation_id := DBMS_CLOUD_AI.CREATE_CONVERSATION();

  l_final_answer := DBMS_CLOUD_AI_AGENT.RUN_TEAM(
    team_name   => 'ADB_USER.Shared_ACCOUNT_TEAM',
    user_prompt => 'What is the billing address for john_smith',
    params      => '{"attribute_variables":{"llm_profile":"GROK_ADB_USER2"},"conversation_id":"'
                   || l_conversation_id || '"}'
  );

  DBMS_OUTPUT.PUT_LINE(l_final_answer);
END;
/
Beispiel: Laufzeitvariablen an ein benutzerdefiniertes Tool übergeben
Dieses Beispiel zeigt, wie ein benutzerdefiniertes Tool ein vom Verbraucher bereitgestelltes AI-Profil aus state_variables liest, indem es GET_VARIABLE verwendet und das Profil an DBMS_CLOUD_AI.GENERATE übergibt. Der Agent verwendet auch den Platzhalter für die Laufzeitvariable {llm_profile}, der aus attribute_variables aufgelöst wird, wenn das gemeinsame Team ausgeführt wird.
Der Teameigentümer ADB_USER erstellt die Funktion WEB_SEARCH, WebSearchTool, WebSearchAgent und WebSearchTeam und erteilt dem Team ADB_USER2 Zugriff. ADB_USER2 stellt ein eigenes KI-Profil bereit, wenn das gemeinsame Team ausgeführt wird.
Das Beispiel zeigt auch, dass SET_TEAM Teamvariablen festlegen kann.
Hinweis
Hinweis: Im Beispiel werden Platzhalterwerte für das angezeigte Szenario verwendet. Ersetzen Sie diese Werte durch Werte, die für Ihre eigene Anwendung und Ihren Anwendungsfall geeignet sind.
Bevor Sie beginnen
Beurteilung:
- Voraussetzungen für die gemeinsame Nutzung der Select AI Agent Framework Teams
- Laufzeitkonfiguration für Agentteams
- SET_VARIABLE - Prozedur
- Funktion GET_VARIABLE
- RUN_TEAM (Funktion)
Tipp: Verwenden Sie eine Statusvariable, wenn ein Tool einen Wert an ein späteres Tool in derselben Teamausführung übergeben muss. Der Wert bleibt während der gesamten Ausführung verfügbar, ohne die gemeinsame Teamdefinition zu ändern.
Das vollständige Beispiel lautet:
conn ADB_USER/<password>@<connection_name>

exec DBMS_CLOUD_AI_AGENT.drop_team('WebSearchTeam', TRUE);
exec DBMS_CLOUD_AI_AGENT.drop_agent('WebSearchAgent', TRUE);
exec DBMS_CLOUD_AI_AGENT.drop_tool('WebSearchTool', TRUE);

CREATE OR REPLACE FUNCTION websearch(
  user_prompt   IN CLOB
) RETURN CLOB AUTHID CURRENT_USER IS
  l_result        CLOB;
  l_profile_name  VARCHAR2(128);
BEGIN
  l_profile_name := dbms_cloud_ai_agent.get_variable(
    namespace => 'state_variables',
    name      => 'llm_profile'
  );

  l_result := DBMS_CLOUD_AI.generate(
    prompt       => user_prompt,
    profile_name => l_profile_name,
    action       => 'chat'
  );

  RETURN l_result;
EXCEPTION
  WHEN OTHERS THEN
    RETURN 'TOOL_ERROR: ' ||
      REPLACE(REPLACE(SQLERRM, CHR(10), ''), '''', '''''');
END websearch;
/

BEGIN
  DBMS_CLOUD_AI_AGENT.create_tool(
    tool_name   => 'WebSearchTool',
    attributes  => '{
      "instruction": "Use this tool to answer every user request. Always call the tool before responding.",
      "function": "ADB_USER.WEBSEARCH",
      "tool_inputs": [
        {
          "name": "user_prompt",
          "description": "User question to send to DBMS_CLOUD_AI.generate",
          "mandatory": "true"
        }
      ]
    }'
  );
END;
/

BEGIN
  DBMS_CLOUD_AI_AGENT.create_agent(
    agent_name  => 'WebSearchAgent',
    attributes  => '{
      "profile_name": "{llm_profile}",
      "role": "You are a web search assistant. You must call ADB_USER.WebSearchTool for every prompt and return the tool output.",
      "enable_human_tool": "false",
      "tools": ["WebSearchTool"]
    }'
  );
END;
/

BEGIN
  DBMS_CLOUD_AI_AGENT.create_team(
    team_name   => 'WebSearchTeam',
    attributes  => '{
      "agents": [{"name":"WebSearchAgent"}],
      "process": "sequential"
    }'
  );
END;
/

grant execute on websearch to ADB_USER2;

exec DBMS_CLOUD_AI_AGENT.grant_team_access('WebSearchTeam', 'ADB_USER2');

conn ADB_USER2/<password>@<connection_name>;

set serveroutput on;

DECLARE
  l_final_answer  CLOB;
  l_conversation_id VARCHAR2(128);
BEGIN
  l_conversation_id := DBMS_CLOUD_AI.create_conversation();

  l_final_answer := DBMS_CLOUD_AI_AGENT.run_team(
    team_name   => 'ADB_USER.WebSearchTeam',
    user_prompt => 'What is Oracle Database in one sentence?',
    params      => '{"state_variables": {"llm_profile":"GROK_ADB_USER2"}, "attribute_variables": {"llm_profile":"GROK_ADB_USER2"}, "conversation_id":"' || l_conversation_id || '"}'
  );

  dbms_output.put_line(l_final_answer);
END;
/

Oracle Database is a multi-model database management system produced and marketed by Oracle Corporation, primarily designed for enterprise grid computing and data warehousing.

PL/SQL procedure successfully completed.

-- SET_TEAM can also set the variables

exec dbms_cloud_ai_agent.set_team(team_name => 'ADB_USER.WebSearchTeam', params=> '{"state_variables": {"llm_profile":"INVALID_PROFILE_FOR_STATE_TEST"}, "attribute_variables": {"llm_profile":"GROK_ADB_USER2"}}')

PL/SQL procedure successfully completed.

select ai agent What is Oracle Database in one sentence?;

RESPONSE
--------------------------------------------------------------------------------
Oracle Database is a multi-model database management system produced and markete
d by Oracle Corporation, designed to handle a wide range of data management task
s.
Wenn die Statusvariable nicht vorhanden ist, gibt GET_VARIABLE NULL zurück.
Beispiel: Werte zwischen Tools mit SET_VARIABLE und GET_VARIABLE übergeben
Dieses Beispiel zeigt, wie ein Tool einen Wert in state_variables mit SET_VARIABLE speichern kann und ein nachfolgendes Tool diesen Wert mit GET_VARIABLE abrufen kann.
Der Teameigentümer ADB_USER erstellt die Funktionen VERIFY_ACCOUNT_NAME und SUMMARIZE_VERIFIED_ACCOUNT sowie die entsprechenden Tools, Agents und Aufgaben. AccountVariableHandoffTeam führt zuerst die Verifizierungsaufgabe aus. Das Verifizierungstool speichert die verifizierte Konto-ID in state_variables. Das Zusammenfassungstool ruft die gespeicherte ID ab, um die Kontodetails abzurufen und zurückzugeben.
ADB_USER2 erhält Zugriff auf das freigegebene Team und führt es unter Verwendung des vom Verantwortlichen qualifizierten Teamnamens aus. Die Accountdaten werden in der Tabelle ACCOUNT_HANDOFF_ACCOUNTS von ADB_USER2 gespeichert.
Bevor Sie beginnen
Beurteilung:
- Voraussetzungen für die gemeinsame Nutzung der Select AI Agent Framework Teams
- SET_TEAM (Funktion)
- RUN_TEAM (Funktion)
Tipp: Verwenden Sie SET_TEAM, wenn dieselbe Session ein gemeinsam verwendetes Team wiederholt mit derselben Laufzeitkonfiguration ausführt. Verwenden Sie RUN_TEAM, wenn Sie einen Wert für eine bestimmte Ausführung außer Kraft setzen müssen.
Das vollständige Beispiel lautet:
conn ADB_USER/<password>@<connection_name>

CREATE OR REPLACE FUNCTION verify_account_name(
  account_name IN CLOB
) RETURN CLOB AUTHID CURRENT_USER IS
  l_account_name VARCHAR2(100);
  l_account_id   VARCHAR2(30);
  l_schema_name  VARCHAR2(128);
BEGIN
  l_account_name := TRIM(DBMS_LOB.SUBSTR(account_name, 100, 1));
  l_schema_name := SYS_CONTEXT('USERENV', 'CURRENT_USER');

  EXECUTE IMMEDIATE '
    SELECT account_id
      FROM ' || l_schema_name || '.account_handoff_accounts
     WHERE UPPER(account_name) = UPPER(:1)'
    INTO l_account_id
    USING l_account_name;

  DBMS_CLOUD_AI_AGENT.set_variable(
    namespace => 'state_variables',
    name      => 'verified_account_id',
    value     => l_account_id
  );

  RETURN 'ACCOUNT_VERIFIED=' || l_account_name ||
         ';DETAIL_LOOKUP_READY=TRUE';
EXCEPTION
  WHEN NO_DATA_FOUND THEN
    DBMS_CLOUD_AI_AGENT.set_variable(
      namespace => 'state_variables',
      name      => 'verified_account_id',
      value     => NULL
    );
    RETURN 'ACCOUNT_NOT_FOUND=' || NVL(l_account_name, 'NULL');
  WHEN OTHERS THEN
    RETURN 'TOOL_ERROR: ' ||
      REPLACE(REPLACE(SQLERRM, CHR(10), ''), '''', '''''');
END verify_account_name;
/

CREATE OR REPLACE FUNCTION summarize_verified_account(
  request_context IN CLOB
) RETURN CLOB AUTHID CURRENT_USER IS
  l_account_id_clob CLOB;
  l_account_id_text VARCHAR2(4000);
  l_user_name       VARCHAR2(100);
  l_email           VARCHAR2(100);
  l_billing_address VARCHAR2(200);
  l_phone           VARCHAR2(20);
  l_account_status  VARCHAR2(20);
  l_schema_name     VARCHAR2(128);
BEGIN
  l_account_id_clob := DBMS_CLOUD_AI_AGENT.get_variable(
    namespace => 'state_variables',
    name      => 'verified_account_id'
  );
  l_account_id_text := DBMS_LOB.SUBSTR(l_account_id_clob, 4000, 1);

  IF l_account_id_text IS NULL THEN
    RETURN 'ACCOUNT_SUMMARY_ERROR=NO_VERIFIED_ACCOUNT_ID';
  END IF;

  l_schema_name := SYS_CONTEXT('USERENV', 'CURRENT_USER');

  EXECUTE IMMEDIATE '
    SELECT account_name, email, billing_address, phone, account_status
      FROM ' || l_schema_name || '.account_handoff_accounts
     WHERE account_id = :1'
    INTO l_user_name, l_email, l_billing_address, l_phone, l_account_status
    USING l_account_id_text;

  RETURN 'ACCOUNT_SUMMARY_NAME=' || l_user_name ||
         ';EMAIL=' || NVL(l_email, 'Not set') ||
         ';BILLING_ADDRESS=' || NVL(l_billing_address, 'Not set') ||
         ';PHONE=' || NVL(l_phone, 'Not set') ||
         ';ACCOUNT_STATUS=' || NVL(l_account_status, 'Unknown');
EXCEPTION
  WHEN OTHERS THEN
    RETURN 'TOOL_ERROR: ' ||
      REPLACE(REPLACE(SQLERRM, CHR(10), ''), '''', '''''');
END summarize_verified_account;
/

grant execute on verify_account_name to ADB_USER2;
grant execute on summarize_verified_account to ADB_USER2;

BEGIN
  DBMS_CLOUD_AI_AGENT.create_tool(
    tool_name   => 'AccountVerificationTool',
    attributes  => '{
      "instruction": "Verify that the account name exists.",
      "function": "ADB_USER.VERIFY_ACCOUNT_NAME",
      "tool_inputs": [
        {
          "name": "account_name",
          "description": "Account user name to verify",
          "mandatory": "true"
        }
      ]
    }'
  );
END;
/

BEGIN
  DBMS_CLOUD_AI_AGENT.create_tool(
    tool_name   => 'AccountSummaryTool',
    attributes  => '{
      "instruction": "Summarize the matching account details.",
      "function": "ADB_USER.SUMMARIZE_VERIFIED_ACCOUNT",
      "tool_inputs": [
        {
          "name": "request_context",
          "description": "User request context",
          "mandatory": "true"
        }
      ]
    }'
  );
END;
/

BEGIN
  DBMS_CLOUD_AI_AGENT.create_agent(
    agent_name  => 'AccountVerificationAgent',
    attributes  => '{
      "profile_name": "{llm_profile}",
      "role": "You verify account names. Always call AccountVerificationTool first and return its exact output.",
      "enable_human_tool": "false"
    }'
  );
END;
/

BEGIN
  DBMS_CLOUD_AI_AGENT.create_agent(
    agent_name  => 'AccountSummaryAgent',
    attributes  => '{
      "profile_name": "{llm_profile}",
      "role": "You summarize the verified account. Always call AccountSummaryTool and return its exact output.",
      "enable_human_tool": "false"
    }'
  );
END;
/

BEGIN
  DBMS_CLOUD_AI_AGENT.create_task(
    task_name   => 'AccountVerificationTask',
    attributes  => '{
      "instruction": "Call AccountVerificationTool with the exact account name from the user request. The tool saves the account id in state_variables, but the response must not include the id.",
      "tools": ["AccountVerificationTool"]
    }'
  );
END;
/

BEGIN
  DBMS_CLOUD_AI_AGENT.create_task(
    task_name   => 'AccountSummaryTask',
    attributes  => '{
      "instruction": "Call AccountSummaryTool to read the saved account id and summarize the account details. Return the exact tool output.",
      "tools": ["AccountSummaryTool"]
    }'
  );
END;
/

BEGIN
  DBMS_CLOUD_AI_AGENT.create_team(
    team_name   => 'AccountVariableHandoffTeam',
    attributes  => '{
      "agents": [
        {"name":"AccountVerificationAgent","task":"AccountVerificationTask"},
        {"name":"AccountSummaryAgent","task":"AccountSummaryTask"}
      ],
      "process": "sequential"
    }'
  );
END;
/

exec DBMS_CLOUD_AI_AGENT.grant_team_access('AccountVariableHandoffTeam', 'ADB_USER2');

conn ADB_USER2/<password>@<connection_name>;

set serveroutput on;

BEGIN
  EXECUTE IMMEDIATE 'DROP TABLE account_handoff_accounts PURGE';
EXCEPTION
  WHEN OTHERS THEN
    IF SQLCODE != -942 THEN
      RAISE;
    END IF;
END;
/

CREATE TABLE account_handoff_accounts (
  account_id      VARCHAR2(30) PRIMARY KEY,
  account_name    VARCHAR2(100) NOT NULL UNIQUE,
  email           VARCHAR2(100),
  billing_address VARCHAR2(200),
  phone           VARCHAR2(20),
  account_status  VARCHAR2(20)
);

INSERT INTO account_handoff_accounts (
  account_id, account_name, email, billing_address, phone, account_status)
VALUES (
  'ACCT_MARY_0002',
  'mary_jones',
  'mary.jones@example.com',
  '456 Oak Ave, Austin, TX 78701',
  '512-555-0200',
  'ACTIVE');

COMMIT;

DECLARE
  l_final_answer    CLOB;
  l_conversation_id VARCHAR2(128);
BEGIN
  l_conversation_id := DBMS_CLOUD_AI.create_conversation();

  l_final_answer := DBMS_CLOUD_AI_AGENT.run_team(
    team_name   => 'ADB_USER.AccountVariableHandoffTeam',
    user_prompt => 'Verify account mary_jones. Then summarize the verified account details using the saved account id.',
    params      => '{"attribute_variables": {"llm_profile":"GROK_ADB_USER2"},"conversation_id":"' || l_conversation_id || '"}'
  );

  dbms_output.put_line(l_final_answer);
END;
/
Wenn ein Wert sowohl in den SET_TEAM-Parametern als auch in den RUN_TEAM-Parametern angegeben wird, hat der an RUN_TEAM übergebene Wert Vorrang für diese Ausführung.
Beispiel: Zugriff auf ein freigegebenes Team entziehen
Entziehen Sie den Zugriff, wenn ein Datenbankbenutzer oder eine Datenbankrolle kein gemeinsames Team mehr ausführen soll. Das Eigentümerschema ist Eigentümer und verwaltet die Teamdefinition, die weiterhin vom Eigentümerschema verwaltet wird.
Bevor Sie beginnen
Beurteilung:
- Voraussetzungen für die gemeinsame Nutzung der Select AI Agent Framework Teams
- Prozedur REVOKE_TEAM_ACCESS
Das vollständige Beispiel lautet:
BEGIN
 DBMS_CLOUD_AI_AGENT.REVOKE_TEAM_ACCESS(
 team_name => 'SHARED_ACCOUNT_TEAM',
 user_or_role_name => 'ADB_USER2');
END;
/