4 Performing Post-Installation System Setup Tasks

Perform these post-installation system setup tasks for Oracle Business Intelligence Applications (Oracle BI Applications).

Topics:

Setting the Business Analytics Warehouse Connection in Oracle Data Integrator

Use Oracle Data Integrator (ODI) Studio to set the connection properties in the ODI Repository of the physical schema associated with the BIAPPS_DW_FILE physical server.

To set the Oracle Business Analytics Warehouse physical schema connection in ODI:
  1. Log in to ODI Studio using the Oracle BI Applications Administrator credentials.
  2. In the navigation pane, go to Topology, and expand Technologies, and then expand File.
  3. Double-click BIAPPS_DW_FILE.
  4. In the Definition pane, for the Directory (Schema) and Directory (Work Schema) properties, specify the directory where you copied the source files to and include the sub-folders data_files/src_files/BIA_11.

    For example:

    SOURCE_FILE_HOME/biapps/etl/data_files/src_files/BIA_11

Performing Setup Steps for On-Premises Oracle Fusion Applications Sources

These procedures apply to on-premises Oracle Fusion Applications sources.

Creating a User for ETL

The ETL process must be run by a user with appropriate data security privileges granted on the Oracle Fusion Applications tables from which data is extracted into Oracle Business Analytics Warehouse. For this purpose, the enterprise role named FUSION_APPS_OBIA_BIEE_APPID is provisioned during the installation of Oracle Fusion Applications with the appropriate ETL security privileges.

This procedure applies only to on-premises Oracle Fusion Applications sources.

Work with your security administrator for Oracle Fusion Applications to complete these steps.

  1. In the Oracle Fusion Applications LDAP system, create a new user.

    For example, you might create a new user named OBIA_ETL_USER.

  2. Make the user a member of the Enterprise Role FUSION_APPS_OBIA_BIEE_APPID.
  3. Make a note of the user credentials.
  4. When using the embedded LDAP for Oracle BI Applications, create a user with exactly the same credentials as the ETL user created in Oracle Fusion Applications LDAP.

    Grant this OBIA_ETL_USER the BIAdministrator Duty Role.

Configuring the Oracle BI Repository for ETL

This procedure applies only to on-premises Oracle Fusion Applications sources.

To configure the repository for ETL against on-premises Oracle Fusion Applications sources:
  1. Log in to Oracle BI Administration Tool.
  2. Open the Oracle BI Repository for Oracle BI Applications in offline mode.
  3. In the Physical layer, configure a connection to the BIEE broker for each of the Oracle Fusion Applications pillar domains. Set the connection for each of these Physical layer objects:
    Pillar Physical Layer Object

    CRM

    oracle.apps.crm.model.analytics.applicationModule.CrmAnalyticsAM_CrmAnalyticsAMLocal

    FSCM

    oracle.apps.fscm.model.analytics.applicationModule.FscmTopModelAM_FscmTopModelAMLocal

    HCM

    oracle.apps.hcm.model.analytics.applicationModule.HcmTopModelAnalyticsGlobalAM_HcmTopModelGlobalAMLocal

    1. Right-click one of the pillar objects, and select Properties.
    2. In the General tab of the Database dialog, select Allow direct database requests by default.
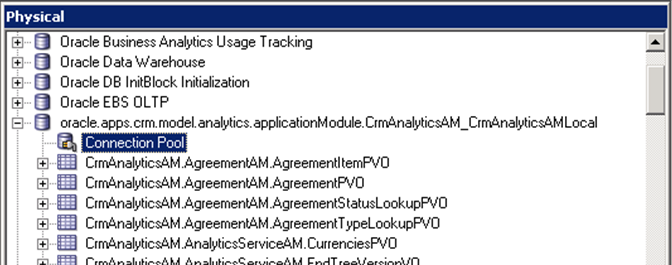
    3. Expand the pillar object, and double-click Connection Pool.
      This graphic is described in the surrounding text.

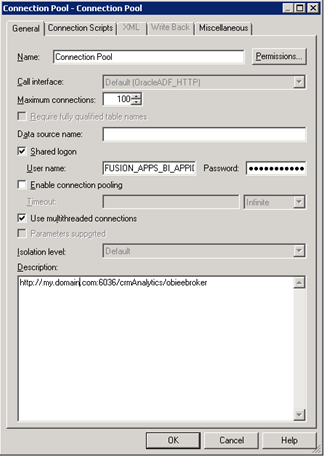
      The Connection Pool dialog opens.

    4. In the General tab, enter FUSION_APPS_BI_APPID as the data source user name, and enter the password for this user.

      You can obtain the password for the FUSION_APPS_BI_APPID user from your Oracle Fusion Applications administrator.

      This graphic is described in the surrounding text.
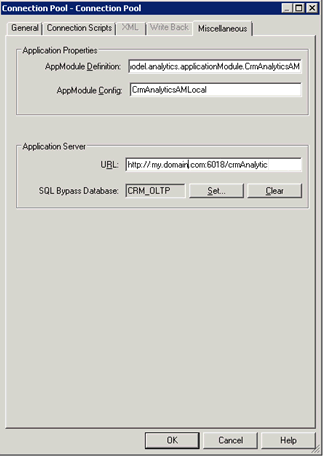
    5. In the Miscellaneous tab, in the Application Server URL field, enter the URL for the BIEE broker for the appropriate pillar, in the format:
      Http://<host>.<domain>:<port>/<pillar>Analytics/obieebroker
      

      For example:

      Http://hostName.myDomain.com:30615/crmAnalytics/obieebroker
      
    6. In the SQL Bypass Database field, enter <PILLAR>_OLTP.

      For example: CRM_OLTP.

      This graphic is described in the surrounding text.
    7. Repeat steps 3a through 3f for each of the three pillars.
  4. Set the value for these DSN variables.

    These variables specify the connection to the Fusion Applications transactional database.

    • CRM_OLTP_DSN

    • FSCM_OLTP_DSN

    • FBI_OLTP_DSN

    • HCM_OLTP_DSN

    • OLTP_DSN (used by the Marketing OLTP data source)

    1. In the menu bar, select Manage, then Variables.
    2. In the Variable Manager dialog, scroll down to locate the <PILLAR>_OLTP_DSN variable.
    3. Double-click the <PILLAR>_OLTP_DSN variable.

      The Static Repository Variable dialog opens.

    4. In the Default Initializer text box, enter the connection information to the Fusion Applications transactional database in the tnsnames.ora format.

      For example:

      '(DESCRIPTION=(ADDRESS=(PROTOCOL=TCP)
       (HOST=db_host_name.domain.com)
       (PORT=<port>))(CONNECT_DATA =
       (SERVICE_NAME=<service_name>)))'
      
    5. Repeat steps 4a through 4d for each DSN.
  5. Set the value for these user variables.

    These variables specify the Oracle Fusion Applications transactional database user.

    • CRM_OLTP_USER

    • FSCM_OLTP_USER

    • FBI_OLTP_USER

    • HCM_OLTP_USER

    • OLTP_USER (used by the Marketing OLTP data source)

    1. Obtain the user name for the users listed above from the repository for Oracle Transactional Business Intelligence.
    2. Obtain the password for the users from the Oracle Fusion Applications administrator.

      You'll need this password in a later step.

    3. In the menu bar, select Manage, then Variables.
    4. In the menu bar of the Variable Manager dialog, select Action, New, Repository, then Variable.
    5. In the Variable Manager dialog, scroll down to locate the <PILLAR>_OLTP_USER and OLTP_USER variables.
    6. Double-click the variable.

      The Static Repository Variable dialog opens.

    7. In the Default Initializer text box, enter the user name.
    8. Repeat steps 4a through 4g for each user.
  6. Configure the connection pool for each of the OLTP objects listed in the Physical layer:
    • CRM_OLTP

    • FSCM_OLTP

    • FBI_OLTP

    • HCM_OLTP

    • Marketing OLTP

    1. Expand the object.
    2. Double-click Connection Pool.

      For Marketing OLTP, double-click Fusion OLTP Connection Pool.

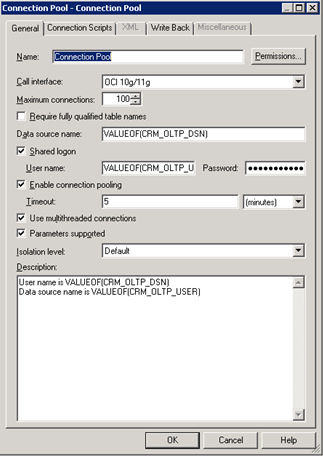
      The Connection Pool dialog opens.
    3. In the Data source name field, enter VALUEOF(<PILLAR>_OLTP_DSN).

      For example: VALUEOF(CRM_OLTP_DSN).

      For Marketing OLTP, enter VALUEOF(OLTP_DSN)

    4. In the User name field, enter VALUEOF(<PILLAR>_OLTP_USER).

      For example: VALUEOF(CRM_OLTP_USER).

      For Marketing OLTP enter VALUEOF(OLTP_USER).

      The user for CRM_OLTP, FSCM_OLTP, FBI_OLTP, and HCM_OLTP is the same. The user for Marketing OLTP is the value of OLTP_USER, which is different from the user for the other pillars.

    5. In the Password field, enter the password for the user.

      Obtain this password from the Oracle Fusion Applications administrator.

      This graphic is described in the surrounding text.
    6. Repeat steps 6a through 6e for each of the OLTP objects.

Registering Source Systems and Propagating Connection Details to Oracle Data Integrator

Use this procedure to register a source system and propagate the connection details to ODI.

To register a source system:

Note:

If you want to register the Oracle Fusion Applications source, then follow the steps in Register the Fusion Applications Source.
  1. Launch Oracle BI Applications Configuration Manager using the URL http://<host>:<port>/biacm, and log in as the Oracle BI Applications Administrator user.
  2. In the navigation pane, select the Define Business Intelligence Applications Instance link, which appears under System Setups.

    The Source Systems tab is displayed.

  3. Click the Add icon.

    The Register Source dialog displays.

  4. Register the source in Configuration Manager, specify these properties.
    Property Description

    Product Line

    Select the source instance product line.

    For Oracle Fusion sources, select Oracle Fusion.

    Product Line Version

    Select the version number of the source instance product line.

    Source Instance Name

    Specify a name for the source instance.

    This is the name given by the Oracle BI Applications System Administrator to a transactional system that serves as a source of data for Oracle BI Applications data load. The source instance is important because functional setup tasks, and the setting of values for objects such as parameters and domain maps are performed in relation to a source instance.

    Description

    (Optional) Enter additional information about the source instance.

    Data Source Number

    Enter a unique number to identify the source instance.

    The Data Source Number value specifies a data source so that the data can be identified in the Oracle Business Analytics Warehouse. Each source instance must have a unique Data Source Number.

    Data Server

    For all sources except PeopleSoft sources, a read-only list of data servers is displayed.

    For PeopleSoft Enterprise sources, in the Data Server Details window, select the appropriate data server for the source instance.

    Note:

    Ensure that the Data Source Number value is the same in all environments (development, test, and production), otherwise the importing and exporting of data fails with error messages.

    Click Next. The Register Source in ODI Topology page is active.

  5. Register the source in ODI:
    1. Select Global from the Context drop-down list.

      The Global value is required because the Oracle BI Applications interfaces are designed to use this value.

    2. In the Technology: Oracle tab, specify these properties:
      Property Description

      ODI Data Server Name

      Specify a name for the ODI Data Server that indicates the transactional OLTP database (source database). This ODI Data Server Name must be unique across all ODI data servers in the ODI Repository.

      JDBC Driver

      The name of the JDBC driver for the transactional OLTP database (source database) connection.

      For Oracle Fusion sources, this property indicates the name of the JDBC driver for the Oracle BI Server. For example: oracle.bi.jdbc.AnaJdbcDriver.

      Data from the Fusion Applications transactional system is retrieved from the Oracle BI Server.

      Oracle recommends that you use the default value.

      JDBC URL

      Specify the JDBC URL for the transactional OLTP database (source database) connection. The format for the URL is:

      jdbc:oracle:thin:@<host>:<port>:<sid>

      If your source is Oracle Fusion Applications on-premises, specify the JDBC URL for the Oracle BI Server. The format is

      jdbc:oraclebi://<BI Server host>:<BI Server port>/PrimaryCcs=<Cluster Controller Host>;PrimaryCcsPort=<Cluster Controller Port>

      For example:

      jdbc:oraclebi://biserverHost:9703/PrimaryCcs=CCSHost;PrimaryCcsPort=9706

      Database Username

      Specify the database user name for the transactional OLTP database (source database).

      For Oracle Fusion sources, specify the user name of the ETL user. This is the user created in Creating a User for ETL.

      Database Password

      Specify the password for the transactional OLTP database (source database).

      For Oracle Fusion sources, specify the password for the ETL user.

      Test

      Use this button to test the connection to the transactional OLTP database (source database).

    3. In the Technology: File System tab, specify these properties:
      Property Description

      ODI Data Server Name

      Specify a name for the file system data server. This ODI Data Server Name must be unique across all ODI data servers in the ODI Repository.

      Host Name

      Specify the name of the host system where the file system (source files used for ETL) resides. This is the system to which you copied the source files.

      Path To File

      Specify the directory where you copied the source files to.

      The directory path must include the appropriate source-specific folder for your environment. The source-specific folders are located in /biapps/etl/data_files/src_files.

      For example, if your source system is Oracle EBS 12.1.1, the directory path would be:

      SOURCE_FILE_HOME/biapps/etl/data_ files/src_files/EBS_12_1_1

      Array Fetch Size

      The number of rows requested by ODI on each communication with the data server.

      This column may be hidden. To view this column, click View, Columns, Show All.

      Batch Update Size

      The number of rows in a single INSERT command.

      This column may be hidden. To view this column, click View, Columns, Show All.

      JDBC Driver

      Oracle recommends that you use the default value.

      This column may be hidden. To view this column, click View, Columns, Show All.

      JDBC URL

      Oracle recommends that you use the default value.

      This column may be hidden. To view this column, click View, Columns, Show All.

    4. Click Save and Close.

      This information is passed to ODI where the connections are created.

Note:

The connection details aren't propagated to the ODI Repository until you enter and save the information on both the Register Source in the Configuration Manager page and the Register Source in ODI Topology page.

Enabling Offerings for Deployment

Use Configuration Manager to enable the Oracle BI Applications offerings that you've purchased and are deploying. The setup data relating to offerings is made visible in Configuration Manager when you enable the offering.

By default, if you've multiple source instances and you enable an offering, the offering is enabled for all source instances. If an offering won't source from all source instances, then you can disable the source instances from which the offering won't source. For example, suppose you've two source instances, Oracle EBS and PeopleSoft, and you're deploying Financial Analytics. If Financial Analytics sources only from PeopleSoft, then you'd disable the Oracle EBS source instance for the Financial Analytics offering.

To enable Oracle BI Applications offerings for deployment:

  1. Log in to Configuration Manager as the Oracle BI Applications Administrator user.
  2. Select the Manage Business Intelligence Applications link to display the Manage Business Intelligence Applications dialog.
  3. Select the Business Intelligence Application Offerings tab.
  4. Select Enabled next to each offering you want to deploy.

    Enabling an offering makes the setup data associated with that offering available in Configuration Manager.

  5. Click Save to save your changes.
  6. To exit this dialog, click Done.

Disabling a Source Instance

You can disable a source instance from which an offering won't source.

  1. Go to the Business Intelligence Application Offerings and Associated Sources tab.
  2. Expand the appropriate offering.
  3. Deselect Enabled for the source you want to disable.
  4. Click Save.

Setting Languages for Data Load into the Business Analytics Warehouse

Oracle BI Applications supports data loads in multiple languages. You specify the languages for data loads in Configuration Manager.

Note:

PSFT and JDE customers must also configure the LANGUAGE_BASE_OLTP variable before executing the Domain-Only load plan. This is the base language of the PeopleSoft or JD Edwards OLTP and not necessarily the BI Apps base language. The LANGUAGE_BASE_OLTP variable doesn't apply to any other source system.
  1. Log in to Configuration Manager as a user with the Oracle BI Applications Administrator duty role.
  2. Select the Manage Warehouse Languages link to display the Manage Warehouse Languages page.
  3. In the Manage Business Analytics Warehouse Languages tab, specify the languages from which data is to be extracted from the list of languages displayed in the table by selecting Yes from the Installed menu.

    Note that American English is the default installed language. All other languages are disabled.

    Note:

    When you specify a language as being Installed, the Data Load Parameter LANGUAGE_LIST is populated internally with the list of selected languages. This parameter list is used during data extraction to extract data in the selected languages.

  4. Click Save to save your changes.

Running the Domains Load Plan

You must define, generate, and run a domains load plan to load source-specific data into Configuration Manager tables. This enables Configuration Manager to display the appropriate source-specific values as choices in drop-down lists for setup objects.

Before you perform this step you must have completed the procedure Registering Source Systems and Propagating Connection Details to Oracle Data Integrator, including registering the source in the Register Source in ODI Topology page. Additionally, if you've Fusion Cloud as a source in a load plan, then don't run such plans until you've set up the Oracle Fusion Applications cloud data source. See Setting up Fusion Applications Cloud Data Sources.

To define, generate, and run the domains load plan:

  1. Define the domains load plan:
    1. In the Tasks pane of Configuration Manager, select Manage Load Plans, which appears under the Load Plans Administration heading.

      The Manage Load Plans page is displayed.

    2. In the Load Plans toolbar, click the Add icon.

      The Create Load Plan page is displayed.

    3. On the first page of the Create Load Plan series, specify this information:
      Field Description

      Name

      Enter a unique name for the load plan.

      Description

      (Optional) Enter additional information about the load plan.

      Load Plan Type

      Select Domain-only Extract and Load (SDE and SIL).

      Source Instances

      Select a source instance. If you don't select an instance, then all instances are selected by default.

    4. Click Next.

      The second page of the Create Load Plan series displays.

    5. In the Available Fact Groups tab, select the fact groups you want to include in the domains load plan definition.

      The fact groups may belong to a hierarchy of fact groups. You can select only the top level parent fact group and not a child fact group.

      A load plan must contain at least one fact group. Multiple fact groups may be selected from one or more data sources.

    6. Click Save.
      A submenu is displayed with these options:
      • Click Save to save the load plan. After a load plan is saved, it's displayed in the Load Plans master list.

      • Click Generate to save and generate the load plan.

      The generation process in Configuration Manager propagates the load plan properties to the ODI Repository, where the load plan is built.
  2. If you didn't generate the load plan upon saving in the previous step, then generate it:
    1. In the Load Plans master list, select the domains load plan you defined in step 1.
    2. In the Load Plans toolbar, click the Generate icon.

    The Generation Status column indicates the progress of the generation process. The process must complete successfully before you can move on to the next step. Click the Refresh icon to refresh the display.

  3. Run the domains load plan by selecting it in the master list, and clicking the Execute icon on the toolbar.

Mapping Externally Conformed Domains

After you run the domains load plan, you must complete the mapping of externally conformed domains to point to a particular source (even if you've only one source) in Configuration Manager.

You must perform the mapping configuration for each domain listed in the Manage Externally Conformed Domains dialog.

User Access to Configuration Manager, FSM, and Oracle Data Integrator

On installation the Oracle BI Applications system is configured to use WebLogic Server embedded LDAP for authentication. Work with your security administrator to grant users access to Configuration Manager, Functional Setup Manager (FSM), and ODI.

Access to Configuration Manager and FSM is controlled through these duty roles:

  • BI Applications Administrator Duty

  • BI Applications Functional Developer Duty

  • BI Applications Implementation Manager Duty

  • Load Plan Operator Duty

  • Load Plan Administrator Duty

The security administrator must grant the appropriate duty roles to a user based on the user's job responsibilities. See Duty Roles for Access to Functional Setup Manager or Configuration Manager in Oracle Business Intelligence Applications Security Guide.

The Oracle BI Applications administrator, load plan operator, and load plan administrator users require appropriate access to ODI. In addition to these users being created in the LDAP system, you must create these users in the ODI Repository and grant them the Supervisor profile or an appropriate ODI profile. The Oracle BI Applications administrator must be granted the Supervisor role in ODI. Work with your security administrator to grant the duty roles.

To manage security in ODI, see Managing Security in Oracle Data Integrator in Administering Oracle Data Integrator.

Additionally, you must complete the following steps to configure the Signout link to work for Configuration Manager on an Oracle Access Manager (OAM) enabled environment:
  1. Execute the commands through WLST as the following:

    addOAMSSOProvider(loginuri="/${app.context}/adfAuthentication",
    logouturi="/oamsso/logout.html", autologinuri="/obrar.cgi")
    Example:
    cd <MW_HOME>/oracle_common/common/bin
    ./wlst.sh
    connect ('admin,'passwd','t3://<WLS_HOST>:<WLS_PORT');
    wls:/>addOAMSSOProvider(loginuri="/${app.context}/adfAuthentication",
    logouturi="/oamsso/logout.html", autologinuri="/obrar.cgi") 
  2. Stop and restart bi_server1.

Editing Preferred Currency Display Names and Enabling Document Currency

Oracle Analytics Server is installed with a set of preferred currencies with pre-configured preferred currency names and preferred currency codes. Preferred currency names are used on Oracle Analytics Server dashboards in the Currency drop-down on the My Account dialog\Preferences tab for a user logged into Oracle Analytics Server.

You can use the Manage Preferred Currencies dialog to edit the default currency display names. You edit preferred currency name values to change the currency labels that are displayed in all modules associated with BI dashboards. For example, you might want to change the "Local Currency" label from "Ledger Currency" to "Local Currency".

To edit currency display names:

  1. Log in to Configuration Manager as the Oracle BI Applications Administrator user.
  2. Under System Setups, select Manage Preferred Currencies to display the Manage Preferred Currencies dialog.
  3. Select a currency in the Preferred Currencies list.

    Selecting the currency displays the associated modules in the bottom table.

  4. Click the value in the Preferred Currency Name column (or click the Edit icon) to display the Preferred Currency Name dialog.
  5. In the Preferred Currency Name field, specify a currency name.

    This is the name that appears for end users in the Currency drop-down list, located in Preferences tab of the My Accounts dialog of Oracle Analytics Server.

  6. Click Save and Close.

Enabling Document Currency

By default, document currency is excluded from the Currency drop-down list (located in the Preferences tab of the My Accounts dialog in Oracle Analytics Server).

To include Document currency in the Currency drop-down list, you must remove a specific filter from all of these security groups in the repository:

  • OBIA_PROJECT_CURRENCY_PREFERENCES

  • OBIA_HCM_CURRENCY_PREFERENCES

  • OBIA_SCM_CURRENCY_PREFERENCES

  • OBIA_FINANCIAL_CURRENCY_PREFERENCES

  • OBIA_MFG_CURRENCY_PRFERENCES

  • OBIA_PROCUREMENT_CURRENCY_PREFERENCES

  • OBIA_MARKETING_CURRENCY_PREFERENCES

  • OBIA_PARTNER_CURRENCY_PREFERENCES

  • OBIA_CRM_CURRENCY_PREFERENCES

  • OBIA_SALES_CURRENCY_PREFERENCES

Note:

The security groups listed above are displayed in Oracle BI Administration Tool on the Application Roles tab on the Identity Manager dialog.
  1. In Oracle BI Administration Tool, click Manage, then Identity, to display the Identity Manager dialog.
  2. In the Identity Manager dialog, click BI Repository.
  3. Display the Application Roles tab.
  4. For each of the security groups in the repository list:
    1. Double-click the security group to display the Application Role - <Name> dialog.
    2. Click Permissions, and then display the Data Filters tab.
    3. In the Data Filter column, remove the filter:
      AND "Core"."Fact - Preference List"."Currency Preference Code" <> 'Document Currency'

      For example, the filter before editing:

      "Core"."Fact - Preference List"."Module Code" = 'PROJECT_AN' AND "Core"."Fact - Preference List"."Currency Preference Flag" in ('W', 'B') AND   "Core"."Fact - Preference List"."Currency Preference Code" <> 'Document Currency'

      For example, the filter after editing:

      "Core"."Fact - Preference List"."Module Code" = 'PROJECT_AN' AND "Core"."Fact - Preference List"."Currency Preference Flag" in ('W', 'B')
  5. Save the changes.

    If you edited the metadata repository in Offline mode, then you must use Oracle Enterprise Manager Fusion Middleware Control to upload the repository.

    Tip:

    To upload metadata to Oracle Analytics Server, see Upload Repository Command.

Enabling Initialization Blocks

For all source systems other than Oracle Fusion Applications, you must enable initialization blocks. Initialization blocks are enabled for Oracle Fusion Applications by default.

This procedure uses forward slashes to separate directories, indicating the UNIX/Linux directory structure. For Windows, substitute a backslash; the directory structure is the same as that for UNIX/Linux.
  1. Copy the sample config.txt file from ORACLE_HOME/bi/biapps/biarpdutil/bin to ORACLE_HOME/bi/biapps/biarpdutil/lib.
  2. Download the Oracle BI Repository file for Oracle BI Applications to the library location using this command:
     <DOMAIN_HOME>/bitools/bin ./datamodel.sh downloadrpd -O <export_location> -SI <service_instancename > -U <username> -P <password>
    For example,
    ./datamodel.sh downloadrpd -O <ORACLE_HOME>/bi/biapps/biarpdutil/lib/OracleBIApps.rpd -SI biainstance -U username -P password
  3. Add <DOMAIN_HOME/bitools/bin to the PATH system variable.
  4. Edit the config.txt file that you copied to ORACLE_HOME/bi/biapps/biarpdutil/lib:
    RPD File Name <RPD file name>
    RPD Password <RPD pasword>
    RPD Database List <Comma separated list of database names in RPD physical layer for which the initialization block has to be enabled>
    

    The values in the repository database list must include all initialization blocks related to the source system that need to be enabled. Oracle BI Server must be included as a value in the repository database list if an initialization block that needs to be refreshed from the Oracle Analytics Server server is to be enabled.

  5. Go to the location <DOMAIN_HOME>/bitools/bin, make a copy of biserverxmlgen.sh, rename it to biserverxmlgen, and give the new file biserverxmlgen all the required permissions.
  6. Execute the ManageInitBlock.jar utility, located in ORACLE_HOME/bi/biapps/biarpdutil/lib, using this command:
    java -classpath ManageInitBlock.jar oracle.apps.biarpdutil.ManageInitBlock >log.txt
    

    An output repository is generated. The file is named Output_RPD.rpd. All relevant initialization blocks are enabled in Output_RPD.rpd.

  7. Deploy the Output_RPD.rpd to Oracle Analytics Server.

    To deploy an Oracle BI Repository, see Administering Oracle Analytics Server.

Trimming the Repository

You can trim the repository so that it includes only the projects that are relevant to your deployment.

Oracle BI Applications delivers a full repository with projects for all the BI Applications modules. This full repository is deployed to the Oracle BI Server. Although optional, trimming the repository makes the Oracle BI Server startup process faster and also makes patching quicker.

Note:

You mustn't trim the repository for on-premises Fusion Applications sources. The full repository is required for ETL in these environments.

The steps for trimming the repository depend on the status of your deployment:

Extracting Projects From Full Repository

Use this procedure to extract projects from the full repository. The end result of this process is a trimmed repository.

To extract from the repository the projects for the products you've purchased, you can use the extractprojects utility only with binary repositories in RPD format. This utility is available at location ORACLE_HOME/user_projects/domains/bi/bitools/bin.
  1. For extracting a single project, use this example:
    extractprojects -B input_rpd -O output_rpd -I project1 Provide your password for the repository. This example extracts project1 from my_repos.rpd and creates a new repository called extract_repos.rpd.
  2. For extracting multiple projects, use this example:

    extractprojects -B input_rpd -O output_rpd -I "project_name1" -I "project_name2"-I "project_name3" (and so on) where 
input_rpd is the name and path of the full (delivered) repository and from which you want to extract the project or projects (for example, OracleBIApps.rpd).
 output_rpd is the name and path of the repository that you want to create with the extracted projects (for example, OracleBIAppsTrimmed.rpd).
 project_name is the name of the repository project that you want to extract.
You're prompted to enter the encryption password for the repository (input_rpd).

    The list of projects in the repository includes:

    • Financial Analytics Fusion Edition
    • Human Resources Analytics Fusion Edition
    • Marketing Analytics Fusion Edition
    • Partner Analytics Fusion Edition
    • Project Analytics Fusion Edition
    • Sales Analytics Fusion Edition
    • Supply Chain and Order Management Analytics Fusion Edition
    • Student Information Analytics
    • Service Analytics
    • Price Analytics
    • Manufacturing Analytics
  3. Save and rename the trimmed repository. Make sure the name identifies this repository as one that has been trimmed, for example, OracleBIAppsTrimmed.rpd.

Merging Repositories

Use this procedure only if you've customized the repository and are subsequently trimming the repository.

  1. In the Oracle BI Administration Tool, open in offline mode the trimmed Oracle BI Repository that you created in the procedure Extracting Projects From Full Repository, for example, OracleBIAppsTrimmed.rpd.
  2. On the menu bar, click File, and then click Merge.
  3. In the Select Original Repository dialog box, select the repository OracleBIApps., which is the full repository.
  4. Enter the password for the original repository, and then click OK.
  5. Click Select for the Modified Repository field.

    The Select Modified Repository dialog opens.

  6. Select the repository that contains the customizations you made to the repository file, for example, OracleBIAppsCustom..
  7. Click Open, and enter the password for the previously customized repository, and then click OK.
  8. In the Decision drop-down list, select the action you want to take regarding the repository change, or accept the default action.
  9. To locate subsequent rows with empty Decision fields, click the Decision header cell.

    After all rows have a value in the Decision field, the Merge button becomes enabled.

  10. Click Merge.

    A message appears after the merge concludes successfully.

  11. On the menu bar, click File, and then click Save As.

    Save the current repository using a new name, such as OracleBIAppsFinal.rpd.

Next Steps After Setup — Functional Configuration

After you complete the setup tasks, Oracle BI Applications is ready for functional configuration, which is accomplished using Configuration Manager and FSM.

Note:

If you're deploying data from Oracle Fusion Applications Cloud source system, complete the tasks in Setting Up Fusion Applications Cloud Data Sources before performing functional configuration.

To enable functional configuration, you must provide the Configuration Manager URL to your implementation managers and functional developers. To learn about the functional configuration process for Oracle BI Applications, see Oracle Business Intelligence Applications Configuration Guide.

In addition, for Oracle Fusion Applications sources, after Oracle BI Applications analyses and dashboards have been tested and the data validated, the Oracle BI Applications system administrator needs to inform the Oracle Fusion Applications Administrator to enable the appropriate embedded analyses and dashboard (ADR) regions in Oracle Fusion Applications. The ADR regions are enabled using FSM for Oracle Fusion Applications.