Adding Detailed Profitability Model Stages
Only two stages may exist in a Detailed Profitability model.
This option is not available if both stages already exist.
To add model stages:
- From Oracle Hyperion Enterprise Performance Management Workspace, select Navigate, then Applications, then Profitability, and then select the application that you want to view.
- From Task Areas, select Manage Model, and then Stages.

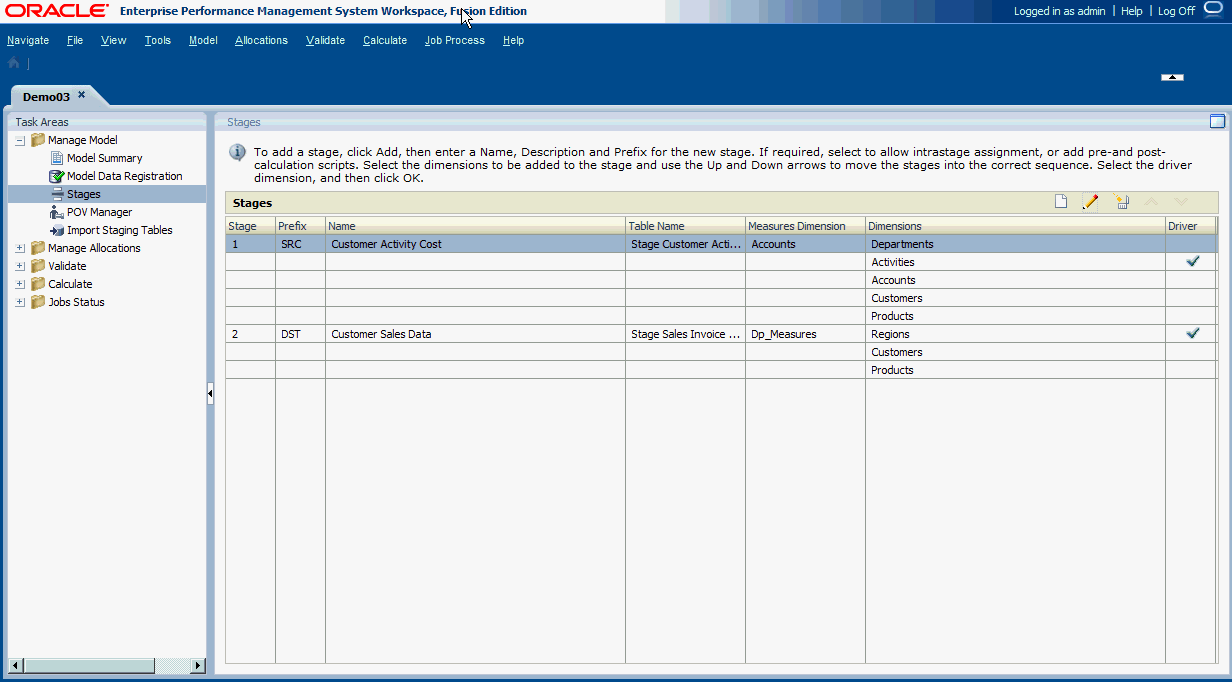
The Stages window provides the following information about the selected stage:
-
Stage displays the stage order. The stage order determines whether the stage is the source or the destination.
-
Prefix is the stage prefix that was entered during stage creation. It could indicate whether the stage is the Source (SRC) or Destination (DST) by its value.
Note:
The prefixes do not impact the identification or source or destination stages. Stage 1 is always the source stage, and Stage 2 is always the destination stage.
-
Name shows the assigned name of the stage, and usually identifies the business function or process of the stage, such as Customer Activity Cost or Customer Sales Data.
-
Table Name is the assigned display name for the registered table.
-
Measures Dimension displays the Measures dimension selected for the Stage during Model Data Registration.
-
Dimensions shows the dimensions included in the stage.
-
Driver dimension selected for the stage is indicated by a check mark.
-
- If two stages do not already exist, click Add Stage
 .
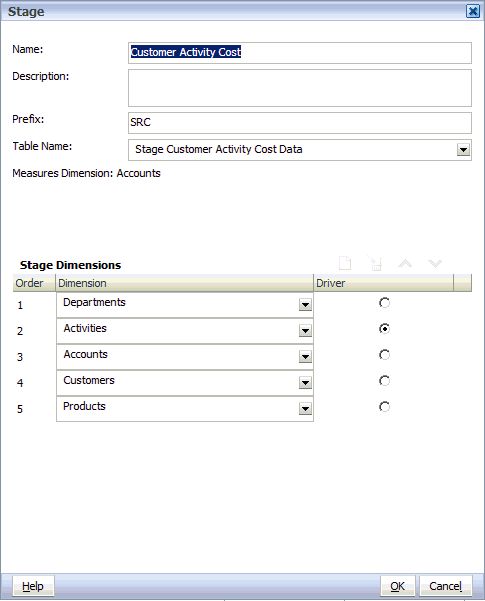
.The Stage dialog box is displayed.

- Enter the following details for the stage:
-
Enter the assigned Name for the stage. The name usually identifies the business function or process of the stage, such as Customer Activity Cost or Customer Sales Data.
-
Select the Prefix to help to indicate, for example, whether the stage is the Source (SRC) or Destination (DST).
-
Optional: Enter a brief description of the purpose or contents of the stage.
-
Select the Table Name that was assigned during Model Data Registration.
-
Under Measures Dimension, verify the Measures dimension associated with the selected stage during Model Data Registration.
-
- Under Stage Dimensions, click Add
 to add a dimension for the stage.
 Note:
When adding dimensions for the selected stage, you must also add the Source Measures Dimension that you defined in Model Data Registration as one of the dimensions for the Source Stage. Do not include the Destination Measures Dimension in the definition of the Destination stage.
- Repeat step 5 to add each dimension for the selected stage. You can add up to 5 dimensions for a Source Stage and up to 25 dimensions for a Destination Stage.
- Optional: Under Order, select a dimension to enable the Up
 and Down
  arrows to move the dimension up or down into the correct sequence. Move all dimensions using the arrows.
 - Under Driver, select the dimension which is the driver for the selected stage. The designated driver is indicated with a check mark.
- Click OK.