Adding Inputs to an Orchestration
Orchestration inputs identify the data an orchestration consumes from a calling custom program, a third-party application, a mobile application, an equipment meter, an IoT device, or a Cloud service. For example, you could have an orchestration that consumes data from an equipment manufacturer, with an "EquipmentID" input to pass the meter reading of the equipment to the orchestration.
For each input, you specify an input type, which can be a string, a numeric value, or various date formats. You can add four types of inputs to an orchestration:
Orchestration Inputs.
You can manually enter orchestration inputs, including arrays and objects, to identify the data an orchestration consumes from third-party applications or devices.
After adding a component as a step in the orchestration, you can use the Add Inputs to Orchestration button in the Transformation dialog box to automatically add inputs that are defined in a component as inputs to the orchestration. You can remove any of the inputs as needed, and then map the orchestration inputs to the appropriate inputs in the orchestration steps.
Variables.
You can enter variables that are available as inputs to other steps or that can be used to return data. To change the variable value in a step, you must define the variable value in the output of the step. When the step runs, the variable will change and will be available in future steps. This gives you the ability to declare variables at the beginning of an orchestration without having to specify them as orchestration inputs. As the orchestration progresses through its steps, it can use and redefine the values of these variables, and these values are available to the subsequent steps in the orchestration.
System Values.
New orchestrations include the following default inputs:
User's Address Book Number,
                        User's Name, User ID, User ID Long, System Date, System Time,
Orchestration Input,Environment(Release 9.2.6), andUser's Language(Release 9.2.9). These inputs represent the originator of the orchestration when executed at runtime. This gives you the option to map these inputs to an orchestration step.Value from Steps.
When you add a form request, data request, or cross reference that is configured to return values from EnterpriseOne, the variables that are defined to represent the return values appear as additional orchestration inputs. Therefore you can map the data returned from one component to a subsequent component in an orchestration.
Also, if you add a service request step that generates output, the Orchestrator Studio automatically adds a
<servicerequestname>.outputas an orchestration input. This input includes a variable that represents the JSON output of the service request, and gives you the option to map the JSON to a subsequent orchestration step.
Each component that you add to an orchestration-a service request, rule, white list, or cross reference-also includes one or more inputs which evaluate data from orchestration inputs. For example, inputs in a rule evaluate data received from orchestration inputs to determine the next step in an orchestration. When you assemble an orchestration, you map the orchestration inputs to the inputs defined in the components. See Mapping Orchestration Inputs.
To manually add orchestration inputs in the Orchestration Inputs grid:
On the Orchestrations design page, click the Start node.
The action control icons are displayed above the Start node.
Click the Inputs and Values icon.
In the Inputs and Values dialog-box, click the Input Format drop-down menu and select the appropriate format:
JDE Standard
Generic
See Supported Input Message Formats for more information about which input format to use.
Click the View Example Input button to view a sample of the input that is passed to the orchestration. The sample input is displayed in the JSON format. (Release 9.2.4.3)
In the Orchestration Inputs tab of the Inputs and Values dialog box, enter the name of the input in the Input column.
Starting with Tools Release 9.2.8.2, you can reorder orchestration inputs by dragging and dropping the rows. This feature improves readability and enables orchestrations to easily integrate with user interfaces or third-party systems that might be sensitive to the order of inputs.
In the Value Type column, select the input value type. Valid values are:
Array
Note:Array is not a valid value type if you are adding a variable input.
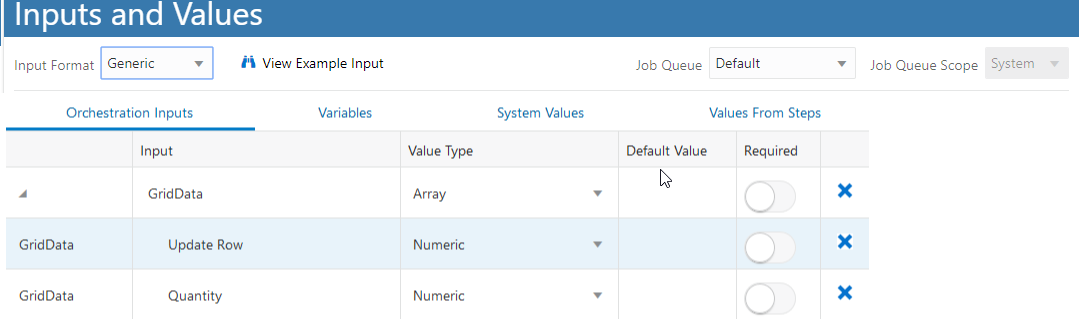
If you add an array for an input, the grid expands so you can define the inputs in the array.As shown in the following example, a user added an array named GridData. And then entered the inputs "Update Row" and "Quantity" for the array in the subsequent rows.
String
Numeric
Boolean
Object
This input type allows you to pass a JSON object into an orchestration. You can use this input type to pass nested arrays of data by defining arrays of objects.
If the input is a date, you can use any of the following date formats:
dd/MM/yyyydd/MM/yyyyyy/MM/ddMM/dd/yyyyMM/dd/yyyy/MM/dd
You can also use the following date formats that create additional inputs derived from the passed value:
Millisecondsyyyy-MM-dd'T'HH:mm:ss.SSSZ
Optionally, use the Default Value column to enter a default value that you want to pass through the orchestration input.
(Release 9.2.6.2) To specify the default values for orchestration inputs that are in an array:
- Click the Default Array icon in the Default Value column. A pop-up window containing the number of columns in your array is displayed.
- Make changes to the array as required. You can enable the Raw option if you want to use the JSON format.
Note: You can click the Array Inputs icon in the Run Orchestrations window to add or modify the array inputs. See Testing an Orchestration.Starting with Tools Release 9.2.6.3, when mapping values, you can select <Space> from the Default Value drop-down menu.
Starting with Tools Release 9.2.9.4, the Default Value drop-down list includes the available system values, enabling you to select these values as default values for the orchestration inputs. For example, you can create an orchestration that includes an input for Address Book Number and set the default value for that input to the Address Book Number of the user running the orchestration.
Additionally, for date inputs, click the Set Special Value icon to configure a default date derived from today's date.
Click Save to save your changes.
To generate orchestration inputs from an orchestration component:
In the orchestration design page, click the component from which you want to generate the inputs.
The action control icons are displayed for the component.
Click the Transformations icon.
In the Transformations dialog box, click the Add Inputs to Orchestration button.
Click the Start node and then select Inputs and Values icon from the action control icons.
In the Inputs and Values dialog box, the inputs that are defined in the component appear as inputs to the orchestration.
Use the X button at the end of each row to remove any unnecessary inputs.
Modify the Value Type and Default Value columns as needed.
Click on the canvas to close the Inputs and Values dialog box and then click Save.
See Mapping Orchestration Inputs to map these inputs to the appropriate component inputs.