Adding Steps to an Orchestration
At a minimum, an orchestration requires only a service request step to run. You can add a rule step to provide true or false conditions that control the orchestration flow, such as whether the incoming data meets the condition to invoke the service request. You can add a cross reference step if an orchestration requires a cross reference to map data from the device to EnterpriseOne data. You can also add a white list step that contains a list of data permitted in the orchestration to provide an initial pass/fail check for the orchestration.
The Orchestrator Studio provides "Insert Step Before" and "Insert Step After" buttons so you can add a step before or after another step in the orchestration. Thus, you do not have to determine whether or not you need to add a particular step, such as a white list, to an orchestration before you add other steps.
The following image shows the steps in the AddConditionBasedAlert sample orchestration in the Orchestrator Studio which contains two cross references, two rules, and a service request:
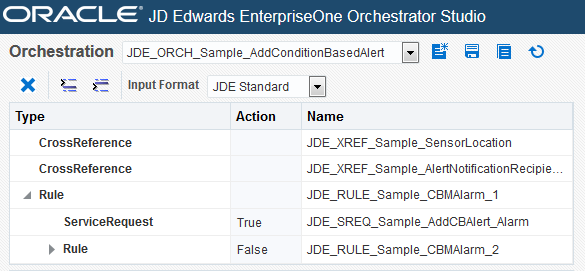
The preceding figure shows how the Orchestrator Studio displays the steps. The Type and Name columns in the Orchestration grid area show the type of step and the name that you give each step or component. The "True" or "False" values in the Action column are used after configuring the rule and service request components as described in the Creating an Orchestration section.
To add steps to an orchestration:
To add the initial step to an orchestration, click the Add Step button (+ icon).
In the "Enter Type of Step" pop-up field, select one of the following steps to add to the orchestration, and then click the Ok button.
CrossReference
Rule
ServiceRequest
Whitelist
The Orchestrator Studio displays the first step in the grid. After you add a step, if you click the step in the grid, the Orchestrator Studio displays the design panel in which you can create the component for that step. See the other sections in this chapter for instructions on how to configure each component.
To add additional steps to an orchestration:
Select a step in the grid, and then click either the Insert Step Before or Insert Step After button to add an additional step before or after the selected step.
In the "Enter Type of Step" pop-up, select the step that you want to add.
Click the Ok button.
To remove a step from an orchestration:
Select the step that you want to remove.
Above the grid with the steps, click the Remove Step button (the X button).
If you make a mistake when updating an orchestration, you can restore the orchestration to its last saved version which erases any changes made since the last save.
To restore an orchestration, click the Restore All button, which is the last button to the right of the other Orchestration buttons.