Setting Up a DB System
This section shows you how to set up a DB System that you created in the previous module "Creating a DB System in Oracle Cloud Infrastructure" of this Learning Path.
This section describes the general setup tasks that must be performed on the Oracle Cloud Infrastructure database service called DB System. If you are using a Linux-based VM in Oracle Cloud Infrastructure Compute for the Database Server, refer to the Learning Path "Deploying JD Edwards EnterpriseOne on Oracle Cloud Infrastructure on Linux with Compute Database".
This module includes the general setup for the primary node of a DB System. Additional setup is required for Real Application Cluster (RAC) and is described in a subsequent module "Setting Up a DB System with RAC" in this Learning Path. Further configuration is required after the One-Click Provisioning is complete. The configuration process is described in the module “Performing Post-Provisioning Tasks” of this Learning Path.
Prerequisites
- You must have already created a DB System by following the process described in the preceding module "Creating a DB System in Oracle Cloud Infrastructure"of this Learning Path.
- The user interface for the Oracle Cloud Infrastructure Console is constantly evolving. For the most up-to-date descriptions and navigation, refer to Using the Console.
- You should have a fundamental understanding of the Oracle Cloud Infrastructure. It is highly recommended that you review the extensive collateral information, including training, at this site:
- You must have a subscription to Oracle Cloud Infrastructure and an Administrator account in the platform. For more information, refer to:
- To access the Oracle Cloud Infrastructure Console, you must use a supported browser.
Setting Up DB Systems with a Single Node
The following prerequisites are required for DB Systems (DBS):
-
Log in to the DBS machine as the opc user and use the following command to modify the entries in the sshd_config file:
$ sudo vi /etc/ssh/sshd_config -
Ensure that the following entries exist in the
sshd_configfile:ClientAliveInterval 3600AddressFamily inet -
While still logged in to the DBS machine as the opc user, use the following commands to add the opc user to the oracle group. Grant the required permission to the /u01 file system:
$ sudo groupadd oracle$ sudo usermod -a -G oracle opc$ sudo usermod -a -G oracle oracle$ sudo chmod 775 /u01$ sudo chown oracle /u01$ sudo chgrp oracle /u01 -
While still logged in to the DBS machine as the opc user, use the following commands to open the ports required for JD Edwards EnterpriseOne and One-Click Provisioning:
sudo iptables -I INPUT -p tcp -m tcp --dport 14502 -j
                        ACCEPT
sudo iptables -I INPUT -p tcp -m tcp --dport 14503 -j ACCEPTsudo iptables -I INPUT -p tcp -m tcp --dport 14504 -j ACCEPTsudo iptables -I INPUT -p tcp -m tcp --dport 14505 -j ACCEPTsudo iptables -I INPUT -p tcp -m tcp --dport 14506 -j ACCEPTsudo iptables -I INPUT -p tcp -m tcp --dport 14507 -j ACCEPTsudo iptables -I INPUT -p tcp -m tcp --dport 14508 -j ACCEPTsudo iptables -I INPUT -p tcp -m tcp --dport 14509 -j ACCEPTsudo iptables -I INPUT -p tcp -m tcp --dport 14510 -j ACCEPTsudo iptables -I INPUT -p tcp -m tcp --dport 1521 -j ACCEPTsudo iptables -I INPUT -p tcp -m tcp --dport 22 -j ACCEPTsudo iptables -I INPUT -p tcp -m tcp --dport 5150 -j ACCEPTsudo service iptables saveNote:
- Port numbers 14502 through 14510 are predefined Server Manager inbound ports.
- Port number 22 is the SSH port.
- Port 1521 is the Database Server listener port. If you have created a Database Server instance with a different port, then open that port instead of 1521.
-
Port number 5150 is required to support the predefined One-Click Provisioning port.
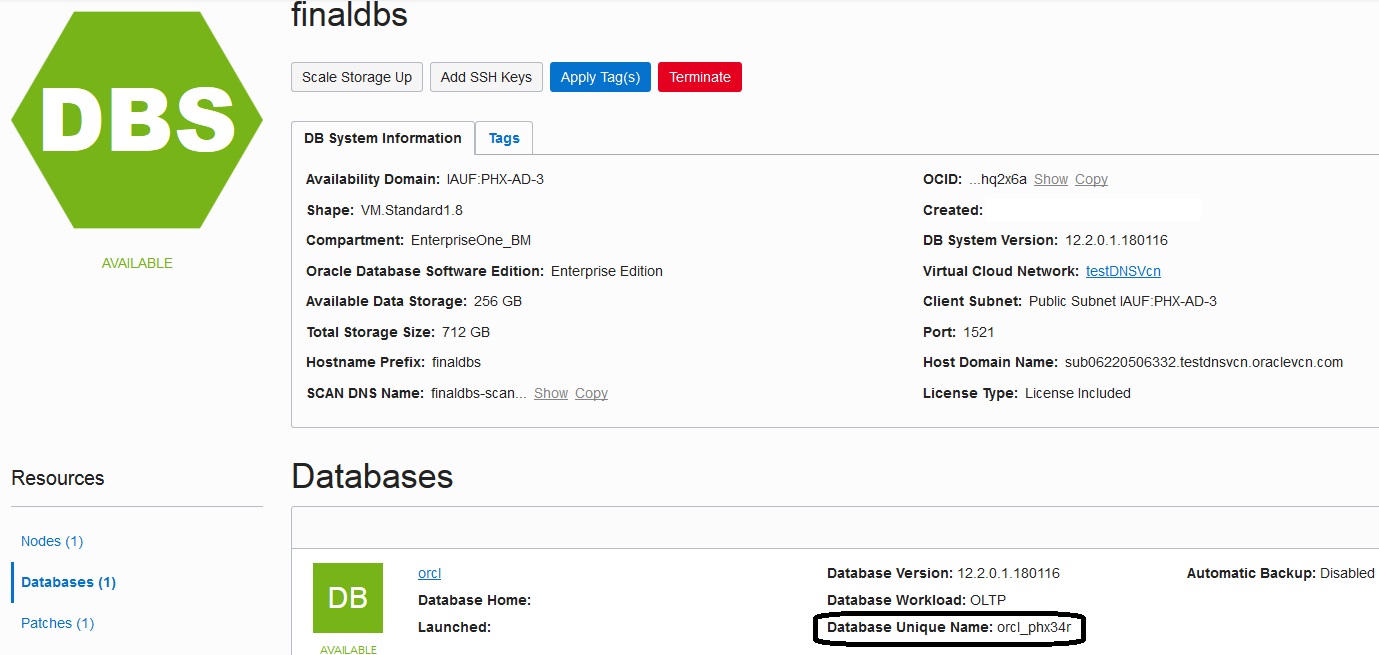
Determine the Database Unique Name by navigating to the DB Systems instance summary screen of the Oracle Cloud Infrastructure console. This value is displayed in the Database Unique Name field, as shown in the following screenshot.
 Note:
Note:In the above example, the value orcl_phx34r is shown in the circled Database Unique Name field. In the subsequent examples in this module, this value is referred to as the site variable <UNQNAME>.
-
Add environment variables for the oracle user by editing the /home/oracle/.bash_profile using these commands:
$ sudo su - oracle$ vi /home/oracle/.bash_profileTypically, a properly completed .bash_profile will look like this:
export
                            ORACLE_HOME=/u01/app/oracle/product_12.2.0.1/dbhome_1
export ORACLE_UNQNAME=ORCL_phx1mkPATH=$ORACLE_HOME/bin:$PATHexport PATHUse this command to execute the .bash_profile file for the variables to take effect:
$ source /home/oracle/.bash_profileNote Value Description ORACLE_HOME The ORACLE_HOME environment variable value is typically the software installation directory of your Oracle database, which by default is similar to this: /u01/app/oracle/product/12.2.0.1/dbhome_1ORACLE_UNQNAME Refer to Step 5. -
Log in to the DBS machine as the oracle user and run these commands to get the value of the SERVICE_NAME:
$ sudo su - oracle$ sqlplus system/<DB_ADM_PWD>@<DB_UNIQUE_NAME>sql> select name from v$services where PDB='JDEORCL';Note:In the example commands above, the value used for the pluggable database name is JDEORCL. If the name of your pluggable database is different, adjust the name in the SQL query accordingly.
The value returned by this sequence of commands is the SERVICE_NAME.
Make a TNS entry for the pluggable database in the tnsnames.ora file located in the
$ORACLE_HOME/network/admindirectory of the DB System. This entry is in addition to the existing entries in thetnsnames.orafile.The TNS entry should be in this format:
TNS_NAME =
(DESCRIPTION
                        =
(ADDRESS = (PROTOCOL = TCP)(HOST = DB_HOST)(PORT = DB_PORT))(CONNECT_DATA =(SERVER = DEDICATED)(SERVICE_NAME = SERVICE_NAME)))Note Value Description TNS_NAME A net service name that is an alias to your pluggable database name. It can be any unique name not used as an alias in TNS name entries.
Important:For shared schema, the TNS_NAME must be JDEORCL and for non-shared schema it must be other than JDEORCL.
DB_PORT The database listener port. The default value is 1521. DB_HOST DB System - Standalone
For a Standalone DB System (no RAC), this value is the FQDN host name of the database node. To find the FQDN host name , use the following command:
$ hostname -fThe returned results will be in this syntax:
jdedbs123.sub01234567890.yourvcn.oraclevcn.comDB System - RAC
For a DB System with RAC, the value shown in the following screenshot is displayed in the SCAN DNS Name field in the Oracle Cloud Infrastructure console of the DB System.
SERVICE_NAME Refer to Step 7. 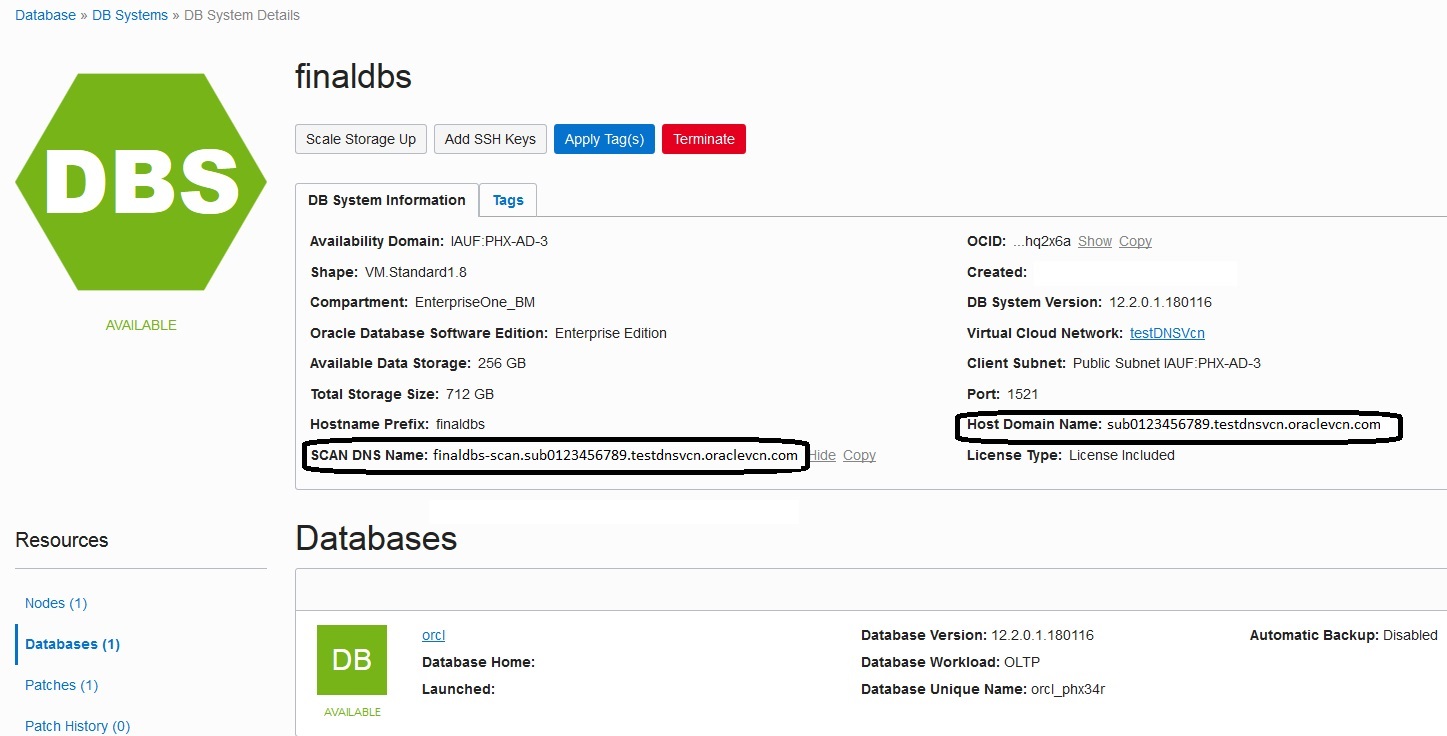
Following are two examples of a properly completed
tnsnames.orafile.Example: DB System - Standalone
JDEORCL
                            =
(DESCRIPTION =(ADDRESS = (PROTOCOL = TCP)(HOST = jdedbs123.sub0123456789.testdnsvcn.oraclevcn.com)(PORT = 1521))(CONNECT_DATA =(SERVER = DEDICATED)(SERVICE_NAME = JDEORCL.sub0123456789.testdnsvcn.oraclevcn.com)))Example: DB System- RAC
JDEORCL
                            =
(DESCRIPTION =(ADDRESS = (PROTOCOL = TCP)(HOST = dbsrc14-scan.sub0123456789.testdnsvcn.oraclevcn.com)(PORT = 1521))(CONNECT_DATA =(SERVER = DEDICATED)(SERVICE_NAME = JDEORCL.sub0123456789.testdnsvcn.oraclevcn.com)))You must ensure that the search setting in the /etc/resolv.conf file specifies the DNS domain name of the Availability Domain to which all JD Edwards EnterpriseOne servers belong. While logged in as root (the owner of the resolv.conf file), you must add a line with this syntax:
search <DNS_Domain_Name> <subnet>.<DNS_Domain_Name>
Because each region has at least three subnets, you must specify the exact subnet in which your JD Edwards EnterpriseOne servers are running.
For example, your subnets can look like this:
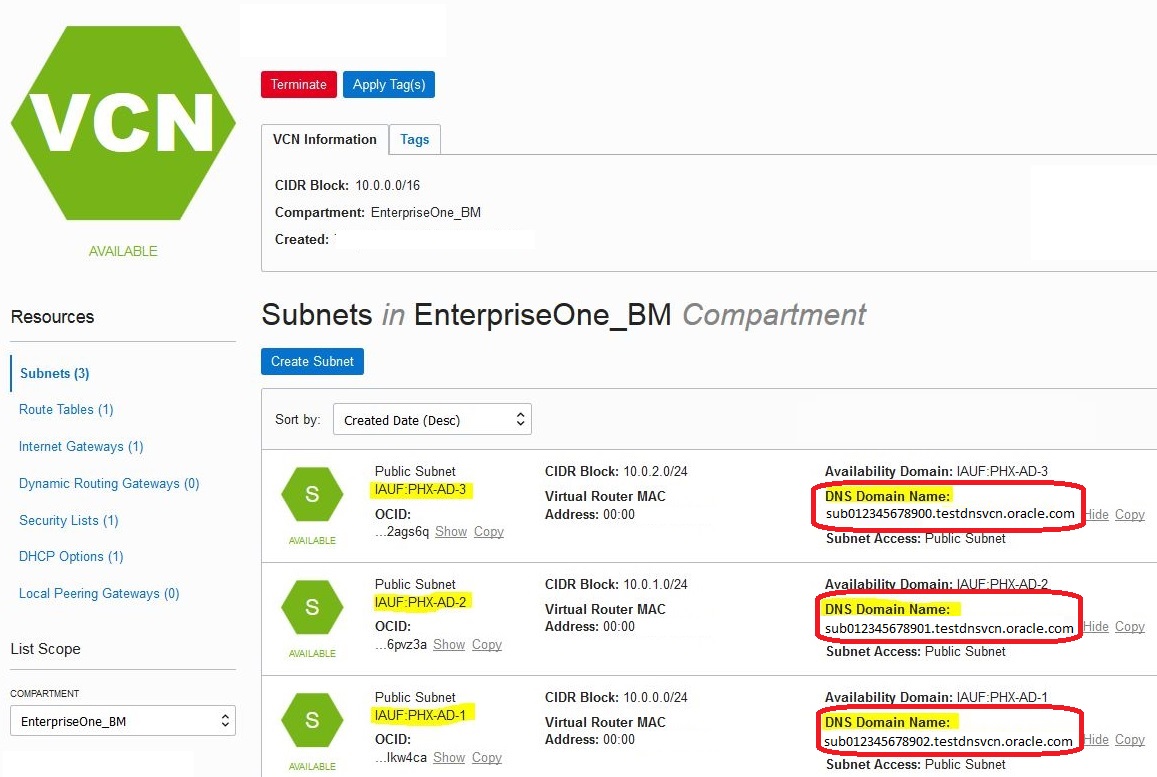
Using the above example, assuming that your JD Edwards EnterpriseOne Servers are running in the Phoenix Availability Domain, you would edit your /etc/resolve.conf file to add a line with a search setting similar to the setting shown below to include all the three domains:
search testdnsvcn.oraclevcn.com sub012345678900.testdnsvcn.oraclevcn.com sub012345678901.testdnsvcn.oraclevcn.com sub012345678902.testdnsvcn.oraclevcn.com-
From a SQL prompt on the DBS machine, use these commands to allocate recovery space for archive logging::
-
Log in as the oracle user using this command:
$ sudo su - oracle -
Log in to the database using this command:
$ sqlplus sys/<DB_ADM_PWD>@<DB_UNIQUE_NAME> as sysdba; -
Set the recovery space using this command:
sql> ALTER SYSTEM SET db_recovery_file_dest_size=50G SCOPE=BOTH; -
Verify the available and used recovery space using this command:
sql> SELECT * FROM V$RECOVERY_FILE_DEST;For example, if you set the recovery space to 50 GB and install a full complement of pathcodes (SHARED, PS, DV, PY), issuing this command returns these results which show that the space limit is approximately 54 GB with 48 GB in use.
NAME--------------------------------------------------------------------------------SPACE_LIMIT SPACE_USED SPACE_RECLAIMABLE NUMBER_OF_FILES CON_ID----------- ---------- ----------------- --------------- ----------+RECO5.3687E+10 4.7264E+10 0 53 0
-
-
From a SQL prompt on the DBS machine, use these commands to set number of processes:
-
Set the number of processes to 1500 using this command:
sql> alter system set processes=1500
                                        scope=spfile;
-
-
From a SQL prompt on the DBS machine, use these commands to set PGA_AGGREGATE_LIMIT to 15GB
-
Set the PGA_AGGREGATE_LIMIT using this command:
sql> alter system set pga_aggregate_limit=15G
                                        scope=spfile;
-
-
Check whether the temporary tablespace with name ‘TEMP’ is available by running following sequence of commands:
-
Use this command to log in to sqlplus as the system user at the PDB Level:
sqlplus system/<db_adm_pwd>@JDEORCL - Run the following query to check temporary for the existence of a
tablespace with name
‘TEMP’:
where TABLESPACE_NAME='TEMP'SELECT TABLESPACE_NAME from DBA_TABLESPACES - If the tablespace query does not output results that a temporary
tablespace exists with name ‘TEMP’, run the following command as a
single contiguous line with no
returns:
CREATE TEMPORARY TABLESPACE TEMP TEMPFILE 'jdetemp.dbf' SIZE 500m
              autoextend on next 10m maxsize unlimited
If the command executes correctly, it should output results like "Tablespace Created".
-