Balance Sheet Case Study Task: Format Account Balances Columns
You can format the appearance of the account balances in columns by applying column masks, which apply decimal places to the amount, and by applying other formatting.
To hide zero account balances, complete the following steps:
Select the column, and then select Highlight from the Conditional Formatting section on the Column tab.
In the Highlight window, perform the following steps:
Enter 0 in the Value field.
Click in the Color field, and then select the box for white on the Color Picker window.
Click in the Background Color field, and then select the box for white on the Color Picker window.
Note: Do not select the white box that has an X in the box. The white color is not used in the statement output if you select that box.Repeat Steps 1 and 2 for each column with account balances.
Change the size and appearance of the balances in columns to match the font used in the account description:
Select the cells in the column, and then select Highlight from the Conditional Formatting section of the Column tab.
Select Account Level of Detail under the Rowset heading from the Data Field list.
Enter 3 in the Value field.
Select 10pt from the Size list.
Click the Bold icon.
Click the Underline icon.
Click OK.
Select Account Level of Detail under the Rowset heading from the Data Field list.
Enter 4 in the Value field.
Click the Bold icon.
Click OK.
Repeat Steps 2-11 to format the account balances in the other columns.
To apply column masks, complete the following steps:
Highlight the column cells to which to apply the mask.
For example, select the cells in the Current Actuals column to apply a mask to the account balances in the Current Actuals column.
Open the Properties tab in the Data Source panel.
Click in the Formatting Mask field in the Data Formatting section.
Select the mask for the column selected.
For example, select the Current Actuals Mask if you selected the Current Actuals column.
Repeat Steps 1-4 for each column of account balances.
Click the Save icon to save your layout.
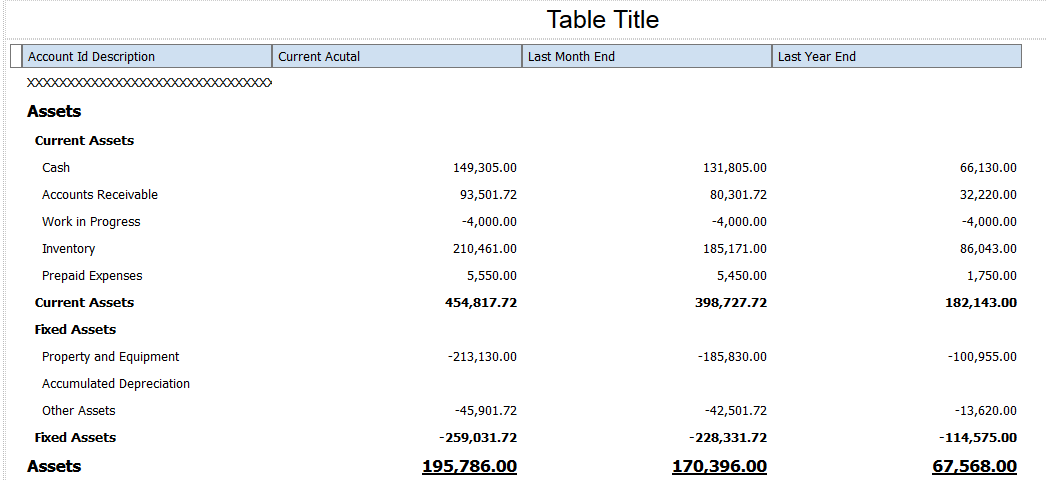
After you complete the steps in this task, your statement layout should look like the following image: