Consolidated Income Statement Case Study Task: Add, Delete, and Format Headers Elements
To replace the default text in the statement header and format the new text:
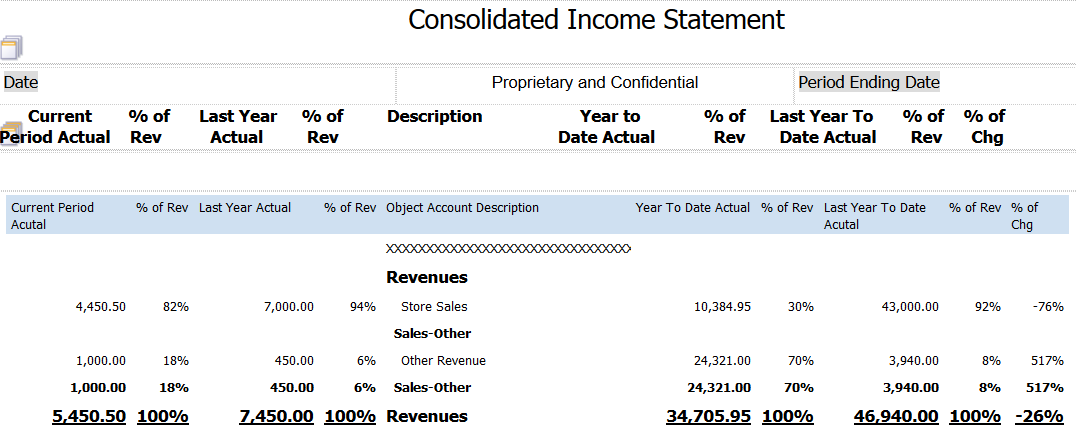
Double-click on the heading named Report Title.
Enter Consolidated Income Statement.
Click the Align to Center icon on the Text tab to center the title.
From the list in the Font area, select 16pt.
To add the date stamp:
In the System section on the Data Source panel, locate the Time list item and drag-and-drop it in the header area.
In the Report Variables section, locate the Period Ending Date and drag-and-drop it below the header.
Select the Period Ending Date element that you just placed in the header, and then click the Align to Center icon on the Text tab to center the period ending date.
To create and format column titles in the header:
Select a grid cell in the header area.
If the grid cell is empty and in the position in which you want the column titles, skip to Step 4; otherwise, continue with Step 3.
Click the Add a Row above or Add a Row below icon in the Insert section of the Layout Grid Cell tab.
Select the Text Item option from the Insert tab.
Double-click in the text item cell, and enter Current Period Actual.
Format the text using the options in the Font section on the Text tab:
Select Tahoma.
Change the font size to 10pt.
Click the Bold icon.
Add the following text in the Text Item cell:
Note: To have the text center properly, you might need to add a hard-return to put some of the text on a second line.% Rev Actual
Last Year Current Period Actual
% Rev
Description
Year to Date Actual
% Rev
Last Year to Date Actual
% Rev
% Chg
Using your space bar, center each title you entered over the appropriate column.
You will need to preview the results to assure that the output has the titles in the correct positions. Centering the titles in the layout might not result in the titles being centered in the output.
See Consolidated Income Statement Case Study: Preview the Statement.
Click the Save icon to save your layout.
After you complete the steps in this section, your layout should look like the following image: