This 20-minute OBE (Oracle By Example) shows you how to attach
a schedule to an orchestration and how to use the scheduler user
interface in the on the JD Edwards EnterpriseOne Studio to run
the orchestration according to its schedule.
In this example, you will use the JD Edwards EnterpriseOne
Orchestrator Studio to create an orchestration that includes a
message request for sending emails to an email address that you
can access. After attaching a schedule to the orchestration, you
will use the scheduler page to start the process of running the
orchestration on a schedule. You can then verify that the
orchestration is running according to its schedule if you
receive emails at the scheduled interval.
Notifications can also run through the scheduler.
Background
In the JD Edwards EnterpriseOne Orchestrator Studio, you can
create and attach a schedule to an orchestration or a
notification. A schedule determines how often the scheduler
executes an orchestration or notification. You can define a
schedule using minutes, hours, days, or a Cron string (for
example, every Tuesday at 2:00 pm). You can attach the same
schedule to multiple orchestrations or notifications.
Use the scheduler page in the Studio to start, stop, and manage
scheduled orchestrations or notifications. For more information
see: Working
With Scheduler.
The EnterpriseOne environment must be configured with an
SMTP server to send emails.
Creating
an Orchestration with a Message Request
In this task, you will use the Orchestrator Studio to create an
orchestration with a message request.
Access the Orchestrator Studio.
Click the Messages icon and then click
the New button.
On the Message design page, complete these fields:
Name= Scheduled Message
Description = Send an Email
message.
Click the Product Code drop-down list and
select a customer product code, 55 – 59.
Enter the recipient, subject, and message:
To = Click the drop-down list and select
Email Address.
E-mail Address = Enter an email address
to which you have access. This is the email that you will
use later to verify that the orchestration is running as
scheduled.
Subject = Sending email message.
Message box = This is an email to
test orchestrations running on a schedule.
Click Save.
The message service request should look like this when
complete:
Message
Request
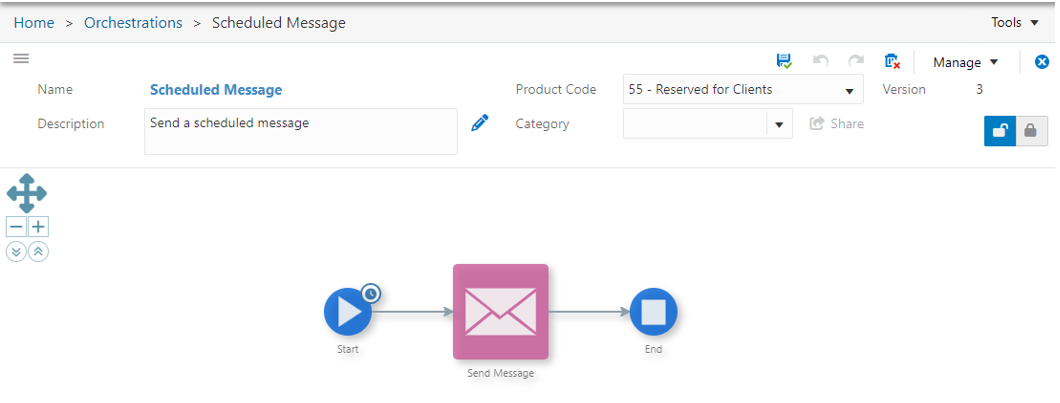
Click the Manage menu, and then click Create
Orchestration.
On the Orchestration design page, change these fields:
Name = Scheduled Message
Description = Send a scheduled message
Click the Product Code drop-down list and
select a customer product code, 55 – 59.
Save the orchestration.
Attaching
a Schedule to the Orchestration
In this task, you will attach a schedule to this orchestration.
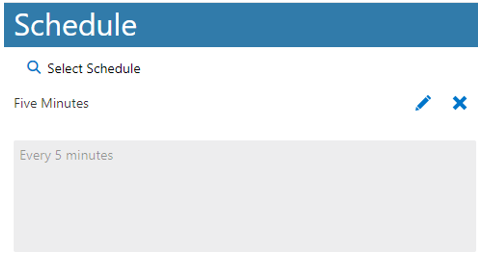
On the Orchestration design page with the Scheduled Message
orchestration, click the Start node.
In the Schedule to run every field, notice
the default value is already set to 5 Minutes. To set a
different time, click the Increment (up
arrow) icon to set it to the desired timing and select the
required value (Minutes, Hours, or Days) from the drop-down
list.
Click Save. The resulting schedule looks
like this:
Using
the Scheduler to Run and Test the Scheduled Orchestration
In this task, you will start the scheduled orchestration using
the Scheduler page.
Click the Tools menu (top right) and
select Scheduler.
Verify that the scheduler is running by looking at the top
right of the page, which should show the Scheduler uptime as
shown in the following screenshot: Scheduler uptime
If this is not shown, then the configuration of the server is
not enabled to run the scheduler. Configuration changes are
necessary. For more information, see the Before
You Begin section of this
OBE file.
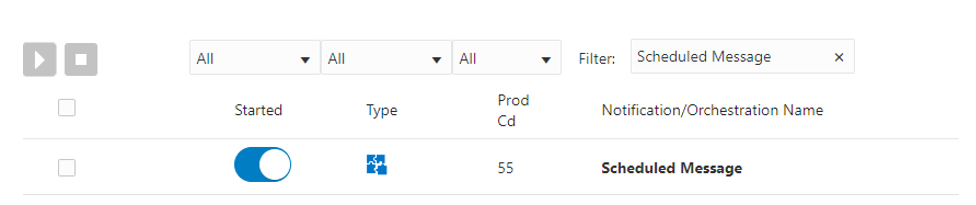
All scheduled orchestrations and notifications that your
user has access to will display in the grid. In the Filter
field, enter Scheduled Message.This is the name
of the orchestration you just created.
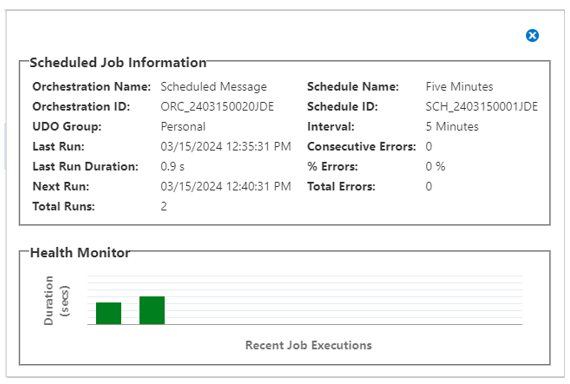
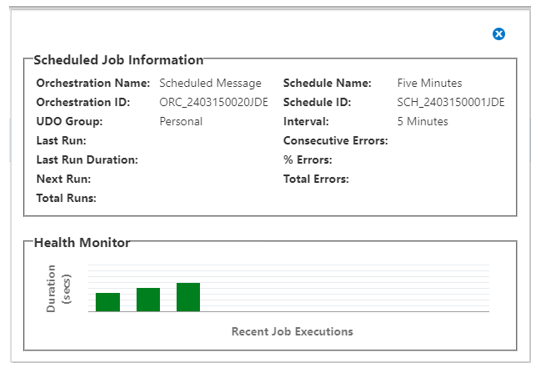
Click the i button and notice that there
is no information in the Next Run field. This is because the
Started option is disabled (the schedule is off).
 Running
an Orchestration on a Schedule
Running
an Orchestration on a Schedule Before You Begin
 Creating
an Orchestration with a Message Request
Creating
an Orchestration with a Message Request 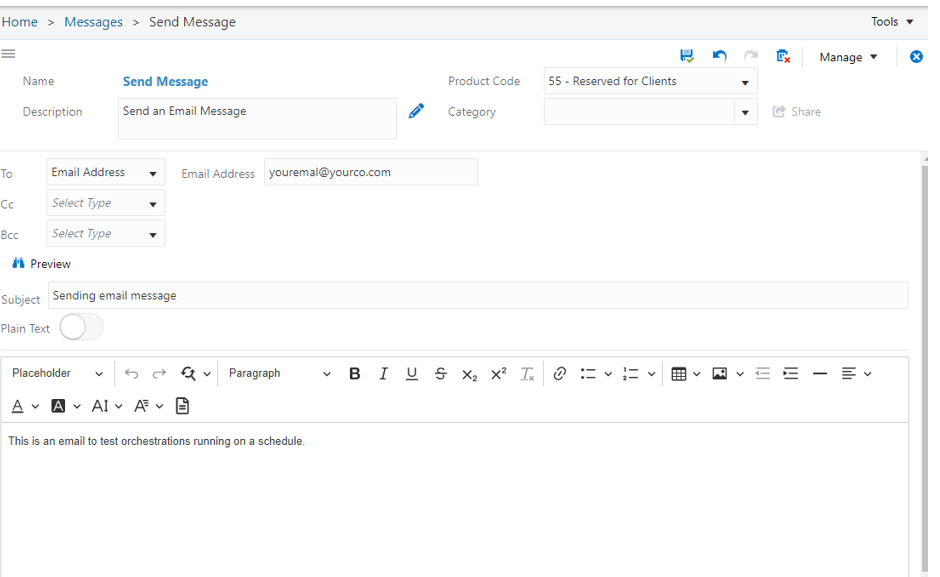
 Attaching
a Schedule to the Orchestration
Attaching
a Schedule to the Orchestration
 Using
the Scheduler to Run and Test the Scheduled Orchestration
Using
the Scheduler to Run and Test the Scheduled Orchestration

 Want
to Learn More?
Want
to Learn More?