Installing an IBM WebSphere Application Server 8.5.x/9.0
IBM WebSphere Application Server (WAS) 8.5.x/9.0 is installed through the IBM Installation Manager. Fix Pack 8.5.x/9.0 can be installed as a new installation or an update.
To install an IBM WebSphere Application Server 8.5.x/9.0:
Start the IBM Installation Manager, which you must have previously installed as described in the preceding chapter of this guide entitled: Installing the IBM Installation Manager.
To start the Installation Manager manually, execute IBMIM from
<IM_HOME>/eclipsefolder. For example:/u01/WebSphere855/InstallationManager/eclipseThe IBM Installation Manager screen displays.
You must configure the software repository in the Installation Manager before you can start the product installation. On the initial screen of the IBM Installation Manager, navigate File > Preferences.
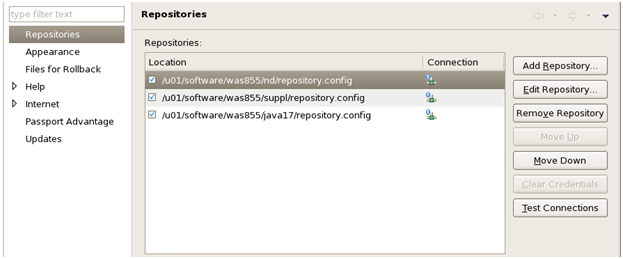
On Preferences, click on the Add Repository... button and enter the location of the
repository.configfor each of the product. For example:Z:\Software\WAS855\ND\repository.configZ:\Software\WAS855\Suppl\repository.configZ:\Software\WAS855\JDK17\repository.config/u01/software/was855/nd/repository.config/u01/software/was855/suppl/repository.config/u01/software/was855/java17/repository.config

Optionally, if needed for your installation, you should enable a proxy server and enter proxy information.
After all repositories are added, click the Install option from the Installation Manager.
IBM Installation Manager displays a list of available products, as shown in the following example:
The IBM Install Manager displays a list of available products (packages) to install.
On Install Packages, select packages, select the products you want to install such as:
WebSphere Network Deployment
SDK 1.7 / SDK 1.8
Click the Next button.
Note: Once the installation begins, the installer may prompt to inform you that updates are available.If Updates are available, the installer will display a list as shown in this example:
 Note: If the IBM Install Manager displays a list of updates, it is recommended that you click the Select Recommended button to accept and install the updates.
On Install Packages, review the International Program License Agreement and click the radio button to accept the terms if you want to continue with the installation.
On Install Packages, select location for the shared resources directory, enter an appropriate location for IMShared. These files will be used by all IBM products installed through the Installation Manager (such as HTTP Server and Customization Toolbox).
For example:
z:\IBM\IMShared/u01/WebSphere855/IMSharedClick the Next button.
On Install Packages, package group, click the radio button entitled: Create a new package group.
In the Installation Directory field, enter an appropriate location to install the IBM WebSphere Application Server 8.5.x/9.0 software. It does not have to be the same location as the shared location.
For example:
z:\IBM\WebSphere\AppServer/u01/WebSphere855/AppServerClick the Next button.
On Install Packages, translations, select your desired language.
Click the Next button.

On Install Packages, select features, verify that the package for Java JDK 1.7/JDK 1.8 is selected.
Caution: Although JDK 1.6 is the default installation for Websphere Application Server 8.5.x, you must choose to install JDK 1.7 in order to be compatible with JD Edwards EnterpriseOne.Click the Next button.
Review the summary information and click the Install button.
On Install Packages, the packages are installed, click the Finish button.
To create a profile, ensure this radio button in the right pane is selected:
Profile Management Tool to create a profile.
Continue to the next section of this chapter entitled: Creating a New Profile for WebSphere Application Server 8.5.x/9.0.