Before You Begin
This 45-minute tutorial shows you how to create a virtual cloud network (VCN) in the Oracle Cloud Infrastructure Console.
Background
To create a Cloud Manager instance on Oracle Cloud Infrastructure, you need a Virtual Cloud Network, or VCN, subnets that are either public or private, route table, and security lists to define access rules and restrictions. If you use Resource Manager to install the Cloud Manager stack, you can create a VCN and necessary networking resources as part of the Resource Manager process. In that case you can skip this tutorial. This tutorial includes examples of the steps for users who want to create their own VCN.
This is the fourth tutorial in the Install PeopleSoft Cloud Manager series. Read the tutorials in the order listed. The optional tutorials offer alternate methods for setup.
- Prepare to Install PeopleSoft Cloud Manager
- Verify Oracle Cloud Account Information for PeopleSoft Cloud Manager
- Plan the Virtual Cloud Network for PeopleSoft Cloud Manager (Optional)
- Create a Virtual Cloud Network for PeopleSoft Cloud Manager in the Oracle Cloud Infrastructure Console (Optional)
- Use Custom or Private Network Resources with PeopleSoft Cloud Manager (Optional)
- Create a Custom Linux Image for PeopleSoft Cloud Manager (Optional)
- Create a Custom Windows Image for PeopleSoft Cloud Manager in Oracle Cloud Infrastructure (Optional)
- Create Vault Resources for Password Management for PeopleSoft Cloud Manager
- Generate API Signing Keys for PeopleSoft Cloud Manager
- Install the PeopleSoft Cloud Manager Stack with Resource Manager
- Log in to the Cloud Manager Instance
- Specify Cloud Manager Settings
- Use File Storage Service for PeopleSoft Cloud Manager Repository
- Manage Cloud Manager Users, Roles, and Permission Lists
- Configure a Web Proxy for PeopleSoft Cloud Manager (Optional)
- Create a Load Balancer in Oracle Cloud Infrastructure for PeopleSoft Cloud Manager Environments (Optional)
- Create Defined Tags in Oracle Cloud Infrastructure for PeopleSoft Cloud Manager (Optional)
- Create Data Science Resources for Auto Scaling in PeopleSoft Cloud Manager (Optional)
Step 1: Create a VCN and Related Resources
This example uses the Oracle Cloud Infrastructure VCN wizard, which creates a VCN, internet gateway, NAT gateway, regional public subnet, regional private subnet, and security rules. For other options, see Networking in the Oracle Cloud Infrastructure documentation.
- In the Oracle Cloud Infrastructure Compute Console, select Networking
> Virtual Cloud Networks.
Note:
Alternatively, you can start the VCN wizard by clicking the tile Set up a network with a wizard on the Oracle Cloud Infrastructure home page. In that case, skip the next two steps. - Click Start VCN Wizard.
- Select VCN with Internet Connectivity (the default selection).
- Click Start VCN Wizard.

Description of this illustration (create_vcn_wizard_start.png) - On the Create a VCN with Internet Connectivity page, enter a name for the VCN.
- Select the compartment you want to work in from the drop-down
list, and then click Next.
The name in this example is pscm_network, and the compartment is mycmprt.

Description of this illustration (create_vcn_wizard_intnetconn_page.png) - Review the networking resources, and then click Create.
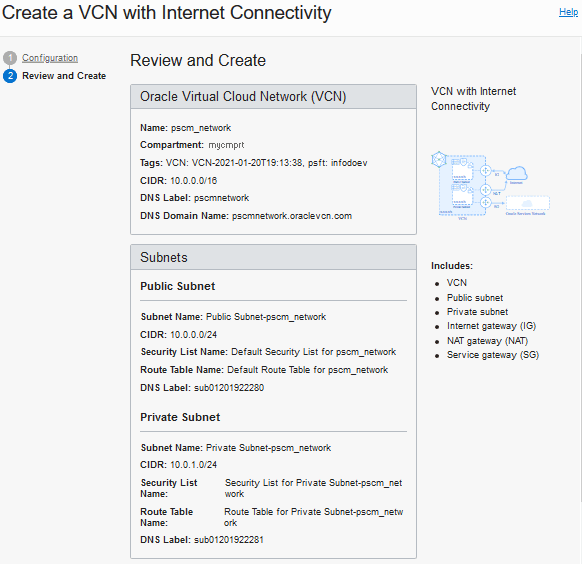
Description of this illustration (create_vcn_wizard_review_top.png) 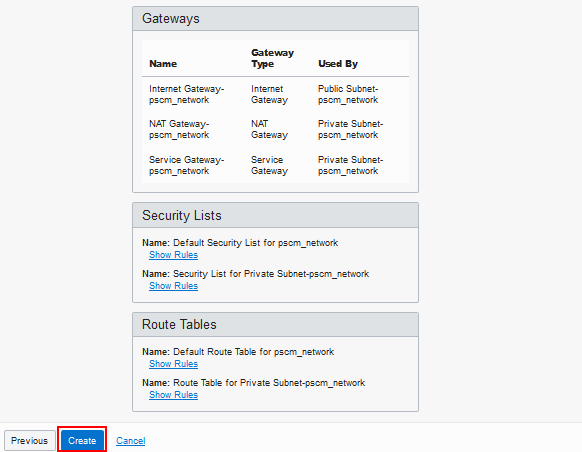
Description of this illustration (create_vcn_wizard_review_bottom.png) - When the process is complete, click View Virtual Cloud
Network to go to the Virtual Cloud Network details
page.
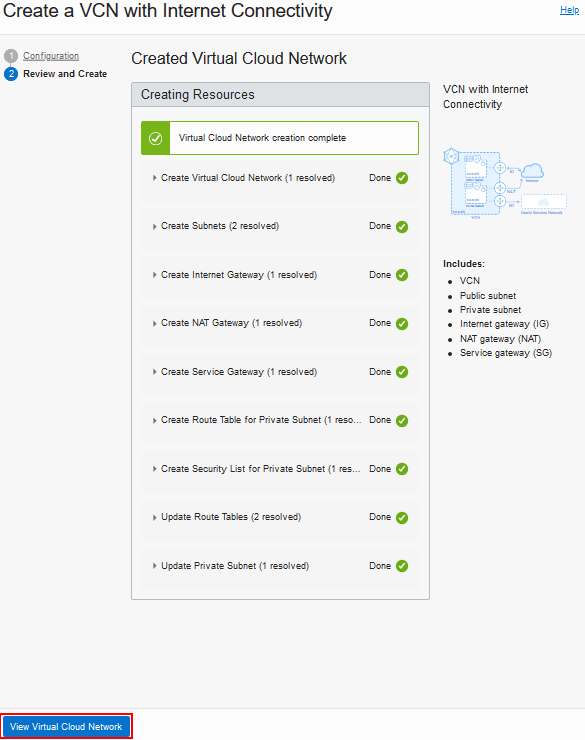
Description of this illustration (create_vcn_wizard_complete.png) - Update the security lists to allow all necessary ports.
Step 2: Edit a Security List
This section gives an example of editing the public subnet created in the previous step to add a security list that allows access between the Cloud Manager instance and file server instance. The subnet where Cloud Manager and the File Storage Service file system is created needs to allow the ingress of four TCP ports (111, 2048, 2049, and 2050) and two UDP ports (111 and 2048). For simplicity, the source in the stateful ingress rules can be the whole VCN’s CIDR.
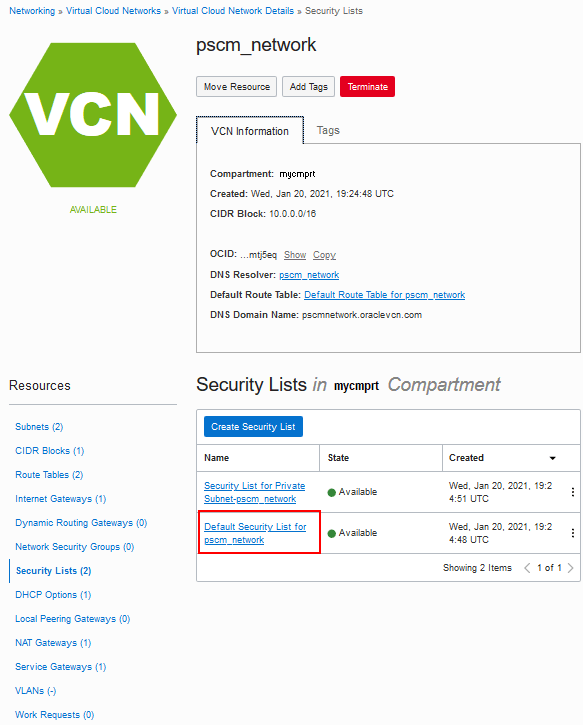
- On the Virtual Cloud Network Details page, select Security
Lists under Resources on the left.

Description of this illustration (vcn_details_select_sec_lists.png) - Select the default security list.
Description of this illustration (vcn_details_def_sec_list.png) - On the Security List details page, click Add Ingress
Rule.
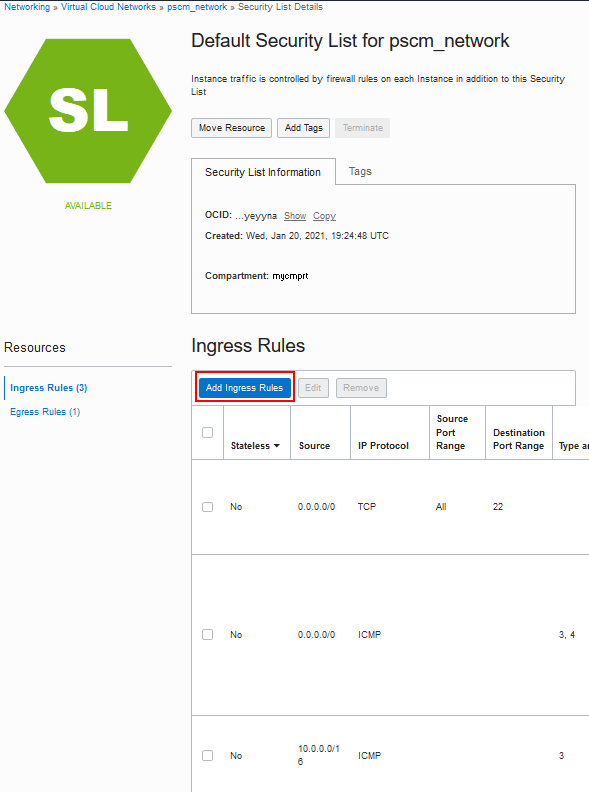
Description of this illustration (sec_list_add_ingress_rule.png) - Select Source Type CIDR.
- Enter 10.0.0.0/16 for the Source CIDR. This is the same as the CIDR for the VCN.
- Select TCP as the IP protocol.
- Enter 111 for the Destination Port Range.
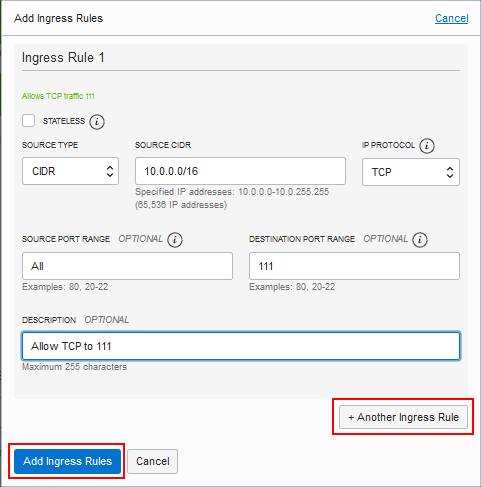
Description of this illustration (add_ingress_rules_dialog_box.png) - Click +Another Ingress Rule.
-
Repeat steps 4 through 7 for TCP ports 2048, 2049, and 2050 and UDP ports 111 and 2048. Add any other ports you need.
-
When you have added all the security rules, click Add Ingress Rules.
-
Specify this subnet when you create the Cloud Manager and file server instances.
Create a NAT Gateway for a Private Subnet
Here are the high-level steps for creating a NAT Gateway for a private subnet. This section assumes that you have already created a VCN, and want to add a NAT Gateway.
For more information, see the Oracle Cloud Infrastructure Documentation, NAT Gateway.
-
In the Oracle Cloud Infrastructure Console, select Networking > Virtual Cloud Networks and select your VCN.
-
Create a NAT Gateway.
-
Create a Route Table, and select the NAT Gateway as the target.
-
Create a private subnet, and select the Route Table.
-
Select the private subnet when creating environment templates in Cloud Manager.
After setting up the NAT gateway, you can use various methods for setting up inbound connections, such as VPN or bastion. If you don’t want to use a NAT gateway for any reason, you can also enable access to the internet by configuring a web proxy.
Next Steps
Use Custom or Private Network Resources with PeopleSoft Cloud Manager (Optional)
Learn More
- PeopleSoft Cloud Manager Home Page (My Oracle Support, Article ID KA594)
- Cumulative Feature Overview Tool (Click Generate a CFO report and select Cloud Manager at the top)
- Oracle Cloud Documentation in Oracle Help Center
Create a Virtual Cloud Network for PeopleSoft Cloud Manager in the Oracle Cloud Infrastructure Console (Optional)
F26295-10
February 2026
Copyright © 2026, Oracle and/or its affiliates.
Set up a Virtual Cloud Network (VCN), subnets and security lists in the Oracle Cloud Infrastructure Console for your Cloud Manager instance.
This software and related documentation are provided under a license agreement containing restrictions on use and disclosure and are protected by intellectual property laws. Except as expressly permitted in your license agreement or allowed by law, you may not use, copy, reproduce, translate, broadcast, modify, license, transmit, distribute, exhibit, perform, publish, or display any part, in any form, or by any means. Reverse engineering, disassembly, or decompilation of this software, unless required by law for interoperability, is prohibited.
If this is software or related documentation that is delivered to the U.S. Government or anyone licensing it on behalf of the U.S. Government, then the following notice is applicable:
U.S. GOVERNMENT END USERS: Oracle programs (including any operating system, integrated software, any programs embedded, installed or activated on delivered hardware, and modifications of such programs) and Oracle computer documentation or other Oracle data delivered to or accessed by U.S. Government end users are "commercial computer software" or "commercial computer software documentation" pursuant to the applicable Federal Acquisition Regulation and agency-specific supplemental regulations. As such, the use, reproduction, duplication, release, display, disclosure, modification, preparation of derivative works, and/or adaptation of i) Oracle programs (including any operating system, integrated software, any programs embedded, installed or activated on delivered hardware, and modifications of such programs), ii) Oracle computer documentation and/or iii) other Oracle data, is subject to the rights and limitations specified in the license contained in the applicable contract. The terms governing the U.S. Government's use of Oracle cloud services are defined by the applicable contract for such services. No other rights are granted to the U.S. Government.
This software or hardware is developed for general use in a variety of information management applications. It is not developed or intended for use in any inherently dangerous applications, including applications that may create a risk of personal injury. If you use this software or hardware in dangerous applications, then you shall be responsible to take all appropriate fail-safe, backup, redundancy, and other measures to ensure its safe use. Oracle Corporation and its affiliates disclaim any liability for any damages caused by use of this software or hardware in dangerous applications.
Oracle and Java are registered trademarks of Oracle and/or its affiliates. Other names may be trademarks of their respective owners.
Intel and Intel Inside are trademarks or registered trademarks of Intel Corporation. All SPARC trademarks are used under license and are trademarks or registered trademarks of SPARC International, Inc. AMD, Epyc, and the AMD logo are trademarks or registered trademarks of Advanced Micro Devices. UNIX is a registered trademark of The Open Group.
This software or hardware and documentation may provide access to or information about content, products, and services from third parties. Oracle Corporation and its affiliates are not responsible for and expressly disclaim all warranties of any kind with respect to third-party content, products, and services unless otherwise set forth in an applicable agreement between you and Oracle. Oracle Corporation and its affiliates will not be responsible for any loss, costs, or damages incurred due to your access to or use of third-party content, products, or services, except as set forth in an applicable agreement between you and Oracle.