Associating Templates
Access the Template page (.)
This example illustrates the fields and controls on the Create BIP Report Definitions-Template page (RTF template). You can find definitions for the fields and controls later on this page.
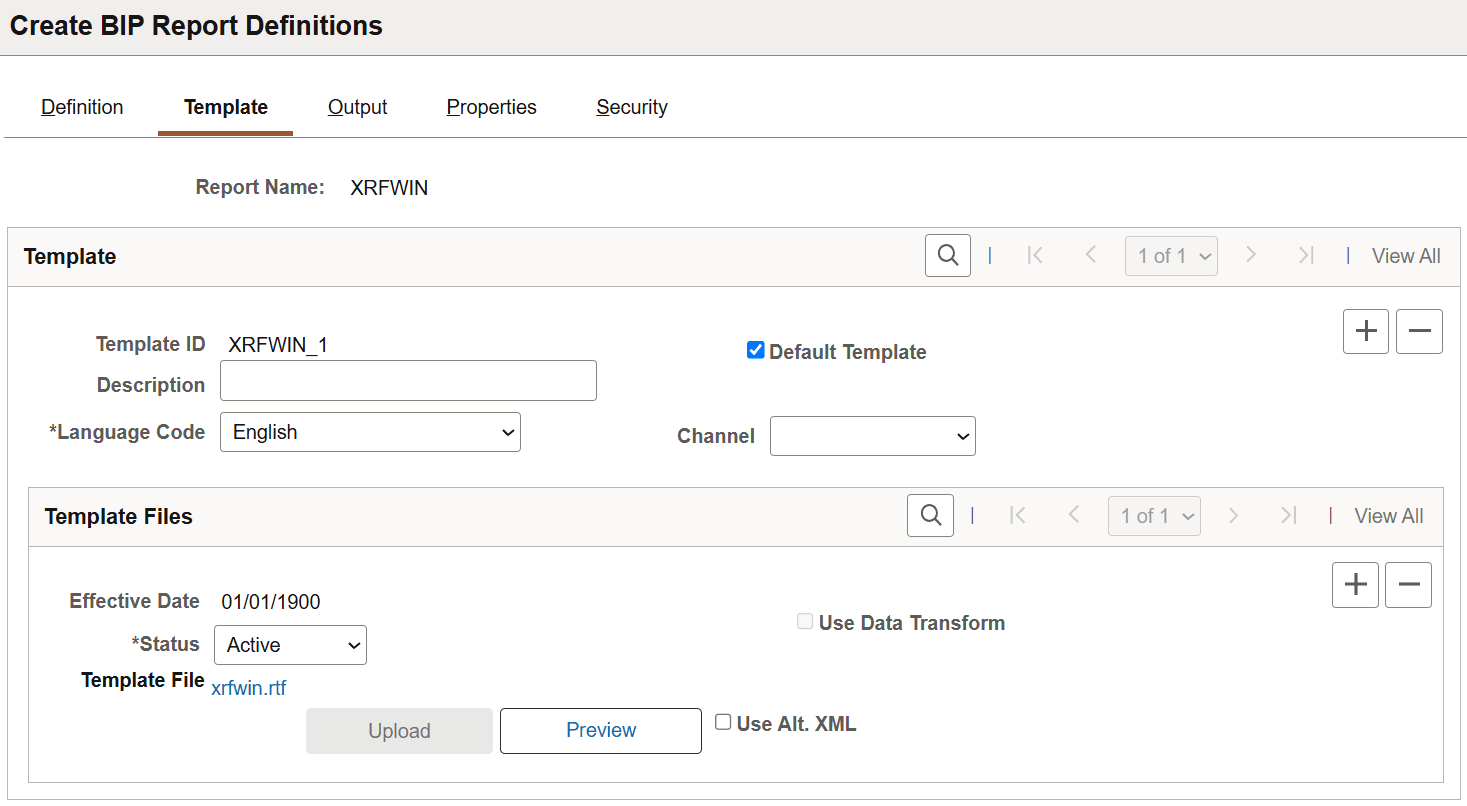
The Template group box on the Template page refers to a particular template layout, because one report definition can associate multiple template layouts differentiated by language code or channel.
| Field or Control | Description |
|---|---|
|
Template ID |
Enter a template ID that uniquely identifies this template. The default template ID is a system-generated ID based on the report name. You can edit this ID when you first add a template to the report definition, but it must be unique across all templates in the system, not just within the current report definition. |
|
Description |
(Optional) Enter descriptive text that provides more detail about the template and identifies its use. Entering a meaningful description helps the user select the proper template at runtime. For example, indicate a unique layout or channel. |
|
Language Code |
Select a language code for the template. The default value reflects the default template language. |
|
Default Template |
Indicate whether this is the default template. You can select only one template as the default template. The first template that you add to the report definition is automatically selected as the default. You can change this selection as necessary. Default templates are automatically used at runtime if no other value is supplied. |
|
Channel |
(Optional) Select the distribution channel for the template. The Channel attribute supports the need to identify different layout formats as required by the various distribution mechanisms. For example, a printout may require a different template layout than an email or a web posting. Leaving the channel blank would indicate that this particular template does not have a format that is specifically suited to just one channel. These values are for information only and do not trigger a particular Process Scheduler distribution mechanism. Developers can drive a template choice based on channel through the PeopleCode BI Publisher classes. |
Adding Template Files
Within each template layout defined previously is one or more effective-dated versions of the template. For example, you can have a new government form for each year. In the Template Files group box, you attach effective-dated files that are the actual report templates.
| Field or Control | Description |
|---|---|
|
Effective Date |
Select an effective date for the template file in order to maintain new versions or versions specific to a particular time period. For example, a new file could be uploaded to reflect a new format, effective for reports as of the new date. The default date for a newly added template file is the current system date. The user can change the data per effective-dating logic with Update, Update/Display, and Correction modes. |
|
Status |
Select a status of In Progress Active, or Inactive for the template file. This field indicates the usability of the template file. Runtime selection logic for a template file uses this field in conjunction with the Effective Date field to determine which template file to use. At least one file must be active to save a report definition. |
|
Template File |
When you upload the template, the template name appears as a link. Click this link to download the template file to your local computer for updating the field or tag assignments. |
|
Upload |
Click to attach a template file to the template. The file extension is checked against the template type value on the Definition page and a warning is issued if no match is found. When you save the report definition, this button becomes disabled. To re-upload a new version of the template, you must either delete and add it again in correction mode or add a new effective-dated row. |
|
Preview |
Click to preview the report using the current template file based upon the sample data file that was registered with the data source. The Preview button is not enabled when no sample data file is registered with the data source. The preview tab title depends on the default output type as follows:
|
| Field or Control | Description |
|---|---|
|
Use Data Transform |
Select to specify a data transform program to be applied to this report definition. Once you save the report definition, this field will be Display Only. See Using Data Transform. |
| Field or Control | Description |
|---|---|
|
Use Alt. XML (Use alternate XML) |
Select to use an alternate XML file for previewing. When you click the Preview button, a dialog box appears, where you can select the file. |
Note:
The preview button uses the sample XML data file to generate report output. Sometimes, if the sample data does not match the real data, you may find discrepancies between preview and real report outputs. This is specifically true when the report template uses sample data in variables and conditional formatting. Creating your own sample file with real data makes the report look more realistic. This sample file can also be used to preview reports using template builder.
See Mapping Data Tags.
Mapping PDF Template Files
For PDF files, a mapping is sometimes required between the field elements from the data source and the form field elements on the PDF template in order for the XML data element tags to print in the correct place within the PDF template. This is often true for third-party PDF templates, for which the form fields already exist inside the form template. However, if you create PDF form fields and XML tag names that are the same, no mapping is necessary.
This example illustrates the fields and controls on the Template page for PDF mapping. You can find definitions for the fields and controls later on this page.
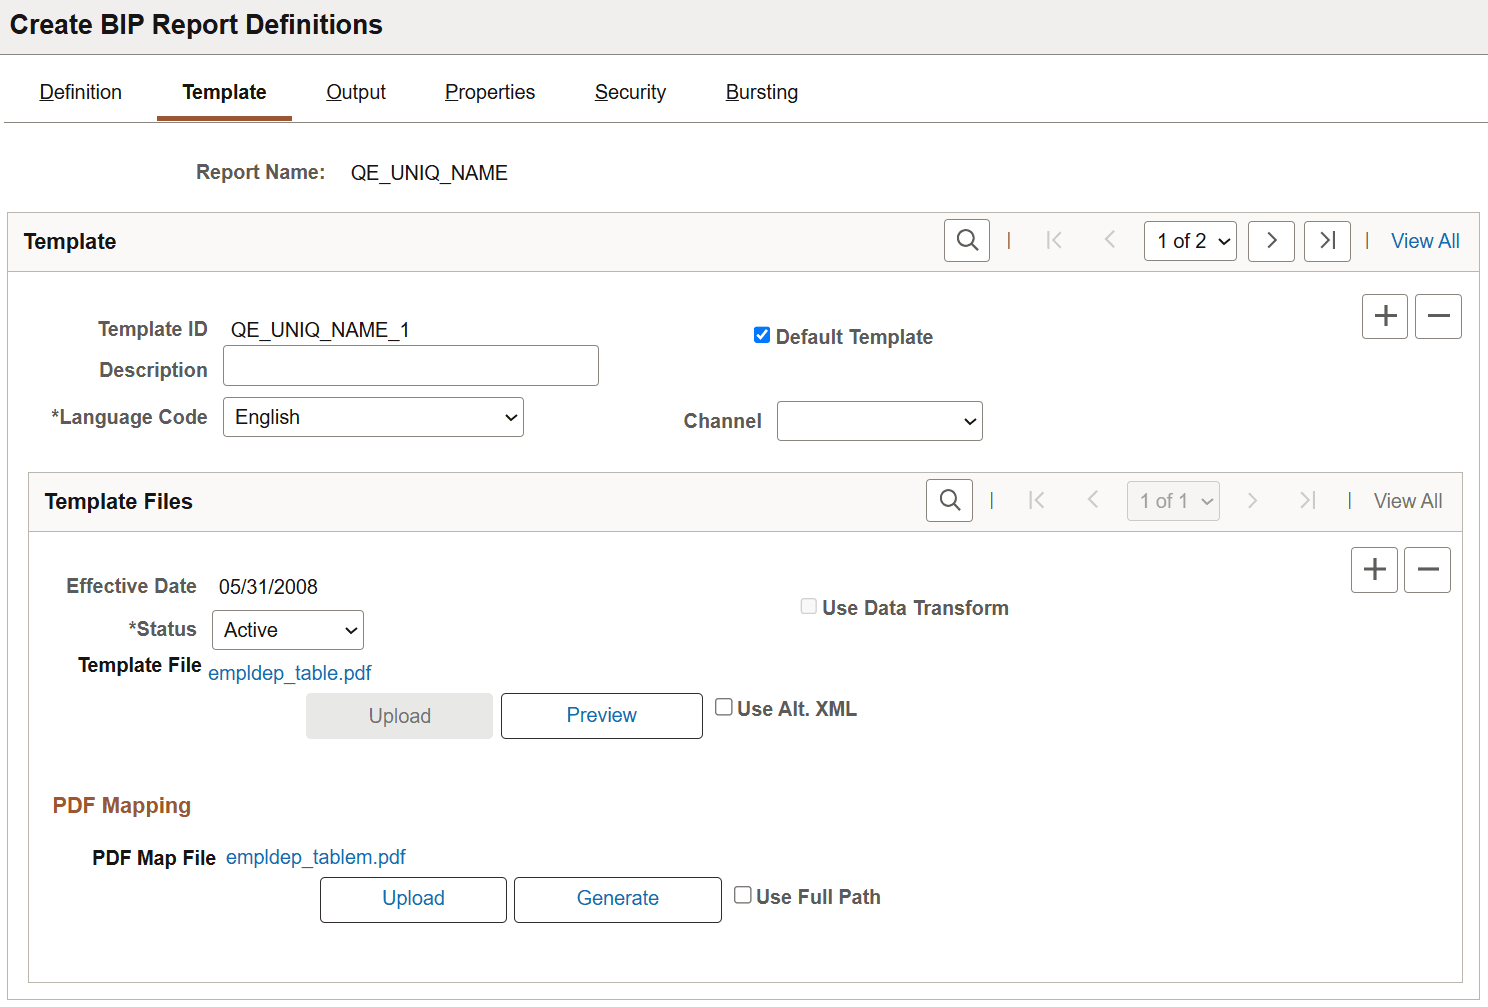
The following fields appear on the Template page for PDF templates files:
| Field or Control | Description |
|---|---|
|
Map File |
When you upload the mapped PDF file, the file name appears as a link. Click this link to open or download the file to your local computer. If changes are required in the map file, you can make the changes and upload the revised file without creating a new effective-dated row. |
|
Generate |
Click to generate the PDF map file. The system uses the uploaded PDF template file and the sample XML data associated with the data source definition to generate a PDF template embedded with a Visual JavaScript plug-in used for mapping. Any changes made to XML tag names and structure after the template is defined or mapped, require you to redefine or remap the template. Note: PDF file security must allow altering and saving for the mapping to be completed. This depends on the version of Adobe with which you are working. When working with PDF map files, some indication of mapping file should be included in the file name to distinguish the mapping file from the unmapped template file. By default, the generated mapping file name is the name of the template file followed by a dash and either an m for map file or mfp for full path mapping. |
|
Upload |
Click to upload the PDF map file when the tags have been mapped. |
|
Full Path Mapping |
Select this check box if your XML data has elements with the same name at different levels. For instance, ADDRESS is used at the company level and also at the employee level. |
This is an example of XML file that requires full path mapping:
<PayChecks>
  <PayCheck>
    <EmpNo>00001</EmpNo>
    <CompanyInfo>
      <Address>1 Company st. CA 00001</Address>
      <Description>Company Info</Description>
    </CompanyInfo>
    <EmployeeInfo>
      <Address>1 Employee st. CA 00001</Address>
      <Description>Employee Info</Description>
      <Salary>50000</Salary>
      <Vacation>12</Vacation>
      ......
    </EmployeeInfo>
  </PayCheck>
  <PayCheck>
    ......
  </PayCheck>
  <PayCheck>
    ......
  </PayCheck>
</PayChecks>
The JavaScript plug-in will use the full path for address data elements instead of the element name. So it will use PayCheck.Employee.Address to map to the employee’ address form field, and use PayCheck.Company.Address to map to the company’s address field.
See Mapping Data Tags.