Using the Send Master Batch Work Space
The Send Master Batch work space enables you to test groups of projects, as well as stress test a project or group of projects. You can access the Batch Processing work space by starting Send Master, opening an EIP Testing (Batch EIP) project and selecting
This example illustrates the fields and controls on the Batch Processing work space. You can find definitions for the fields and controls later on this page.
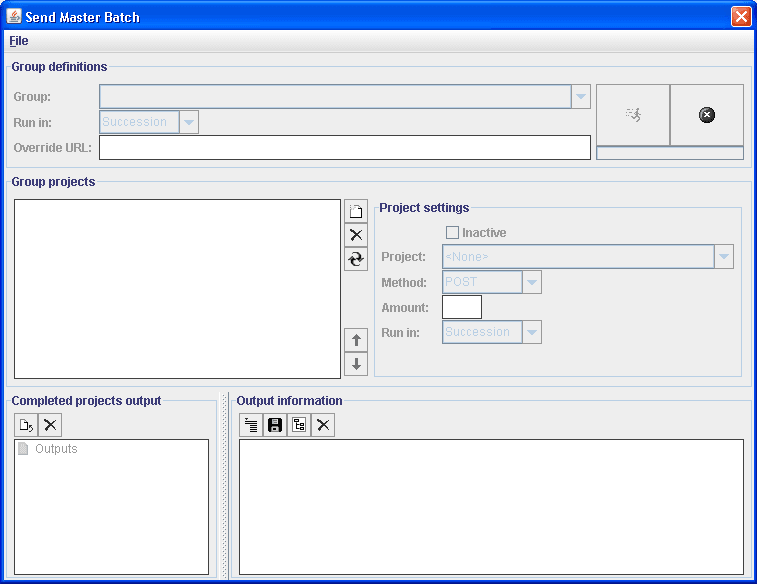
The Batch Processing work space features these sections:
-
Group Definition
-
Group Projects
-
Completed Projects Output
-
Output Information
Group Definitions Section
You use the Group Definitions section to create, select, or delete a group of projects. You can also use this section to specify whether to run the projects in the group all at once, in sequence, or at intervals that you specify.
This section features these two buttons:
| Field or Control | Description |
|---|---|
|
|
Click the Start Projects button to start processing the defined group. |
|
|
Click the Stop Projects button to stop processing the defined groups. |


Group Projects Section
You use the Group Projects section to add, remove, and arrange projects in a group. For each project that you add to a group, you can select the method to invoke, such as GET or POST. You can also specify the number of times to run each project, and specify whether to run project instances all at once, in sequence, or at defined intervals.
This section features a toolbar with the following buttons:
| Field or Control | Description |
|---|---|
|
|
Click the Add a New Project button to add a project to the group. |
|
|
Click the Delete Selected Project button to delete the selected project from the group. |
|
|
Click the Update Selected Project button to update the selected project with changes and modifications that were made to it since it was added to the group. |
|
|
Click the Move Selected Project Up button to move the selected project up in the order sequence of projects in the group. |
|
|
Click the Move Selected Project Down button to move the selected project down in the order sequence of projects in the group. |


Completed Projects Output Section
The Completed Projects Output section provides processing information about each project in a group, including the number of project instances processed, total time to process all project instances, the average amount of time to process a project instance, and more.
This section features a toolbar with the following buttons:
| Field or Control | Description |
|---|---|
|
|
Click the Export Results to File button to display a text file that contains processing information about the completed project, such as the number of service operations processed, the total time to process the service operations, the average time to process a service operation, and so forth. |
|
|
Click the Clear Results button to clear the contents currently displayed. |


Output Information Section
The Output Information section displays information that the system returns when you perform a Get or Post on a web server.
When you work with MIME messages, you can use the View drop-down list to view the entire raw message response, message metadata, or individual sections of the response.
When you are working with message types other than MIME, you can view the raw message response only.
This section features a toolbar with the following buttons:
| Field or Control | Description |
|---|---|
|
|
Click the View Header Information button to display only the contents within the header tags of the selected message. |
|
|
Click the Save Output button to save the contents of the Output Information area, using a filename and location that you specify. |
|
|
Click the If Valid XML, Format button to format the code displayed in the section to make the contents more readable. This button is valid only if the file displayed is an XML file. |
|
|
Click the Clear Output button to delete the contents of the Output Information area. |


