Setting Upgrade Options
This section discusses how to:
-
Access the upgrade options.
-
Set general options.
-
Set compare options.
-
Set report options.
-
Set report filter options.
-
Set copy options.
Accessing the Upgrade Options
To access the upgrade options:
-
Select
-
Select To Database.
-
Sign in to an upgrade target database.
This example illustrates the fields and controls on the Compare and Report page.
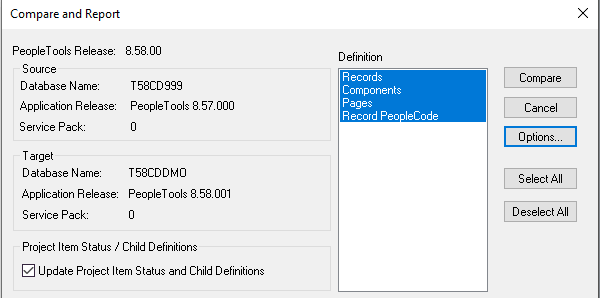
By default the Update Project Item Status and Child Definitions is selected.
-
On the Compare and Report dialog box, click Options, and select the appropriate upgrade option tab.
Setting General Options
This example illustrates the fields and controls on the Upgrade Options dialog box: General Options tab. You can find definitions for the fields and controls later on this page.
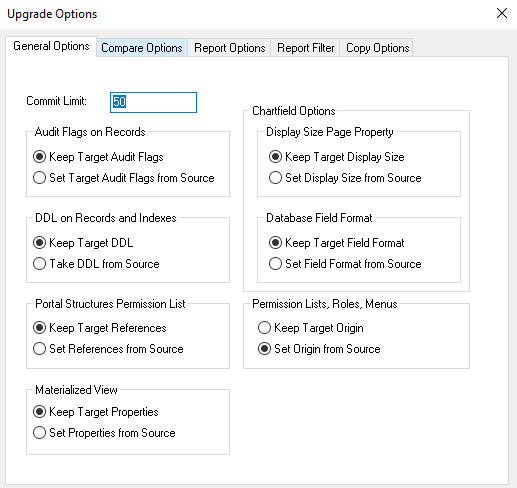
Use the Upgrade Options dialog box to set general options for the Compare or Copy process.
| Field or Control | Description |
|---|---|
|
Commit Limit |
Set the commit limit. Start with the default of 50. If the Copy process seems slow and there is sufficient log file space, try increasing the commit limit. You can modify the initial project default commit limit on the PeopleTools Options page. Very large commit limits, however, can cause more work if something goes wrong during the copy. For example, if the commit limit is set to 1,000 and the Copy process stalls on the 999th definition, none of the previous definitions are copied. The Copy process must be performed again. |
|
Audit Flags on Records |
Select one:
|
|
DDL on Records and Indexes |
Select one:
Note: For Oracle customers using partitioning on records and indexes, the partitioning is not migrated with the record or index. To migrate the partitioning use Data Migration Workbench and create a project containing the data set definition PTTBLIDXPART. See Data Management: Maintaining Partition Definitionsand Defining ADS Project. |
|
Materialized View |
Select one:
|
|
Portal Structures Permission List |
Select one:
|
|
Chartfield Options |
Set the Display Size Page Property:
Set the Database Field Format:
|
|
Permission List, Roles, Menus |
If Roles, Menus or Permission Lists are renamed or cloned, this information is tracked in tables that store the original name. This information is used by PUM Security Automation when change packages are created to apply updates. Select one:
Note: This option applies to Upgrade Copy operation and is ignored for Upgrade Compare operation. |
Setting Compare Options
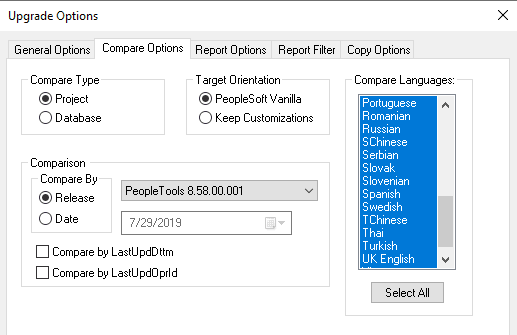
Access the Upgrade Options dialog box and select the Compare Options tab to complete setting compare options. You can find definitions for the fields and controls later on this page.
| Field or Control | Description |
|---|---|
|
Compare Type |
Select Project to compare only the definitions of the specified definition type in the current project. The contents of the project do not change. Select Database to compare all definitions of the specified definition type. If you select Database, the contents of the current project are deleted and replaced with definitions that are found during the comparison. |
|
Target Orientation |
Determines how the Upgrade check boxes in the upgrade definition window are set for definitions that were last modified by the customer in one database and last modified by PeopleSoft in the other database. |
|
Comparison |
Select Release to compare databases by the highest release that the two databases have in common. Use the drop-down list box to select from lower common releases. The Compare process labels definitions as Changed or Custom/Changed if they have been changed since the date and time stamp for that release level. This is the default. Select Date to have the Compare process label definitions as Changed or Custom/Changed if they have been modified since the date that you specify. Use LastUpdDttm (last update date and time) and LastUpdOprid (last user to update definition) to improve the performance of the compare process for larger compare projects. If these options are selected, Application Designer uses only these values to assess differences between PeopleCode definitions. If it is determined that the LastUpdDttm and/or LastUpdOprid are the same, Application Designer assumes that the rest of the attributes are the same and moves on to the next definition in the project. If it is determined that the PeopleCode definitions are different, Application Designer proceeds to compare all attributes of the definition as normal. Note: LastUpdDttm and LastUpdOprid apply only to PeopleCode definitions. |
|
Compare Languages |
Select the languages of definitions that you want to compare, and select COMMON, which specifies basic definition characteristics and parameters in the architecture that are not language-sensitive. Language options specify label-oriented characteristics of a definition, such as page names, labels, and messages. If you do not select COMMON, basic definition characteristics are omitted. If you need specific languages and basic definition characteristics, also select COMMON. However, to compare only language attributes of a definition, you do not need COMMON. Clicking Select All is the recommended default. Press the Ctrl key and your mouse to clear unwanted languages. |
|
Checkboxes for Compare by LastUpdDttm and Compare by LastUpdOprid |
Since Compare by LastUpdDttm and Compare by LastUpdOprid are a customization bypass, the process will skip the comparison if LastUpdOprid = PPLSOFT or if the LastUpdDttm has the same value on both the source and target databases. |
Setting Report Options
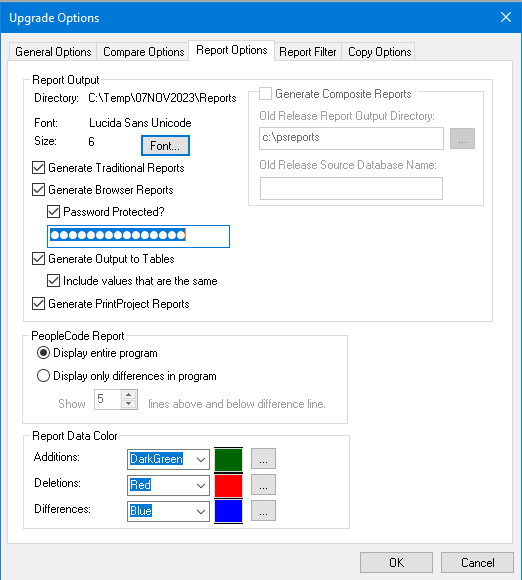
The following screenshot is an example showing how to set values in report options. Access the Upgrade Options dialog box and select the Report Options tab. You can find definitions for the fields and controls later on this page.
| Field or Control | Description |
|---|---|
|
Report Output |
Note: If no output options are selected, traditional reports will be produced. You can select multiple output options. |
|
PeopleCode Report |
Specify the PeopleCode report options. For PeopleCode compare reports, specify whether to show the entire program on the report (the default setting) or only the code differences between the source and target. If you select the latter, you can specify the number of code lines to show above and below the difference for context. The values for the number of lines to show are 0 to 99. A value of 0 shows only the difference line. A value greater than 0 shows that many lines above and below the difference line. Note: The PeopleCode report options are global across all projects. Changing settings for one project changes all subsequent PeopleCode compares, regardless of project. |
|
Report Data Color |
Select the report data color. Use the Browse button to display the standard color dialog box. Choose a color that is not included in the drop-down list box or create a custom color. The custom color value appears as hex color code, for example, #820041.
The color selection is not applicable for Browser compare report. The color selection can be set through command line parameters such as -ADDCLR, –DELCLR, and, -DIFCLR. For details, refer Command Line Parameters. |
Setting Report Filter Options
The following screenshot shows how to set up report filter options. Access the Upgrade Options dialog box and select the Report Filter tab.
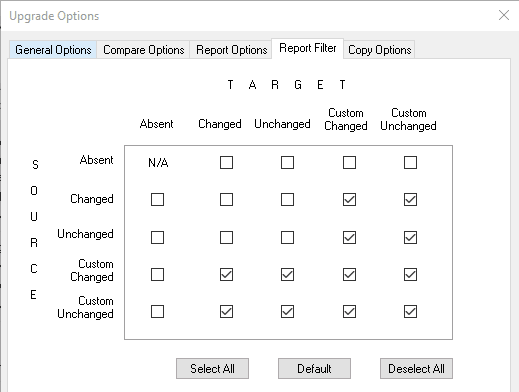
When you perform a comparison, the system generates a report for each definition type compared. These reports provide detailed information about how each definition in the source differs from its counterpart in the target.
Before performing a comparison, you can select the definition status combinations with which you generate reports by using report filter options. For example, during an upgrade to a new PeopleSoft release, you might decide that if a definition that was last changed in the target by PeopleSoft is found in the source and it hasn’t changed since the last upgrade, you don’t need to see information about the definition differences (because you intend to accept the new PeopleSoft version). In this case, you want to filter the compare reports so that a report is not generated if:
-
The source is any status.
-
The target is unchanged.
Note:
Filtering comparison reports does not affect which definitions are added to a project during a database comparison, only which definitions are reported. Definitions that are defined differently in the two databases are always added to the project.
Select the check boxes corresponding to the definition status combinations that you want to report.
Each row in the matrix corresponds to the definition status in the source database. Each column corresponds to the definition status in the target.
The default settings for report filtering show conflicting configured definitions only.
-
To reset your selections to the default setting, click the Default button.
-
To select all definition status combinations, click the Select All button.
-
If you don't want to generate any reports, click the Deselect All button to clear all of the check boxes.
Setting Copy Options
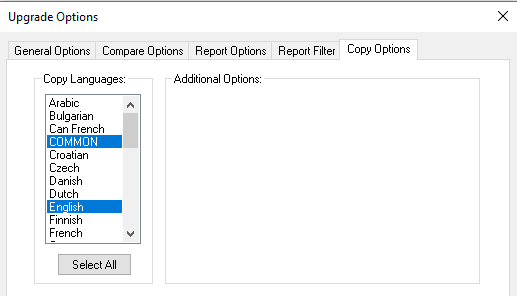
This example illustrates the fields and controls on the Upgrade Options dialog box: Copy Options tab. You can find definitions for the fields and controls later on this page.
| Field or Control | Description |
|---|---|
|
Copy Languages |
Select a specific language for label-oriented characteristics of a definition, such as page names, labels, and messages. COMMON, specifies basic definition characteristics and parameters in the architecture that are not language-sensitive. Select COMMON when you select English. Do not select COMMON when you select a language other than English. If you do not select COMMON, basic definition characteristics are omitted. Make sure that the enabled languages in the source and target databases match. Otherwise, you might overwrite translations in the target. Use the Ctrl key and your mouse to clear unwanted languages. When you save the project, the copy settings that you made are saved and remain set unless you change them again. |
This table lists translation scenario examples:
| Selection | Reason |
|---|---|
|
COMMON and English |
The source database does not include translations, but the target database has translations that you do not want to overwrite. |
|
Languages (omit COMMON) |
You sent the database out for translations and want to avoid copying inadvertent changes that were made by the translators to the definitions. |
|
COMMON (omit languages) |
You want to copy the source without translations to the target. |