Creating Related Links
You can create related links for a portal page using the RELLINK content reference attribute. You can create related links to external sites, to internal sites, and to other portal pages.
Note:
Related links can be implemented with your choice of template on the content reference. Using the PeopleTools Related Links template displays the related links for the content reference, but not the portal menu navigation.
To create related links:
-
Define the RELLINK content reference attribute.
-
Create related links groups.
-
Create related links for each group.
-
Test the related links.
This example illustrates related links for a content reference.
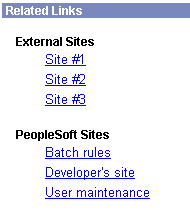
This table describes the page elements shown in the sample page:
| Page Element | Description |
|---|---|
|
Related Links |
RELLINK content reference attribute with the label Related Links. |
|
External Sites |
A related link group defined with the label External Sites. |
|
Site #1, Site #2, Site #3 |
Related links for the External Sites group. |
|
PeopleSoft Sites |
A related link group defined with the label PeopleSoft Sites. |
|
Batch rules, Developers' site, and User maintenance |
Related links for the PeopleSoft Sites group. |
Defining the RELLINK Content Reference Attribute
To define a related link content reference attribute:
-
Access the Content Ref Administration page (Navigate to the appropriate content reference; then click the Edit link.)
-
Enter RELATEDLINKS_TEMPLATE in the Template Name field.
-
In the Name field of the Content Reference Attributes region, enter RELLINK.
After you enter this value and move out of the field, the Attribute Information link changes to Edit Related Links.
-
Verify that the Translate check box is selected.
-
Enter a label for the related links attribute.
Note:
You do not need to enter any information in the Attribute Value field. After you create the related link group and the related links, the system populates this field with all defined attributes as a string.
Creating Related Link Groups
Access the Related Links Group (PORTAL_RLNK_ADM) page.
To create a related link group:
-
In the Related Link Groups Label field, enter a name.
This name is the heading under which you place related links.
-
To create additional related link groups, click Add and repeat step 1.
Creating Related Links
To create a link:
-
In the Related Links region on the Related Links Group (PORTAL_RLNK_ADM) page, enter a name in the Related Link URL Label field.
This name appears as a link under the group name.
-
If you're linking to an internal site, select a node name from the list.
If you're linking to an external site, leave this field blank.
-
In the Related Link URL field, enter URL information for the link.
If the link is to an internal site, enter the URL or URI. The URL or URI can be to an internal site, to a portal, and so on. If you specified a value for the Portal URI Text field on the node definition, you can enter a specific document name as the target. The name is appended to the URI text for a full URL.
If the link is to an external site, enter the URL.
-
To define additional links for the group, click Add and repeat steps 2 and 3.
-
Click OK to save the entry and return to the Content Ref Administration page.
The Attribute Value field is populated with an XML-type formatted string. This string contains all the related link data and is stored in the PORTAL_ATTR_VAL field of the PSPRSMATTRVAL record for the content reference specified in the PORTAL_OBJNAME field. The following example shows a generated XML-type formatted string:
<GRPLBL>Worklist Pages
		<URLLBL>Worklist Details</URLLBL>
		<CP>Portal</CP>⇒
		<URL>ICType=Panel&Menu=WORKLIST&Market=GBL&PanelGroupName=⇒
WORKLIST_DETAILS
		</URL>
		<URLLBL>Worklist Monitor</URLLBL>
		<CP>Portal</CP>⇒
		<URL>ICType=Panel&Menu=WORKFLOW_ADMINISTRATOR&Market=⇒
GBL&PanelGroupName=WF_MONITOR_01
		</URL>
	</GRPLBL>

	<GRPLBL>Tasks
		<URLLBL>Task List Summary</URLLBL>
		<CP>Portal</CP>
		<URL>ICType=Panel&Menu=PORTAL_COMPONENTS&Market⇒
=GBL&PanelGroupName=EO_PE_TASK_LIST⇒
		</URL>
</GRPLBL>
Testing Related Links
You should test related links to view how the page appears to users, ensure that the labels are correct, and verify that the links function properly. To test related links, click Test Content Reference on the Content Ref Administration page just above the URL Information region.
Note that:
-
If the portal cache is enabled on the web server, the related link template does not appear for a content reference page accessed from the menu until the cache expires.
-
Related link URLs are displayed only when a user has security access to the URLs.
To grant security access to a related link URL, register the related link URL as a separate content reference and associate permission lists with it.
If the related link is not separately registered, then it is treated as having public access.
If a related link group contains no URLs to which the user has security access, the related link group is hidden. If the user does not have access to any of the related links associated with the target page, then the related links section of the template is hidden.
If the target page does not display any related links, ensure that:
-
The application and portal databases are registered as content providers.
Also check for data-entry errors.
-
The templates are registered in Application Designer with the correct names.
If the templates are registered, check for data-entry errors.
-
The correct related link template is specified for the target page.
Also ensure that the value of the PORTAL_TEMPL_NAME field in the PSPRSMDEFN record displays a correct related link template
-
The RELLINK string was saved on the target page in the content registry.
Check whether an XML string appears in the Attribute Value field on the Content Ref Administration page. If not, then delete and reenter the RELLINK attribute for all the related link information.
-
You assigned security in the registry to the user for the content references listed as related link URLs.
If not, assign security using the Content Reference Security page for registered related link URLs.