Defining Jobs
To access the Job Definition page, select
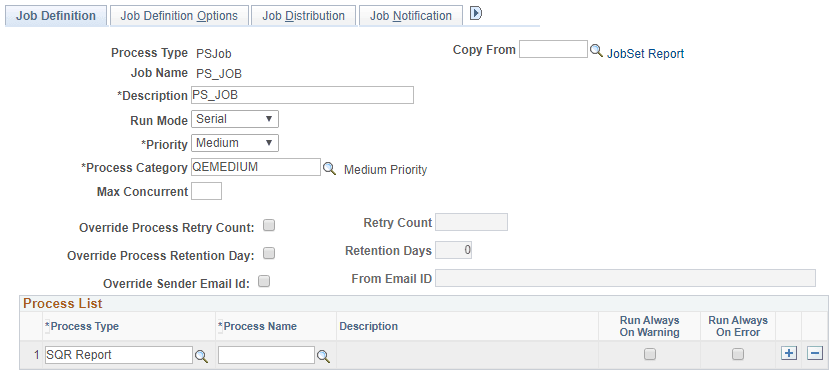
This example illustrates the fields and controls on the Job Definition page. You can find definitions for the fields and controls later on this page.
Before creating a job definition, define the individual processes that are included in the job.
| Field or Control | Description |
|---|---|
|
Copy From |
Copy data from an existing Job definition. |
|
JobSet Report |
Click to go to the JobSet Report page. |
|
Description |
Use this property to specify a description for the Job definition. |
|
Run Mode |
Serial: Select to run each process in the job sequentially. Parallel: Select if you don’t have a requirement for the processes to run in a certain order. If you select this option, Run Always check boxes for all of the processes are selected. |
|
Priority |
Select High, Medium, or Low. PeopleSoft Process Scheduler initiates the job with the highest priority first. |
|
Process Category |
Select a process category for this job. Note: The categories Default and LOADCACHE are delivered with your system. |
|
Max Concurrent |
Enter the maximum number of occurrences of this job that can be active at one time across all process schedulers. The default value is unlimited (blank). Jobs exceeding the maximum will appear on the Process Monitor with a run status of Blocked. As active occurrences complete, blocked jobs are released and scheduled. |
|
Override Process Retry Count |
Select to override the process definition retry count for the individual processes contained in this job. Selecting the check box activates the Retry Count field. |
|
Retry Count |
Enter the number of times the system should attempt to restart this job. |
|
Override Process Retention Day |
Select to override the process definition retention days for the individual processes contained in this job. |
|
Retention Days |
Enter the number of days before the files that are on the report repository are deleted. |
|
Override Sender Email Id |
Select to override the Sender Email ID for Email Notifications. When this option is selected the process will consider the From Email ID value of the Job Definition for all processes which are listed in the jobs process list. |
|
From Email ID |
Enter an email ID which must be considered as the Sender ID for all instances of the processes for report distribution in case of destination output type set to Email and for Process Status Notifications. This value will be considered only when the Override Sender Email Id option is selected. |
See Defining Process Categories, Displaying a Hierarchical View of Processes in a JobSet.
Process List
This group box lists all processes and jobs that are associated with this job. To add additional rows or processes, click the Insert Row button that precedes the location where you want the new row.
| Field or Control | Description |
|---|---|
|
Process Type |
Select the processes that you want in the order that you want them to run. |
|
Run Always on Warning |
Select to enable the next process in the queue to run, regardless of whether the process situated immediately before this process ran to warning. |
|
Run Always on Error |
Select to enable the next process in the queue to run, regardless of whether the process situated immediately before this process ran to error. |
The Run Always feature only works if the process that is selected to run is always the next process in the queue after the process that ran to error or warning. For example:
A serial job contains three processes. The third process in the queue is selected to Run Always on Error. If the first process in the queue runs to error, the third process will not run because the system looks only to see if the next process in the queue is selected. Process #2 is not selected, so the job runs to No Success.
Note:
After completing this page, select a server name and recurrence name on the Job Definition Options page.
Procedure for Run Always Settings
This table shows the procedure for the Run Always on Warning and Run Always on Error settings:
| Run Always on Warning | Run Always on Error | Process Status | Job Status | Next Process Scheduled |
|---|---|---|---|---|
|
0 |
0 |
Warning |
Warning |
No |
|
0 |
0 |
Error |
Error |
No |
|
1 |
0 |
Warning |
Warning |
Yes |
|
1 |
0 |
Error |
Error |
No |
|
1 |
1 |
Warning |
Warning |
Yes |
|
1 |
1 |
Error |
Error |
Yes |
Run Always - Functionality Rules
Process Scheduler uses the following rules when either of the Run Always check boxes are selected for a PSJob contained within another PSJob.
Note:
The Run Always check box must be selected for individual items within a PSJob. The items do not automatically inherit the selection if the check box is selected for the PSJob.
If a serial job (JOB A) contains another job as an item (JOB B), the Run Always check box is selected for JOB B, and the item that precedes JOB B receives a status of either Error or No Success. Process Scheduler proceeds using the following rules:
-
If JOB B is also a serial job, then the first item in this job is changed to Queued.
If this first item encountered an error or warning during processing and received a status of either Error, Warning, or No Success, the next item in the list is changed from Pending to Queued if the Run Always check box is selected for that item. If no item in JOB B has the Run Always check box selected, then JOB B will receive an Error or Warning status when the first item did not run successfully.
-
If JOB B is a parallel job, then the status for all items in JOB B is changed to Queued and will be run by Process Scheduler.
-
If the status of JOB B is Error or Warning, the JOB A item listed after JOB B is only released by Process Scheduler if its Run Always check box is selected.
If the check box is not selected, Process Scheduler will consider JOB A complete and no other items in JOB A will be run. Process Scheduler will update the status of JOB A to Error or Warning.
Copying Data From an Existing Job Definition
To copy data from an existing Job Definition:
-
Access the Job Definition page by selecting
-
Click the Copy from look up button.
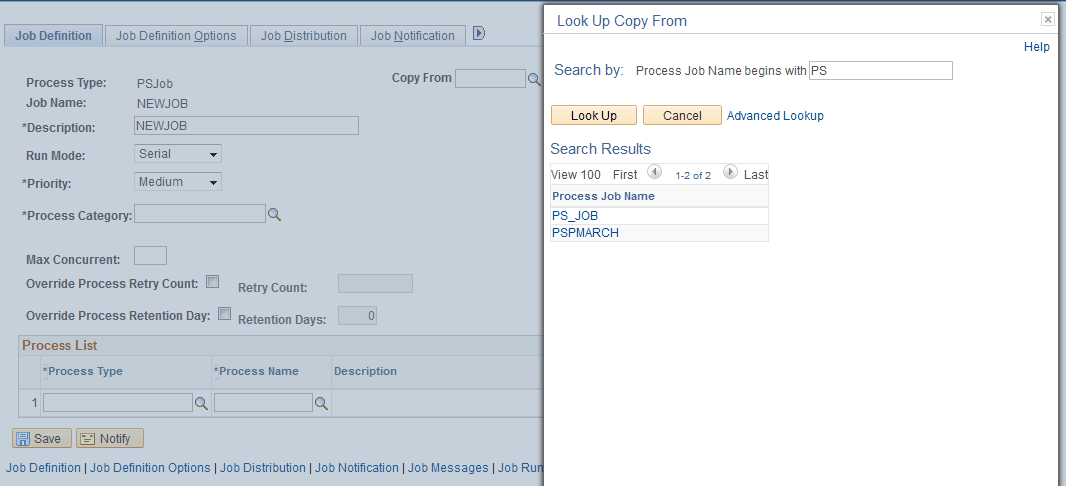
The Look Up Copy From page appears.
-
Find an existing Job definition by typing all or part of the existing Job definition name in the Search by field.
-
Click the Job Definition that you want to copy from.
-
Click Yes.
The data from the existing Job definition is copied to the corresponding fields in the Job Definition page.
-
Update the fields that you want to edit with the correct data.
-
Click Save.
The following example illustrates the Look Up Copy From page displaying search results with the prefix of PS.