Selecting Process Requests
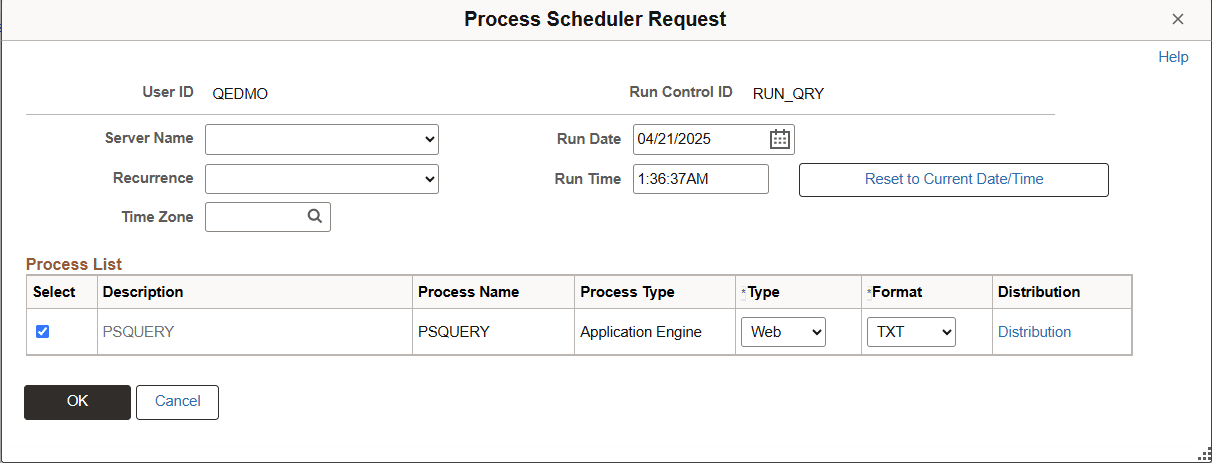
The Process Scheduler Request page enables you to set the server, run date and time, how often the process runs (the recurrence of the process), output type, and format.
This example illustrates the fields and controls on the Process Scheduler Request page. Definitions for the fields and controls appear following the example.
| Field or Control | Description |
|---|---|
|
Server Name |
Select the name of the server on which you want the process to run. |
|
Recurrence |
Select the recurring time intervals for the process to run. For example, to run a process every weekday at 5:00 p.m., select the predefined recurrence definition M-F at 5pm. |
|
Time Zone |
Select the time zone in which the process will run. For example, you might be in Eastern Standard Time (EST) and schedule a process to run in Pacific Standard Time (PST). |
|
Run Date |
Select the date on which you want the process to run. |
|
Run Time |
Select the time at which you want the process to run. |
|
Reset to Current Date/Time |
Click to reset the run date and time to the present date and time. |
|
Select |
Select a job or process to run. You can select multiple jobs and processes. |
|
Description |
Identifies a process or job. Jobs are listed as links. Click the link to display the Job Detail page, which shows all of the individual processes and jobs that are associated with the selected main job. |
|
Process Name and Process Type |
Identifies the name and type (such as COBOL) of the process as it appears in the process or job definition. |
|
Type |
Select the output type for this job or process. An output type that is selected for a process at the process definition level overwrites the output type and the output type drop-down list becomes unavailable. An output type that is selected for a job at the main job level carries through to the job items. An output type that is selected for individual job items overwrites the output type that is entered for the parent job. Values are:
|
|
Format |
Select the output format for this job or process. When an output format is selected for a process at the process definition level, it cannot be changed. Therefore, the output format drop-down list becomes unavailable. Select the XFORM option to display the Transformation column. You must define a transformation to submit the process. See “Scheduling and Distributing Query and Connected Query Results with Transformation” in the Scheduling Queries section. Note: An output format that is selected for a job at the main job level carries through to the job items. The format that is selected for individual processes or jobs that are attached to a job overrides the format that is entered for the parent job. To get text-wrapping support for very long text fields, use HTML format. PDF format has a maximum page width size of approximately 353 cm and it does not support text-wrapping. All output columns must fit within this limit. A column’s size will be as wide as the longest text it has to accommodate. If a text field's length needs more than 353 cm of space, the text may go beyond its column border and successive columns will not print. XML format is for producing webrowset XML format result. XMLP format is producing XMLP format result. |
|
Node |
This column is available when the Type column is set to IB Node. Select one node from the list of the external Integration Broker nodes that are valid to receive query output with transformation; for example, the IB external node with routing defined for the query transformation service operation. |
|
Approval Required |
This column is available when the Type column is set to IB Node. Select to request that the transformed output be reviewed and approved before you distribute the output data to the external destinations. If the Approval Required option is selected, then at the report runtime:
If the Approval Required option is not selected, then at the report runtime:
See “Reviewing and Publishing the Transformed Output” in Scheduling Queries. |
|
Distribution |
Click to access the Distribution Detail page, where you enter additional distribution information when the output type is Web, Window, or Email. Also use this page to select a folder name to which the output should be distributed when the output type is Web or Window. |
|
Output Destination |
Enter the file directory path or printer destination for the output. For example, C:\Documents and Settings\admin\psft\pt\8.5x\appserv\prcs\QEDMO\log_output. Note: This field is available only when the output type that you select is File or Printer. If you select an output destination (OutDest) for a process at the process definition level, this field is populated with that output destination. See PeopleCode API Reference: PeopleCode Syntax Quick Reference. |
|
Transformation |
This column is available when the output format is set to XFORM. Select a transformation from the list of valid transformations that were defined for the query or connected query. See Extracting and Transforming Data from PeopleSoft Pure Internet Architecture. |
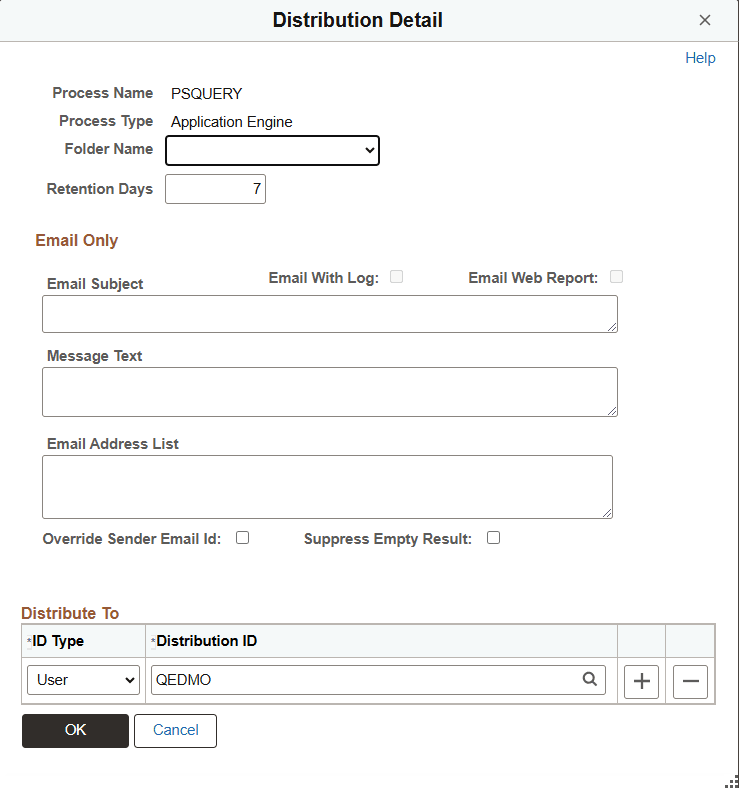
This example illustrates the fields and controls on the Distribution Detail page. Definitions for the fields and controls appear following the example.
| Field or Control | Description |
|---|---|
|
Folder Name |
Select a folder name to which the output should be distributed when the output type is Web or Window. |
|
Retention Days |
Enter the number of days the output is stored in the report repository before it is expired and purged by the purge process for the selected process request. |
|
Email Subject |
Enter the subject of the distribution email. |
|
Message Text |
Enter the text to be included in the distribution email. |
|
Email Address List |
Enter the email addresses of those users who would be notified about the completion of process request. |
|
Email With Log |
Select if the email has to be sent with log. |
|
Email Web Report |
Select if the email must contain web report. |
|
Override Sender Email Id |
Select to override the Sender Email ID for email notifications. |
|
Suppress Empty Result |
Select to suppress sending query result through an email if the query returns empty result set. When this check box is not selected, an email is sent with "No matching rows were found" as the subject if the query returns no data. |
To select a process request:
-
Select
-
Select a run control ID, and click the Run button.
The Process Scheduler Request page appears.
-
Complete the fields on the Process Scheduler Request page.
-
Click the OK button to run the query.
The system displays the Schedule Query page. The process instance number appears below the Run button.
-
Click the Process Monitor link to view the status of your request.
The Process List page appears. The Run Status field reveals the status of your scheduled or running process.