Displaying Dynamic Role Members
Access the Roles - Dynamic Members page (select and click the Dynamic Members tab).
This example illustrates the fields and controls on the Roles - Dynamic Members page.
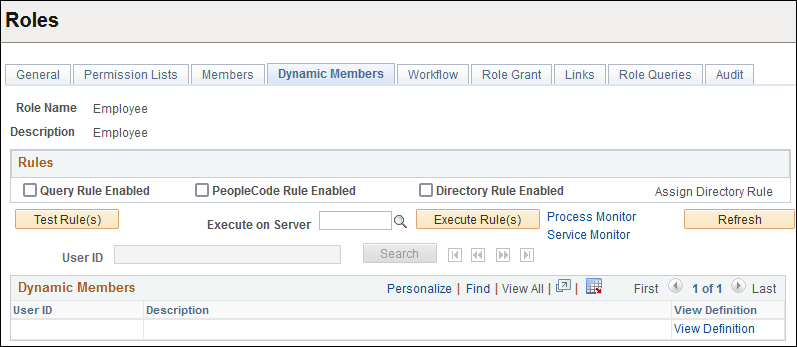
Use this page to set the rule to invoke to assign roles. A dynamic role rule is defined or coded in PeopleSoft Query, PeopleCode, or your Lightweight Directory Access Protocol (LDAP) directory. A rule can use a combination of PeopleSoft Query and PeopleCode, or PeopleSoft Query and LDAP. For the rule to successfully assign a role to the appropriate users, you must select the rule type you have in place for a particular role and then specify the object that contains the rule you coded.
Note:
You must define your role rules before you apply the options on this page. If you change the name of the rule, add a new rule, and so on, save all changes before you run the rule.
If your database contains more than 1000 dynamic role members, this page initially retrieves only the first 1000. You can view the other chunks of 1000 dynamic members one chunk at a time, either by searching for a user ID or by using the navigation buttons above the Dynamic Members grid. The navigation buttons enable you to display the first chunk, the previous chunk, the next chunk, or the last chunk.
Note:
The navigation buttons, the User ID field, and the Search button are available for use when there are more than 1000 role members in the grid.
| Field or Control | Description |
|---|---|
|
User ID |
Enter part or all of a role member user ID for which to search. |
|
Search |
Click to search through the role members for the first chunk of rows that contains the user ID you entered. |
|
View Definition |
Click to view the user ID of the role member to ensure that you have selected the appropriate definition for inclusion in the role. |
|
Query Rule Enabled |
Select if you defined your rule with PeopleSoft Query. The Query Rule group box appears below the Rules group box. Use the Query drop-down list box to select the query that contains your role rule. |
|
PeopleCode Rule Enabled |
Select if your rule is a PeopleCode program. The PeopleCode Rule group box appears. Specify the record, field, event, and function associated with your PeopleCode role rule. |
|
Directory Rule Enabled |
Select if your role rule is based on information in your directory server. With a directory-based rule, you must assign directory groups. The PeopleCode Rule group box appears because directory rules are implemented using the DynRoleMembers PeopleCode program. This program uses the Directory business interlink to retrieve user and group information from the directory. To view the program, open the FUNCLIB_LDAP record in PeopleSoft Application Designer. Click Assign Directory Groups to select a particular directory group that exists in your LDAP server hierarchy. For example, if your directory server is grouped by geographic region, then your rule could assign a new self-service role to all users in the North America group. Use the Directory Group drop-down list box to select the appropriate directory group value. The values are derived from the LDAP data that you import using the Directory Group Import process. |
|
Test Rule(s) |
Click to view results of the selected rule. |
|
Execute on Server |
Select the appropriate PeopleSoft Process Scheduler server to run the rule. |
|
Execute Rule(s) |
The Execute Dynamic Role Rules button on this page launches the DYNROLE_PUBL application engine program which executes the rule(s). The application engine program runs through PeopleSoft Process Scheduler. After the DYNROLE_PUBL application engine program runs the rule, it publishes a message, ROLESYNCHEXT_MSG, that contains a list of users in the role. Note: The successful completion of the dynamic roles program does not ensure that your roles were updated; the associated message must also be published successfully. Use the Process Monitor link on the page to view the status of the application engine program. Use the Service Monitor link on the page to view the status of the message publication. You can also execute dynamic role rules for all roles and users. |
|
Refresh |
After you run a rule, click to repopulate the grid with updated information. |
|
Process Monitor |
Click to view the status of the DYNROLE_PUBL application engine program in the Process Scheduler Monitor. |
|
Service Monitor |
After the DYNROLE_PUBL application engine program runs, it publishes a message, ROLESYNCHEXT_MSG, that contains a list of users in the role. Click the link to access the Service Operations Monitor and to view the publication status of the ROLESYNCHEXT_MSG message. |
Note:
To clear all dynamic users from the role, run the delivered NO_USERS query.
Query Rule Example
This section describes the process of creating a PeopleSoft Query rule that assigns dynamic role membership. This example should also help to illustrate similar techniques that you would use for a PeopleCode or LDAP rule.
Use these guidelines in creating a PeopleSoft query rule:
-
The query must be public.
-
The query must be a role type query.
-
The query should not contain too many nested queries.
-
The query must not include bind variables.
Do not use queries with bind variables as a query rule for dynamic roles. The Dynamic Role functionality is not designed to resolve bind variables (prompts). When you select a query with a bind variable as a dynamic role rule, the system issues an error.
Many of the delivered role queries are intended to be used with PeopleSoft Workflow, and many of them contain bind variables. These queries are not designed to work as role rules, but you can modify them to do so. See Workflow Technology: Query Roles for information on Workflow queries.
-
The query should not return duplicate user IDs.
If the query returns duplicate user IDs, dynamic roles will fail on the insert into PSROLEUSER and may have mixed results. You should add a DISTINCT clause to your query role rule to return unique IDs, especially when your query involves thousands of user IDs.
Avoid creating a role query based on a record
with OPRID as a key field to avoid issues with row-level security. Instead, create or use
a view to the record that includes OPRID as a non-key field. The OPRID field must not be a
key in this view because PeopleTools appends WHERE OPRID =
'<CURRENT_USER_ID>' in PeopleSoft Query Manager. For instance, if PSOPRALIAS
was used as the record for a query to return OPRID and EMPLID, the Query Manager View SQL
page would display the following:
This example illustrates the Query Manager View SQL page.
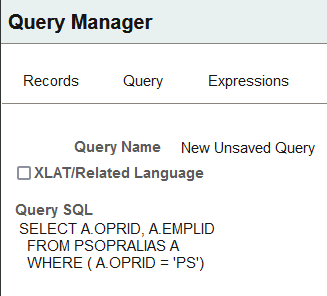
This query would only return at most one row depending on which OPRID is running the query.
In this example you need to find all users who currently have job code Z00008 and add them to the appropriate role. To create the rule, create a view, create a role query based on the view, and use the role query to run the dynamic rule.
Note:
This example assumes a working knowledge of PeopleSoft Query.
-
In Application Designer, create a view.
See Application Designer Developer’s Guide: Creating Views.
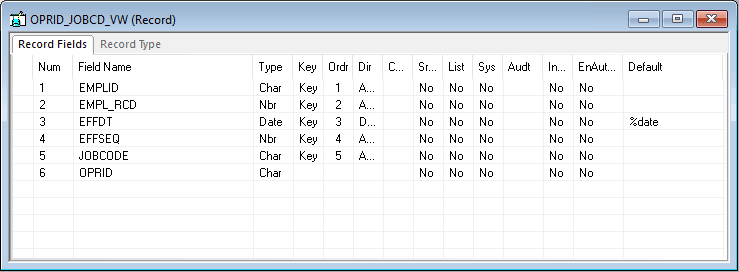
The view in this example uses the fields EMPLID, EMPL_RCD, EFFDT, EFFSEQ, JOBCODE, and OPRID from the PSOPRALIAS and JOB record. OPRID is not a key field.
This example shows a possible view definition to use as a role rule.
-
After choosing the desired fields, select the Record Type tab and select SQL View.
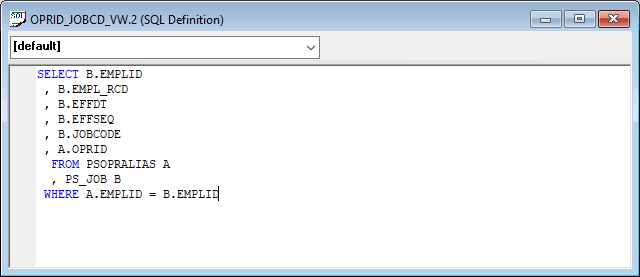
Select Click to Open SQL Editor, and enter the SQL for the view. Ensure that the order of the fields in the SQL definition is the same as the order in the record definition. This definition shows that the PSOPRALIAS and JOB records are joined by the EMPLID field.
This example illustrates the associated SQL definition.
-
Build the view.
-
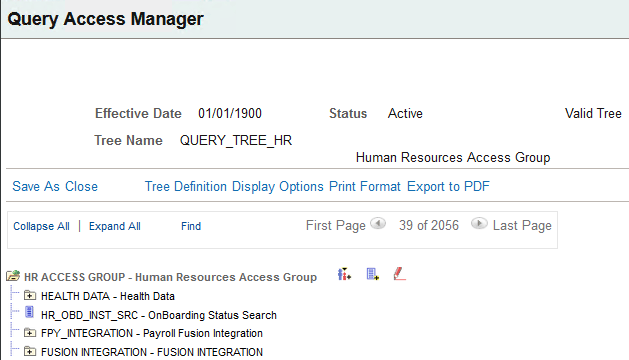
In PIA, select and add the view to the appropriate query tree.
PeopleSoft Query uses query access group trees to control the access of the tables in the PeopleSoft database. See Working with Query Trees.
This example illustrates the top portion of the Query Access Manager page for QUERY_TREE_HR.
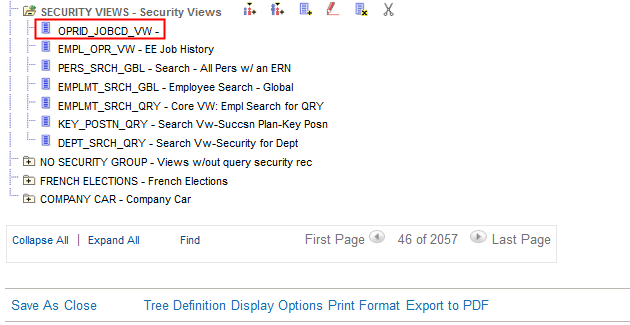
This example illustrates the SECURITY VIEWS portion of the Query Access Manager page for QUERY_TREE_HR, showing the view OPRID_JOBCD_VW.
-
Select .
-
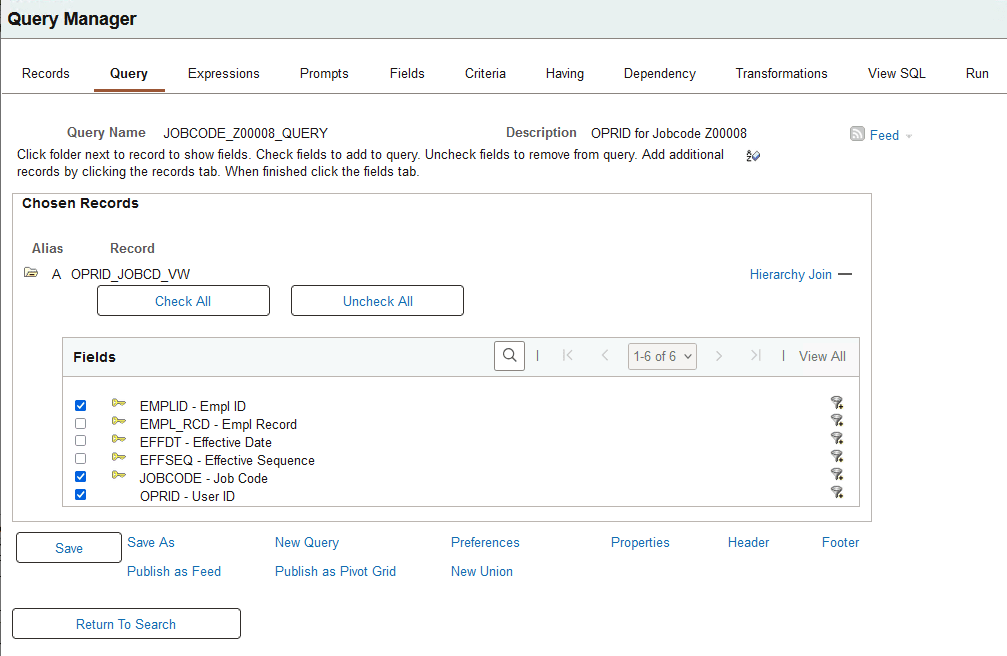
Create a query with OPRID_JOBCD_VW. See Query: Creating New Queries.
This example illustrates the Query Manager - Query page for a role query.
-
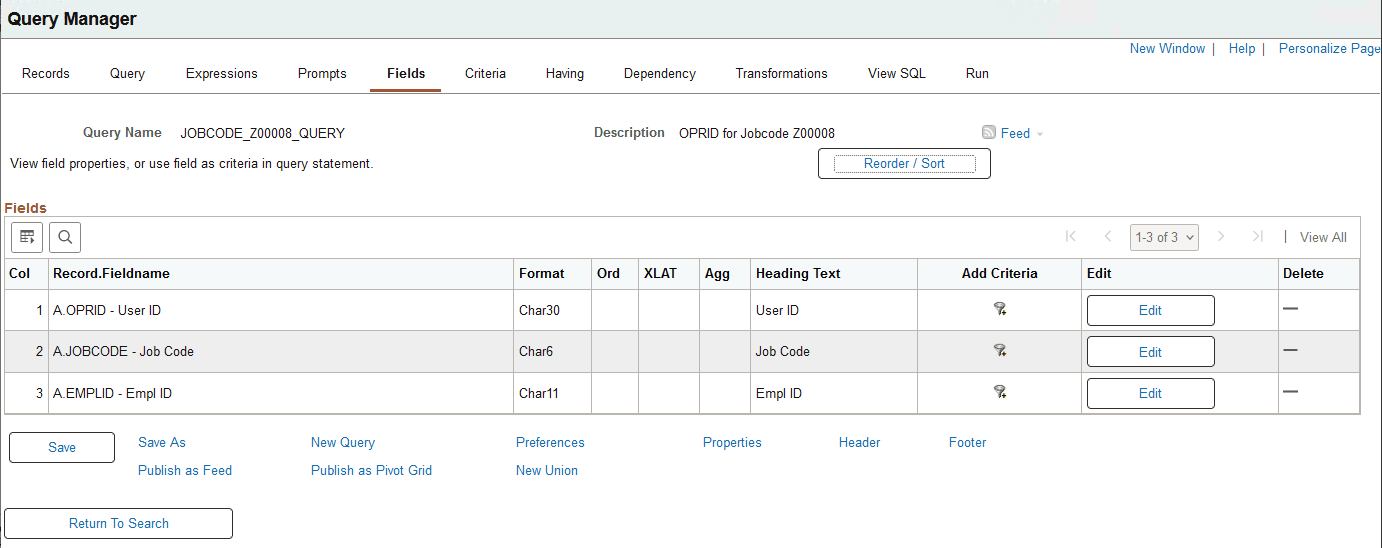
Select the Fields tab and order the fields to make OPIRD the first field.
For OPRID to be properly assigned in the dynamic role rule, OPRID must be the only ID or be the first field selected by the query.
This example illustrates the Query Manager - Fields page.
-
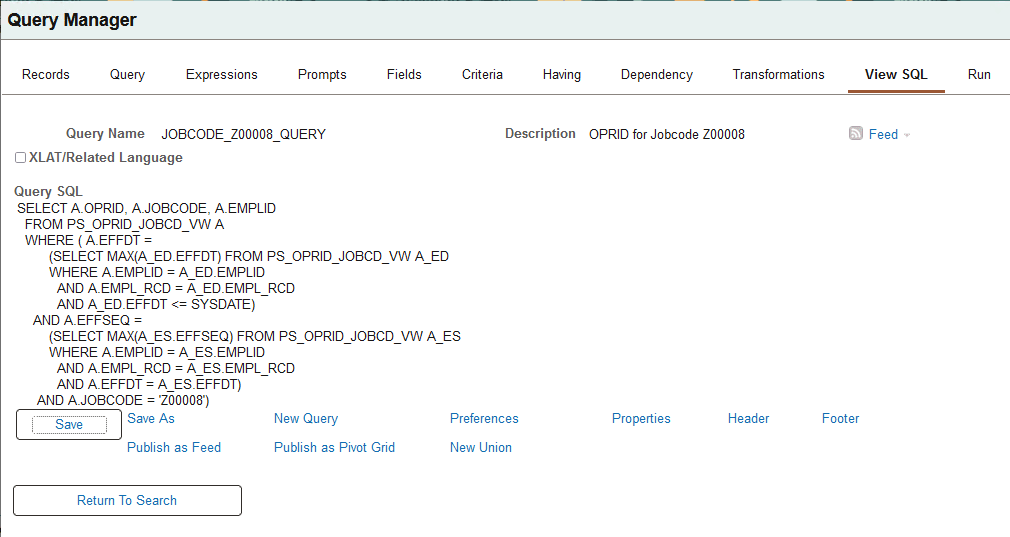
Select the View SQL tab to review the SQL for the query.
Because the view does not have OPRID as a key, the resulting SQL does not contain the extra line
WHERE A.OPRID = 'PS'.This example shows the View SQL page for the query.
-
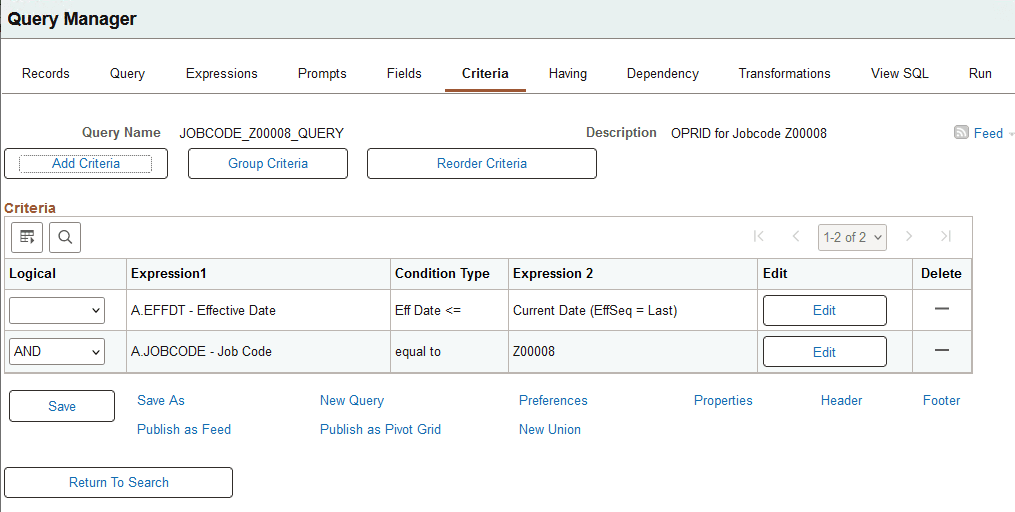
Add criteria to limit the results to Job Code = Z00008. See Query: Defining Criteria.
This example illustrates the Query Manager - Criteria page for a role query.
-
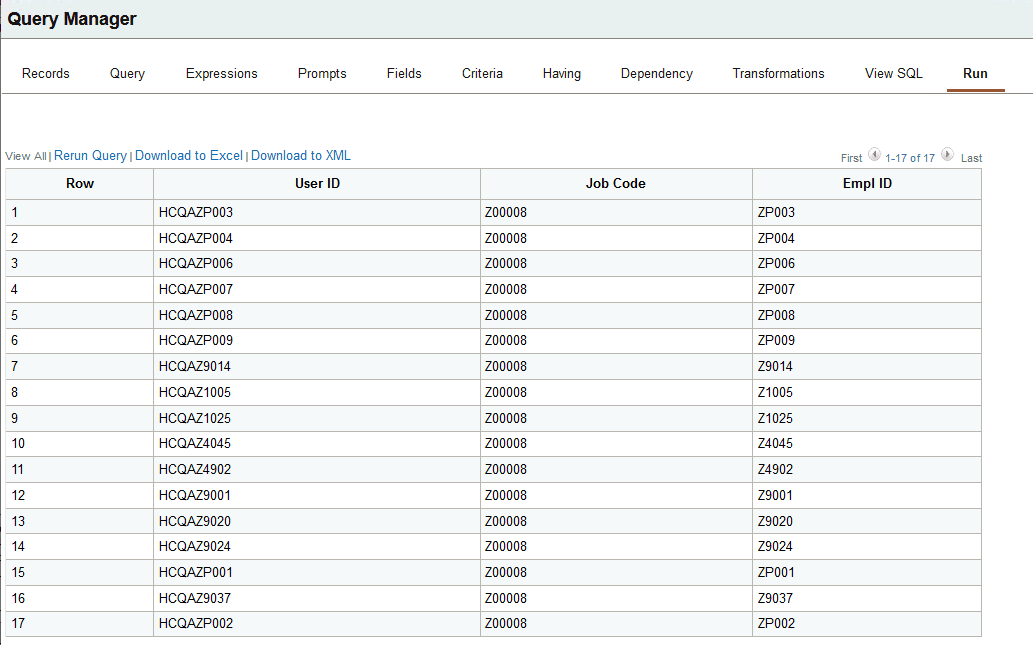
Select the Run tab to review the result, which includes 17 user IDs.
This example illustrates the Query Manager - Run page for a role query.
-
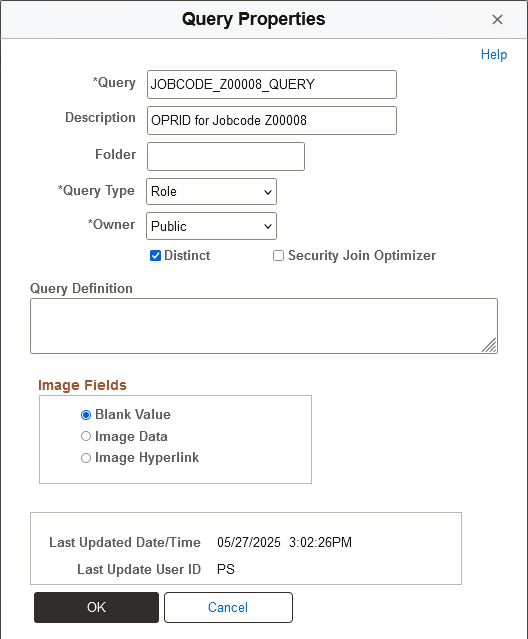
Select the Properties link to open the Query Properties page, make these recommended selections, and click OK.
-
Query Type = Role
-
Owner = Public
-
Distinct option selected.
This example illustrates the Query Properties page with Query Type = Role.
-
-
Save the query.
-
To apply the query rule, select and select the Dynamic Members page.
-
Select Query Rule Enabled and select the query in the Query field.
-
After enabling the query rule, click Test Rule(s) to make sure the system assigns the appropriate roles to the appropriate users.
-
To populate the role membership table, click Execute Rule.
See Executing Dynamic Role Rules.
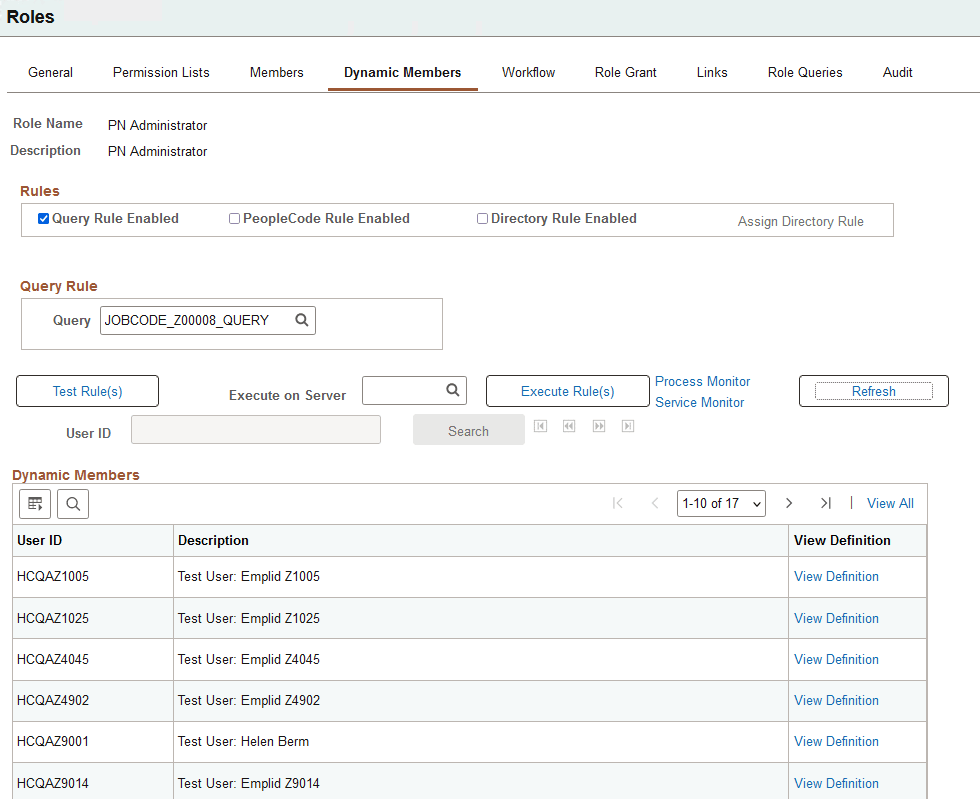
This example shows the Roles - Dynamic Members page after enabling and executing a query rule. The bottom portion of the page is not shown.