Configuration Instruction Manual
With Configuration Assessment, you can see all your enabled configurations and real usage for Oracle Fusion subscriptions in one place. This helps uncover insights, close adoption gaps, and maximize the value of your investment.
This topic provides a secure, repeatable procedure for running the required Oracle Fusion Analytics reports for Configuration Assessment and packaging the encrypted CSV outputs into a single ZIP file.
Data Security and Compliance Considerations
- These extracts capture configuration and usage indicators, often represented as flags (For example, Y/N).
- These reports are not intended to extract business transactional data or personally identifiable information (PII).
- Follow your organization’s policies to:
- Access control (least privilege)
- Secure storage of exported files
- Secure transmission or sharing of the final ZIP file
Checksum Validation
Before proceeding, validate the integrity of the downloaded files using checksum verification.
- Log in to Success Navigator.
- Navigate to the Account Profile.
- Select the Configuration tab.
- Select Begin Assessment.
- Select Download Script.
- Save the files to a secure local directory.
- Extract the ZIP file, which includes these components:
- Archived BI Catalog
- PGP Public Key
Note:
Do not modify the file before performing checksum validation.- Open Command Prompt or Terminal in the folder that contains the downloaded ZIP file.
- Replace <filename.zip> with the name of the downloaded file, and then run the command for your operating system.
- For Windows
Command: certutil -hashfile <filename.zip> SHA256
Example: c:\folderpath> certutil -hashfile <filename.zip> SHA256
- For Linux or macOS
Command: sha256sum <filename.zip>
Example: c:\folderpath> sha256sum <filename.zip>
- For Windows
- Compare the generated hash with the SHA-256 checksum provided in [identify the exact page, field, or downloaded file].
- Complete one of the following actions:
- If the values match, continue to the next step.
- If the values do not match, do not run the downloaded file. Download it again, and repeat the checksum validation.
- Locate the expected checksum value provided in Success Navigator in the Script Download page.
- Compare it with the checksum value generated on your system.
- ✅ If both checksum values match exactly, File integrity is confirmed.
- ❌ If the values do not match, Do not proceed.
- Re-download the file from Navigator.
- Repeat the checksum validation process.
Note:
- Checksum validation is a mandatory security step before using or uploading files.
- Always ensure you are comparing values from a trusted Navigator source.
Fusion Roles and Responsibilities Matrix
The table below summarizes the required roles, privileges, and responsibilities for executing the Configuration Assessment process in Oracle Fusion.
It helps ensure users have the necessary access to run reports, manage BI Catalog, configure security (PGP), and download outputs, for successful execution.
| Activity | Purpose | Recommended Roles | Required Privileges |
|---|---|---|---|
| Environment Access | Access Fusion instance | Employee / Any valid user role | Login access to Fusion environment |
| Access BI Catalog | Browse reports | BI Consumer / BI Author | View Analytics Catalog |
| Configure PGP Keys | Enable encryption | BI Administrator | Access BI Publisher Admin, Upload PGP keys |
| Configure Content Server (UCM) | Setup delivery channel | BI Administrator | Configure Delivery → Content Server |
| Import (Unarchive) CSN Catalog | Load reports into system | BI Administrator / BI Author (elevated) | Write access to Shared Folders > Custom, Unarchive capability |
| Run BI Reports | Execute reports | BI Consumer / BI Author, Application Implementation Consultant | Access Reports and Analytics, Run reports |
| Schedule Reports | Automate report execution | BI Author / BI Administrator | Schedule and bursting permissions |
| Download Outputs | Download generated report files | Employee / Application Implementation Consultant | View and download files from UCM |
| Access UCM (File Import & Export) | Retrieve outputs | Employee / Application Implementation Consultant | Access Navigator → Tools → File Import and Export |
Accessing Fusion Analytics (Catalog)
- Sign into your Oracle Fusion.
- Open the Navigator .
- Go to Tools(menu name may vary).
- Select Reports and Analytics.
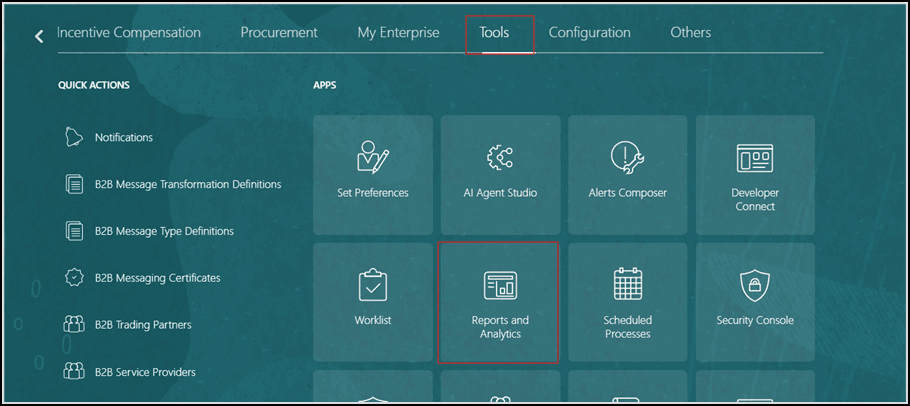
- Select Browse Catalog to open the Analytics Catalog.
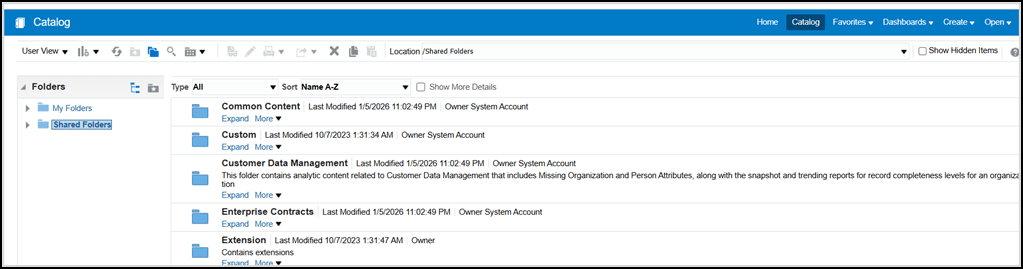
You should now see the Catalog interface with:- A folder tree on the left (My Folders, Shared Folders).
- Object list in the main panel.
Unarchiving (Importing) the CSN Catalog Content
- In the folder tree, expand Shared Folders.
- Expand Custom.
If you cannot expand or you do not see Custom, contact your Fusion/Analytics administrator.
Unarchive the Catalog file
- Highlight or select Shared Folders > Custom >
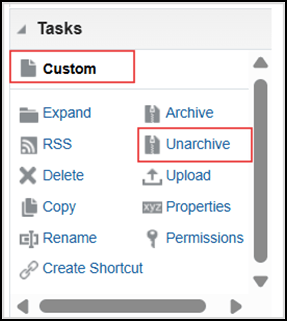
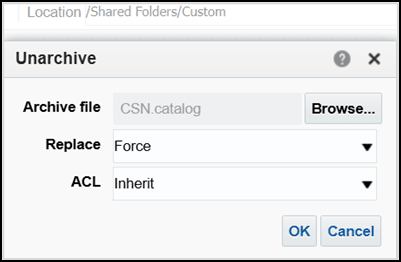
- Select OK or Save.
- Complete the Unarchive process.
Refresh the folder view and confirm the reports appear.
Validate the final path
Confirm the following path is visible in the folder tree: /Shared Folders/Custom/CSN/Config Assessment/Report
- Restrict write access to a small admin group.
- Grant read or run access to the team that will execute the reports.
PGP setup with the Public Key
- Sign into Oracle Fusion Cloud with the required BI Administrator permissions .
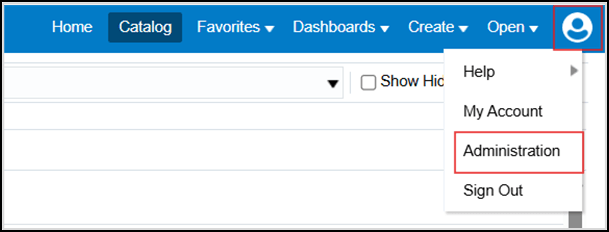
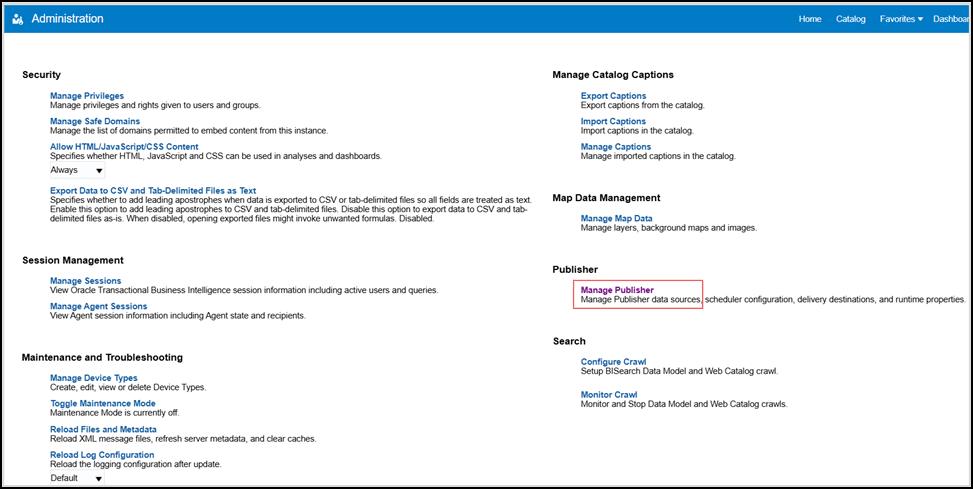
- In BI Catalog open My Profile > Administration > Publisher > Manage Publisher.
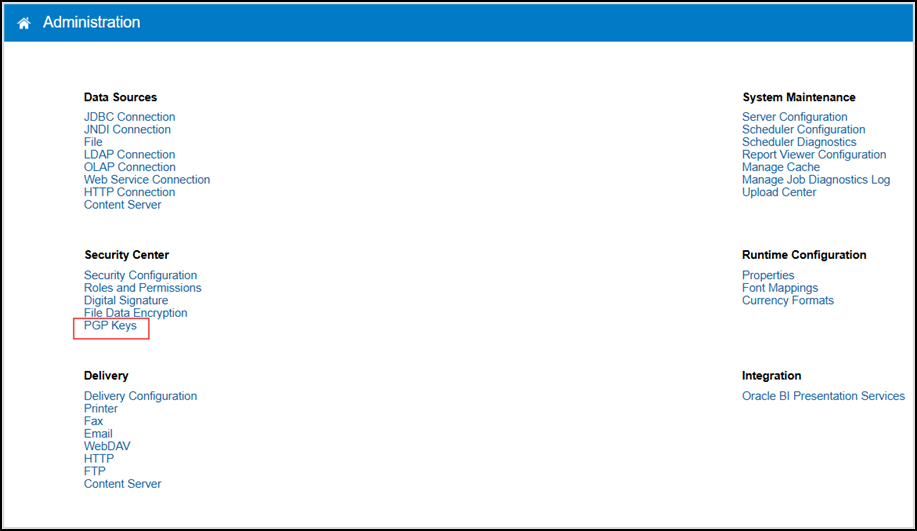
- Select Security Center > PGP Keys.
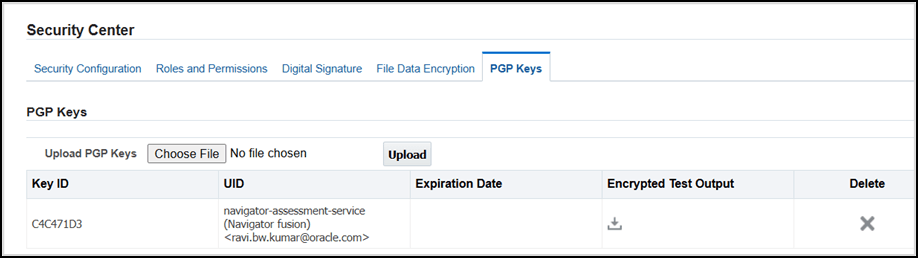
- Select Choose File > Browse and upload the PGP Key.
Configure Custom UCM Content Server
- Select Delivery > Content Server > Add Server as per below:
Server Name URL Username/PWD FA_UCM_CSN https://fa-internal.oracleoutsourcing.com:10663/idcnativews Fusion Username/Password - Select PGP key from the list and test the connection and apply.
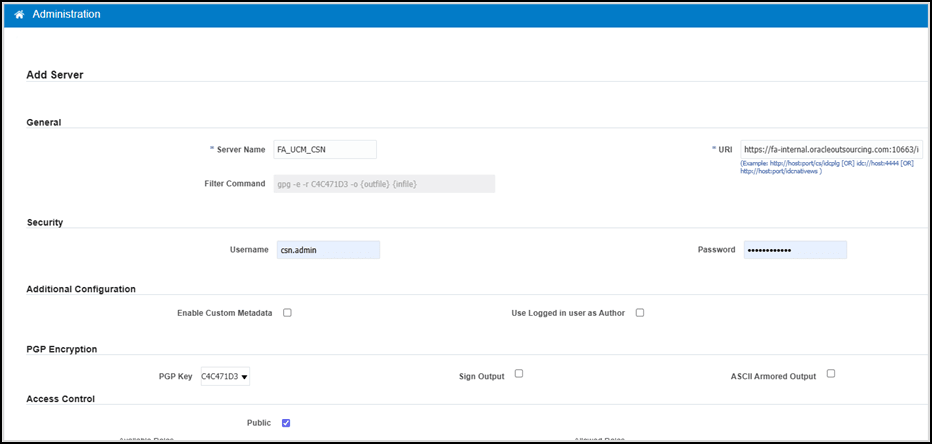
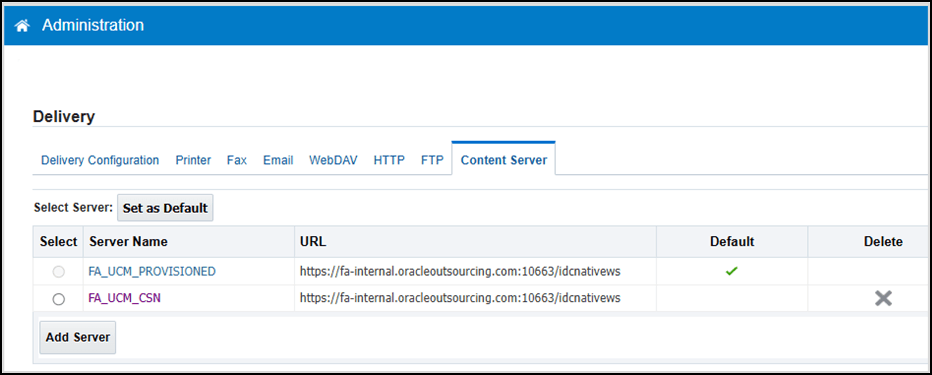
Available Reports (Mandatory Set)
Following are the pillar wise config and extraction reports: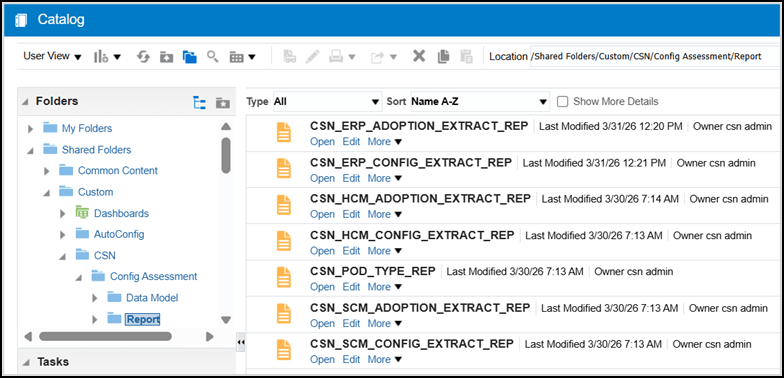
Required Reports (Mandatory Set)
| Report Name | Purpose |
|---|---|
| CSN_POD_TYPE_REP | Extract Fusion instance name and environment details |
| CSN_HCM_CONFIG_EXTRACT_REP | Common Configurations HCM pillar configuration extraction for business processes |
| CSN_HCM_ADOPTION_EXTRACT_REP | HCM processes adoption/usage extract |
ERP Reports (Optional)
| Report Name | Purpose |
|---|---|
| CSN_ERP_CONFIG_EXTRACT_REP | ERP pillar configuration extraction for business processes |
| CSN_ERP_ADOPTION_EXTRACT_REP | ERP processes adoption/usage extract |
SCM Reports (Optional)
| Report Name | Purpose |
|---|---|
| CSN_SCM_CONFIG_EXTRACT_REP | SCM pillar configuration extraction for business processes |
| CSN_SCM_ADOPTION_EXTRACT_REP | SCM processes adoption/usage extract |
Scheduling the Reports
This section describes how to schedule BI reports to run automatically and deliver output files at defined intervals.
- Sign into the Oracle Fusion environment.
- Navigate to: Navigator → Tools → Reports and Analytics.
- Select Browse Catalog.
- Navigate to the report location: /Shared Folders/Custom/CSN/Config Assessment/Report.
- Identify the report you want to schedule.
- Select the report name.
- From the toolbar or More menu, select: Schedule
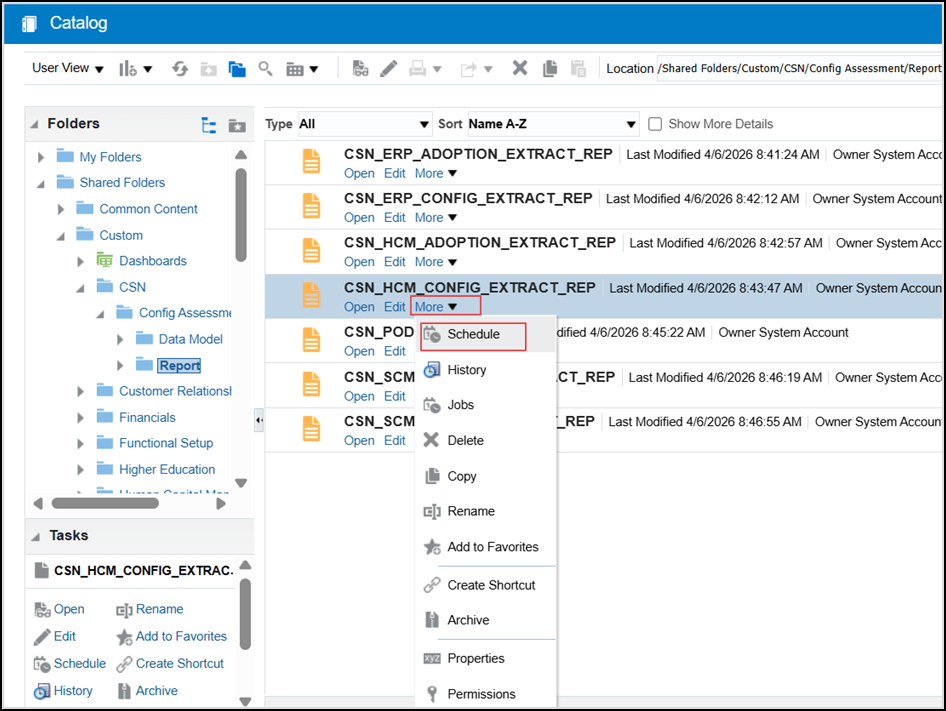
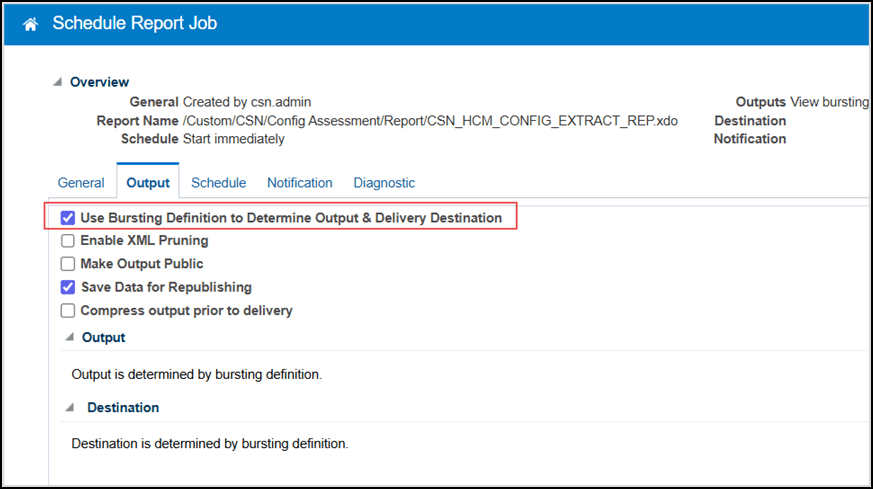
- Select Use Bursting is enabled.
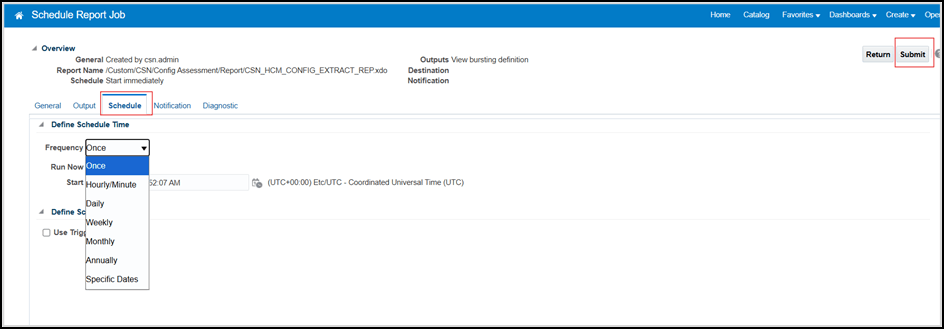
- Go to the Schedule tab.
- Choose frequency:
- Run Once
- Hourly / Daily / Weekly / Monthly
- Set:
- Start date and time
- End date (if applicable)
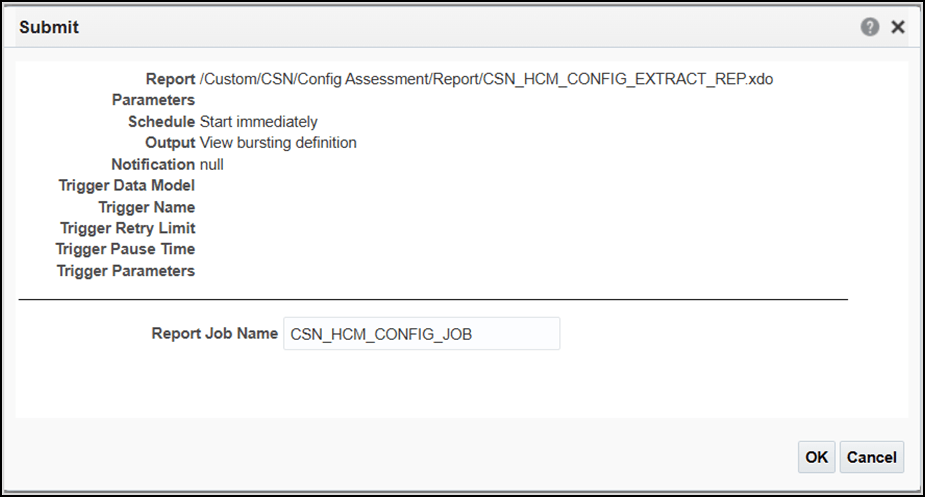
- Provide Job Name
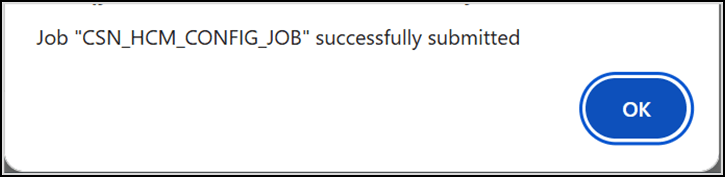
- Select Submit and a confirmation message will appear with a Job ID.
Download Extract Files Using File Import and Export in Oracle Fusion
- Navigate to File Import and Export
- Log in to Oracle Fusion Applications.
- Select Navigator, from the Application menu.
- Select Tools → File Import and Export.
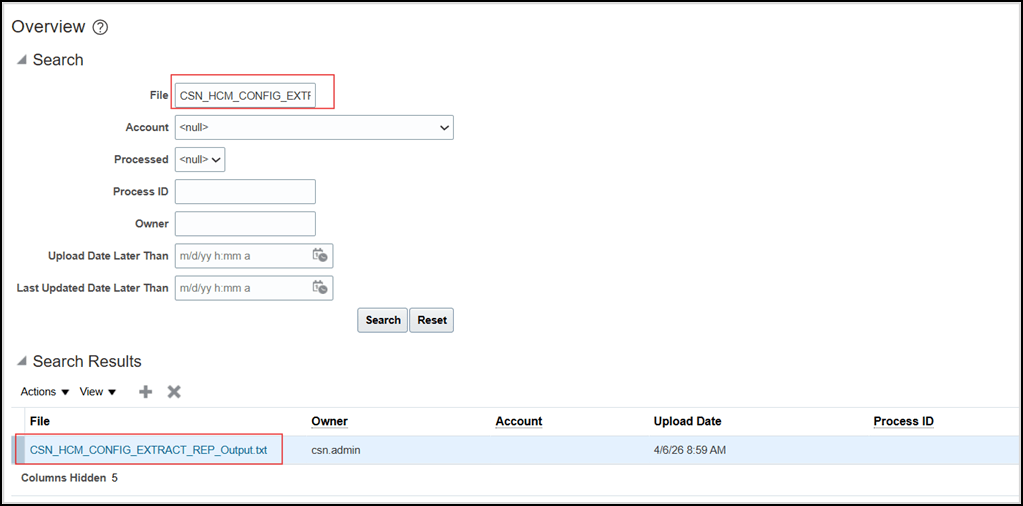
- Open the Export or Import Search Page
- The File Import and Export page will open.
- By default, you’ll land on the Search Results section where previously generated files are listed.
- Search for a File Using File Name
- In the Search panel, enter the full file name or a partial name.
- Enter:
- Full file name or
- Partial name (recommended if unsure)
- (Optional) Use additional filters:
- Account
- Date
- Job Name
- Select Search.
- Identify the Required File
- Review the search results grid.
- Look for:
- File Name
- Content Type
- Creation Date
- Confirm the file matches your expected output (e.g., Report extract).
- Download the File
- Select the required file from the results.
- Select Download button (or icon).
- The file will be downloaded to your local machine.
- Access Downloaded File
- Open your browser’s Downloads.
- Open the file to verify contents.
Packaging Outputs into a ZIP File (Required Deliverable)
- Confirm all the required Text files are present.
- Select all the required Text files.
- Compress them into a single ZIP file.
Recommended ZIP file name format: ConfigAssessment_<CustomerName>_<EnvName>_<YYYYMMDD>.zip Example: ConfigAssessment_<Name>_TEST_20260217.zip
- ✔ Catalog imported
- ✔ Reports scheduled
- ✔ Outputs generated
- ✔ Files validated
- ✔ ZIP created
Report List and Purpose
- CSN_POD_TYPE_REP – Fusion instance details.
- CSN_HCM_CONFIG_EXTRACT_REP – HCM configuration indicators.
- CSN_HCM_ADOPTION_EXTRACT_REP – HCM adoption/usage indicators.
- CSN_ERP_CONFIG_EXTRACT_REP – ERP configuration indicators.
- CSN_ERP_ADOPTION_EXTRACT_REP – ERP adoption/usage indicators.
- CSN_SCM_CONFIG_EXTRACT_REP – SCM configuration indicators.
- CSN_SCM_ADOPTION_EXTRACT_REP – SCM adoption/usage indicators.
Deliverable
One ZIP file containing all 7 CSVs.