Manage Gateway Nodes in the API Platform Cloud Service Management Portal
Manage registration, polling intervals, and proxies for each of your gateway nodes in the Oracle API Platform Cloud Service - Classic Management Portal.
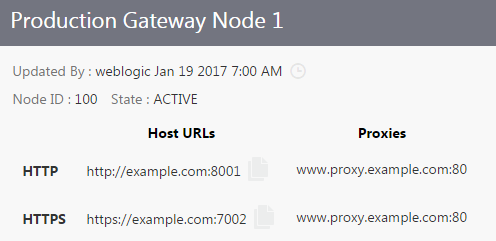
Understand Gateway Node Details
The Nodes page displays details for all nodes known to a gateway.
The Active tab displays all active gateway nodes. The name, description, and host is shown for each gateway.
The Requesting Registration tab displays gateway nodes that are requesting registration but have not yet been approved. The name, description, and host is shown for each node. The name of the user requesting the registration and the time the request was made are also displayed.
Tip:
Click Dismiss to clear a gateway node from the Rejected tab.
Register a Node to a Logical Gateway
Use the join node installer action to register a node to an existing logical gateway on the Management Portal. If you want to create a new logical gateway and register a node to it, use the create-join action instead.
Tip:
You can also register a node to a logical gateway with the REST API for the Management Service in Oracle API Platform Cloud Service.
The node is registered to the logical gateway on the Management Portal. The Gateway Manager user you specified is issued the Manage Gateway grant for the gateway and the Gateway Runtime user you specified is issued the Node Service Account for the gateway.
Approve a Gateway Node Registration
- From the Gateways List page, click the gateway for which you want to approve node registrations
- Click the
 (Nodes) tab.
 - Click the Requesting tab.
- Hover over the gateway node registration you want to approve, and then click Approve. Click Reject to reject the registration instead. You can see rejected requests on the Rejected tab.
Changing the Node Polling Interval
Configure how regularly a gateway node polls the management tier for the logical gateway definition.
When a node polls the management tier and the definition for the gateway it is registered to differs from its current shape, the node updates itself to match the definition from the management tier. See Understanding Gateways and Gateway Nodes for an explanation of gateways and gateway nodes.
Gateway Managers must be issued the Manage Gateway grant for a gateway to change the polling interval of a node registered to it.
Note:
Different nodes belonging to a gateway can have different polling intervals. Nodes registered to the same gateway may not have the same endpoints or API iterations deployed, depending on the delay between polls from each node.
Note:
If the previous polling interval was 0, you must manually initiate a poll to synchronize the node with the latest logical gateway definition. The poll will not happen automatically.
Configuring a Proxy for a Gateway Node
Configure proxies for each node registered to gateways you manage. This allows for different proxy configurations for development and production gateways or different proxies for nodes located in separate data centers. When configured, the node passes requests to your backend services through the proxies you specify.
Gateway Managers must be issued the Manage Gateway grant for a gateway to configure proxies for nodes registered to it.
Unregister a Gateway Node
Unregister a node from a gateway to stop managing it with the Oracle API Platform Cloud Service - Classic management tier.
Unregistering a node does not shut it down; it continues to run normally until you manually shut it down using the stop node installer action.
When you unregister a gateway, the node stops polling the management server for updated logical gateway definitions. As a result, new APIs or more recent API iterations deployed to the gateway will not be deployed to the unregistered node; however, APIs that were deployed to the node when it was unregistered are still deployed. Requests sent to these APIs are handled normally.
Tip:
You can also unregister a node using the REST API for the Management Service in Oracle API Platform Cloud Service or the unregister node installer action.
Gateway Managers must be issued the Manage Gateway grant for a gateway to unregister nodes from it.
Run the stop node installer action to stop the running node server. Run the destroyNode node installer action to stop the running server and uninstall the node from the machine.
To reregister a node to a gateway, use the REST API for the Management Service in Oracle API Platform Cloud Service or the join gateway installer action.


