Register an Integration as an Agentic AI Tool

An integration can become an agentic AI tool for AI agents. AI agents can then invoke the integration as a tool to accomplish a specific task.

Prerequisites:

Any integration can be used as an Agentic AI tool, but the integration must meet the following criteria:
  • The integration must be part of a project.
  • The integration must be Active.
  • The first connection in your integration must be a REST trigger connection with the REST Adapter.
  • The REST trigger connection in your integration must have:
    • Authentication type OAuth.
    • JSON payload
    • POST verb
  1. In the navigation pane, select Projects.
  2. Select the project in which your integration is located.
  3. In the Integrations section, find the integration that you want register as a tool.
  4. Check that your integration is Active. If it's not active, activate it by clicking Actions Actions icon, and selecting Activate.
  5. Register the integration as a tool. Click Actions Actions icon, and select Create agentic AI tool

    The Create Tool panel is displayed.

  6. Enter information for the tool.
    Field Description
    Name

    Required.

    Not sent to the Large Language Model (LLM).

    Automatically populated from the integration name.

    Example: validate-invoice-data.

    You cannot change the name after the tool has been created.

    Identifier

    Required.

    Uniquely identifies the tool in the project. By default, the identifier is automatically populated from the tool name.

    Sent to the LLM as tool metadata. The AI agent uses this information to understand the purpose of the tool and when to use it.

    Specify a descriptive tool identifier so that the AI agent knows exactly what the tool does.

    Example: validate-invoice-data.

    You cannot change the identifier after the tool has been created

    Description

    Required.

    By default, automatically populated from the integration description.

    Sent to the LLM as part of the system prompt.

    The description helps the LLM decide when to use the tool. Add information to clearly describe what the tool does and when to use it. Clear descriptions help LLMs use tools correctly and reduce errors.

    Example:

    Validates invoice data against business rules and vendor database.
    Usage: Use when processing invoices to ensure data accuracy before approval.
  7. Click Create.

    The Tool details page is displayed. The tool lists the tool description, guidelines, and input parameters.

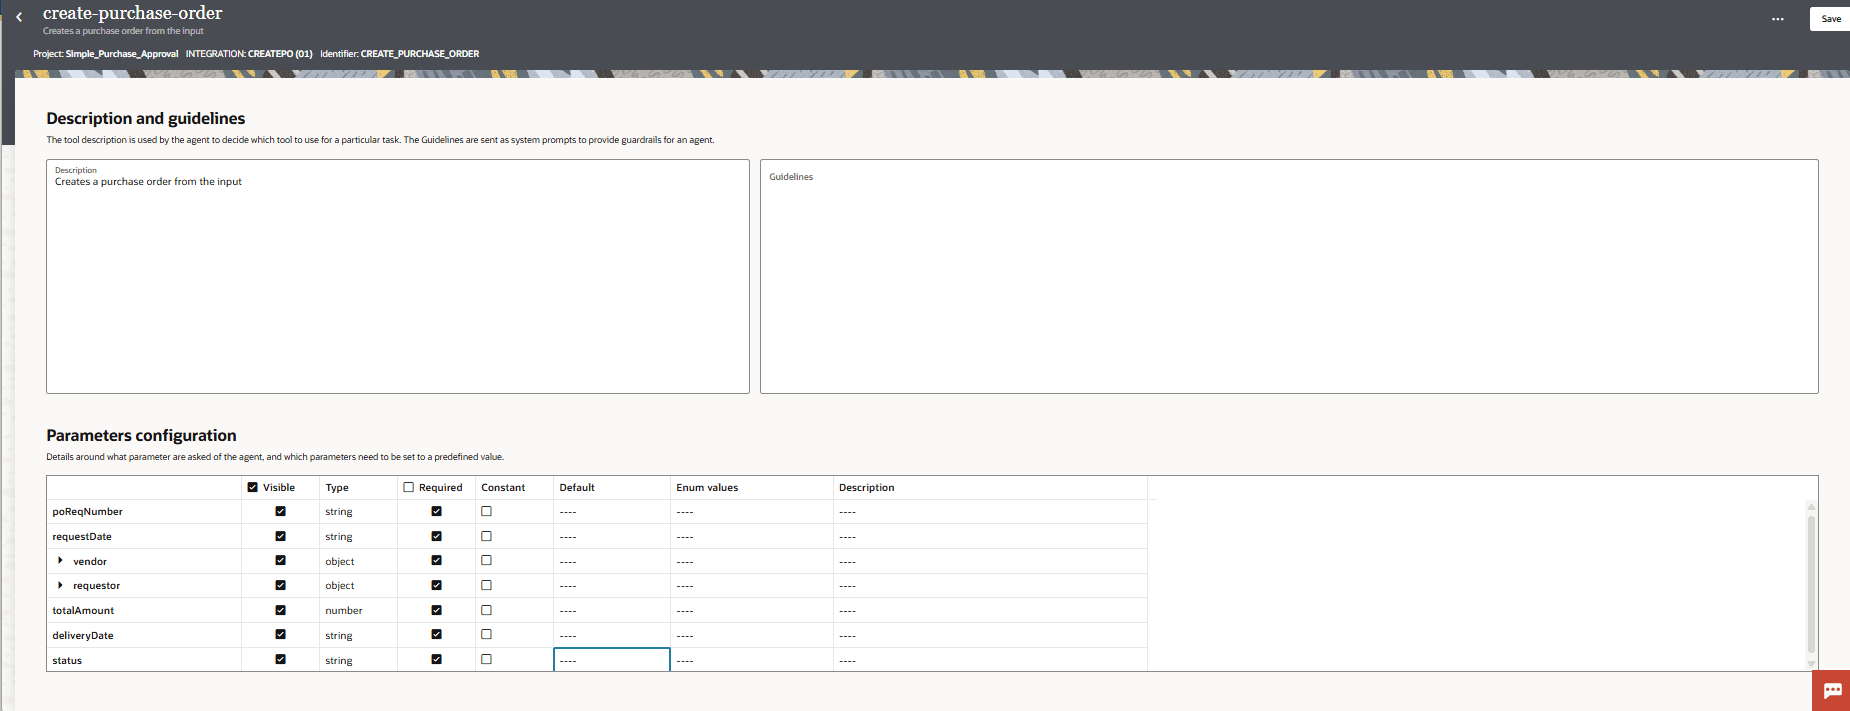
  8. Enter additional information for the tool and identify which parameters are sent to the LLM.

    You already defined the description.


    The Tools details page has a Description and guidelines section and a Parameters configuration section. In the Description and guidelines section, there are two text fields Description, Guidelines. In the Parameters configuration section, there is a parameter table listing all parameters for the tool. The first column contains the parameter name, and subsequent columns are Visible, Type, Required, Constant, Default, Enum Values, Description.

    Field Description
    Guidelines

    Optional.

    Sent to the LLM as part of the system prompt.

    Guidelines are constraints to limit tool behavior and respect corporate policies. Guidelines influence the LLM decision process.

    Specify constraints such as when the tool should be used and when it should not be used.

    For example, if you had a weather tool and you wanted to limit queries to only cities in the United States, you could specify as a guideline:

    only use the tool for cities in U.S.

    Parameters configuration

    Lists all input parameters for the integration. These are automatically populated.

    Configure parameter information for the tool.

    • Visible: Add a checkmark to the fields that will be sent to the LLM. Fields that do not have a checkmark are not sent to the LLM.
      • Expose only essential parameters.
      • Do not send to the LLM technical or internal parameters that are not relevant to the purpose of the tool.
    • Type: Automatically populated from the integration.
    • Required: When you indicate that a field is required, you are indicating to the LLM that it must assign a value to that parameter. Specifying a parameter as required ensures that there will always be a value for the parameter when the AI agent calls the agentic AI tool.
    • Constant: Enter any specific value that you want to assign to the parameter and you do not want the LLM to decide on.
    • Default Values: Specify default values for parameters when you know there's a safe value for the parameter if no value is assigned. This reduces the chance of LLM hallucination.
    • Enum Values: Specify comma-separated values when there are several options that could be sent to the LLM. For example, for temperature, you would specify: celsius,fahrenheit.
    • Description: Required. Describe all parameters clearly. The LLM depends on the descriptions to understand the tool. Clear descriptions reduce LLM errors.
  9. Click Save to save your changes.