Define the Integration Schedule

You can define a schedule for running integrations, such as the frequency at which to run the integration, whether to run the schedule based on an iCal expression, whether the schedule run never expires, whether the schedule has a fixed expiration date, and so on.

Decide When to Create the Integration Schedule

You can decide to first design and activate an integration and then create the schedule later or first create a schedule and then design and activate the integration later.

Note:

  • You cannot separately export the schedule of an integration.
  • When the user that created and scheduled an integration is locked or deleted, the schedule does not run. Ensure that this user is not locked or deleted.
  1. In the navigation pane, click Design, then Integrations.
  2. Find the schedule integration in the Integrations list.
    These integrations are identified by Schedule integration Scheduled integration icon. There are several ways in which to create a schedule on an integration.
  3. If you want to first design and activate the integration and then create the schedule:
    1. Hover over the integration.
    2. Click Activate Activate icon.
      The Activate Integration dialog is displayed.
    3. Click Activate And Schedule.
  4. If you want to first create a schedule for an integration that you design and activate later:
    1. Hover over the integration on which to create a schedule.
    2. Click Actions Actions icon, then select Add Schedule.

      Note:

      For integrations with no defined schedules, the menu shows Add Schedule. For integrations that have a defined schedule, the menu shows Schedule.

      The page for defining the schedule processing details is displayed.

    Note:

    • Assume you create a schedule and generate several integration runs, then deactivate and delete the integration. If you then create and activate a new integration with the same name as the deleted integration, and go to the Instances page, the past runs of the deleted integration are displayed. This is by design.
    • Deactivation of an active, schedule integration is not allowed. You must stop the schedule, then retry.

Define the Type of Integration Schedule to Run

You define a schedule for running integrations, such as a basic schedule, a reoccurring AI-generated iCal schedule created by entering natural language text, or a reoccurring schedule created by directly entering iCal parameters.

Note:

  • Oracle Integration allows up to five recurrences in an iCal expression when defining the schedule.
  • There is a one-minute limitation on how frequently you can run schedule integrations with an iCal expression. Anything under this limit is not supported.
  • You cannot use lookups in iCal expressions.

Create a Basic Integration Schedule

  1. Click Simple. For this type, there is a minimum frequency limit of ten minutes. If you try to define a schedule frequency of under ten minutes, a validation error occurs.
  2. In the Frequency section for a Simple schedule, click the list to select the frequency with which to run the integration. When you define one frequency, you can specify additional values by clicking the icon to the right of the Frequency section.
  3. Select a frequency.
    • Only Once: This is the default selection.

      If you select this option, you cannot select When schedule starts as the start date. This option is disabled.

    • Hours and Minutes: Specify the hour and minute at which to run the integration.

    • Days: Specify the days on which to run the integration.

    • Weeks: Specify the weeks during which to run the integration.

    • Months: Specify the months during which to run the integration.

Create an AI-Generated iCal Schedule by Entering Natural Language Text

You can define an AI-generated, reoccurring schedule by entering natural language. This eliminates the need to manually enter an iCal expression completely from scratch. See AI Innovation and Oracle Integration.

  1. Click iCal.
  2. Enter a reoccurring schedule clearly and explicitly in English, then click Validate to generate the equivalent iCal expression. For example:
    Entering the Following Natural Language Text ... Generates This iCal Expression ...
    Run the schedule every two weeks on Friday at 11 pm
    FREQ=WEEKLY;INTERVAL=2;BYDAY=FR;BYHOUR=23;
    Run on the 1st, 10th, and 15th days of the month at 5:15 AM, 10:15 AM, 3:15 PM, and 8:15 PM.
    FREQ=MONTHLY;BYMONTHDAY=1,10,15;BYHOUR=5,10,15,20;BYMINUTE=15;
    Run daily at 530 PM every ten minutes. Run daily at 600 PM every ten minutes. Run daily at 7 pm every ten minutes until 730 PM.
    FREQ=DAILY;BYHOUR=17;BYMINUTE=30,40,50;BYSECOND=0; 
    &FREQ=DAILY;BYHOUR=18;BYMINUTE=0,10,20,30,40,50;BYSECOND=0; 
    &FREQ=DAILY;BYHOUR=19;BYMINUTE=0,10,20,30;BYSECOND=0;
  3. If validation is successful, view the following message that appears at the top: iCal expression is valid.
  4. Review the generated iCal expression carefully. The expression may be close to what you want, but may still require updating. Copy the generated iCal expression to the text area to update further, as needed. When complete, click Validate again.

Create a Schedule by Directly Entering iCal Parameters

If you are comfortable with creating iCal expressions completely from scratch, you can use this approach.

  1. Click iCal.
  2. Enter an iCal expression, and click Validate. For example:
    Expression Syntax

    This expression indicates that this integration runs each month on the 1st, 10th, and 15th days of the month at 5:15 AM, 10:15 AM, 3:15 PM, and 8:15 PM.

    FREQ=MONTHLY;
    BYMONTHDAY=1,10,15;
    BYHOUR=5,10,15,20;BYMINUTE=15;
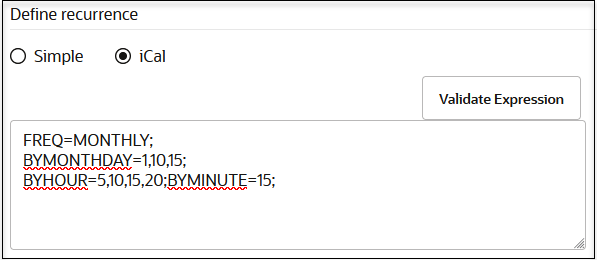
    The Simple and iCal options are displayed. iCal is selected. The Validate Expression is to the right. After this is the defined expression.

    This expression defines multiple schedule frequencies. The schedule runs every day between the hours of 5:30 PM – 7:30 PM, and during these hours it processes every 10 minutes. This configuration requires three schedules separated by the & sign:

    FREQ=DAILY;BYHOUR=17;BYMINUTE=30,40,50;BYSECOND=0;
    &FREQ=DAILY;BYHOUR=18;BYMINUTE=0,10,20,30,40,50;BYSECOND=0;
    &FREQ=DAILY;BYHOUR=19;BYMINUTE=0,10,20,30;BYSECOND=0;


    Description of oic3_ical_sched2.png follows
    Description of the illustration oic3_ical_sched2.png

    This expression runs daily at 8 AM and also monthly at 12 PM on day 1 and day 2.

    FREQ=DAILY;BYHOUR=8;&FREQ=MONTHLY;BYMONTHDAY=1,2;BYHOUR=12;


    The Validate Expression bullet appears. After this is the following iCal expression: FREQ=DAILY;BYHOUR=8;&FREQ=MONTHLY;BYMONTHDAY=1,2;BYHOUR=12;

  3. If validation is successful, view the following message that is displayed at the top: iCal expression is valid.
  4. If an AI engine is configured, more human-readable text is shown for the given iCal expression. This is meant to enhance understanding of the iCal expression you entered.

Select When to Run the Integration Schedule

You can define whether the schedule run never expires, whether the schedule has a fixed expiration date, and so on.

  1. In the This schedule is effective section, click the When schedule starts link to the right of From.
    A menu is displayed for defining the start date of the schedule.
  2. If you want to start the integration run when the schedule is activated, click When schedule starts.
  3. If you want to explicitly set an integration run start date:
    1. Select Modify start date.
    2. Click the Calendar icon to select the month, year, and day and the hour, minute, and second at which to start the integration run.
    3. Click Done.
  4. In the Until section, click the Never (repeat indefinitely) link to the right.
    A menu is displayed for defining the expiration date.
  5. If you want the schedule run to never expire, select Never (repeat indefinitely).
  6. If you want the integration run to have a fixed expiration date:
    1. Select Choose expiry date.
    2. Click the Calendar icon to select the month, year, and day and the hour, minute, and second at which to end the integration run.
    3. Click Done.
  7. From the Time zone list, select a time zone in which to run the schedule. By default, this field shows the value you selected on the Preferences page.
  8. Click Save.
    If successful, a message is displayed in the upper right corner.
    Schedule Run name saved successfully
    If there are any errors, a validation message is displayed in the upper right corner that describes how to resolve the errors.
  9. Return to the Schedule and future runs page.

    Details about the integration run schedule are displayed. There are two sections:

    • Schedule section: This section is collapsed by default. Clicking the top bar (showing schedule name and buttons) expands the section and shows the schedule.


      The Scheduled Time Zone is displayed. The frequency is displayed after this. To the right are the From and Until settings.

    • Future Instances table: This table remains empty until the schedule is started. Once it starts, you see data.


      The number of future instances is displayed. After that is a table with columns for Type, State, and Scheduled Time.

  10. If you have already activated the integration, select an option to run the integration:
    1. Click Actions Schedule menu icon , then select Run.
      The Configure and run page is displayed.

      Clicking Run triggers the integration immediately.

    2. If you are a user with the ServiceAdministrator role, you can change the user with which to run the schedule in the Run as field.
    3. Select how to initiate an instance of the integration when prompted.
      • Ad hoc request: The instance is processed independently of the scheduled run for the integration (if any).
      • As part of schedule: The instance runs in sequence with the scheduled run and shares schedule parameters (if any).
    4. Click Run.
    or
    1. Select Start Schedule Start schedule iconon the Schedule and future runs page to activate the integration schedule.
    2. If you are a user with the ServiceAdministrator role, you can change the user with which to submit the schedule.
    3. Click Start Schedule when prompted. Otherwise, click Cancel.

    Note:

    • If you place a file in an input directory and run an integration for the first time, the file is copied to the output directory. If you then run the integration a second time, the same file is not copied again to the output directory, even if you deleted the file from the output directory before rerunning the integration. This is by design. Second integration runs do not copy the same file. However, if a new file is placed in the input folder or the previously-copied file is updated with a newer version in the input directory, both are copied to the output directory.

    • If you create a new schedule to repeat every minute and launch the calendar to specify a start time, it shows the current time (for example, 12:41:16). If you update the start time to several minutes later (for example, 12:43:55), save, and start the schedule integration run, the integration starts running at 12:43:16 instead of  12:43:55. The scheduler does not care about the seconds entered and runs the schedule every minute.

  11. If you have not yet activated the integration, return to the Integrations page and click Activate Activate icon.
  12. Run the schedule integration as described in the previous steps.