Manage a Group of Actions and Fault Handlers with a Scope Action
You can manage a group of actions with a scope action. The scope action is essentially a collection of child actions and invokes that can have their own fault handlers. The scope action provides the behavior context for the child elements. The elements defined in the parent scope have local visibility inside this scope. Anything that you can do in an integration such as designing invokes, mappings, and actions can be done in a scope action.
Note:
Scopes can have fault handlers in which specific faults can be caught and rethrown. However, in the case of connectivity agent-based invokes, the named fault handlers are not processed. All fault handling must be done in the default fault handler.Create a Scope Action
- Add a scope action to an integration in either of the following ways:
- On the right side of the canvas, click
Actions
 and drag the Scope action to the
appropriate location.
- Click
 at the location where you want to add the scope action, then
select Scope.
- On the right side of the canvas, click
Actions
-
Click Edit
 under Edit Scope to enter a name and
optional description for the scope action.
-
Drag and design appropriate actions, mappings, and invokes into the scope action.

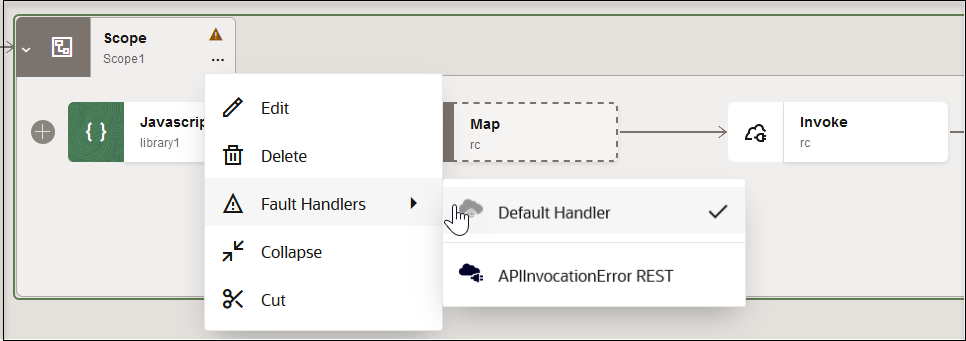
The scope includes a default fault handler that is accessible by clicking the scope action and selecting Actions
 , then Fault Handlers, then
Default Handler.

- Click + to define actions on the default fault handler.
- To return to the scope action, click the fault handler, and select
Actions
 , then Show Scope Block 'scope_name'.
When you add invokes to a scope, the named faults associated with the invokes are added to the default fault handler in the scope. For example:
, then Show Scope Block 'scope_name'.
When you add invokes to a scope, the named faults associated with the invokes are added to the default fault handler in the scope. For example:- Add and configure an invoke connection inside the scope action (for example, a REST Adapter).
- Click the scope and select
Actions
 , then Fault Handlers.
In addition to the Default Handler, an invoke fault handler has been added.

-
Select appropriate named faults.
You can also define catch all blocks for fault handling through use of the raise error action in the Fault Handler section of the scope action. Catch all blocks are processed if an invoke throws a fault, but there is not a specific catch named for it. See Catch Faults with a Re-throw Fault Action.
-
Collapse the scope action by double-clicking it. You can expand it again by double-clicking it, selecting Actions
 , then Expand, or clicking
>.
Note:
For application integrations with multiple REST Adapter invoke connections, only one handler can be defined when there are multiple invokes in an integration with scopes. Though the fault handler options are available for each invoke in the scope, it always points to one single handler.
Add Nested Scopes to a Scope Action
- Behaves the same way as a basic scope. It provides its own container of child actions and fault handlers.
- There is no limitation to the levels of nesting. Even a scope’s fault handlers can have nested scopes.
- Drag a scope inside an existing scope.

- Add actions and fault handlers to the nested scope, when necessary.
Track the Status of a Scope Action During Runtime
- In the navigation pane, click Observability, then Instances.
-
Click the business identifier value of the integration to track.
Depending upon runtime processing, several scope processing states can be displayed in the diagram:
-
Scope processing succeeds and is displayed in green. Because the fault handler is not processed, the Fault Handler section of the scope remains hidden.
-
Scope processing fails and is displayed in red, but the fault handler succeeds in handling the fault and is displayed in green. Processing continues after the scope. Because the fault handler was processed, the Fault Handler section of the scope is visible.
-
Both the scope and fault handler fail. Both are displayed in red. Both the scope and the Fault Handler section are displayed.
-
Rename a Scope
- Open the integration that includes the scope to rename.
- Click
 to collapse the scope action.
- Click the scope and select Actions
 , then Edit.
- Change the name and click Save.