Configure Notification Emails
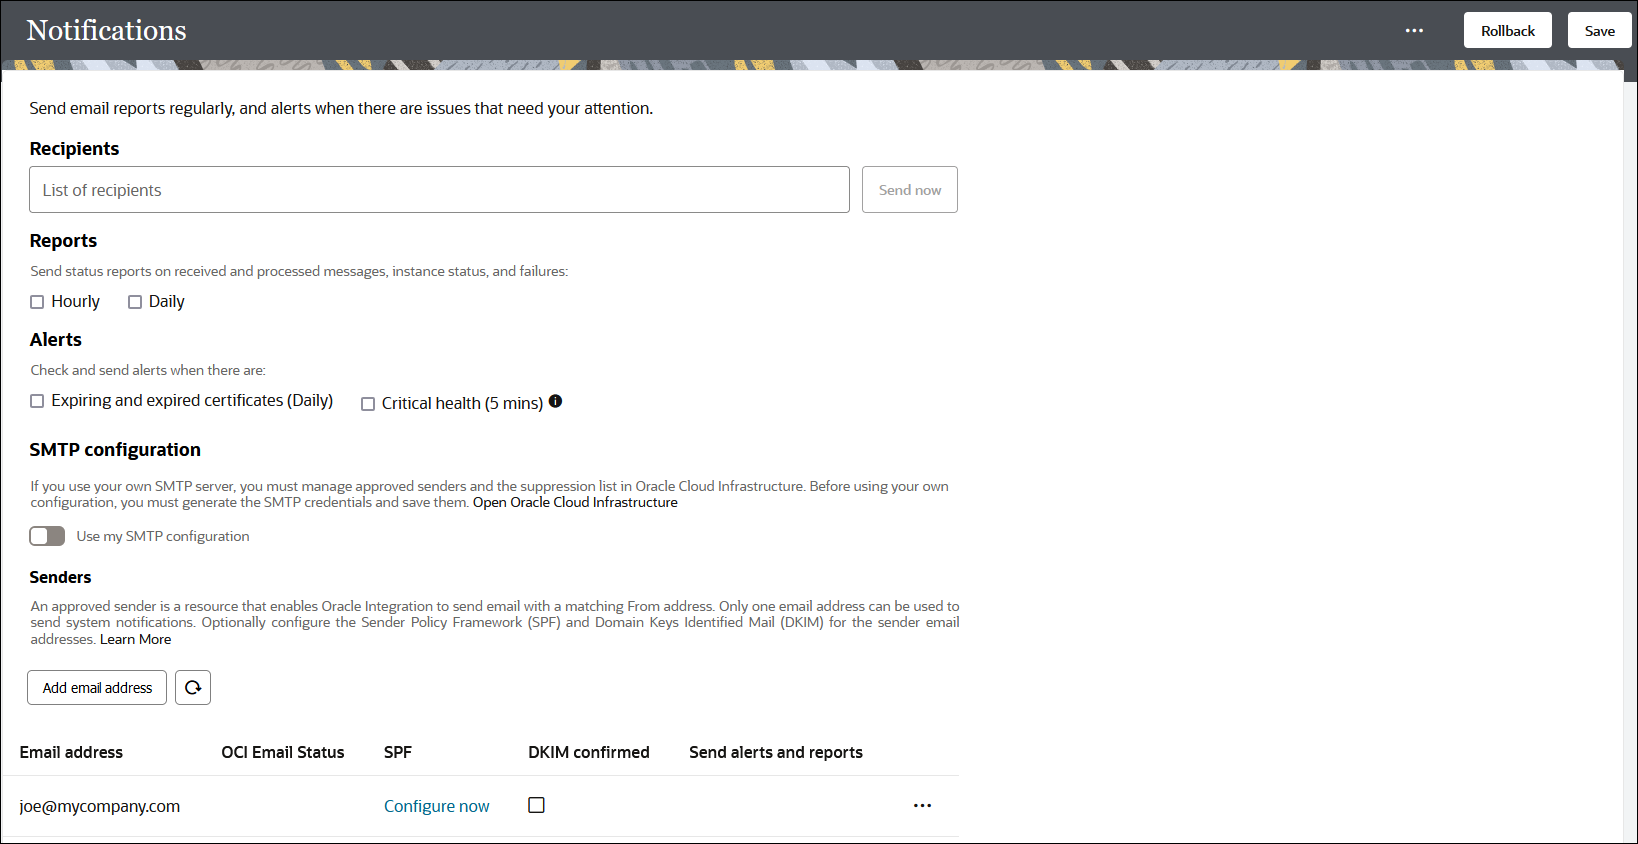
You can configure notification emails to notify interested parties about system status on a regular basis and alert them about service failures. Detailed system status reports include metrics on instances and runs processed by the system, including failures. You can select to send an hourly or daily report and specify the list of recipients.
The report includes the following information:
-
POD name (also included in the subject of the email)
-
Time period
-
Total messages received, processed, succeeded, aborted, and failed
-
Percentage of successful messages
-
Errors by integration instance and run including messages received, processed, succeeded, and failed
The email includes a link at the bottom to change the notification settings or completely stop receiving email notifications. Click Oracle Integration to access the Notifications page to adjust your settings.
- The default method: Sets your limit at 10,000 emails for a rolling 24-hour window. This is provided automatically and requires no additional configuration to use.
- Your own customer tenancy: Sets your limit
to the number allowed by the Oracle Cloud
Infrastructure Email Delivery Service for a
rolling 24-hour window. See Email
Delivery Service Capabilities and Limits.
To use your customer tenancy, you must do the
following:
- Create SMTP credentials in the Oracle Cloud Infrastructure Console in order to complete the Use customer SMTP configuration section. Only Oracle Cloud Infrastructure SMTP credentials are supported. See Generate SMTP Credentials for a User.
- Register the default sender email address and the sender email address for system notification with Oracle Cloud Infrastructure in your customer tenancy.
- Manage the approved senders and suppression list in your customer tenancy.
- Check the service limits. See Overview of the Email Delivery Service.
-
In the navigation pane, click Settings, then Notifications.

-
In the Recipients field, enter the email address to which to send the reports. You can specify multiple email addresses, each separated by commas.
- In the Reports field, select the type of
report to send.
- Hourly Status: Send a detailed report every hour.
- Daily Status: Alerts are sent once a day.
- In the Alerts section,
select to send alerts when the following occurs:
Option Description Expiring and expired certificates (Daily) Select to send alerts when the following occurs:
- Certificates are set to expire within seven days.
- Certificates have expired.
The check is made for certificates you uploaded on the Certificates page. Certificate expiration status is checked daily. Oracle Integration provided-certificates are not checked.
Critical health (5 mins) Select to send alerts when one or more of the following conditions are detected:
- The email quota exceeded the threshold.
- One or more connectivity agent instances became unavailable.
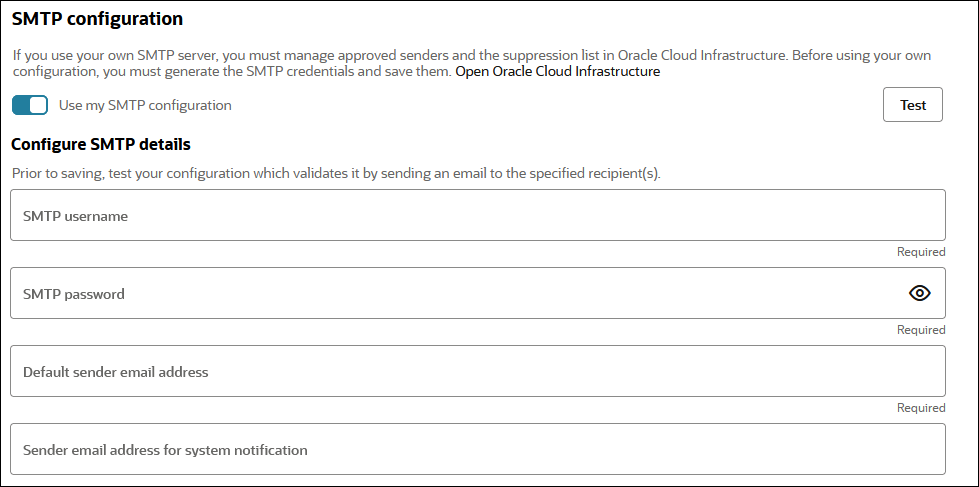
- To use your own customer tenancy to manage the
number of emails to send, click
 to enable customer tenancy mode.
- Specify the SMTP user name and
password and the default sender email address
(that is, the
fromaddress). These three fields are required. You can also optionally specify a default address for system notifications.
- Click Test to validate the SMTP credentials.
- Click
Save.
Note:
If you want to return to using the default method, click to disable the SMTP credentials, and
click Save.
- Specify the SMTP user name and
password and the default sender email address
(that is, the
- To use the default method to manage the number of
emails to send, follow these steps:
- In the Senders section, click Add email address to add approved senders.
- Specify the following
details:
Element Description Email address An approved sender enables Oracle Integration to send email with a matching From address. An email is sent to each of the email addresses listed as approved senders. Upon approval, these email addresses can be used as the From address in a notification action of an integration and/or system notification. OCI Email Status Perform the following steps: - Enter an approved sender email
address and click Save.
A verification code is sent to that address and verification status changes to In Progress.
- Click Enter
verification code and enter the code
received by that email address.
Upon successful verification, status is changed to Verified.
Note the following:- Existing sender emails that were previously approved, but never formally verified with this process, can continue to be used for now. It is recommended that you delete these entries, re-enter them, and enter the verification code sent to the email address.
- Don't share approved sender email addresses across service instances (for example, test and production instances). Create different approval emails addresses for each service instance, even if they are in the same tenancy.
SPF Optionally configure the Sender Policy Framework (SPF) for the sender email addresses. You configure SPF support outside of Oracle Integration. DKIM confirmed Optionally confirm the Domain Keys Identified Mail (DKIM) for the sender email addresses. You configure DKIM support outside of Oracle Integration. Send alerts and reports Select to use this email address for the system notifications you selected at the top of the page. However, only a single email address can be selected to send system notifications. Recommendations are provided to ensure that you configure notification email correctly. See Troubleshoot Oracle Cloud Infrastructure Notification Email Configuration to Ensure Proper Delivery.
- Enter an approved sender email
address and click Save.
-
Click Save.
- Perform other email notification tasks on this page.
To ... Description Receive an immediate email about system status
Click Actions
 and select Send
Now.
Clear the distribution list, selected alert/reports options, and specified sender email addresses. Click Actions  and select Reset All
Notifications.
Remove email addresses from the suppression list Note: This task is only required if you are using the default method.
Click Actions  and select Email Suppression
List.