Change Your Message Pack Subscription Using the Command Line

You can change the number of message packs you subscribe to using the Oracle Cloud Infrastructure command line (OCI CLI). Select a suitable number of message packs to handle the message usage you expect for your instance.

The OCI CLI is part of the Cloud Shell. The Cloud Shell provides access to a pre-installed Linux shell with a pre-authenticated OCI CLI. See Cloud Shell.

Note:

You can also edit the number of message packs through the user interface. See Edit the Edition, License Type, or Message Packs for an Instance.

Message pack options are based on the type of Oracle Integration license you selected.

  • For Oracle Integration:
    If you created a new Oracle Integration license in the cloud:
    • Each message pack includes 5,000 billing messages per hour.
    • You can subscribe to up to 100 message packs.
    If you brought an existing Oracle Fusion Middleware license to the cloud (BYOL):
    • Each message pack includes 20,000 billing messages per hour.
    • You can subscribe to up to 100 message packs.
  • For Oracle Integration for SaaS:
    • Each message pack includes 1 million billing messages per month.

      Note that usage is tracked on a monthly basis instead of hourly, which keeps costs predictable even when you have unpredictable hourly volumes.

    • You can subscribe to up to 43 message packs.

WARNING:

The following steps provide an example of how to increase the number of message packs for your instance. The Cloud Shell supports a variety of features, tools, and utilities. You must also grant a specific Oracle Cloud Infrastructure Identity and Access Management (IAM) policy to the user requiring access to the Cloud Shell. See Cloud Shell.

  1. Grant the following IAM policy to the group containing the user requiring access to the Cloud Shell. See Manage Access and Assign Roles.
    allow group group_name to use cloud-shell in tenancy
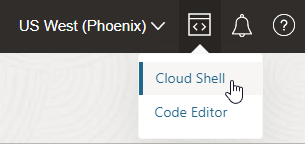
  2. In the upper-right corner of the Oracle Cloud Infrastructure Console, click the Developer tools icon, and select Cloud Shell to open the Cloud Shell.
    This image shows the region selection dropdown list (Phoenix is selected), the Cloud Shell icon, and three other icons.

    The Cloud Shell drawer opens at the bottom of the screen. The Cloud Shell executes commands against the selected region in which you opened the Cloud Shell (for this example, Phoenix is the selected region).
    Welcome to Oracle Cloud Shell.
    Try the new file upload/download capability in Cloud Shell. Access this new feature from the 
    Cloud Shell menu.
    
    Your Cloud Shell machine comes with 5GB of storage for your home directory. Your Cloud Shell (machine 
    and home directory) are located in: US East (Ashburn).
    You are using Cloud Shell in tenancy oicpm as an OCI Federated user 
    oracleidentitycloudservice/my_login_name@example.com
    
    Type `help` for more info.
    my_login_name@cloudshell:~ (us-phoenix-1)$ 
  3. Enter the following command to increase the number of message packs.

    For this example, the instance is using an existing Oracle Fusion Middleware license type brought to the cloud (BYOL) that is configured with 20,000 messages per pack. This example shows how to increase the value to 10.

    oci integration integration-instance update --id OCID_value --message-packs 10
    Where:
    • --id is the unique OCID identifier of your instance. This option is required. You get this value by clicking Copy in the OCID field on the details page for the instance.
    • --message-packs is the number of allowed message packs to which to increase your instance. For this example, 10 is specified.

    These are the minimum required options to specify. Additional command line options are also available. See Update Oracle Integration instances.

    You receive an immediate response with a work request ID. For example:
    {
      "opc-work-request-id": "ocid1.integrationworkrequest.oc1.geography-region-1.vmaerdicjfhkgfyaqrkihl6weoxhg6dxktxpdhh5ln6yi2en52xr3bplth4x"
    }
  4. Confirm that your work request completed and the message pack number is updated.
    1. In the Oracle Cloud Infrastructure Console, open the navigation menu and click Developer Services, then, under Application Integration, click Integration.
    2. Open the Oracle Integration instance you updated.
      If you don't see the instance you're looking for, make sure you're viewing the correct region (in the banner) and compartment (at the top of the instance list, next to Applied filters).
    3. In the tabs across the top, click Work requests.
      Configuration changes occur quickly, so the operation should show that it has completed.
    4. In the tabs across the top, click Details.
      The Message packs entry should show the updated number of message packs. If you don't see the updated number, you might need to return to the Integration instances list, then reopen the instance to see the change.