Abort or Delete a Salesforce Bulk Job with the Salesforce REST Adapter

For every Bulk version 2.0 query operation, Salesforce assigns a unique job ID. You can perform postprocessing operations on this job using the Abort or Delete operation available in the Salesforce REST Adapter.

This use case describes how to configure an application integration that performs either of the following operations:
  • Abort a Job: Aborts a query job.

    When a job is aborted, no more records are processed. If changes to data have been committed, they aren't rolled back.

  • Delete a Job: Deletes a query job.

    When a job is deleted, job data stored by Salesforce is deleted and job metadata information is removed. The job no longer appears on the Bulk Data Load Jobs page in Salesforce.

  1. Create an application integration.
  2. Drag a REST Adapter into the integration canvas.
    1. Configure the REST Adapter to receive the job ID as input.
  3. Drag a Salesforce REST Adapter invoke connection into the integration canvas.
    1. On the Basic Info page, provide a name (for example, Abort Job).
    2. On the Action page, select Perform Bulk Data Operations.
    3. On the Operations page, select the Bulk Query operation type.
    4. Select Abort a Job/Delete a Job from the Select an operation list.
    5. Review your selections on the Summary page.
  4. Open the mapper for the Salesforce REST Adapter invoke connection.
    1. Map the Trigger Request (REST) source Job id element to the Request (Salesforce REST) target Query Job id element.

      The Sources, Mapping canvas, and Target sections are shown. The Job Id is mapped to the Query Job Id.

  5. Add a response action (if REST Adapter-triggered).
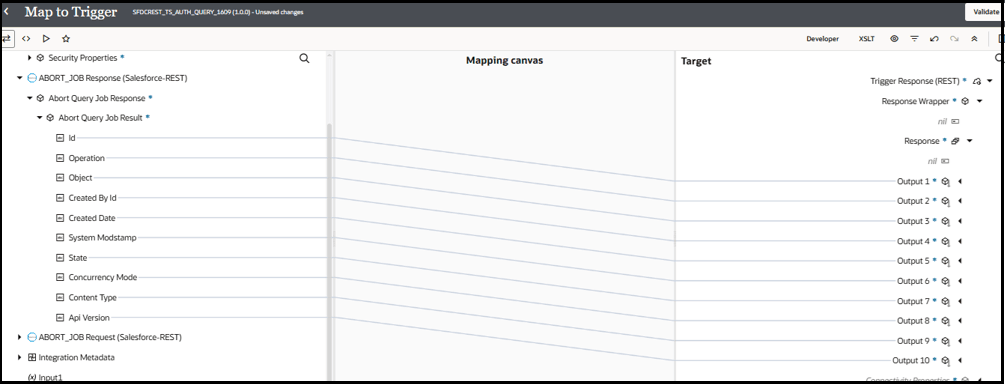
    1. Map the Response (Salesforce REST) source status (for example, State or Message) to the output target elements.

      The Sources, Mapping canvas, and Target sections are shown. The source element Abort Query Job Result subelements are mapped to the target Response subelement.

  6. Specify the tracking variable.
    1. Click Business Identifiers Business identifiers icon.
    2. Drag the required variable to use for the tracking reference (for this example, Input1 is selected).

    When complete, the integration looks as follows:


    The trigger, map, invoke, and map are shown.

  7. Activate the integration.
Here are the key points to remember while creating this case:
  • The job ID must be valid and present in Salesforce.
  • You can only delete a job if its state is Job Complete, Aborted, or Failed.
  • You can only abort jobs in the following states: Upload Complete or InProgress.
  • Any user with the correct permission can abort a job.
  • Only a user who created a job is authorized to close it.